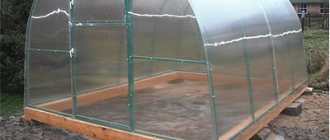
Correctly placing a log house on the foundation is an easy task at first glance. How many times have you observed that the bathhouse has moved or become distorted over time? But it will be difficult to carry out repair work, since the frame will have to be rolled out and reassembled. We will discuss together with our readers how to place a log bathhouse on the foundation correctly, what features need to be taken into account.
It is necessary to place the log house on the foundation correctly, observing all the details.
In what order to install a log bathhouse
It's no secret that the first crown of a house
or any other building is the most important.
Since the dimensions of the lumber were known to me in advance, I precisely adjusted the layout of the future bathhouse and the size of the foundation to their length. Having accurately marked the first crown, it was enough in the future to use only a plumb line and a level so that the walls and corners of the bathhouse were vertical. Log bathhouse.
The first crown Before laying the first crown on the surface of the bathhouse foundation, I made waterproofing from two layers of RKP-350 roofing material.
Log bathhouse
, thanks to horizontal insulation, will not be exposed to ground moisture, which can rise through the foundation concrete due to capillary pores.
After the first crown, the rest are arranged. The entire frame made of timber
must be mounted along the crowns so that the lumber in the corners and other junctions is tied to each other.
How to connect beams in corners
To connect the beams in the corners, I decided to use the simplest method, but quite sufficient for strength and heat protection - in a dressing with a root tenon (sometimes it is called a “warm corner”). It’s easier than not to tie the lumber together at all, installing them end-to-end, but then you would have to use staples to tie them together, and the corners of the bathhouse would be blown out.
Log bathhouse. Warm corner
All other methods that were in demand in the past - in a paw, in half a tree, in a cup, I immediately “rejected” as unreasonably complex. With modern means and methods for sealing joints, you can easily avoid unnecessary labor costs.
In order not to mark the configuration of the cutouts in the lumber for each corner separately, I simply made two cardboard templates, according to which I marked the ends. After this, making one or two cuts with a chainsaw and removing excess wood with a hammer and a wide chisel is a matter of a couple of minutes. The direction of the spike on each row must be changed. That is, if in an even row the tenon is on the right and the groove is on the left, in the odd row there should be a groove on the right and a tenon on the left. This bandage firmly holds the crowns together in height, preventing the frame from falling apart.
How to join a beam to a long wall
In some cases, it is necessary to make a T-shaped connection of the timber. This need arises when connecting an internal wall to an external one. I got three such connections for each crown.
It is better to make a T-shaped junction using a method that carpenters call a “dovetail” (in some sources this method is called a “frying pan connection”).
Log bathhouse. Dovetail connection
To do this, the end of the adjacent beam is cut out in a shape reminiscent of this very tail, and a corresponding notch is made in the long beam. After installing the unit, the connection must be wedged. For this, wedges made of dense, dry wood are used.
This type of connection provides sufficient strength and is completely airtight, since there are no through vertical joints.
How to connect crowns to tie a bathhouse frame
The connection of the crowns with each other must be carried out in order to ensure the strength of the structure of the bathhouse frame vertically. In other words, this is necessary so that the crowns do not move relative to each other. Previously, this operation was performed on wooden dowels - rods of round or square cross-section. They were driven into pre-drilled holes, connecting two or three adjacent crowns.
Not wanting to waste time preparing these dowels and drilling large diameter holes, I simply used 200 mm long nails. The nails are hammered very quickly, and if you deepen the head 3-5 cm into the upper beam, the nail will securely connect the two crowns, preventing them from moving.
To finish the nail and immerse it completely into the drilled hole, you need to use a hammer. If you don’t have it on hand, you can use an old, worn-out drill bit from a rotary hammer with a diameter of 10 mm.
Construction of wooden houses
Not only how long a log house will last, but also its correct geometric shape depends on the strength of the foundation and on compliance with the technology when creating it.
But not only the foundation itself deserves attention, but also the methods of installing a log house on it. Building codes suggest two methods for installing a log house on a foundation:
- Use rigid fixation of the log house to the foundation;
- There is no rigid fixation; the log house is simply placed on the foundation.
Rigid fixation
In this case, a collapsible or non-demountable connection between the grillage and the log is used. The immobility of the lower crown in this case occurs due to mechanical fastening using bolts and clamps.
This option provides a reliable connection and guarantees the immobility of the log house. However, in this case, repairing the first crown is very difficult, the cost of construction work increases, construction time is extended and the need arises to use a large number of consumables.
Overlay option
In this case, there is no need to talk about the complete immobility of the house, since there is no rigid attachment of the log house to the foundation. But at the same time, this option is often used, since it is simpler to implement. In addition, if necessary, there is free access to the first crown of a log house, whereas with rigid fastening, replacing the frame crown is very difficult and sometimes technically impossible.
The reliability of this method is ensured by the large weight of the logs. Practice has shown that the significant weight of log walls helps to obtain almost complete immobility of the frame crown. And it gives the same guarantees as the fastening technologies of the first option.
Installation of a log house on strip or slab foundations
Rigid attachment of a log house to strip or slab foundations requires preparation. Preparation is carried out during construction (when pouring the grillage) or after the foundation is completed.
Strong bolts are mounted into the grillage of the slab or tape, to which the frame crown logs will then be attached using pins - holes must be made in the logs for these purposes. Rigid fixation is achieved thanks to locknuts that are threaded onto the stud. A tight connection between the grillage and logs is achieved through a threaded pair.
Technological details
- After the foundation is poured, bolts are placed in the last layer of concrete. The distance between the hardware is about half a meter. In this case, each log must be secured with two or more bolts.
- At the same time, the logs are prepared by drilling holes in them for fastening.
- It is necessary to check the horizontality of the grillage by removing convexities (they are cut off) and concavities (they are filled with cement). As soon as a flat surface is obtained, a waterproofing roll material is laid on it (most often it is roofing felt).
- Logs are mounted on roofing felt, connecting them with pins. The corner joints of the crown are sometimes reinforced with metal corners on self-tapping screws.
- Finally, strong washers and locknuts are threaded onto the studs. Important! To avoid distortion, the nuts must be tightened at the same time, slowly tightening them.
Installation of a log house on strip or slab foundations without rigid fastening (overhead option) is also carried out. Only then do not install the bolts into the grillage.
Installation of a log house on a pile foundation
Rigid fastening of the log house to screw piles is carried out in a different way. Heads in the shape of the letter P are placed on the piles. These parts have perforations on the sides for fastening with studs or screws.
The logs are placed in a U-shaped groove and secured with hardware. If a pin is used, it is necessary to make perforations in the log as well. It is believed that using a pin does not provide any advantages; self-tapping screws or self-tapping screws also hold the crown securely.
Technological details
- The very first step is cutting blanks for a grillage made of square-section timber.
- Then the heads are mounted on each pile. To do this, timber blanks are laid on the pile and secured with side brackets. The brackets are welded to the pile, after which the timber is removed.
- A layer of waterproofing (most often roofing felt) is placed into the heads, which will protect the wood from contact with metal.
- Logs are placed in brackets, joining them at the corners in the usual way. The crowns are fixed using screws that are inserted into the perforations in the head bracket. This method allows you to use a flashing crown as a grillage, which has a positive effect on the speed of construction.
When using the overhead option, it is necessary to mount the logs on T-shaped heads on piles. The grillage is assembled at the corners using the usual methods.
Practical recommendations
When building a log house, it is necessary to lay two layers of waterproofing along the entire perimeter of the strip foundation (in this case it is advisable to use rolled bitumen materials). A board (50x200x6000mm) is laid on the waterproofing layer, which must be thoroughly treated with an antiseptic.
This board compensates for all the unevenness of the foundation and also prevents deformation of the rim. In addition, the board will become a reliable barrier between soil moisture and logs. Practice has shown that this approach is very rational, since in case of repair it is much easier to replace the board than the logs of the first crown.
. Many experts are of the opinion that there is no need to do any fastening of the foundation to the log house. Since this makes it very difficult to repair and replace the casing. In addition, the organization of fastening greatly increases both the cost and construction time. We can conclude that fastening is necessary (for practical reasons) only in cases where the log house is made of small-diameter logs and therefore has little weight. For log houses made of large diameter logs that have a huge mass, it is not practical to attach them to the foundation.
You can learn about the construction of wooden houses in the WOODEN HOUSES .
You can learn about foundation construction in the FOUNDATION .
Stage 3. Construction of the foundation
Let us immediately make a reservation that massive monolithic foundations can be abandoned due to the insignificant weight of the future structure. In order to save money, you can resort to one of two possible lightweight designs, namely:
- strip foundation;
- columnar.
Let's consider each of the options.
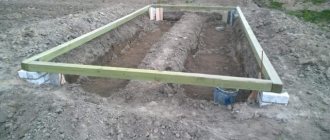
Strip foundation
Belt-type foundationMarkingMarkingDigging a trenchFormwork and reinforcementFillingReady foundation for a bathhouse
To build such a foundation around the entire perimeter, as well as under future walls, dig a trench 40 cm wide and 50 cm deep, lay a “cushion” of sand and gravel at the bottom. Next, lay the reinforcement, build formwork 50 cm high and pour concrete mortar. As a result, the height of the foundation will be approximately 1 m.
Video - Pouring the foundation
Place strips of sand and crushed stone inside the perimeter. In the future, the strips can be filled with concrete or a wooden floor can be built on them. The choice of one option or another depends on personal preferences and financial capabilities.
Columnar foundation
Drilling Fittings and pipe for the foundation Pipe and fittings installed in the hole Concrete poured into the pipe Anchor for attaching the lower trim
In the case of a columnar base, supports will need to be erected. There are two possible options:
- brick;
- from asbestos pipes.
Place supports at the corners of the perimeter, as well as under all walls in 1.5 m increments. Pre-lay a concrete “cushion” under each support. Fix several reinforcement rods in each support so that the latter protrude above the surface by at least 30 cm.
Build formwork 40 cm high, lay reinforcement in it and tie it to rods protruding from the supports. Fill with concrete mortar. After four to five weeks, when the concrete is completely dry, you can begin further work.
Foundation for a bathhouseBrick columnar foundation
Stage 9. Roof
Construction of a roof on males with layered rafters
Rafter system
As soon as the tree shrinks, you can begin building the roof. If you do this earlier, the roof will simply collapse.
Step 1. Place wooden beams on the wall framing (we have already talked about this).
Step 2. Fix the beams and attach the rafter legs to them in 1 m increments. In the ridge part, cut the rafters at the appropriate angle for the connection.
Step 3. Nail a solid board deck to the rafters (if you plan to use rolled roofing material) or make a sheathing (if you use slate, tiles, etc.).
Step 4. Install the roofing according to the instructions for the specific material.
Step 5. Cover the ridge with galvanized sheet steel to protect it from aggressive environmental influences.
Step 6. Cover the roof gables with siding or clapboard.
How to sew up a pediment
After this, proceed to further planned work - pouring a concrete screed or building a wooden floor (in the second case, the logs are cut into the logs of the second crown and fixed), install insulation, carry out interior finishing and arrangement of the steam room according to your project.
Example of a log house with a shingle roof Example of a log house with a shingle roof Eaves lining
Roof overhang trim
Nuances of log processing
Initially, the log bathhouse must be kept under the roof so that the material used in construction (log or timber) is dried as much as possible in at least 8 months
It is important to note that these months should be as dry as possible. Usually, bathhouses are installed from a log house in December, so that they have time to dry before August.
If it is possible to wait a longer period, then drying can last 1.5-2 years.
While the log house is drying, it is necessary to carry out a number of other works. Having installed the logs, it is necessary to treat them using special antiseptics, which are based on solvents. They are necessary to prevent fungi or mold from forming on the surface of the logs. To prevent the wood from tearing when drying, it must be treated with a different composition, for example, “Teknol JRM” is suitable.
Backing board: to be or not to be
When constructing log houses, some builders practice laying a backing board or plank on the foundation. Their task is to separate the first row of logs from the cold stone, and accordingly, increase the durability of the wood.
Many, of course, consider this point controversial, because in their opinion this will in no way extend the service life of the log house. If engineering communications are carried out incorrectly or are absent altogether, then no lining will save the tree from damage. If the board rots, the crown molding will also rot.
In general, this is food for thought, but if you still think this is a necessary element, then treat the board several times with an antiseptic. Its thickness must be at least 40mm.
The essence of the problem
Theoretically, almost any structure can be lifted from its foundation without destruction or disassembly, as evidenced by the transfer of even multi-story buildings. Frequently encountered problems:
- How to raise an old bathhouse onto a foundation? Often, the construction of a small bathhouse is carried out without a foundation, and its base is simply placed on compacted soil and a sand-crushed stone cushion. Over time, such a structure begins to sag (often unevenly), which necessitates the creation of a foundation; the problem arises of how to raise the bathhouse onto the foundation after several years of its operation.
- How to repair the foundation? It often happens that the frame of a bathhouse can last for many more years, but for some reason the foundation is seriously damaged. This may be a consequence of a violation of technology during construction or natural circumstances. In this case, the possibility of repairing or replacing the foundation is associated with raising the structure itself.
- How to eliminate distortions in the structure as a result of its uneven subsidence? The bathhouse can receive dangerous deformation in the form of subsidence of a corner or wall, which causes the structure to tilt and the risk of destruction.
- How to raise the ceiling in a bathhouse? You can raise a building to increase its height. Often at the time of construction, a minimum ceiling height is set, but over time there is a desire to increase comfort. In this case, lifting will help solve the problem.
Preparing the log house for assembly
Let me remind you that first all the main elements of the log house must be put in proper order, that is, completely manufactured and assembled into test layouts of log crowns in accordance with the design of the bathhouse. This can be one or more layouts.
In the layout, each log is marked with easy-to-remember and understandable numerical and alphabetic symbols. For example, you can take as a basis the letter designation of the cardinal directions (south - “S” , north - “N” ...) or the sides of orientation (right, left, front, back). The main thing is that during the final assembly of the bathhouse, already on the foundation, no questions arose about the ownership of this or that log or the place of its actual location.
You need to start marking from the bottom log in the upward direction. So, approximate markings might look like this:
- B2 – second log on the eastern side;
- ZP4 – fourth log in the west
- F5 – the fifth log on the facade;
- DF3 – third log on the far facade;
- L5 – fifth log on the left wall;
- P2 – second log on the right wall.
Wooden log bathhouse: pros and cons
Reliable and budget-friendly type of foundation. It does not create the need for additional waterproofing, but does not allow the possibility of building a basement. This foundation is placed under buildings with light walls (gazebos, bathhouses, verandas, utility buildings, wooden or frame houses), and is also used as a support for the porch. Used mainly on sandy and dry soil.
To lay this type of foundation, the top layer of soil is removed to the required depth before starting the main work. Then a kind of cushion of sand is formed to reduce the load that occurs in the event of seasonal swelling of the soil. Then the main structure is installed.
As an option, for heavy log houses a columnar foundation design with a grillage is used.
When considering foundation options, developers most often focus on cost
At the same time, you should pay attention to the durability indicator. The most expensive is a monolithic foundation, but its service life is estimated at 150 years, which exceeds the operational indicator of the log house itself
To strengthen the columnar supports, it is necessary to provide a strapping device that will sequentially connect all the supports into a single foundation. For a bathhouse made of wooden materials, a beam made of natural wood can be used as a frame, which is laid on top of the pillars. The strapping beam is also the bottom crown of the bathhouse.
Installing a columnar base does not take much time; the foundation is easy to build with your own hands.
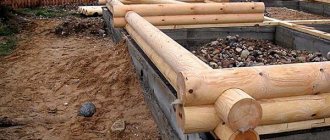
The first (flat) crown of the log house.
The lower crown works in the most difficult conditions - close to the ground, more wet than other crowns during rain and snowfall. Therefore, traditionally, special attention was paid to its production.
Before laying the first (lower) crown of the log house, do not forget about waterproofing, which is 2 - 3 layers of rolled bitumen waterproofing material laid between the foundation and the logs to prevent the walls from getting wet from the foundation.
The first (flashing) crown is made from the thickest logs.
If you have such an opportunity, then it is best to make the first crown from the types of wood that are most resistant to rotting. Larch or oak are best suited for this purpose.
It is obvious that sides 1, 3 and 2, 4 are at different horizontal levels, which differ in height by half the diameter of the log. Therefore, the first crown, from which the entire frame begins, can be realized in two ways.
The first method of laying the lower crown
The first method of laying the lower crown. Logs are laid according to the “as is” principle. Those that lie on the foundation are trimmed from below by 4 - 5 cm (figure “Cut size”) for a tighter fit.
A sealant is laid between the waterproofing and the log. The sealant can be used exactly the same as what we will use as an interventional sealant (moss, jute, tow). The disadvantage of this method is the presence of cracks under the top logs and foundation. These cracks are additionally sealed with bricks, bars or halves of logs.
You can also get rid of cracks by pouring a foundation with different levels on opposite sides.
Despite some inconveniences, such a crown will be more durable due to the fact that the logs undergo minimal processing and remain almost solid.
The second method of laying the lower crown
The first crown of the log house. Photo.
The second method of laying the lower crown. In this case, two logs are trimmed in half, the other two are trimmed from below by 4 - 5 cm for a tighter fit to the foundation. There is no gap as such.
The logs are connected to each other by a corner notch called an okhryap.
To prevent rotting of the logs of the first crown, special attention must be paid to thoroughly antiseptic surfaces in contact with waterproofing (hewn surfaces). Before laying, coat the hewn surface with an antiseptic using a brush 3 - 5 times. By the way, this is the only place in the bathhouse where I used antiseptic.
To reduce the harmful effects of moisture on the lower crown of the log house, a so-called backing board can be placed between the foundation and the lower crown. Sometimes it is called a flashing board. After time, a rotted backing board is much easier to replace than the lower crown. To do this, the log house is raised using powerful jacks placed in the corners, old boards are removed, new ones are inserted.
The width of this board is 20 - 30cm, thickness 5 - 8cm. It is made from rot-resistant wood (oak, larch), carefully antiseptic, or soaked in waste (used motor oil).
Backing boards should not be coated with melted resin (bitumen) or wrapped in roofing felt. A tree clogged with resin or wrapped in roofing felt will rot very quickly.
An inter-crown sealant is laid between the foundation waterproofing and the backing board, between the backing board and the first crown.
Protection of the lower crown of the log house.
As I already said, the lower crown is subjected to the most severe humidity conditions during operation. In addition to the impact of moist soil evaporation, it is exposed to slanting rain, snow, and atmospheric moisture that rolls down the walls. The seal between the bottom log and the waterproofing does not dry out for eight months of the year. And this, as you understand, does not add durability to the logs of the lower crown.
In my bathhouse, I solved this problem with the help of galvanized sheet canopies.
The process of making a frame crown is shown in a series of videos : frame (first) frame crown of a log house .
The frame (first) crown of the log house is video technology.
Cover crown. Part 1. Theory.
Basic rules and requirements for the frame crown of a log house.
Cover crown. Part 2. Chopping logs
Log hewing technology. Can be applied to both flashing and other logs of the log house.
Cover crown. Part 3. Corner notches.
We make the lower bowls with a hidden spike.
Cover crown. Part 4. Refinement of the foundation
Refinement of the foundation for the casing.
Cover crown. Part 5. Laying on moss.
The final operation is laying on the inter-crown seal.
Was the information published on the site useful? You can thank the author for the work done!
Did you find the information published on this site useful? Here you can thank the author for the work done.
Foundation for a log house with your own hands
Before starting construction, first of all, you should make a verified calculation of the foundation for the log house, marking the construction site accordingly. It is extremely difficult to redo such a foundation later.
It is also necessary, regardless of the type of foundation, to waterproof the log house in several layers, and also treat the initial log of the log house with an antiseptic to protect the walls from moisture.
During cold months, it is advisable to heat the water for the concrete solution to allow it to harden faster. During hot periods, only cold water should be used for this solution to avoid rapid cooling.
Material calculation
How to make a log house and calculate the amount of money spent, if the dimensions of the proposed structure are known - this is an important point in the manufacture or ordering of a finished building. For example, for a bathhouse with dimensions of 3x4 m and a height of 2.4 m with a frame in a bowl.
Due to the fact that the corners of such a structure will protrude 25 cm on each side, when calculating the length and width of the building, 50 cm is added.
If the diameter of the log is known (for example, 24 cm), then the volume of wood can be calculated using the formula 3.5 x 4.5 x 2.4 x 0.24 = 9.072 m³. During assembly, a groove is made in each log, which differs in width from 0.5D to 0.67D. This reduces the final volume of wood, so this formula requires further refinement.
Wide logs for a log house Source promdrevo.ru
| Characteristics of rounded logs | Width of crown groove B=0.5*D (1/2D) | Width of crown groove B=0.6*D (3/5D) | Width of crown groove B=0.67*D (2/3D) | ||||||
| D | B | L | V | B | L | V | B | L | V |
| mm | mm | linear meters | cubic meters | mm | linear meters | cubic meters | mm | linear meters | cubic meters |
| 200 | 100 | 5,75 | 0,180 | 120 | 6,25 | 0,196 | 133 | 6,67 | 0,209 |
| 220 | 110 | 5,22 | 0,199 | 132 | 5,68 | 0,216 | 147 | 6,06 | 0,230 |
| 240 | 120 | 4,79 | 0,217 | 144 | 5,21 | 0,236 | 160 | 5,56 | 0,251 |
| 260 | 130 | 4,42 | 0,235 | 156 | 4,81 | 0,255 | 170 | 5,13 | 0,272 |
| 280 | 140 | 4,11 | 0,253 | 168 | 4,46 | 0,275 | 187 | 4,76 | 0,293 |
| 300 | 150 | 3,83 | 0,271 | 180 | 4,17 | 0,294 | 200 | 4,44 | 0,314 |
| 320 | 160 | 3,59 | 0,289 | 192 | 3,91 | 0,314 | 213 | 4,17 | 0,335 |
| 340 | 170 | 3,38 | 0,307 | 204 | 3,68 | 0,304 | 227 | 3,92 | 0,356 |
| 360 | 180 | 3,19 | 0,325 | 216 | 3,47 | 0,353 | 240 | 3,70 | 0,377 |
| L – the number of linear meters of profiled logs that are necessary for the construction of 1 m² of log wall. | |||||||||
| V – volume of log (cubic capacity of profiled log), which is required for the construction of 1 m² of log house wall. |
Based on the table, the total volume of required materials will be 7.2912 m³, which is already 1.7808 m³ less than the previous calculation. Such calculations will help save money due to the fact that excess wood will not be used.
From this video you will learn how much a log house costs:
Technical requirements
Before planning construction work, you need to take into account several technical requirements, without compliance with which the construction of a steam room may be at risk:
- The mass of the future structure should be small - up to 4000 kg. A massive building will sooner or later displace the soil.
- The dimensions of the bath structure should not exceed an area of more than 30 m2, and not internal, but external.
- The structure should be easy to disassemble and assemble. Thus, it can be easily dismantled and reassembled with your own hands. It is better if the portable bathhouse is a log house, since its elements are more mobile and environmentally friendly. If the steam room is not dismountable, then before installing the structure you should take care of the future transfer to the foundation - secure the brackets, with the help of which the building can later be moved.
Useful tips
In order for the bathhouse to be in working order for a long time, you need to know the subtleties when building a structure:
- Logs for the log house are harvested in winter. This is necessary because during winter harvesting the log undergoes less rotting and is resistant to various precipitation. To check whether the logs were harvested in winter, iodine is dripped onto them. A bluish spot should form.
- To ensure that the building lasts as long as possible, all wooden structural elements are treated with an antiseptic.
- To increase the thermal capacity of the structure and give it a beautiful appearance, it is necessary to fill all joints and gaps with tow. It should not protrude further than the logs, otherwise it will get wet and rot.
- If you choose the “foot-to-foot” method of fastening logs, it is necessary to protect the corner joints. To do this, they are sheathed with boards.
- It should be remembered that during shrinkage, the height of the building will decrease by 5 or 10 percent.
- Cutting the material to the center will help prevent cracks from appearing in the log.
- Caulk work is carried out in dry weather.
- They increase the stability of the structure and prevent the displacement of logs by securing them with dowels, installed in holes in the center of the logs.
Thus, making a log house with your own hands, although a complex process, is doable. In the video presented for this article you can find complete information on this topic.
Boulder base
As already mentioned, one of the most suitable areas for building a bathhouse without a foundation is mountainous and rocky terrain. In it you can find boulders and stones of different sizes and shapes in abundance. Therefore, it will be cheaper and easier to make a base for a bathhouse from them.
- Collect boulders and sort them into large and small.
- Dig a small pit and mark the contours of the future bathhouse inside. It is necessary to note both external and internal walls.
- Along the lines of the future walls, form walls from large boulders. You need to select them so that the gaps between the stones are minimal. The boulders can be held together with concrete or cement.
- Fill the space between these walls with small boulders.
- Make a grillage on top of the masonry. Additional waterproofing is not required.
Such a foundation will be very reliable and will withstand even a fairly heavy structure. A bathhouse without a foundation, but on a stone foundation can even be built from logs. Reliability and ability to withstand heavy loads are quite comparable to a real foundation.
How to properly fold a log house - sequence of work
Without house-building skills, it will be difficult for the owner of the site to build a log house with his own hands. The instructions given below will help a novice carpenter not to make gross mistakes in such a matter as how to fold a log house. So, the construction of the century has begun - God help!
Stage one - laying the crown molding
(provided that the foundation is already ready and has stood for the required time)
Who hasn't heard of waterproofing? If you have no idea what it is, then you can safely wind up the work and leave it to the masters. This process is simply necessary when laying the first log or timber.
Wood tends to rot, and this happens precisely because of interaction with moisture. Thus, by covering the initial and important element of the log house, you can prevent many troubles associated with this, namely:
- Destruction of the foundation. Concrete itself is not capable of absorbing moisture. But due to its cold surface, it will accumulate it and release it to the wood in the form of condensation.
It will dry out on its own, but the swollen material will not. Therefore, the constant pressure of the mass of wood and water can also be reflected on the surface of concrete. Slowly, peeling will begin and, as a result, the destruction of the base.
Therefore, before building a log house with your own hands, you should pay great attention to waterproofing the foundation. To do this, it is tarred with bitumen mastic and a couple of layers of roofing material are placed on top, thereby reliably fencing it off from the first crown.
- Rotting of all wood. Mold and mildew spread very quickly.
Already in the first year of operation, it was noticeable how the log house was handed over. And the money invested in construction will rot along with it.
- Skewed frame. Because damage is eating away at areas of the house, the stability of the house may be in question.
After all, the entire structure bears enormous loads. It’s good if it doesn’t come to the point of collapsing any part.
Scary? It is better not to neglect all stages.
- Next, you should stock up on larch beams in advance, even if the structure is made of logs. This is the most reliable wood, and also expensive. It is impractical to make an entire house from it - it is expensive, and mechanical processing is difficult to do anything, but as a basis for the first crown it will be very useful. It (the timber) is laid on top of the waterproofing and fastened with dowels.
- Then a subfloor is installed. Firstly, this is necessary for the convenience of construction. Secondly, the logs will serve as an additional connection for the log house. The space under the floor must be immediately insulated with a layer of expanded clay and sand. It will be a kind of pillow, and groundwater, if there is any, will not linger there.
- Installing a frame crown is a key point in deciding how to build a log house. The stability of the house as a whole depends on this. To do this, it is recommended to use wooden dowels - pins for tying logs together.
First, holes for them are marked in the first crown and drilled slightly smaller than the fastenings. Thus, they will fit tightly and will not let go of the mating logs or beams.
This is the first crown, but the matter is not over. You still have to sweat.
Stage two - maintaining rows to the desired height
Each whip, when it comes to logs, has a top and a butt. These are ends of different diameters. When laying rows of crowns, you cannot forget about this - only alternating, in a checkerboard pattern.
Of course, rounded material and the correct shape do not need this - their evenness is not satisfactory. By the way, the question of how to build a log house from timber can also be solved within the framework of this article - although the wood is not the same, the work is the same.
Driving the crowns is always accompanied by rearranging their rows with a compactor. For this, the industry has come up with all sorts of options: jute, tow. You can use natural moss - it will always remain dry.
The material, first of all, must be soaked in oil with the addition of kerosene. Thus, the Viennese will also receive impregnation from parasites. The rows are led to the desired height, fastened with dowels and sealing the joints.
The last row is simply left on top, without using anything - it will have to be removed after the timber frame has matured to attach the rafter system. And the dowels can swell completely during this time, and it will take titanic efforts to free the last crown.
That's it, the log house is almost ready. Without a roof, of course, but it is done after shrinkage, which should occur in at least a year. During this time, you can fold the frame of the bathhouse, why sit around doing nothing? The finished building should be covered with any material that will allow the log house to remain dry during the settling period.
Installation of a pile-screw foundation
Installation of a foundation on screw piles is possible both on uneven and flooded areas, as well as on well-groomed lawns, without causing damage to it. Thus, when installing a bathhouse on a screw foundation, there is no need to disrupt the natural topography (see also the article “Foundation for a bathhouse made of tires: construction principle”).
Site preparation
Before installation begins, it is necessary to carry out a number of preparatory work. At this stage, site preparation plays an important role.
If the construction site is occupied by construction or household waste, then it is necessary to remove all foreign objects and clear the area. Also, if there are pits and trenches, they should be carefully backfilled.
Installation of screw piles using special equipment
It is very important to take into account the presence of various obstacles at the project development stage. Such obstacles can be, for example, a large tree or a stump that has not been uprooted; sometimes there is an obstacle in the form of concrete slabs and the remains of an old foundation
Care must be taken to eliminate them.
Tool
In order to make a high-quality foundation for a bathhouse on screw piles, you need to purchase all the necessary tools:
- Shovel;
- Scrap;
- Magnetic level 30 cm long;
- 15-meter hydraulic level;
- Roulette;
- Two pieces of pipe 2-2.5 m long and 50 mm in diameter;
- Hammer;
- Sledgehammer;
- Garden drill;
- Bulgarian;
- Extension;
- Marker;
- Work gloves;
- Welding machine;
- Construction mixer;
- Container for batches;
- Hoe;
- Bucket and watering can.
Pile field marking
Before erecting a foundation on screw piles, it is necessary to first calculate the number of piles and the distance between them, and also mark out the pile field around the entire perimeter.
Screw piles for the foundation cut into dense layers of soil; to correctly determine the depth level of a stable soil layer, it is best to turn to professionals. In addition, to accurately calculate the future foundation, it is also recommended to take into account the weight of the future structure, groundwater fluctuations, soil type and climatic conditions of the area.
Marking the area for future installation of piles
The number of piles required depends on the size of the future bathhouse. The pillars must be evenly distributed under the building, not forgetting the corners of the internal walls. The length of the part of the pile that protrudes above the ground is 0.5 m, it is usually hidden behind a false base or left open.
The technology for installing screw piles provides for a sequence of work that this instruction describes step by step:
- We install the pile in the corner hole, attach a magnetic level and insert a crowbar into the mounting hole;
This photo shows screwing in a screw pile
- The pile should go 1/3 meter deep into the load-bearing soil;
- When carrying out these works, constantly monitor the position of the pipe with a magnetic level;
- In this way, four corner piles are exposed;
- Using a water level, we bring them to the same design height;
- Upon completion of the installation of corner piles, intermediate piles should be installed in the same way;
- Then the levers are extended to a length of three meters and the pile is rotated by four workers until it stands still. This means that the drill has hit a hard layer;
- At the final stage of installing screw piles, use a hydraulic level to level them according to the already installed corner piles;
- After installation, the internal cavities of the piles are filled with cement-sand mortar. This strengthens the foundation structure;
- It is necessary to install caps on the end part of the protruding screw pipes;
- We make a head from a pipe whose inside diameter is smaller than the outside diameter of the pile;
- We take a plate 250×250 mm and 10 mm wide for the mounting area of the head;
- After installing the heads, their position should be checked with a water level, then scalded;
- All welds and the head are primed and painted with enamel twice;
Crown installation techniques
During the design process, the problem of how to correctly install a log bathhouse on a strip foundation can be solved in 2 ways: by installing a crown with additional leveling pads or by pouring the base with level transitions on the base (step).
Before installing crown logs on a concrete foundation, it is necessary to carefully carry out preparatory operations in the upper part of the monolith. First, the base must be plastered with 2–3 mm of cement mortar, followed by ironing of the entire surface. The laid layer of plaster mortar is leveled in a horizontal plane.
The procedure for leveling the base surface mechanically is shown in the photo:
The foundation with the step is preparing to receive the crown
The height of the base should ensure that the wooden floor is protected from water from the surface of the ground. The minimum rise above the zero mark of the upper edge of the support is 0.2 m.
For a special-purpose building (for example, a bathhouse), the optimal height will be determined by suitable technological communications, the dimensions of the manhole for inspection and cleaning of the underground space. With this device, the rise will be at least 0.5 m.
Insulation
The preparatory procedures include performing horizontal waterproofing along the entire perimeter of the supporting area of the wooden crown. Placement of a log bathhouse on a foundation of any height begins only after laying 2–3 layers of roofing material on concrete. The sheets are laid with an overlap of 0.1 m - 0.15 m with an overhang of 2 cm - 3 cm along the outer and inner edges of the tape.
Waterproofing horizontal and vertical
The roofing material laid under the log to ensure hydraulic fracturing looks like this photo:
Backing boards will be placed on the waterproofing layer, which also need to be pre-treated with an antiseptic solution and coated with a water-repellent compound (bitumen). The ends and the upper plane of the boards, which is in contact with the logs, are left open from the resin.
Linings
The material for making gaskets can be oak, which has a durable hard wood that is resistant to the development of microorganisms. A good option would be a larch or pine board impregnated with antiseptics.
The main function of the spacer layer is to compensate for deformation displacements of the transverse and longitudinal logs of the log house. Therefore, the selected boards must be of the ideal shape and the maximum possible length. The joints of 2 adjacent elements are made without a gap, without the possibility of excess cold air (there are vents) entering the subfloor.
The width of the board is selected based on the size of the crown (25 - 30 cm), the thickness is about 5 cm. There is no need to attach it to the foundation or the logs located above.
Insulating lining
Modern technologies introduce new solutions using polymer materials to insulate wood from concrete. To prevent this from leading to unexpected consequences, it is better to use them in established structures (during renovations, moving a house to a new foundation). The laying of a log frame on polystyrene foam is shown in the photo:
In the construction of a log house, it is better to use materials that are comparable in behavior (with changes in temperature, humidity) and durability to wood.
Crown installation
The logs are laid out on boards along the foundation, with a layer of insulation made of moss, hemp, and tow. Heat conservation in the underground is ensured by carefully filling the entire space with a heat insulator between the gasket and the bottom of the first crown. The protection will work not only from cold, but also from dampness, which reduces the possibility of the development of fungi or mold.
Time-tested tricks of using free material to independently lay the first crown on a strip foundation are shown in this video: The first row of logs is usually wider than the subsequent ones, as it resists not only vertical loads, but also compensates for bending deformations from the ground.
In the corners, the first row must be additionally reinforced with fastening staples.
Floor joists are cut in starting from the 2nd row of the crown
When building a wooden bathhouse placed on a strip foundation, you need to take care of a protective canopy. To do this, in the 2nd crown (cladding) along the outside of the log, a longitudinal groove is cut for a board, which will direct the water flowing from the wall away from the base. Under such a board, support slopes made of a block or board are placed. The edge of the visor is selected at a bevel. Instead of a wooden board, iron sheets or plastic panels are often used. The protrusion above the plane of the plinth at the drain board must be at least 50 mm.
Log house
To ensure the strength of the assembled structure, the logs are fastened between the rows with wooden spikes. Holes for them are drilled at intervals of 1 m - 1.5 m. In the upper 2 rows, the step between the tenons is reduced by 2 times and taken equal to 0.5 m - 0.7 m. They are staggered at a distance of 10 cm - 20 cm.
Laying of ascending rows is carried out in accordance with the assembly diagram attached to it, containing the sequence of markings for each row.
These designations are applied by craftsmen when making a log house. Numbers and letters may differ in different cases; the following signs are used as standard:
- numbers from 1 to 38 (numbering according to installation from bottom to top);
- letters C, B, Yu, Z (indicate the cardinal directions).
The location of each wall of the future bathhouse is assigned according to the cardinal directions. Front wall S, back wall S, right wall B, left wall W.
The marking of the log house means that it has already been assembled and rolled into transport position.
The assembly of the structure begins with the installation of a crown on the foundation, which is assembled into half a tree; the next logs are laid on dowels with a root tenon or half a tree.
In some cases, a log house for a bathhouse is placed on poles. Since it has a level difference between the longitudinal and transverse logs of the crown (150 mm), the supports can be immediately made of different heights. The principle of isolating the foundation from horizontal logs must be observed in any case, as shown in this photo:
On poles
With all the pre-processing, gaps will remain between the rounded logs, which may increase over time (drying of the wood). Prevent possible heat loss by laying rows with a seal made of jute fiber, tow, or felt. Work is carried out from the bottom up along the entire perimeter (it cannot be done separately on each wall).
As the wood loses moisture, the gap may increase, so you need to mark risk areas, periodically inspect them and caulk if necessary.
Memory marks
Various nuances with the installation of the crown depend on the chosen design of the bathhouse - the type of foundation, flooring, the principle of draining water from the interior (open drain into the underground or into outlet pipes).
Drilling for tongues
For long-term operation of any building for this purpose, the following basic rules must be observed:
- Impregnation with antiseptics and waterproofing should not be done with compounds that are toxic or produce fumes with an unpleasant odor. The bathhouse has increased requirements for environmental cleanliness and safety for human health.
- Not only water from the soil, but also moisture flowing from the interior can have a destructive effect on the foundation and wooden crown. Waterproofing needs to be designed comprehensively.
- It is recommended to make the floor of the building floating without nailing the flooring to the supporting joists. During subsequent shrinkage of the log house, the beams may bend and deform the finished floors. For the same reason, there is no need to immediately hang the ceiling.
- Uniform shrinkage of the log house is facilitated by still moist moss cleared from the soil, which tightly fills all the cavities and crevices of the crown as an insulating material.
- The smooth shrinkage of the frame will not affect the roof of the building. The gables must be sewn up.
- Complete shrinkage (up to 10 cm) of the assembled log house occurs from 6 to 12 months. After 1 year, it will be possible to cut door and window openings of the required size, otherwise the shrinkage will be uneven. Until this moment, the door can be a cutout 0.5 m wide and 5 logs high. After this, finishing work begins.
Independent experience and skills may not be enough for high-quality assembly of a log house. In such cases, professionals are invited. They not only have experience, but also the necessary tools.
Even if the work of installing a log bathhouse on the foundation is carried out by invited specialists, it is worthwhile to independently participate in the acquisition of materials. High-quality wood without knots and damage from pests and mold will be the basis for the pleasant operation of the bathhouse for many years.
Did we do the right thing, many of us ask ourselves, by ordering or purchasing a ready-made log house? Of course yes! There is no better wooden bathhouse, and there never will be. No matter what modern materials are invented, there is no alternative to real wood.
The only thing that can really be a little concerning is the capriciousness of this very wood in terms of processing and operation. But if everything is done correctly, then there will be no problems with this. Now we will consider one of the aspects of the proper construction of a bathhouse, namely the laying of the first crown of the log house.
Groundwater and degree of freezing
Geological studies help determine the exact type of soil. Depending on the result obtained, the depth of concrete is determined:
- If the soil is poor and heaving, then it is worth increasing the depth of the foundation. In such areas it can reach up to 2 meters.
- If the soil is stronger, for example there is crushed stone or stones, you can go slightly deeper. In some cases, 0.5 meters will be enough. But if you have the means, you can do more.
- On rocky surfaces, you don’t have to bother at all and make literally 20-30 centimeters.
- The clay surface has a finely porous structure. That is why you can also not be too zealous with the size of the strip foundation. Its depth for a small bathhouse made of logs or wood can be approximately 0.5 meters.
Also, to strengthen the soil, you can increase the width of the base itself. This will help the wall be more stable and strong. On clay surfaces, lightweight structures do not require a deep and wide foundation.
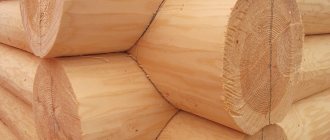
Log selection
It is best to harvest timber for the bathhouse in winter, from late November to early March, when there is no sap flow.
Summer wood, compared to winter wood, dries out much more, so after shrinkage there will be more cracks and cracks in the log house. In addition, it darkens faster and is more susceptible to fungi and mold. You need to choose a tree that is not affected by rot, fungus and insects, preferably with a minimum number of knots. The trunks should be smooth and not runny, that is, the difference between the diameters of the butt and crown should be no more than 50-70 mm. The most suitable type of wood for a bathhouse is pine, although the lower crown, which is most susceptible to dampness, can be made from larch.
Self-installation of a log house
Installing a log bathhouse with your own hands is something that someone who has made the foundation for it himself may well be able to do. So, after work with the base is completed, it needs to be given some time to stand. At least this should be a week. The standing time is determined depending on the air temperature, time of year and air humidity.
The next stage is the manufacture and preparation of the log house. The best wood for a bathhouse is considered to be winter wood, which is characterized by high levels of durability and strength. This type of work can take from 10 to 45 days. This question depends entirely on the project and size of the log house. And, naturally, manual assembly will take much longer than industrial assembly.
After making the log house, it is necessary to begin assembling it on a ready-made and stable foundation. You can cut logs into a bowl or into a paw. Both of these technologies are time-tested and reliable and durable. At the same time, primary caulking is carried out. Since there are many types of materials for insulation, the assembly time for a log house can range from 10 to 40 days.
After installing the log house, it needs to be given time to shrink. As a rule, most owners prefer to wait at least a year. After this period, roofing work begins, the duration of which depends on the type of roof, its size and type of covering material. After the roof is laid, you can begin the final stage of construction of the log house - finishing work: internal and external. Thus, the installation of a log bathhouse on the foundation can be done by professionals or done by yourself. It is quite feasible for anyone who wants to do this work independently, without the involvement of a construction team.
Why did you choose a log house?
Wooden baths are no longer a simple tribute to our traditions. At a dacha, a wooden building will decorate the area; in a private house, a bathhouse will become a highlight and a place where you can relax from the noisy city and dust. The heat capacity of wood and its durability, proven over the years, have made the material indispensable for the construction of a log bathhouse.
It is necessary to choose only high-quality, non-rotten logs for the log house.
When building a log bathhouse, logs of the same diameter from 20 cm are taken. It is important that the log is even along its entire length; narrowing will cause difficulties during installation and the structure will be aesthetically unattractive. Of course, if we are not talking about designer baths, where different logs can be used, for example, as in the photo:
An unusual bathhouse made of logs of different diameters.
When choosing logs, pay attention to their surface. The material must be free of knots, smooth and free from rot or mold. Sellers often claim that blued wood can be easily bleached with special preparations. You should not take such material, darkening is the first sign of the development of microorganisms inside: fungus or mold. Such a bathhouse will not last long and you will regret the wasted effort and time.
Among the main advantages of the log house are:
- high heat-saving indicators;
- availability of materials;
- aesthetic appearance;
- environmental friendliness;
- affordable price.
When choosing wood for a log house, give preference to durable types. Price is also an important factor. Price/quality ratio is important for any developer. Spruce and pine are more suitable for this criterion. The diameter of the log is selected depending on the region and how the bathhouse will be used (all year round or seasonally). Logs with a diameter of 20–26 cm are optimal. The material must be healthy and of the correct shape, without bends or knots. Only after purchasing materials can you begin building the log house.
Bath equipment
Bake. Perhaps this is the most important part of the bathhouse. Stove options are varied, from complex stone and brick ones to homemade metal ones.
- The stove is installed on a foundation specially made for it.
- The distance from the stove of wooden structures must be at least 200mm. The wall in places of approach must be protected by special means, for example, a sheet of felt soaked in clay and covered with a reflective metal shield.
- The chimney is made of metal. Its passage through the ceiling and roof should only be through specially prepared openings filled with insulating materials.
The connection of metal parts of the stove and chimney to wooden structures is strictly prohibited.
For the heater, use only stones that can withstand high temperatures with sudden changes.
Water supply in the bathhouse is carried out in two ways. The first is the connection of a water pipe from the source, and its installation into the building through the embedded casings left in the foundation. Further, it is possible to connect a shower, font, etc. In this case, hot water can be provided by connecting a special heat exchanger to the chimney. The second method is to install tanks for cold and hot water, which will be heated by the stove.
Drainage is carried out through PVC pipes installed on fittings under the bathhouse floor.
Lighting and electrical equipment. All electrical wiring in the bathhouse must be made of cable whose characteristics allow it to function at high temperatures. In addition, be sure to lay it only in a metal hose. All lighting sources must be protected by special bulbs with high-temperature and moisture-proof characteristics. Ideally, you need to install a step-down transformer at 36V.
Interesting: DIY plumbing in a private house
Features of building a bathhouse from round timber
Since ancient times, our ancestors have used processed wooden logs for the construction of various premises, including bathhouses. And in our time, such options are very popular, since such a bath not only lasts a very long time, but is also a real decoration of any local area. This type of material has many advantages. First of all, it is worth noting environmental friendliness. Using such a bath will definitely benefit your health. In addition, round timber baths are valued for their high quality and durability. And the beautiful appearance will become a real decoration of the yard and the pride of the owner, especially if the building was built with his own hands.
It cannot be said that building a bathhouse from round logs is very simple. As a rule, this is done by professionals, since it requires certain knowledge and experience. First, a bathhouse project is created.
At the same time, several people can take a steam bath at once without much embarrassment.
Whether to build it yourself or entrust this work to a professional - everyone decides for himself, but when constructing a building of this type, such as a bathhouse, you need to take into account the complexity of the work. If knowledge in this area is not enough, it is better to turn to the experts, since in inept hands the logs will simply be damaged, and they are quite expensive.
In order to build a bathhouse, you first need to develop a project. After this, having carried out all the calculations, you can begin to select and purchase materials. Next you need to work on the foundation, and then prepare the logs for work. The finished round timber is folded into a log house, and after that doors and windows are installed in the building. Next, you can proceed to installing the roof. Only after this, specialists begin work on the stove and chimney. This stage is quite complicated, but some bathhouse owners try to save money and carry out this work themselves.
The final stage of work on a round timber bathhouse is interior decoration and thermal insulation. This point is necessary for a bathhouse, since a room of this type must be able to withstand high temperatures and humidity well and not release heat.
Bath sewage system
To drain wastewater from a bathhouse you will need: a pit with a water seal, a well for wastewater and pipes that drain dirty water into the pit and then into the wastewater well.
The pit is torn off from the outside of the bathhouse foundation, and gravity pipes made of plastic, cast iron or ceramics are inserted into it from the steam room and washing room (metal pipes will quickly rust).
The pit should be 500 mm from the foundation, its depth should be 700 mm, and its cross-section should be 500x500 mm. The walls of the pit are covered with a 100 mm layer of concrete, and a 110 mm drain pipe(s) from the bathhouse is inserted into it under the foundation. The main well for drainage, holding at least 2 m3, must be dug at a distance of at least 2.5 m from the pit - the further the better.
A pipe is supplied to it from the pit, laid at a slope at a depth of 1.5 m (below the freezing depth), its outlet from the pit must be located 100 mm from its bottom. After inserting the drain pipe, the main drainage well is filled with gravel or sand 1 m from the bottom, and soil is poured on top - in a layer of at least 500 mm. When laying, carefully compact each layer.
Before leading the drain pipe into the pit, a galvanized water seal is installed, located at an obtuse angle to the drain pipe from the bathhouse. Its edges and upper side are hermetically attached to the walls of the pit; the distance from its lower edge to the bottom should be no more than 50 mm - thanks to this design, unpleasant odors and cold air will not penetrate into the steam room (washing room) through the drainage hole.
https://www.youtube.com/watch?v=channel
To prevent freezing in winter, the pit must be covered with two covers of the appropriate size (wooden or metal), felt should be placed between them, and the top cover should be covered with expanded clay, slag or sawdust.