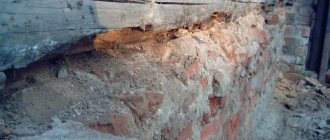
The lower crowns in a wooden frame are one of the most vulnerable places. No matter how hard the owners try to protect a wooden frame (be it a house or a bathhouse), it is not immune from deterioration. Wood is an excellent building material, but its service life is limited.
The situation when the house is in good condition, but the base is very rotten, is quite common. The owner of a wooden building should think about the possibility of repairing the lower logs already at the construction stage.
When is it necessary to replace the lower crowns?
If a wooden frame house requires major repairs after 50-60 years of operation, then its lower crowns (basement part) may fail much earlier. Accelerated destruction of wood occurs for the following reasons:
- Rotting as a result of frequent and prolonged direct contact with sedimentary and flood moisture, the release of groundwater, the accumulation of penetrating moisture and condensation.
- Damage by microorganisms (fungi, mold, bacteria), insects (ants, bark beetles, etc.) and various rodent pests.
- Destruction under excessive loads.
- Mechanical damage of various types.
The following factors contribute to the appearance of these destructions:
- Absence or poor quality waterproofing between the foundation and the plinth, as well as on the outside of the lower part of the wall.
- An improperly organized drainage system, which causes the accumulation of sedimentary and flood water, as well as moisture formed when snow melts.
- Lack of foundation ventilation (vents or vents).
- Violations during construction - use of low-quality wood, incorrect choice of log diameter, use of undried wood, insufficient antiseptic treatment and anti-rot impregnation of wooden elements, incorrect calculation of loads, violation of the rules for laying the lower crowns.
Important. The lower crowns, made of high-quality, durable material and impregnated with a protective composition, with proper waterproofing, have the same service life as the entire wooden frame of the house.
Go straight to the project search
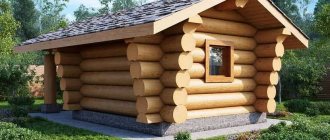
At our dacha, the bathhouse has already been used for more than a dozen years. The design of the bathhouse is quite traditional, a small log house. The roof is covered with slate, but for the time being, no one thought about the foundation.
Over time, the lower crowns, especially the very first one - the frame crown, began to rot. As far as I understand, this problem is typical for many baths; if you heat regularly, the bottom of the wall is constantly exposed to moisture.
At first they just wanted to change the two lower crowns, but during their examination it turned out that the bathhouse did not have a foundation as such. The corners of the log house rest on large stones dug into the ground, and that’s the entire foundation.
It was decided to cast a strip of shallow depth, and make a brick plinth on top of it. The equipment included two jacks, a chainsaw and hand tools, plus a concrete mixer and a welder borrowed from friends for the time of pouring.
The old brick stove was in need of repair for a long time, and it was decided to dismantle it and, after replacing the crowns, replace it with a new metal stove. Before starting to lift the log house, the stove and chimney were dismantled. The floors and joists were also not in the best condition and were sent for firewood.
The inside of the bathhouse is lined with boards; they decided not to remove it, but to avoid cracking, raise the bathhouse slowly and evenly. The roof, by and large, is also not in the best condition, but at the moment it is not leaking, and it was decided to leave it, so to speak, until better times.
Initially, they dug under two corners of one wall; they didn’t immediately cut out pieces of logs that needed to be replaced - who knows what will come of it. Jacks were placed into the resulting holes. To prevent the jacks from denting into the ground, shields made from scraps of 50 mm boards were placed under them. They lifted it very little - about two centimeters. Then they put up temporary supports made of boards and bricks and crossed to the other side. Two supports were placed on each wall - eight in total.
Since we moved it little by little, we had to do a fair amount of running around with the jacks, five approaches on each side, that is, we raised it by about 10 cm. Maybe we could have done all this faster - two approaches and it was done, but I didn’t want to risk the skin.
On the last climb, when the wall was still on the jack, the rotten logs were sawed down and the middle part was removed. After this, props were placed under a normal log, and the jack was lowered and the corner fragments of the rotten crowns were pulled out.
To prevent the log house from standing on temporary supports for a long time, it was decided to first make corner posts - the result was small posts with a base of approximately 40 by 40 cm, and the top narrowed to 30 by 30 cm. The depth of the post is 40 cm below ground level, plus 20 cm for a sand cushion . The total depth of the trench was 60 cm. Pieces of reinforcement were placed in the columns, to which the reinforcing frame of the tape was then attached.
The column rose just a little above the ground, only 10 cm, the rest was raised with bricks. By the way, this solution did not seem to me the best, and the tape under the walls was cast higher.
The pillars were allowed to stand for four days, after which a bathhouse was placed on them. I understand that the concrete has not gained strength, but the log house doesn’t weigh much at all, and the deadlines are running out, and vacations have an unpleasant tendency to end. They cast the tape and, after letting it sit for three days, raised the base.
Waterproofing was done with roofing felt in two layers. The first is between the foundation and the brick plinth, and the second is between the brick and the first crown of the frame.
The time was spent two weeks, and almost half of the time was waiting for the concrete to gain minimum strength.
Preparatory work
A properly carried out preparatory stage creates the basis for high-quality repairs. It includes the following activities:
- Visual inspection. It must be carried out periodically so as not to start a destructive process. The above-ground part of the foundation, the filling element and the 3-4 lower crowns of the frame are inspected with special care. An obvious reason for repair is the appearance of visible defects - cracks in the wood, deformation of individual logs (including bulging in one direction or another), discoloration, traces of insects and pests. A pronounced sign may be the presence of a specific smell of rotten wood.
- Checking the internal condition of the wood. Superficial signs do not always indicate the need for major repairs - sometimes they just need to be cleaned off the logs and covered with a protective layer. Things are much worse if the process goes deeper into the material. The first sign of this is established by the dull sound heard when the logs are tapped with a hammer. To create a more accurate picture, you need to use a chisel and carefully remove the top layer of the tree to assess the condition of the core.
- Assessing the scope of work and drawing up a repair plan. At this stage, the types of defects and the distribution of damage are identified - local, i.e. on a small area of logs; damage to individual logs; destruction of almost the entire basement area (on one wall or along the entire perimeter of the house). Accordingly, repairs can have the following types: replacement of a small section of a log; replacement of one log with or without lifting the entire frame; complete replacement of the entire basement part of the frame.
Preventing the appearance of rotten areas
Wood rotting is an inevitable process, but you can try to postpone it for some time.
To do this, it is enough to follow preventive measures:
- Periodically treat log walls with special antiseptics and compounds.
- If during the construction or repair of a wall you use several strips of roofing material (between the lower crown and the foundation, between the upper crown and the roof, on cuts, as a lining for the foundation), it will be possible to protect the walls from excess moisture.
- Treating log walls with fire-fighting compounds.
- Ensuring normal ventilation in the basement.
- Facing the lower part of the facade with foam block, brick or other strong material.
- It is recommended to install storm drainage systems at the greatest possible distance from the house.
- Systematically inspect and tap the crowns so as not to miss the beginning of the process of decay of the structure.
- When replacing the lower crown, it is better to give preference to larch materials.
- For waterproofing it is recommended to use modern materials.
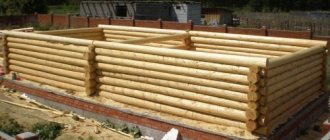
Complete replacement of the lower crowns
Major repairs in the form of a complete replacement of the lower crowns include raising the frame, removing rotten logs and installing new crowns. The work is carried out in the following order: preparatory activities, replacement of the lower crowns and beams.
Preparatory activities:
- maximum lightening of the entire structure (removal of furniture and plumbing, removal of doors and windows, dismantling of the floor and roofing);
- dismantling stoves and fireplaces if they do not have their own independent foundation;
- separation of the chimney from the ceiling and roof, if the stove is not dismantled;
- disconnecting floor joists if they are embedded in the lower crowns to be replaced;
- shutting down all communications.
To secure the crowns along the entire perimeter of the house, boards with a thickness of at least 3 cm are nailed vertically at a distance of 45-60 cm from each other. You can fasten adjacent crowns using metal staples. Fastening is provided on both sides of the wall (outside and inside).
To lift the log house at a distance of 60-80 cm from the corner of the building, an opening 35-45 cm wide is made in the foundation and part of the logs is cut out to form a niche for installing a jack. The following lifting technology can be used:
- With one jack. Each corner is raised in turn.
- Using 2 jacks. First, one wall is raised completely, and after it is fixed, the opposite one.
- On 4 jacks. The entire frame rises at once. This method eliminates damage to the frame, but requires coordination of the operation of the devices.
After raising the corner of the log house to a height sufficient to remove one log, a support is placed under the first crown, which cannot be replaced, mounted on 2 posts. This way the frame is fixed at all lifting points, and the jack is removed.
Unusable logs are knocked off the nigels and removed outside. Then new logs are installed. They are immediately held together with nigels. A jack is again placed under the lower crown, which is used to compact the new logs.
Before completing the work, the foundation is repaired if necessary, the waterproofing between the base and the base is restored, and a new filling element is installed. After this, using jacks, the frame is slowly lowered to its original place, secured with pins.
After the log house is completely lowered, all the cracks between the logs are caulked with moss, tow or jute. The thermal and waterproofing of the base is restored.
Repair of columnar foundation
For various reasons, the columnar foundation of the bathhouse may begin to settle. The culprits for this may be both the hydrological changes in the lower layers of the soil, which thus reduce its basic load-bearing capacity, and the serious construction work that is taking place nearby. Moreover, the foundation can settle not only at a newly built bathhouse, but also at already established buildings.
Sometimes it happens that the foundation piles begin to “grow upward” and warp the entire bathhouse. This doesn't happen all that often. In this case, the piles, together with the top layer of frozen soil, simply rise upward, but practically do not settle in the spring. Even when they try to tie such piles on top with a concrete grillage or channels, they still grow. But the method of quality repair in this case will depend on how much concrete was poured under the piles in an attempt to save the situation.
If the columnar foundation begins to settle
The subsidence itself usually begins at the base of the so-called bed stone of a columnar foundation. Its first sign is cracks in the space and holes around the pillar itself. Moreover, cracks can increase over time. Although the subsidence itself, of course, can be temporary - until the bed of the base finds a more stable position for itself. Or the subsidence will continue, and the destruction will increase: the joints and seams on the log bathhouses will widen, the caulking will begin to fall out, and the cracks on the lower crowns will become wider. Therefore, the subsidence of the foundation must be stopped in time.
To do this, beacons are placed on the cracks - plaster tapes. If they soon break, then directly with the columnar foundation you need to dig a hole inclined at an angle of 35°, with a depth to the plane of the base of that same bedded stone. You need to insert an asbestos-cement pipe 20 cm in diameter into this hole and pour cement mortar into it until it is completely saturated. As soon as the poured solution stops decreasing within two hours (absorbing into the soil), filling can be stopped. But after a day or two, everything needs to be repeated - and so on three times. After which you need to put the beacons on the cracks again, and strengthen the wooden plank at the beginning of the base and the edge of the upper part of the blind area.
If subsidence continues, the bar will begin to lower. Then you need to add the solution again. But even in this case, subsidence may continue. Then a ring-shaped ditch of 20x35 cm is dug around the pillar, wooden boards are laid at the bottom and, like formwork, along the edges. A metal mesh is installed to the pins that are installed between the stones and bricks - this is done as reinforcement. For it, you can safely use different scraps of metal rods.
After this, concrete with fairly fine fillers in the form of gravel or crushed stone is poured into the equipped formwork. This creates a reinforced concrete ring around the foundation pillar, which should strengthen its load-bearing capacity, distribute the load of the settled corner of the bathhouse horizontally and, thus, stop the subsidence that has begun. If such a ring also had to be made at an adjacent or opposite angle, then it is better to place a reinforced concrete, metal or wooden beam under the rings themselves - it will triple the load-bearing capacity of the entire columnar foundation of the bathhouse.
If the pillars themselves begin to tilt
Indeed, good, high-quality baths can stand for decades on a solid columnar foundation, and suddenly begin to tilt. This often happens on damp soils - no matter how wide the concrete slab is under the pillars, they themselves may begin to lose their stable vertical position. But this can be fixed.
Replacement of columnar foundation supports.
To do this, you will have to hang up the bathhouse, dig up the pillars, forcefully level them, add concrete, bury them and repeat the procedure a year later - but no one will give a guarantee for such work. Therefore, today more and more experienced builders resort to this option:
- The bathhouse is lifted and installed on temporary supports. Moreover, nothing needs to be taken out of it; neither doors nor windows need to be dismantled. Perhaps only a few floorboards will need to be opened for a while.
- The tilted pillars are dismantled.
- A trench is opened under the bathhouse and a sand cushion is compacted.
- A well-reinforced tape 20 cm thick is poured.
- Pillars are placed on the finished tape.
- To support the floor joists, steel beams - I-beams - are mounted.
- The bathhouse is lowered onto a new foundation and its position is adjusted so that the windows and doors open well.
The main thing in repairing the foundation of a bathhouse is its timely start. Then the bathhouse itself will serve regularly for decades.
Partial replacement of timber
If an examination of the condition of the house shows that the foundation is in good condition, as is most of the base, and only a small section of the crown is destroyed, then repairs are carried out by partially replacing the elements of the frame. In this case, only the damaged area of one or more logs is removed, and a kind of “patch” is installed.
Such work involves the following steps:
- The area to be repaired is clearly marked, for which you can use a knife, ax or chisel.
- Fixation of crowns. At a distance of 35-45 cm on both sides of the boundary markings, ties from a board 3-4 cm thick (with fixation of 2-3 crowns) or metal brackets are installed.
- Cutting along the markings of the damaged area using a chainsaw, electric saw or grinder.
- Preparing the opening. The lower surface of the upper, untouched crown is slightly flattened, and cuts 15-20 cm wide are made at the ends of the opening. The entire surface of the opening is carefully treated with an antiseptic.
- Manufacturing and installation of the insert. From logs of a size similar to the installed logs, elements 1.5-2 mm shorter than the opening are cut out. After treatment and impregnation with an anti-rot composition, the insert is firmly driven into the opening using a sledgehammer. All cracks will be caulked.
Questions and answers
Let's look at some of the most common questions that arise from the vast majority of inexperienced users.
How to determine whether the whole crown needs to be replaced, or just a certain section?
The main criterion is the size of the problem area and, accordingly, the working residue. If the defect is larger than the remainder, it is better to replace the entire crown. If the defect is smaller, local replacement must be performed.
Does it make sense to change all 4 crowns if only two of them have problems?
Most often, all crowns should be changed. They are operated under the same conditions, and defects in other areas may simply go unnoticed. However, a specific decision should be made after examining the remaining crowns.
Is it necessary to insulate “patches” of brick or concrete in places where the rotten parts of the lower crown have been removed?
Hard inserts can become cold bridges. If possible, they should be insulated. However, this will be a rather complicated procedure, since the insert is in close contact with the wood and requires a special approach. It is best to apply a layer of polyurethane foam or liquid polyurethane foam from the inside - this will be a sealed, waterproof and heat-insulating layer.
Is it necessary to treat the new crown with an antiseptic and other types of protection?
It is necessary to process the lower crown. It is best to completely process the walls, since they are also in difficult conditions. It is recommended to cover the lower 2-3 crowns with several layers of freshly slaked lime.
Is it necessary to look for logs that are the exact size of the problem crowns?
Yes, this is a prerequisite. You can take logs of larger diameter and remove a layer, ensuring that the height of the old and new crown matches. Attempts to install a stack of several boards usually lead to severe shrinkage - the stack does not have such a high load-bearing capacity as a massive log.
Replacing timber without raising the frame
Major renovations to a house can be done without lifting the frame. The following options are available:
- Replacement of destroyed logs. First, the rotten element is removed in parts. To do this, the log is cut into pieces 1-1.5 m long, which are taken out one by one. The technology is no different from the previous method of partial replacement. After removing the entire log, exactly the same element is carefully driven into the vacant space and fastened to the adjacent crowns with metal staples.
- Replacing a damaged wooden plinth with brickwork. The technology is based on alternately cutting and removing sections of a wooden plinth 1-1.5 m long and replacing it with brickwork 1.5-2 bricks thick. The masonry is brought directly under the remaining lower crown, and waterproofing is laid between them. Gradually moving along the entire perimeter of the house, a complete replacement of the rotten lower wooden crowns with a brick basement is ensured. Next, it is enough to insulate the masonry and plaster it.
Log joining method
Since ancient times, baths were built only from logs, and therefore the technology of their connection is quite ancient and proven over centuries. And logs can be joined in two main ways - without a remainder and with a remainder. In the first case, the corners of the bathhouse will turn out to be perfectly even, but the second method looks much more beautiful - when the logs protrude slightly beyond the wall, which, of course, looks much more beautiful.
But it also turns out to be more expensive - after all, you will have to use half a meter more logs than in the first method. Although the corners “with a remainder” are much better protected from rain and wind and are much more stable.
So, the logs are combined with the rest in these four options.
"To the brink"
Cutting “in the okhryap” differs from the okhlop in that special straight notches are made both at the bottom and on top of the log - exactly a quarter of the diameter. Essentially, this method falls somewhere between regular angles and paw angles.
Which wood is best suited for the lower crowns of a log house?
When constructing a wooden house, the following types of wood are used:
- Spruce. This is one of the most accessible and cheapest materials. Thanks to their loose structure, spruce logs retain heat well. In addition, they have antibacterial abilities. The main disadvantages are low moisture resistance and a tendency to rot, which limits their use in lower crowns.
- Pine has a smooth trunk without knots, but in its shortcomings it is similar to spruce.
- Birch is considered a hard, durable material, but it dries out strongly, has high water permeability, a tendency to rot, and low durability.
- Larch. It has high strength, resistance to microorganisms, and is not subject to rotting. The main advantage is moisture resistance and fairly high fire resistance. Wood is a highly drying species, which requires good drying before construction. The only real drawback is the high cost.
- Oak. This wood is distinguished by its strength and durability, high hardness, and resistance to any weather conditions. In terms of resistance to rotting and moisture resistance, oak logs are comparable to larch and have a similar disadvantage.
Taking into account the economic side, wooden houses are most often built from spruce and pine. However, in the lower crowns their use threatens premature major repairs. The best option for making a plinth is larch and oak. Such materials will be more expensive than common tree species, but their very high resistance to moisture and mechanical strength will significantly increase durability.
Attention! The lower crowns of the log house bear the maximum loads, and therefore the diameter of the logs for them should be 15-20% larger than the size of the elements of the rest of the walls.
For what reasons can logs rot prematurely?
Operational wear and increased load on the lower part of the structure are the main reasons that lead to damage to wood. However, there are factors due to which the tree rots earlier than planned:
- In order to save money or due to an oversight of the owner, logs of inappropriate quality were purchased for construction: high humidity, which did not undergo antiseptic and hygroscopic treatment.
- Low quality waterproofing material that protects the log house from environmental aggression.
- Violation of storage rules during construction of the building. Even properly dried logs stored in damp or dirty conditions during construction lose the necessary properties.
- Incorrectly installed ventilation system in utility rooms with high humidity (kitchen, bathroom). Impaired air circulation leads to the appearance of rotten areas and further rotting of the tree.
- Failure to follow the rules for caring for external wooden elements. Contact of logs with the ground in the event of shrinkage of the backfill leads to freezing and further thawing, as a result of which the process of rotting begins.
Logs can rot prematurely due to the fault of the developer. An oversight, incorrect construction technology, and banal “hackwork” lead to the need for early replacement of logs.
What tools are required to complete the work?
When carrying out repairs on your own, you will need the following tools and equipment:
- jack for raising the house (1-4 pieces);
- Bulgarian;
- gasoline or electric saw for cutting logs;
- hammer drill for forming a jack installation site on the foundation;
- electric drill for installing nigels;
- scrap;
- sledgehammer;
- hammer;
- chisel;
- axe;
- plane;
- knife;
- hacksaw;
- scissors for cutting waterproofing;
- metal brush;
- paint brush;
- roulette;
- metal ruler;
- rail to control the lifting height.
Rules for caring for bath premises
Most of these problems can be avoided.
Pine and spruce lumber must be of ideal quality, without a single knot, because basically they are the gateway for the released resin.
Boards with cracks, knots and blue stains are not suitable for a bathhouse.
The material must first be steamed and dried, then the release of resin will be reduced to a minimum.
Pine boards should be selected with almost no defects
You need to carefully inspect all lumber you purchase. A tree affected by fungus or rotten is immediately visible. If you notice specimens that are black or blue, it would be advisable to contact another supplier. There is a high probability that the entire batch is affected, even if the fungus is not noticeable on all the boards and logs.
We invite you to familiarize yourself with: Ventilation in the bathhouse (67 photos): diagram and device, how to make a steam room and dressing room with your own hands, “Basta” type ventilation
It is better to buy wood cut down in winter. Frost will prevent fungus from spreading in the wood. And before use and after assembly, wooden elements must be treated with antifungal impregnation.
Fungus on a log cut is immediately visible
Application of impregnations
This remedy can protect you from many problems associated with the operation of the bathhouse. For a modern busy person who does not want to use impregnation, there are only two ways to avoid the appearance of dirt:
- rarely use the bathhouse or allow a small number of people into it (and dry it well each time);
- every two to three years, completely change the furniture, lining on the ceiling and walls (but this method is not suitable for everyone).
Fans of a healthy lifestyle claim that treating wooden surfaces inside a bathhouse is not only unnecessary, but also harmful. They believe that impregnation and paint coatings, when heated, give off a strong chemical odor and emit harmful volatile substances. This is true if you use ordinary products not intended for use in a bathhouse. But if you leave the tree in its original form, it cracks, and fungus multiplies in the cracks and micropores.
Domestic (Senezh, Neomid, Belinka, Aquacolor, Empils, Rogneda) and foreign (Dulux, Tikkurila, Nobel, Belinka, Teknos) manufacturers of varnishes and paints produce many products for interior and exterior impregnation.
During the reconstruction, it will definitely be necessary to replace the logs in the steam room and washing department. The removed floorboards are numbered and marked, after which they are sent for discarding, replacement or partial repair of the boards. Lag beams cannot be repaired; they are replaced along with the backfill insulation.
The condition of the drain lines must be checked; most often, they also need to be changed completely.
If the walls of the bathhouse are lined and insulated from the inside, then you will need to selectively remove several pieces of lining or tongue-and-groove boards. As a rule, the walls inside the bathhouse are well preserved and cannot be repaired. The insulation has to be repaired and replaced.
In very old bathhouses, the walls could be insulated with clay backfill, jute cloth, adobe slabs made of clay, rye straw and horse manure. The last option of insulation is the most labor-intensive and time-consuming, since before repairs the blocks have to be molded and dried in the sun for a long time before the material can be laid on the walls of the bathhouse.
For faster repairs, you can use modern materials. The first layer on the walls of the bathhouse is foil foam, a counter-lattice is installed, and magnesite or gypsum fiber boards are laid. The last stage of repair is to sew on a vapor barrier and hardwood cladding.
Of course, this renovation option will not be able to recreate the effect of a clay pot for which old bathhouses are famous, but the steam room will be warmer than the old one. But, on the other hand, thoughtless repairs with wall insulation with baked clay chips, jute or adobe can lead to an obviously unsuccessful result.
Of course, it is not necessary to make major repairs and reconstruction of a large old house in order to equip a small bathhouse with a steam room. The situation when a bathhouse is built inside a residential building, wooden or stone, no matter, is becoming more and more common.
To equip a bathhouse in an old house, you will only need funds to repair the wall insulation and remodel. If the building is too old, then it is best to immediately repair the foundation, since with the installation of a steam room, the load on the foundation will only increase.
The rest of the room can be used as living rooms or converted into a veranda or winter garden.
Is it possible to change the bottom beam yourself?
In general, the repair work in question requires a certain skill, significant time and labor costs.
The question of whether it is possible to independently replace the lower crowns of a wooden house is of a purely individual nature. If you have the necessary equipment and sufficient time, the work associated with lifting the log house can be done with your own hands.
But, if a person is in doubt, it is better to invite specialists. In order to carry out repairs correctly and efficiently, you need to take into account some nuances.
Methods of connecting timber and logs, pros and cons of each of them
Building the walls of a bathhouse from logs or timber is not difficult, it is only important to know the technology for connecting building materials. Moreover, for logs and for profiled timber it is completely different. This article will help you understand all the intricacies.
So, what is the connection between logs and beams? There are only two types: in length, when the size of the standard product turned out to be insufficient, and when cutting corners - more complex options.
"Into the cloud" or "into the bowl"
The “in the bowl” method is the simplest and most ancient. To do this, you need to cut out a round bowl at the top of the log - which is what “oblo” means in the ancient language. A transverse log with the same bowl is placed there. Moreover, be done in three more options: in a fat tail, in half a tree, and in the form of an oval comb.
Since ancient times, baths have been built using the “half-wood bowl” method - this is the simplest method. And in order for the laying to be dense, an additional longitudinal groove is cut out in the upper part of the logs - a laying groove. It is also filled with insulation (flax wool more often) and a second log is placed on top. And in order for the wall to be stable, during assembly, each stacked log is connected with a dowel to the bottom one - this is a wooden dowel of rectangular or round cross-section.
Cutting into the fat tail is the most difficult. In addition to the special ridge, an additional protrusion is made at the very bottom of the bowl, which is located along the log and exactly across the bottom of the bowl.
In the third option, the logs are connected to a landslide-shaped ridge - it must exactly repeat the outline of the laying groove, therefore it is cut not from above the log, but from below - such a log house can withstand even strong winds.
In the "paw"
The connection of timber “into a paw” is done in the following three options: end-to-end, on main tenons, on dowels. The simplest is the first option.
Joining the timber into a joint is done using metal plates with staples or nails, and how good the angle is depends on how perfectly smooth the ends of the joined beams were. But still, this is not the best option, and completely unsuitable for a bathhouse.
But dowels are a special liner made from the hardest types of wood that prevent the entire wall from moving. The best dowels are oblique, although they are the most complex.
The most popular option for building a bathhouse today is connecting the beams into a root tenon, when a groove is made in one of the beams and a vertical tenon in the other. This is the most reliable connection.
Only during the installation process you will need to put a flax-jute fabric in the groove for improved thermal insulation of the log house, and after laying each crown you will need to hammer a round wooden dowel into the corner.
"Into the paw"
Cutting “in the paw” is, in fact, the same as “in the paw” - only here the logs that protrude beyond the plane of the wall are deprived of the end part. This way the angle itself is obtained without any residue, and in order for the entire structure to be reliable, special sockets and spikes are left at the ends of the logs - cut. True, such a wall will have a lot of ventilation, and therefore during its construction it is necessary to make the horizontal planes of the cut inclined - in two directions at once. This will already be called a “dovetail” - i.e. the spikes between adjacent logs are firmly interlocked with each other - due to inclined planes.
"To the region"
This connection is made through key grooves - single-line, double-sided and four-sided. In the first case, a notch is made in each beam in the form of a transverse groove, which is made only on the upper side and the width coincides with the cross section of the beam. It is this technology that is always used to connect profiled timber, which has strictly defined parameters.
In the case of a double-sided locking groove, cuts be made both from above and from below, and the depth of each should be equal to a quarter of the height of the beam itself. But in the third option, cuts are made on four sides at once - this connection of timber is reminiscent of a children's construction set - it is so simple to do.
Sources:
https://ishimpzu.ru/zamena-breven-v-bane-na-kirpich/ https://stroim-domik.org/stroitelsTVo/steny/iz-dereva/iz-breven/remont-i-restavratsiya/esli- gniyut https://banya-v-derevne.ru/bani-iz-dereva/rublenyie-bani/sobiraem-srub-dlya-bani-iz-brevna-chast-1/ https://stroy-banya.com/steni /soedineniya-brusa-i-breven.html
When is the best time to do the work?
Repair of the basement of a wooden house must be carried out immediately when damage is detected. In this case, it is possible to do without major repairs and complete replacement of the lower crowns. The work itself cannot be carried out in high humidity and windy weather.
When planning the timing of repair activities, it is necessary to take into account some features of the behavior of wood. In summer, moisture moves deeper into the log, which can cause cracking when drying.
In winter, the humidity of the tree is minimal, and the moisture is frozen, which ensures uniform shrinkage. In addition, in summer, wood is more sensitive to temperature differences between night and day.
The choice of repair timing should be made taking into account the recommendations given for the construction of a wooden house:
- It is better to carry out foundation repairs in the fall, when the air temperature has not yet dropped to sub-zero values. After 2.5-3 weeks, the concrete will gain the required strength, and you can start building the log house.
- It is better to carry out work with a wooden frame in winter.
- During spring, maximum shrinkage occurs. It is better to wait out this period.
- Summer is the best option for finishing work.
Important! If the major repair of a wooden house involves raising and strengthening the foundation, as well as replacing the lower crowns of the log house, then work should begin at the end of October-November, taking into account that the completion of the log house repair will take place in December-January.
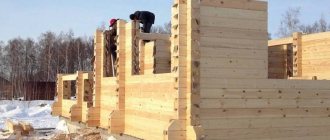
Assembling a log house for a bathhouse. Part 1
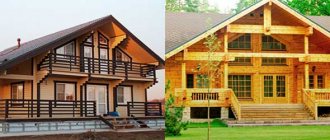
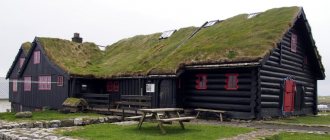
More than once I had to participate in the construction of a real Russian bathhouse from solid logs, and each time it turned out to be special and unlike the others, this is the difference between handmade work and ready-made standard projects.
Hand felling is still not uncommon in cities, but in villages it is still practically the only one. Only it is closest in spirit to the original traditional bathhouse. Is it difficult to build? Yes, it’s not easy on your own, there are a lot of subtleties in this matter, it requires a special approach, which is why people experienced in this matter are invited both for felling and for its construction.
A bathhouse is the same as a house, only small, which is why its construction must be taken with full responsibility
Features of laying crowns
You can’t put wood on the edge of a bowl; you can break it; for the same reason, you should never step on it or knock on it. If necessary, the log
Then we lift one side and drop it into the bowl, and do the same with the other end. If necessary, we adjust until we achieve alignment of the groove in the bowl with the top of the log. This is a very important point, it determines how evenly and tightly the bathhouse , and this, in turn, will affect whether it will be warm in the future or not.
After laying each subsequent row, the grooves outside and inside are additionally caulked, thus filling the inter-crown voids. We again pay special attention to the joints of the logs.
This is the order in which the construction of the walls continues. From the outside, everything seems quite simple, but of course everything is not like that, the process is quite slow, taking into account that the logs are pre-planed, and there is no need to rush here, everything must be verified.
On the first day, it is usually possible to fold about half of the log house - 5-6 rows.
The next day, weather permitting, we continue construction. It is becoming difficult to lift the logs, so a deck is built outside and inside.
Work continues until the moment when the penultimate crown is laid, consisting of the following logs: two “skull” logs and two “purlin” logs. Then we temporarily stop the construction of the log house; it’s time to do the ceiling.
Only after its installation will it be possible to complete the assembly of the log house.
Read the continuation in the next article - here.
How can you increase the service life of timber?
The service life of the lower crowns, and therefore the entire wooden house, can be achieved in the following ways:
- Application of high-quality and reliable waterproofing. Such materials include modern euroroofing felt. It is laid on top of the foundation and protects the frame well from below.
- Cover board. If there is no financial opportunity to manufacture lower crowns from larch or oak, you can increase the reliability of the base by installing boards made of these materials. It is attached on top of the foundation waterproofing and has a width of 25-30 cm and a thickness of 6-8 cm.
- Impregnation of wood with folk remedies. It is recommended to use the following substances: copper sulfate, “Finnish mixture” (slaked lime, copper sulfate, table salt, flour); natural wax; spruce resin or birch tar; bitumen; drying oil; oils
- Modern, synthetic, impregnating compounds. The following antiseptics are popular: Pinotex, Sadolin, Senezh Ognebio, Tikkurila, Belika.
You can replace the lower crowns in a wooden frame yourself in different ways. It is important to correctly assess their condition and determine the scope of work.
To prevent rapid rotting of wood, it is necessary to protect it from moisture and pests. Preventive measures will help eliminate the need for labor-intensive major repairs.
Repairing wall cladding
The interior decoration of a bathhouse is the first to fail, since it is mainly made of wood. Due to temperature changes and high humidity, it begins to rot and warp. It is necessary to tap the walls to determine the problem area. Replacing a deformed section of finishing will not be difficult.
It is much more difficult when you need to completely change the skin
| Actions | Subtleties |
| You must first bring the lining into the room. | It is necessary that it adapts to the temperature regime of the bath. |
| The surface of the walls must first be leveled so that the lining does not subsequently resemble “sea waves”. | This is achieved using lathing. Frame slats are installed perpendicular to the floor in increments of 0.7 m using a level, starting from the corner of the bathhouse. A thin string is pulled between them to align the horizontal slats. Separate bars are attached near windows and doors. The sheathing must be fastened with stainless or galvanized self-tapping screws that do not corrode. |
| The lining is installed on the ideal sheathing, starting from the corner, in a vertical direction (so that moisture drains easily without lingering on the panel). | Experts advise lining the steam room with deciduous wood; you can use coniferous wood to decorate the washing room and rest room. |
To prevent rotting and destruction, it is necessary to treat the wooden elements of the bathhouse with antiseptic impregnations. If you decide to tile the wooden walls of your bath rooms, then just follow the following recommendations.
- Lay the tiles on a flat and clean surface. To enhance the moisture resistance of the walls, they are first sheathed with roofing felt. To add strength, a metal mesh is sometimes attached to it. Then they plaster and apply a primer.
- To determine the angle for laying the first tile, you need to stand at the front door and choose the most noticeable one.
- The glue is applied directly to the tile, and not to the work surface (this will make it more convenient to attach the material). The glue quickly becomes unusable, so it does not need to be prepared in large quantities.
- To ensure that the gaps between the tiles are of the same thickness, special fasteners (dividing crosses) are used. They help to install beautiful tiles without various defects, which will increase the service life of the tiles.
Water supply
An old bathhouse, which has been on the site for a long time and is not used, is unlikely to have a water supply. To steam and wash comfortably, you need to correct this misunderstanding.
The bathhouse can be connected to any water source, from a well to a central water supply system. The main thing is to lay the pipeline correctly. Pipes should be installed in the ground no higher than the soil freezing level. In the underground area they must be carefully insulated. If the steam room is not heated in winter, care should be taken to install a device that allows water to be drained from the system. Otherwise, the pipeline will defrost.
If the water comes from a well or well located on the site, then this problem can be solved quite simply. All that is needed is to install the pipeline with a slope towards the water source. We should not forget about the tap for draining water from the heat exchange and heating system.
Tree protection
I started treating the wood with a protective coating from the ceilings. The ceiling in the steam room was treated with linseed oil. The ceiling in the washing room and dressing room was covered with a scuba tank with Eurotex-sauna wax. Then the walls, door and window openings are the same, the steam room is linseed oil, the dressing room and washing room are Aqualak, only in three layers. At the last stage, the floor, as I already said, had to be sanded in places. The floor was treated with Eurotex-sauna, also three times in all rooms.
The baseboards and corners were treated separately, the “spare parts” from the steam room were treated with linseed oil, the rest with scuba diving. Eurotex dries quickly, the next layer must be applied half an hour after the previous one.