In children's stores you can find a wide range of toys, including doll houses of various sizes. This toy is every girl's dream. You can not only purchase such a house, but also build it yourself. An original plywood dollhouse can be made in just a few days. This will not only save money, but also make a toy that will fully comply with the baby’s wishes. After all, a child can take an active part in production, express his wishes and help decorate. To make it you will need sheets of plywood, a diagram and sketches, as well as simple materials and tools.
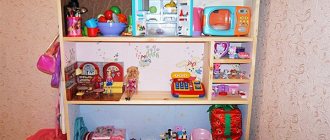
A plywood house for dolls is a great toy for every girl.
Advantages of making your own dollhouse
Toy stores offer a wide range of doll houses. However, making such a toy from plywood yourself has a number of significant advantages:
- Manufacturing according to an individual project. The main advantage of making it yourself is the opportunity to make the house the way the girl sees it. In this case, you can take into account the desired size, number and design of rooms, layout, furniture features and additional decorative elements. This toy will be unique.
- Possibility to make a house of any size. Its dimensions depend only on the wishes of the child and the availability of free space in the room.
- The benefits of working together with your child. If you build a house together with your child, you can not only make a truly beautiful and unique toy, but also have a good time with your baby and strengthen the family bond.
- Development of creative abilities and skills in working with plywood. The whole family can start making a house. If your daughter can express her wishes and decorate the rooms, then her brother may well help in assembling the structure itself.
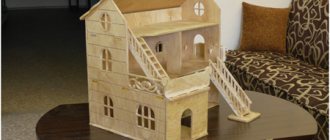
Dollhouse with original plywood furniture
There are many materials that can be used as a basis when making a dollhouse. However, plywood is most often used for these purposes. This is explained by a number of advantages of the material for assembling a toy house. These include:
- plywood is a pleasant-to-touch material, always warm, like all wooden toys;
- if the construction rules are followed, the finished structure will be durable and can be used even for the most violent games;
- plywood is low-cost, so you can use it to build an inexpensive house, unlike a ready-made store-bought option;
- working with plywood requires accessible tools that can be found in every home;
- The surface of the plywood itself is smooth and aesthetically pleasing, so there is no need to further decorate the surfaces.
In addition, plywood is a safe material. However, when choosing it, you need to pay attention to the labeling. The impregnating adhesive contains formaldehyde, which is hazardous to health. Therefore, only material marked E0 should be used.
Original author's models of doll houses
The classic model, similar to the one discussed earlier, has two floors and a standard arrangement of rooms. But today there are a huge variety of ideas for arranging and decorating houses.
Two-story house with a terrace
To create such a model, you will need to make changes to the drawing:
- A sketch of the auxiliary room is made for the standard frame.
- The extension itself can be used as a garage, and instead of the second tier, a summer terrace is formed.
The changes, of course, will also affect the process of making blanks. You will need to create:
- Three additional walls with windows and garage doors.
- Shed roof for extension.
- Relief fencing for the terrace.
- Furniture: tables, toy sofa, decorative plants.
Creating this model will require enough time and skill.
Dollhouse inside a wooden stump
This author's idea is distinguished by original material and an interesting approach to work.
A wooden stump is used as a base and frame, the core of which is cut out. I treat internal surfaces with antiseptic solutions, antipyretics and antifungal agents. It is planned to retain several wooden beams to form the floors. Also, according to the design idea, internal lighting is provided along the upper tier. The installation of the furniture row and the arrangement of the premises is carried out individually, depending on the master’s ideas.
Today, the dollhouse has acquired a new status - not only a toy, but also an original decorative element. Thanks to this fact, new manufacturing techniques, interesting design ideas and original models are being developed in art. You can see photos of the most interesting options for dollhouses on sites on practical needlework, and if you wish, you can create them yourself.
Making a drawing
To build a house from plywood, you will need a detailed drawing with the dimensions of all the parts. First you need to decide on the approximate dimensions of the structure. Its size should be based on the wishes of the future owner, as well as the size of the room in which the house will stand. In addition, it is necessary to think in advance about the shape of the product and its style.
Dollhouse drawing
If a ready-made drawing is used, then it must be remembered that when changing the dimensions of certain parts, other dimensions should be changed proportionally. If the drawing is drawn up independently, it is necessary to include the following data:
- The back wall should be in the shape of a rectangle or pentagon. The latter option is preferable, because it will allow you to make an original roof with beveled edges.
- A base that should be slightly wider than the interior space. This will simplify the process of assembling the structure.
- Overlapping the second and third floors, which should be the same size and be slightly smaller than the base.
- Side details.
- Partitions between rooms.
- Elements for making a roof.
Details of assembling a plywood dollhouse can be found in the video:
The dimensions of all elements can be easily calculated independently by drawing a sketch on paper. To simplify the work, you can use ready-made diagrams by making the necessary adjustments to them.
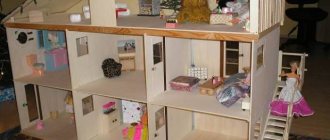
Master class on making a doll house with your own hands
The base for the future structure was made wide, this gives stability to the future structure. For better stability and load-bearing walls, it is best to choose 12mm thick plasterboard, and for partitions you can use 9mm thick plasterboard. I selected the profile for the work at 18x20 millimeters, otherwise the walls would have turned out very thick, and in addition, during the work I did the wiring for lighting.
I kept all the drawings of the future construction in my head, for this reason, when performing further assembly, I made some additions and changes. It turned out that the entire structure of the house was formed during the assembly process. In a couple of evenings I was able to complete the installation of the structure.
Now you can start painting work. True, first, using putty, I began to seal various cracks and level out unevenness on the surface.
After finishing the painting work, we glue the ceiling corners and the rooms in the small toy house look like real rooms.
After filling the cracks with putty, we begin roofing and painting work.
I decided to cover the roof with a soft roof.
Next came the painting work, my daughter decided to help me.
We lay laminate on the floor and make a lawn on the terrace.
The house is ready, we connect the electricity.
The hero of the day has been waiting for this gift!
Materials and tools
Making a house from plywood is a multi-stage and complex process. One of the most important stages is the preparation and purchase of the necessary materials and tools. If you do this in advance, the process of making the house will go faster.
To work you will need:
- Plywood. The main building material for making a dollhouse. To calculate the required quantity, it is necessary to calculate the number of parts and their area from the drawing, and add up all the data. The resulting value should be rounded up. For a small house you will need on average three sheets of material, and for a huge palace for dolls, you may need up to ten sheets of material.
- Corrugated cardboard. It can be used to make a roof. This material can be replaced with ordinary cardboard or plywood.
- Electric jigsaw. The optimal tool for working with plywood. Allows you to quickly cut parts of the desired size with minimal risk of cracks and chips.
- Wood glue. An excellent option for fastening plywood parts. It dries quickly, has no unpleasant odor and does not leave marks on the material.
- Mounting tape. It is recommended to use it as an additional means for securing parts, especially in places where strength and reliability of the structure are required.
- Self-tapping screws. For reliability, the main structural elements can be additionally secured using self-tapping screws.
- Sandpaper. Use it to clean all edges of the material to prevent injuries and cuts.
- Tape measure, ruler, simple pencil.
Additionally, you should prepare materials for decorating the house. To do this, you can use wallpaper or films that imitate them, colored paper and cardboard, and film as a floor covering. You can also use pieces of linoleum, fabric, felt, laminate. Additionally you will need paints and glue. Plexiglass or plastic should be inserted into the windows.
Laminate house
How to make a dollhouse with your own hands? We present to your attention a detailed master class on creating a home for toys from laminate. For work we will need:
- • Detailed drawing;
- • Wood glue or construction PVA;
- • Jigsaw or hacksaw;
- • Small pieces of old paper-based wallpaper. You can use acrylic compounds without a pungent odor. After drying, the surface of future walls can be decorated with various images in the form of stickers or drawings.
- • Wide brush;
- • Sponge with a porous base;
- • A simple pencil for marks;
- • Construction meter.
Let's start making a house for Barbie with our own hands. The working stage consists of several points:
On the back side of the laminate we draw the boundaries of the future walls in accordance with the drawing. After this, we carefully cut out all the components with a jigsaw;
Next, we mark the places where the windows and doors will be located;
Using wood glue we fix all the parts together. When carrying out installation work, we take into account the parameters shown in the project drawing;
Now you can move on to decorating the planes. If paper wallpaper was used for work, then they decorate the walls and ceiling. The flooring can be decorated with soft fabric or left wooden. If acrylic paint was chosen, then the work will require the use of a sponge with a porous structure.
Place a small amount of dye on the back of the working tool. With light pressure we decorate all planes. After applying the composition, leave the entire structure until it dries completely. This will require an average of 1 to 3 hours;
Let's start arranging the doll furniture. It can be purchased in children's stores or ordered from professional craftsmen;
Next, we proceed to decorating the interior space. To do this, we use curtains made from several pieces of decorative fabric, soft rugs, and light organza tablecloths.
As decorative accessories, you can use small plastic bubbles, the surface of which is pre-painted with an acrylic composition. Small artificial flowers are ideal for creating floral arrangements. The photo of the dollhouse shows do-it-yourself options.
Technology for making a dollhouse from plywood
To make a dollhouse from plywood, you first need to transfer the images from the sketch to the plywood. To do this, the elements of the drawing should be printed or drawn by hand, and then transferred to sheets of material.
The parts should be cut out using a jigsaw, after which the edges should be carefully sanded so that the edges of all parts are even and smooth. If the windows are not indicated on the diagram, at this stage they need to be marked on the blanks, cut out and also processed with sandpaper.
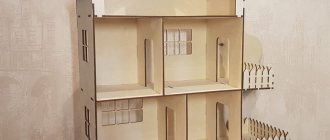
A simple version of a dollhouse
After this, you can proceed directly to assembling the house:
- Using construction glue and self-tapping screws, you need to attach the side walls to the base.
- The ceilings of the second and third floors, as well as all internal partitions, must be mounted on the side walls. If the parts were not cut very carefully and gaps have formed between them, you can cover them with a special putty for wood and then paint them.
- A roof is installed, which can be cut from corrugated paper and the same plywood. If paper is used, it must be painted in the form of tiles. When using plywood, tiles are glued to the roof, which must be cut from colored paper, cardboard or other decorative materials.
- Installation of interior finishing. Pieces of linoleum, carpet, felt or fabric can be used to finish the floors. The walls are covered with wallpaper, colored fabric, film or painted with gouache.
- Furniture manufacturing. For a plywood house, the furniture is best made from the same material. In some cases, a good solution would be to use ready-made furniture, which can be purchased in sets or separately in children's toy stores.
- House painting. It can be painted in various colors with gouache or watercolor. However, plywood is an aesthetic material, so you can leave it without painting.
Additionally, near the house you can make a small garden in which cardboard flowers and trees will grow. This will give the toy an even more delicate and beautiful appearance.
After assembling the structure, all that remains is to decorate the interior space
General provisions
First, let's look at the motivation why it's worth taking on making a dollhouse with your own hands:
Advantages of making it yourself
- Saving. The price of factory-made models is quite high, while homemade wood products will significantly save the family budget;
- Uniqueness. The project you implement will be one of a kind; your daughter will definitely not find the same toy among her friends;
Unique toy castle made of plywood
- Compliance with desires. In your dollhouse there will be exactly the kind of rooms, the kind of colors and the kind of decorations that the child wants to see;
You can even put a dinosaur in the attic, because this is original handmade work
Advice: involve your child in the work, this will allow you both to have more fun and make the homemade toy even more loved.
Advantages of choosing plywood
So, we figured out why you should get to work with your own hands and not run to the store. Now let's decide on the material.
Wood-laminated board consists of several sheets of wood veneer glued together, which determines the following advantages:
- High strength characteristics. Durable children's toys always last much longer than their flimsy counterparts;
- Ease of processing. Plywood is easy to saw, paint, drill, mill and fix with nails or self-tapping screws;
It is easy to cut a plywood sheet into pieces of the required size
- Aesthetic appearance. The top veneer has a beautiful original textured pattern and a warm shade that is pleasant to the eye;
Wood-laminated board looks attractive even without additional decorative processing
- Low thermal conductivity, due to which wooden plywood is always warm to the touch. This is an important factor for a child;
- Relatively low cost. Wood-laminated board is not expensive, and you will need very little material to complete the task in question.
But, speaking about the advantages of plywood, it is necessary to mention its possible disadvantage, which is of no small importance. The adhesive used in the production process of wood-laminated board may contain formaldehyde, which is highly toxic.
Therefore, be sure to pay attention to the appropriate labeling and choose an environmentally friendly product, because your child will come into contact with it, and the following labeling will help you with this:
| Symbol | Formaldehyde content, mg/100 g |
| E0 | No more than 6 – environmentally friendly product |
| E1 | 7-9 – permissible standard for use in residential premises |
| E2 | 10-20 is a rather dangerous type of plywood, the use of which is best limited to external work |
House design
After manufacturing, the frame should be decorated with various materials, and doll accessories should be placed in the rooms. At this stage, no instructions are required; you can decorate the house to your liking. However, some useful tips can help:
- the walls and floor of a wooden house do not have to be painted or covered with decorative elements;
- for swing windows and doors, special small metal door hinges should be used;
- Windows should be decorated with sheets of fabric to create curtains.
You can place your favorite dolls and other toys in the finished house. Making a house from plywood is not difficult, and a child’s joy from owning such a toy is priceless. A beautiful dollhouse will also become a real decoration for a child's room.
Model of a toy dwelling made of plasterboard
Drywall sheets are considered a fairly popular type of finishing material, which is widely used to create various structures and structures. Surely in every house after renovation there are small pieces left that can be used to create a house for dolls with your own hands.
To prevent the structure from deforming during its operation, it is recommended to use metal corners and small screws. It is recommended to cover the fastening points with putty so that the metal elements do not cause injury to children’s hands.
For work, you can use the scheme for creating a house for dolls from plywood. The principle of operation is practically no different from the previous version.
To work with drywall you will need to use a sharp knife. This tool will allow you to carefully cut blanks to create walls, ceilings and floors. To prevent the edges from crumbling, they must be coated with furniture varnish. All walls, ceiling and floor are attached to each other using corners.
Examples of a do-it-yourself plywood dollhouse
Preparatory work
At the first stage, you will need to decide on the dimensions of the structure. To do this, you should take into account the size of the doll the child is playing with - the toy should fit freely at full height with a margin of a few centimeters to the ceiling. There should also be enough space for arranging toy furniture - a crib, a table with chairs, kitchen furniture.
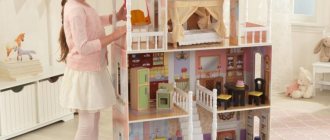
Houses for Barbie
The number of floors in the house depends on the size of the toys and the height of the child. If the figures do not exceed 20 cm in height, then the house can have up to 3 floors. If the structure is assembled for a standard Barbie doll, then it will not be possible to make more than 2 floors - then it is better to arrange the rooms horizontally.
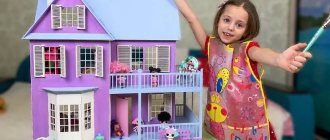
Floor-mounted 3-storey house for playing with small figures
Having decided on the concept, you can begin to develop the project in more detail by drawing a design drawing to scale on a piece of paper.
Project details
Drawing
The drawing of the details of the house must be done to scale - you can draw it on a sheet of paper or in a special computer program. This will allow you to reflect the dimensions of the product, the number and sizes of parts, and determine the methods and locations of fastenings. Also, at the stage of creating the project, you should decide on the internal layout, shape and design of the house. This stage of preparatory work should not be skipped, as it allows you to determine the required amount of material and the sequence of assembly of the product.
Basic elements of a dollhouse
Note! To make a house, you can use a standard drawing. It is worth remembering that when changing (increasing, decreasing) one size, a proportional change in the remaining sizes follows.
When developing a drawing yourself, you will need to consider the following:
- The shape of the rear wall is a rectangle or pentagon, which allows you to make a gable roof.
- To make the assembly process easier, the base is made slightly wider than the space inside.
- The ceilings of the upper floors should have smaller dimensions than those at the base.
- The main structural elements also include sidewalls, interior partitions and roof parts.
Sketch diagram of the house
Let's start to "build"
To create a truly fabulous masterpiece of “architecture,” just like in real construction, you must make a plan and strictly follow it. First, develop a layout together with your baby, determine with her which rooms will have what kind of furniture. By the way, you can also make furniture for a dollhouse with your own hands.
Creating a project
Before you bring to life what you and your baby have in mind, draw it. The drawing will help you understand what you will ultimately build. You can identify and correct many flaws and shortcomings at this stage.
Only the drawing must necessarily contain the dimensions of the future “house construction”. So one of the very common mistakes is the low height of the rooms. For free and convenient movement of dolls around the rooms, the height of the rooms should be at least twice the “height” of the dolls that will “live” in this house.
For ease of play, the upper “floor” should be no higher than the daughter’s eye level, and the optimal depth of the rooms should be from 30 to 45 centimeters. If the house is quite large, then provide wheels on the bottom, so the baby can more easily move the house on her own. I repeat, the drawing must indicate all the dimensions of the future “structure”, and the drawing must also be proportional.
Preparing the details of the house
According to the project, draw all the details of the future house on a 1:1 scale and transfer the drawings to your material. Let's assume it will be cardboard. Such a drawing on a scale of 1:1 will at one time help you determine the amount of material that will be needed to “build” the house. After all, it’s not good if there is not enough cardboard or plywood during the construction process.
Transfer images of parts onto the material. Then cut out the parts according to the resulting contours. If your house will be “built” from cardboard, then use scissors, and if you decide to make a dollhouse with your own hands from plywood, then an electric jigsaw will help you cut out parts from such material; you will also need not very coarse sandpaper for cleaning the end surfaces. Just like in any construction, you will need a ruler, tape measure and pencil.
We connect the prepared parts
It is best to connect the prepared parts of the house using glue. Which glue is best to use depends of course on what material you plan to use. Carpenter's glue is suitable for wood, and regular PVA works perfectly for cardboard. To pre-fix the parts, use masking tape.
The final stage is finishing
Usually children simply adore the finishing stage. To decorate toy rooms you will need:
- Colored paper (you can use colored cardboard).
- Pieces of old wallpaper.
- PVA glue (where would we be without it).
- Self-adhesive paper.
Decorating premises is a deeply individual process. Your little one should lead it, because very soon she will become the mistress of this house.
So I'll just give some advice.
- Consult the future owner of this house. Consult her on all, even the most insignificant, in your opinion, issues related to finishing.
- Windows can be “glazed” by cutting out “glasses” from transparent plastic bottles.
- It is much easier to cover the walls, floor and ceiling with wallpaper before assembling the structure.
- For lighting, if the hostess wants it, use small battery-powered lamps. Fortunately, buying them is not a problem in almost any hardware store.
- The easiest way to decorate external walls is with thick paper and paints. Using paper on the glue, the desired relief is created, and when the glue dries, paint the walls in the desired color.
- It is good to provide drawers in the house for storing various small toys.
Believe me, a doll house created with your own hands, and even if the baby took an active part in its creation, will bring much more joy than a purchased house.
How to make light in a dollhouse?
Any home should have lighting, and a doll's house should have it too. Next we will learn how to make it yourself.
DIY lighting in a dollhouse
Materials, tools:
- Pliers, wire cutters
- Soldering iron
- Energy source box
- Microswitch
- Small light bulb with socket
- AA batteries (2 pieces)
Lighting in doll houses
Progress:
- For a small 3 Volt light bulb you will need two batteries; it is not difficult to buy such products on the market.
- Battery boxes are also sold separately.
- Now let's look at the connection diagram in detail. One wire coming from the box needs to be soldered to the light bulb base.
- First solder the other wire (free) to the bottom of the lamp.
- Then, empirically, find which of the three contacts of the microswitch is suitable for turning on a small light bulb. To do this, apply the wiring coming from the box and the lamp to the contacts of the switch. The switch mode should be on the label - ON.
- If the light comes on, you are on the right track. Feel free to solder the wires to the desired switch contacts.
Light bulb connection diagram
Step-by-step instructions for making and assembling a plywood house
The sequence of making a dollhouse from plywood is as follows.
Table 1. Making a dollhouse
| Illustration | Description |
| In accordance with the drawing, the dimensions of the parts to be cut are applied to the surface of the plywood. |
| Fragments of large size and simple shape are cut out on a machine. |
| Step 3 | In accordance with the drawing, the required number of floors is cut out. |
| Step 4 | To cut out smaller parts, use a jigsaw |
| Step 5 | The junction of two roof elements (slopes) on one side is taped with tape. |
| Step 6 | The parts are turned over and the ends are coated with glue at the points of contact. The parts are pressed and installed in the required position. |
| Step 7 | Glue the pediment. |
| Step 8 | A jigsaw is used to make window and door openings. |
| To insert a jigsaw file and start cutting out the window opening, first drill a small hole. |
| You will have to drill a hole on all sides of the window opening. |
| Step 11 | The inside of window and door openings is sanded using sandpaper. |
| Step 12 | For large parts, use a grinding machine. |
| Step 13 | Holes for self-tapping screws are drilled using a countersink drill so that the screw head is subsequently recessed into the solid part. |
| Step 14 | The parts are painted in the selected colors. |
| The house is assembled using ordinary self-tapping screws, the heads of which are subsequently painted to match the color of the part. |
Note! The method of fastening plywood parts depends on its thickness and the size of the elements. When the material is thin and the house itself is not large, the elements can be fixed using wood glue or using special grooves.
Assembling a small house