An electric or regular jigsaw is useful for a creative craftsman, since the equipment allows you to cut shaped or straight cuts from a wide variety of materials, from soft wood to glass or even steel. The versatility of the tool lies in the files, each of which serves a specific task. Therefore, it is very important to understand their classification and know how the file is secured in the jigsaw clamps.
Jigsaw
Classification of jigsaw files by type of material being processed
Initially, when jigsaws were not yet electric, this equipment was used only for wood processing. But modern devices allow you to cut metal, plastic and any type of wood surface. Therefore, before purchasing a jigsaw (Bosch, Makita or similar models), you need to decide on the material to be processed. After all, depending on the purpose, you will have to look for a specific cutting blade.
For wood and wood materials
Files for wood processing are divided into several groups:
- Quick cut Sometimes the quality of processing of wood material is not as important as the speed of the process itself. For such work, a long blade (from 60 mm) with large teeth (up to 6 mm) is suitable. If the master is going to make a longitudinal cut, then it is advisable to buy files with oblique teeth. And for a cross cut, a straight “tooth” is used.
- Clean cut (average tooth size not exceeding 3 mm, as well as a slight gap). Such files are usually used in furniture assembly plants.
- Figured cut. It is difficult to make a curved cut with a small radius, so special shaped files are used that have a very narrow blade, not exceeding 4 mm. The canvas is also characterized by small teeth (up to 2 mm) and short length (40 mm).
Important! If you choose the wrong file, there is a risk of overheating the motor of the jigsaw (models Dexter, Whirlwind and others).
For metal
Cutting metal is not the most obvious solution when working with a jigsaw, but this is possible thanks to a special blade. But, it should be borne in mind that the process will be very slow, and you will have to change a lot of files, as they become dull.
Experts recommend keeping three types of metal cutters with you at once if the master often works with this material:
- for aluminum;
- for non-ferrous metals;
- for steel.
If these blades are rarely used, you don’t have to spend money on buying additional ones, but choose only one - for processing steel. It will cope with non-ferrous metals and aluminum, but will become dull very quickly.
Attention! Metal files are made of durable steel; they have very small teeth (up to 1 mm), which are arranged in a wave-like manner.
Types of jigsaw blades
For polymer materials
To process PVC pipes or other similar materials, it is necessary to use blades with large teeth. Small ones will also work, but you will have to use the maximum speed of the jigsaw, otherwise the melted plastic will begin to clog the cutter.
If you have to work with thin sheets of plastic or plexiglass, experts advise using blades for metal processing. To cut thick plastic, you can take wood saws, but work at low speeds.
For specific tasks
There are special blades for processing ceramics and glass. They are coated with diamond coating or tungsten carbide.
It is advisable to use an electric jigsaw (Dexter, Diold and other models) for processing ceramic tiles or glass only if it is necessary to make very complex shaped elements. For straight cuts, it is advisable to use tools designed specifically for this purpose.
When sawing cement or plaster with a jigsaw, you will have to buy special files with carbide tips on the cutting edge.
In stores you can also find files that are suitable for processing rubber, cardboard and other soft materials. There are practically no teeth on them, and the cutting edge is a polished wave.
Universal
These types of blades are made from high-speed steel. They are suitable for processing different materials: plastic, wood, metal.
You shouldn’t expect high-quality cuts from such tools precisely because of their versatility - a specific material requires the use of a special blade (this is the key to a high-quality cut).
Types of jigsaws
Before moving on to the immediate specifics describing the process of installing a file, it is worth clarifying the types of tools involved.
Since the jigsaw device has quite a few incarnations, we inform you in advance that in this guide we will touch on 3 of its varieties: manual, electric and stationary. A band saw, which is also sometimes called a jigsaw, will not appear in this article. Now a few words about each type of device under consideration. Hand jigsaw
The cheapest option for a tool for making figured cuts in wood and its derivatives. When using special blades, it can be used for cutting metal of small thickness. The speed of work and the quality of the cut depend entirely on the experience and physical characteristics of the worker. Quite easy to use and does not require hours of study.
Electric jigsaw
A more advanced and expensive type of tool for making straight, transverse, inclined and figured cuts. Depending on the installed saw blades, it can work with wood, plastic, metal and even ceramics. It has a high saw stroke frequency, which usually reduces the quality and accuracy of the cut. Sometimes an electric jigsaw is rightly called a manual jigsaw, since it must be held during use. This tool is considered one of the most popular in everyday life, second in popularity only to the screwdriver and drill.
Stationary jigsaw
A very convenient and functional machine for amateur and professional work. Widely used in industry and at home. It works with thin files like a manual jigsaw, but the cutting speed is not inferior to an electric one. The main advantage of using a stationary jigsaw machine is complete freedom of both hands, which allows you to more accurately control the position of the workpiece during processing. The device copes well with straight cuts, but is primarily intended for figured cuts.
Having finished with a brief description of the devices, you can move on to the main question of the article. Let's look at how to insert a blade into a jigsaw and what nuances should be taken into account. Let's start with electric models.
What can a saw holder be like?
The saw holder is the most vulnerable part in the unit under consideration. It is he who is subjected to the heaviest loads during work, and accordingly fails.
The material for the saw holder is usually of the highest quality, but not all manufacturers take care of this, so the percentage of replacement units on jigsaws is high.
There are three types of holder, and each has its own characteristics, how to install a file in a jigsaw.
Saw holder
Bolt-on clamp (shoe) mount
This is the first option that began to be used on electric jigsaws. Almost all modern manufacturers have already abandoned block fastening, since replacing the cutting part in this case is a labor-intensive process: unscrew two bolts, install a file, and then fasten them back. For this operation you need to have a hex wrench with you.
Quick release mount
Used on many modern jigsaws. The process of replacing the blade takes no more than a minute, since you only need to press a special button to loosen the clamp and insert a new file there.
Radial clamp
The simplest type of fastening. Used on new models of jigsaws. To simplify operation, it is equipped with a spring that returns the cams to their initial position.
Important! When replacing the cutting part, it is important to pay attention to the fastening units, since they most often fail. Over time, play appears there, causing the file to beat, which affects the evenness of the cut.
Jigsaw files: basic recommendations for selection and operation
There are many types of files for electric and manual jigsaws and they all differ in class and parameters . Visually, the blades can be distinguished by tooth, width or length. But you won’t be able to immediately determine what type of material (metal, wood) the file is suitable for.
There are several types of jigsaw blades that are considered common. Depending on the material, you can choose the appropriate option.
Files are produced for different jobs
How to insert a file into a jigsaw
Shoe mount - how to insert a file into a jigsaw:
- Loosen the block by turning the two bolts counterclockwise.
- The canvas is placed with the teeth forward.
- The bolts are tightened evenly to their original position.
It is important to ensure that there is no skew, otherwise the cut will be uneven.
If only a bolt is installed on the block, then it needs to be loosened and tightened. There is no need to tighten the screw all the way, as unnecessary vibration will be created during operation. This data is enough to understand how to insert a file into a jigsaw with a block mount.
Quick-release technology - procedure:
- Press and hold a special key.
- Insert the shank of the file into the corresponding slot.
- The key can be released.
If you hear a click, it means the operation was successful.
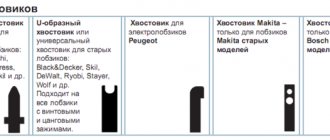
The easiest replacement option is with radial mounting, but you need to choose the correct shank shape (there are U-shaped and T-shaped). The second option is the most common; the u-shaped model has special holes for additional fixation.
Jigsaw with file
How to change a file on a jigsaw:
- Rotate the device head 90 degrees.
- Insert the fabric into the special slot.
- Release the jigsaw.
The clamp will return to its original position under the action of the spring.
Jigsaw: features, design and advantages
This tool is a very useful acquisition for the home workshop. It has many functions, you can work with it in various conditions and in almost any position.
Jigsaw device.
Thanks to modern achievements and high technology, a jigsaw has ceased to be just a hand tool. After all, the use of an electric or pneumatic drive in its operation makes the jigsaw an almost universal household tool. It has also been improved with built-in safety features, noise and vibration dampers, electronic speed control and anti-touch (saw blade) protection.
In a nutshell, the principle of operation of a jigsaw can be described as follows: torque from the engine is converted into movement, due to which the saw moves further forward in the vertical direction.
Jigsaw design
Conventionally, the entire structure of the instrument can be divided into the following parts:
- motor housing;
- gearbox;
- sole;
- handle.
Table on the use of files.
If the handle is bracket-shaped, then the machine will be a closed structure, and you can keep your palm on the handle exclusively from above. The mushroom handle option can be grasped in different ways, as well as calmly changing the position of your hand.
It is necessary to ensure that the sole and body are firmly connected to each other, because even the slightest play can negatively affect how the tool will work.
The sole of the jigsaw is placed on the surface that you are sawing off. Files (or saw blades) cannot be sharpened; they simply need to be replaced. The tool will not overheat or experience additional overload if you promptly replace a dull file.
Jigsaws: main types
They are all the same in purpose and design. But there are several types of tools depending on how the file is attached to the jigsaw.
- For saws with a cross-type shank.
- For saws with a smooth shank.
- For a saw with a shank that has a hole.
Installation in jigsaw machine
A jigsaw machine is a comfortable device, since both hands of the master will remain free when working, which allows for more manipulations.
Attention! To use the device, it is advisable to use special blades with a pin for reliable fastening. If you buy a sample without a pin, you need to tighten it more carefully.
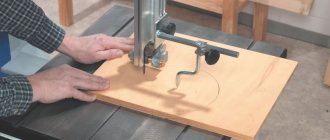
How to properly secure a file in jigsaw clamps:
- Secure the canvas in special grooves (first in the lower part, and then in the upper).
- The teeth should point down and away from the person standing behind the machine.
- The fabric is tightened using a special lever.
If the file is tightened correctly, then after a slight blow it should ring. If the canvas does not have a font, then it must be secured very carefully, since it often jumps out of the device.
Jigsaw machine
Tips for choosing saws
If a craftsman is interested in a decent result of his work, it is better to purchase files from trusted companies. They are a little more expensive, but already a reliable option. Inexpensive canvases wear out faster and break more often.
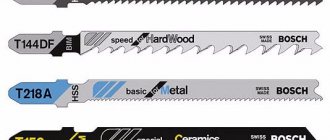
There is a more detailed classification of files :
- Т101В – for cutting plexiglass and plywood;
- Т101ВR – for laminated wood and laminate;
- T101D – for boards, timber, chipboard;
- Т224D – for working with aluminum;
- T118A – for sawing metal and plastic elements;
- T119VO – for shaped cutting on chipboard, laminated chipboard, fiberboard.
To know how to change a file on a jigsaw, you need to have one in stock that is suitable for cutting the prepared material.
The T-shank is considered the most common
Possible problems
When working with jigsaws, certain problems may arise that need to be resolved in time:
- The blade latches fail. They should not be overtightened so as not to break the thread.
- Fastening bolts, which gradually wear off during intensive work, are also subject to timely replacement.
- You should always pay attention to the condition of the file, as it can deteriorate and cause the engine to overheat. And also, if the master works with a dull file, the quality of the work decreases.
- The blades may become distorted, which will affect the processing of the material.
- When working with a dull saw, the wood will char (this is the wrong working technology).
- If you do not lubricate the roller in an electric jigsaw in time (for example, in a Bosch or Zubr model), the motor will overload.
- When working with an electric jigsaw, do not use excessive force, as the blade clamp may be damaged.
- Electrical devices need to be given time to cool down.
This information is enough to understand how to secure a file in a manual jigsaw, as well as maintain the device (for example, Interskol models) in working condition.
Types of clamps
Electric jigsaws on the construction market come in many varieties. Based on the type of file clamp, they can be divided into three types.
Shoe
The clamp consists of a block and a pair of screws that tighten it to the movable rod. The attachment is very easy to attach. It is inserted into the groove with the blades forward, and then the clamps are tightened one by one.
The disadvantage of the block system is the possible skew of the nozzle to one side during installation
Screw
The clamping part is similar to the previous one, but has only one bolt located on the side. Allows you to fix the saw element evenly and reliably without wasting extra time.
The screw clamp should not be tightened too much, otherwise the blade will vibrate during operation.
Quick-clamping
In a very common type of clamp, the saw part is secured in just a few seconds. The canvas is held in place by a lock, which is activated or inactive by a special button. When you press it, the rod moves forward, and the nozzle is secured in the groove. Pressing the button again returns the lock back and ensures high-quality fixation.
A characteristic click indicates that the blade is locked in an electric jigsaw with a quick-release system.
How to use a hand jigsaw
In this lesson we will show you the basics of working with a regular hand jigsaw.
Of course, there are also electric jigsaws, but they cost a lot of money, and working with them is a pursuit of speed, and not a calm, moderate creation of beauty. For work we will need: a hand jigsaw, a file, a table stand, a clamp for attaching the stand to the table, an awl, a pencil, two paper clips, a sheet of tracing paper, a sheet of copy paper, sandpaper and of course a piece of plywood of the required size. We will cut out a Christmas tree; in this work, in addition to the cutting technique, we will also master the technique of assembling plywood parts into a three-dimensional Christmas tree shape and the easiest way to finish the finished product, using ordinary watercolor paint.
The size of the plywood should correspond to the pattern you have chosen; try to arrange the cut parts more compactly, closer to each other, since everything that remains after cutting, as a rule, can no longer be used in further work due to its fragility. And so we clean the selected piece of plywood with sandpaper, trying to move it along the fibers, since transverse scratches will be very visible on the finished product and are very difficult to remove later, and the treated plywood looks velvety and soft.
The sandpaper should be medium-grit to reduce scratching of the plywood.
Secure the sheet of tracing paper and the drawing using clamps, then use a pencil to copy the drawing onto the tracing paper. This operation is necessary in order not to damage the original drawing when transferring it to plywood.
It should be noted right away that with the current level of distribution and availability of copying machines, for large-scale and complex drawings, it is good to use a copying machine for cutting and the required drawing simply needs to be copied onto a blank sheet of paper and then transferred from there to the plywood. The advantage of this method is that it is quite easy to enlarge or reduce the pattern chosen for work. We put tracing paper with a design on the plywood and use a pencil to transfer it through carbon paper to the front side of it.
Having transferred the entire drawing to plywood, we carefully check whether all the lines of the drawing are clearly visible on the plywood.
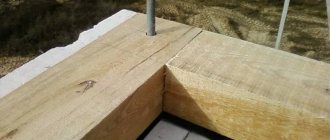
At the next stage, it is very important to check the future joints of the herringbone parts. To do this, a piece of plywood of the same thickness as we are using needs to be attached to the drawn groove of the Christmas tree part and make sure that it fits exactly within the drawn boundaries. If the dimensions of the groove and the thickness of the plywood do not match, the width of the groove is adjusted - it is drawn equal to the thickness of the plywood used. Otherwise, when assembling finished parts, they will hang out or simply not fit into each other. This way all grooves in all part drawings are checked.
We take the stand and insert its clamp into the central hole.
We fasten the stand with a clamp to the edge of a table, window sill or workbench.
If your file is not inserted into the jigsaw, then we do this in the following sequence. We loosen the thumb of the lower clamp of the jigsaw (after turning the handle down to the working position). Insert the file into the lower clamp.
The direction of the saw teeth should be as in figure “b” - this is very important.
Then, having loosened the knob of the upper clamp, insert the upper end of the file into it and placing the jigsaw on the stand, press it firmly and screw the knob tightly. The file should be taut. But excessively strong tension can lead to breakage of the file when cutting shapes, and weak tension on the file will also lead to the same. So everything should be in moderation.
The position of the body when cutting should be as in the figure.
When cutting with a jigsaw, you need to smoothly move your hand up and down, up and down, monitoring the position of the file so that it does not tilt from the vertical position. When cutting along a curved line, turn the plywood rather than the jigsaw during the sawing process - this will reduce the likelihood of breaking the file.
When cutting sharp corners, make movements of the saw in place, gradually turning the plywood.
You should have a free space - a hole in which the file will turn, now continue sawing in the desired direction.
Make free space for turning the saw on the part of the plywood that will be thrown away and you will get sharp corners without much difficulty.