Winter is a difficult time for birds. Our little friends often have to fight for survival. We can help the birds wait until spring. A good, well-chosen feeder is not only a bird’s canteen, but also a decoration for a garden or balcony. Feeders have any shape - it all depends on our imagination and the materials at our disposal. We will tell you how to make a bird feeder with your own hands from a bottle, wood, plywood and other materials in this article.
Requirements for homemade feeders
A homemade design, regardless of the material used, must meet the following requirements:
- Sufficient strength of the building.
- Availability of a wide area for feeding birds.
- Resistance to moisture and temperature changes. The homemade structure is intended for installation outdoors, which means it will often be exposed to precipitation and climate fluctuations.
- Safety for both others and birds. There should be no sharp corners or chips on the frame of the feeder.
- Hanging feeders require a reliable mounting system. A homemade chicken feeder must have strong supports.
When working, great attention should be paid to the pre-processing of wooden parts. Premature coating of surfaces with an antiseptic, moisture-resistant solutions and antifungal drugs will reduce the incidence of parasitic diseases among poultry.
How to make a bird canteen correctly?
Several rules must be followed to avoid harming the birds. Construction of feeders and systematic feeding of birds will be a worthy lesson in ecology for the little ones! We have prepared interesting ideas for making feeders.
Posting rules
The product must meet certain requirements:
- look aesthetically pleasing;
- easy to keep clean;
- It is important to place the feeder in a secluded place:
- away from a busy street;
- away from windows and glassed rooms (birds can break on the glass);
- in a place inaccessible to predators (cats, dogs);
- birds do not tolerate human proximity, do not place feeders on windowsills;
- tree branches and pillars near bushes are suitable, which, if necessary, will become a shelter for birds;
- A good idea is to attach the canteen to a free-standing metal pipe dug into the ground (a wooden pole will not work; a predator could climb up it).
Important elements of the feeder
- Bird canteens should not be painted in bright colors that will scare away birds. Choose quiet, neutral colors that are close to natural. For the health of your winged friends, use paint only on the outside of the structure; after painting, you need to thoroughly ventilate and dry the feeder.
- A necessary element of the feeder is a roof that protects food and birds from rain and strong sun.
- The side walls will make the birds' dining room warmer.
- The base should have a raised edge to prevent food from falling out.
- The design must first of all be safe for birds - sharp edges must be sanded and protected, for example, with tape.
- Beware of hanging ropes and laces - birds can become entangled in them.
- It is worth making a feeder with a detachable bottom or a drawer, which makes it easier to remove droppings and spoiled food debris. Frequent cleaning will protect birds from diseases and parasites.
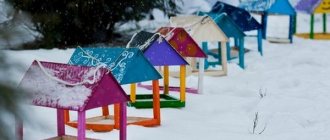
In the photo below: to make cleaning the food supply device easier, the feeder was equipped with a lowering hinged floor.
Dimensions
To make a convenient feeder, its dimensions are adapted to the size of the birds:
- a structure that is too large will be used by large birds; there will not be enough space for small birds;
- small – it will become inaccessible for large birds.
If you don't know what birds live in the area, it's best to choose a small bird feeder. For large guests, you can arrange a dining room in another feeding trough. Different sizes of feeders are chosen for sparrows, pigeons, and jackdaws.
Choosing material for the feeder
Today, craftsmen have access to a wide variety of available materials for building a feeder. To do this, you do not need to purchase parts or spend financial resources. It is enough to look in storerooms for old plastic bottles, sheets of plywood and many other construction items.
The main material can be:
- Solid wood. If properly treated, a wooden feeder can last for more than one season. In addition, such a design will have a pleasant external design.
- Plastic bottle. To create a feeder you will need a blank of sufficient capacity - 3 or 5 liters. A 19 liter bottle is perfect for poultry.
- Made from sheet iron. Before starting work, it is better to treat it with an anti-corrosion compound, and then cover the feeder with 2-3 layers of paint to protect the surfaces from corrosion.
- Pumpkin. This type of feeder is intended for one season - natural materials have a strictly limited service life.
Ideas for creating feeders from old dishes (glass, ceramic or metal pots, pans, trays) are also possible.
What to feed the birds?
- Finches, bullfinches, tits, sparrows - eat sunflower seeds, flax, poppy seeds.
- Robins, wrens, thrushes, feed on insects, worms, snails. In winter, birds lack food; insects can be replaced with seeds, raisins, rowan berries, and elderberries.
- You can attach several hooks to the feeder, hang pieces of lard - a favorite delicacy of tits. If you feed a titmouse in winter, it will get used to finding food in the garden, and in the spring-summer season it will repay its gratitude by feeding on pests living in the garden. One family of tits eats 75 kg of insects over the summer. For tits, you can mix lard with small oil seeds: poppy seeds, flax, crushed seeds.
- Environmentalists remind us that many birds willingly eat fruits, such as apples. Blackbirds love apples and pears.
- Sparrows love millet.
- Jay eats hazelnuts.
Attention! What not to feed birds:
- Don't feed your birds boiled potatoes.
- Bread thrown into the snow becomes wet and freezes, which is dangerous for feeding birds.
- It is important that the food does not contain salt! Salted lard can kill a bird.
Winter is a difficult period for nature, for plants and animals. Low temperatures and unfavorable conditions force some birds to fly to warmer regions of the world. Some birds remain, although it is difficult for them to survive the winter. Without food or shelter, they cannot always wait until next year. Therefore, it is worth thinking about feeding birds in winter. You should not pour food directly onto the ground or windowsill; such food quickly rots and becomes covered with snow. Feeding in a special feeder will bring much greater benefit. You can buy a ready-made feeder in a store, but it’s not difficult to build one yourself from wood, plywood or auxiliary materials.
Types of homemade feeders
According to the principle of design and installation, all feeders are divided into several types:
- Hanging models. The most common types of structures.
- Open areas and areas with edges.
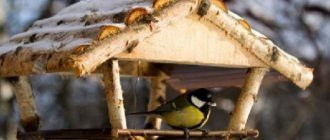
- "House" type design.
- Bunker feeder.
Each craftsman has the right to create his own individual design of a bird feeder; all you need is imagination and sketching skills.
Drawings of a bird feeder made of plywood with dimensions
A feeder is created for one purpose - to feed the birds. The design is so simple that there is no point in developing a full-fledged drawing. For crafts there are no strict requirements regarding shape and size. These parameters are determined individually based on the available material. However, it is also impossible to build a feeder that is too large or small. It will cause discomfort to the birds and the owner himself during maintenance. It is optimal to maintain the width, length and height within the range of 250-300 mm.
For clarity, several diagrams of the simplest feeders are presented. Such houses are most often cut out of plywood.
A standard square-shaped house is complicated by a hipped roof. The blind ends of the house with a gable roof protect birds from the freezing wind in winter. In a simplified design, the gable roof of the house is fixed to racks of slats
Hanging feeders
The most common type of design is the suspended model. The project necessarily includes a reliable frame and fastening system. The feed platform can be made from the following materials:
- A metal sheet.
- Wood blocks.
- Old parquet parts.
- The bottom of a metal kettle.
- Plastic bottle cut along the long axis.
The fastening system uses a chain, strong rope, twine and additional accessories (for example, a carabiner). The upper contour is brought to the selected tree or other support, and then the center of gravity of the feeder itself is adjusted.
Open areas
Such structures do not require a suspended mounting system. A durable open platform or with small sides is mounted on prepared supports. These can be metal corners, corners made of wood. Fastening is carried out to the underlying wall or the trunk of a large tree.
Note!
- Do-it-yourself rugs - TOP 120 simple patterns with master classes on how to make them yourself + photo reviews of finished rugs
- Do-it-yourself dolls: a master class on making a beautiful doll. Simple instructions with photo examples of ready-made options
DIY satin ribbon bows - step-by-step instructions for creating unusual bows + detailed diagrams with photos
Bunker-type structures
One of the original do-it-yourself bird feeders is a bunker-type design. The model has a durable frame, a compartment for filling food and only one flight hole. Only one bird can feed at a time.
These types of feeders are excellent for regions with an unstable climate (strong winds). In addition to the main part, there is always a reliable fastening that allows you to keep the structure suspended.
Birdhouse made from wine corks
Using wine corks, you can make an original birdhouse with your own hands. It does not require much time or special skill. To make it you need to prepare:
- wine corks of the same size;
- sheet of cardboard;
- glue gun and rods for it.
Work plan:
- Glue 4 corks together to form one tall piece.
- Make 4 such blanks and glue them together - this will be 1 wall of the birdhouse.
- Create 3 more walls and the bottom of the birdhouse in this way. Only in 2 walls make several stripes not from 4 corks, but from 2, so that the bird can fly into the birdhouse.
- Collect all the elements into one whole and glue them together.
- Cut a sheet of cardboard to the size and shape to fit the roof and glue the plugs to it on one side.
- Glue the roof onto the birdhouse.
If desired, birdhouses of different sizes can be made in this way.
Preparing parts
Most often, bird feeders are made from scrap materials that require pre-processing:
- Cleaning surfaces of old paint and dirt.
- Sanding with sandpaper (for wooden parts).
- Impregnation with antiseptic solutions, application of moisture-resistant coating.
It is also necessary to remove all defects, chips, and cracks to ensure proper safety for the birds and the person caring for the feeder.
What you need to make a bird feeder from plywood
Work begins with the preparatory stage. Plywood is a convenient material that allows you to quickly and easily build a feeder, which is why it is used as a basis. You don't have to go to the store to buy a large sheet. Pieces can be found at home from old furniture, the housing of a Soviet TV or record player.
Any piece of plywood is suitable for the feeder.
Based on what is found, the dimensions of the future feeder are designed. If you still decide to buy material, preference is given to moisture-resistant plywood. Impregnations, of course, do not completely protect it from moisture, but they help to slightly extend its service life.
Important! Plywood cannot be replaced with scraps of MDF cladding or pieces of laminate. These materials quickly swell and crumble when in contact with moisture.
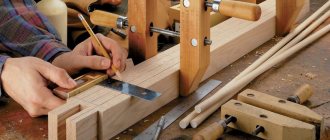
Typically, prefabricated bird feeders made of plywood require the use of wooden slats when joining individual elements. They are used to make roof racks and sides that prevent feed from spilling out. Taking into account the small size of the craft, it is enough to select a strip 1.5-2 m long. Then it is sawed into blanks.
A power tool will help you assemble a craft faster.
The tool is prepared simultaneously with the material. For marking you need a pencil, a square and a tape measure. The best power tool to have is a jigsaw. Cutting plywood sheets with a hand hacksaw is bad. Large teeth leave creases on the edge that are difficult to smooth out with sandpaper. A screwdriver will help you quickly screw in the screws. However, there are few of them at the feeder. If you don't have a power tool, you can do it with a screwdriver.
Assembly of the finished structure
The structure is assembled according to the selected scheme:
- All parts for the house are secured with screws and metal corners.
- The sides for open areas are attached using a similar scheme.
- Plastic bottles are cut along the long axis, and retaining elements are attached to the edges.
It will also be interesting for children to read about growing vegetables, fruits and berries; this can be done on the website https://sadiplod.ru/.
The work is completed by decorating the surfaces. This could be wrapping the house with a textured cord, painting the walls with acrylic paints, pasting it with cereals and seeds. Using natural materials is a great way to decorate bird feeders.
Note!
DIY family tree: instructions for creating a family tree + DIY design ideas- Do-it-yourself sun lounger: photos with instructions for creating sun loungers + detailed diagrams of the stages of work
Do-it-yourself aroma diffuser for the home - instructions for creating an aroma diffuser. Step-by-step instructions, diagram + recipe
Candy box feeder
You will need: 2 candy boxes, glue, 2 laces.
Master Class
- Apply glue to the edges of the box.
- Place the edge of the box into another box in such a way as to form a triangle.
- Glue the base of the box to the triangle.
- Let dry for 10 minutes.
- Thread a string through the roof of the box.
- Tie a knot.
- Tie the feeder to a tree branch using a second string.