Unique designer and unusual items are and will continue to be in high demand. It's all about their uniqueness - only with your own hands or the hands of a skilled designer can you bring to life something that no one else will have.
These things include a table made from cut wood, which you can make yourself . And despite the fact that many people have already brought this idea to life, such a table will still be unique and one of a kind, because nature will certainly not repeat the pattern of the inside of the tree.
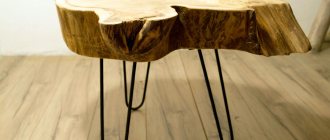
Table made from cut wood
What is good about a table made from sawn wood?
Before we talk about how to make such a table yourself, you should understand why you need to pay attention to it in the first place. So, first of all, it should be noted that furniture made of wood is an environmentally friendly and natural product. To make such a table, you only need a tabletop, the role of which will be played by the end cut of a thick tree trunk, as well as what will play the role of legs. These can be metal supports or supports made of wood.
Table made from cut oak
On a note! Sometimes you can take a whole piece of driftwood suitable for the parameters and make a table directly from it, where the root part will serve as a kind of support, and the even cut itself can be decorated and made into a tabletop.
Table made from cut birch bark
Another undeniable advantage of a table made from cut birch bark is that it can fit into a number of different interiors. So, it will look good in an ecological style, country style, it will fit perfectly into the kitchen or living room, and in the country it will become the optimal addition to the house.
Coffee table made from cut wood
It is also worth understanding that the pattern of the tree, although it will be similar to other cuts, will still remain unique and inimitable. And it will still be different for different trees.
Making a table from cut wood yourself is quite simple - you don’t have to resort to the help of craftsmen and designers. It is enough to allocate a little time and make some efforts, and a unique and inimitable, unusual and beautiful product will appear in the house.
Making a table from cut wood yourself is quite simple.
Important! Such a table will look wild in some interior styles. So you must definitely decide in which room it will stand and whether it will fit into its style, if the decision was made to make such a table.
Features of choosing a tree
To prepare slabs, choose trunks with numerous knots, branches, and all kinds of growths. The cuts of such trees will have a greater natural sculptural quality, which, in fact, is the main advantage of the slab.
The moisture content of the wood determines the color shade of the cut. The most interesting palette is characteristic of trees cut down in the spring and summer. It is also worth noting that the bark of a tree harvested at this time will be much easier to remove. Moreover, it will have to be removed in any case, since over time it will begin to fall off on its own.
4
A little about forms and parameters
The first step is to decide what shape the table will be made. This will largely determine what shape of saw cut will need to be found, and how the work itself will be carried out. So, as for the countertop, it can be:
- round , which will require quite a lot of space around the table. But this furniture looks great. However, it is important to take into account that to make such a table you will need to find either a very large saw cut in diameter, or you will need a lot of end cuts of more modest parameters. These tables look best in spacious rooms;
Coffee table made of natural wood
- oval , which is perfect for use in a large family. It is comfortable to sit at the oval tabletop, and due to its large size, you can place a lot of things on it;
- rectangular , which means the table will fit perfectly against the wall and take up less space than a round one. But in this case, the cuts will have to be taken not end-wise, but longitudinally. Although you can make such a tabletop from many small cuts, choosing the optimal shape. The same can be said about square tables.
Wooden coffee table
On a note! It is not necessary to make a large dining table from sawn wood. You can limit yourself to a small magazine or coffee one. It all depends on the desires and capabilities of the person who will make the furniture and then use it.
Also, immediately “on the shore” you need to think about the number of legs. So, round, square and rectangular tables usually have 4 supports. But there are variations using three legs located at a certain angle, or even one support, but with a wide, stable base. Whatever one may say, the most stable option will still be a table with 4 legs.
Cross-cut oak table
But isn’t there a substitution of concepts behind the fashionable term?
Indeed, one might think that the catchy foreign word “slab” is used as a groundless substitute for such established concepts as solid board, solid wood, saw cut, wooden slab and other terms more familiar to our ears. But that's not true. The concept of slab does not have a full-fledged analogue in the Russian-language lexicon of woodworkers.
Key features of wooden slab:
- slab thickness varies from 50 to 150 mm;
- The longitudinal cut is made from the lower part of the tree, which is wider and more durable.
- a real slab is, by definition, a solid array that excludes gluing and the presence of other types of connections.
- the edges in the slab are left untreated or their natural relief is artificially emphasized;
- in the slab, the emphasis is on the original lines of the tree: cuts in places where the trunk branches or bends are especially valued; the strict geometry of the array with processed edges is more of a variation on the slab theme.
Slab can be called not only longitudinal cuts of a tree, but also transverse sections of the trunk. Small end cuts of logs that have undergone proper processing are used to make designer tables, lamp bases and other creative things.
Where can I get the saw?
Having decided on the basic parameters of the future table, you need to prepare the necessary materials. And the most important material that will play a decisive role in the process is a good quality cut of wood that fits the size. It seems that everything is simple here - I went into the forest, took the first log I came across and sawed off a round piece from it. But in reality everything is much more complicated.
Safety precautions when working with a chainsaw
Preparing saw cuts is not entirely easy. First, you need to find a good tree of the required diameter as well as quality. Secondly, mistakes should not be made during sawing. The slightest mistake - and you will have to look for a new tree and do all the work over again.
Wooden cuts
For the manufacture of tabletops, saw cuts with cracks are almost unsuitable (except in certain cases). Also, the wood must be treated before use. The easiest way is to buy ready-made saw cuts - it turns out that they are sold, but finding a supplier is not so easy.
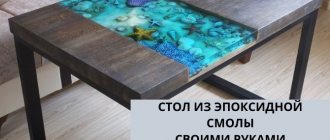
Table made of saw cuts and epoxy resin
If you prepare saw cuts yourself, then you need to look for one that will have a beautiful wood color, will not be cracked, and will have a beautiful pattern. If several cuts will be used for the tabletop, then it is important to ensure that the pattern is similar, or at least use cuts from the same type of wood.
Important! The pattern of the tree on the saw cut is the highlight of the future table. And therefore, the selection of wood patterns must be treated with utmost care.
Wood cuts
It is best to take wood cuts that are already dry for making a table, moreover, they should be made from a type of wood that is less afraid of moisture than others. It is better to choose those that do not have knots and other defects that can break off over time and ruin the product. The cuts must be of sufficient thickness and not too thin or too thick.
Thus, only at the stage of preparing the cuts can you stall. But it’s worth it - a unique table made from sawn wood, created by yourself, can become the highlight of the interior. In addition, as a rule, such tables are very durable and can serve for many years without complaints.
Coffee table made from cut wood
Popular questions and answers
How to remove warping of a slab?
Manufacturers try to prevent the slab from warping. But in any case, it’s good if this happened before the slab was used in the product. First we need to find out the reasons why this happened. To level the formation, it is exposed to heat, moisture or steam, and a plane is used.
How to avoid end-cut cracks?
Radial cracks filled with resin are an interesting decorative option. But some people consider this a flaw and try to avoid them. To do this, it is better to cut down the tree in winter, making cuts after six months, when it dries to such an extent that the humidity inside and closer to the bark will not differ much. I would also recommend making thicker cuts.
What is the thickness of the slab?
The thickness varies from 10 to 20 cm.
What cut table design suits the loft style?
The simplicity and restraint of the loft style involves tabletops made from sections of a more regular shape, preferably on geometrically correct metal legs.
How to care for such furniture?
Care is the same as for natural wood furniture - use polish, furniture wax and crayons to remove scratches and chips.
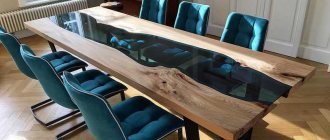
How durable is the epoxy resin that holds the cuts in the products together?
Epoxy resin can be sensitive to sunlight and high temperatures. If such conditions exist, then over time, in 20 years, it will begin to fade a little. In addition, polyester resins are now used, which are more reliable and resistant to ultraviolet radiation.
Materials and tools
In addition to the fact that you will need wood cuts as a base for the tabletop, you will also need other materials, and, of course, tools. But here a lot will depend on what table manufacturing technology was chosen. Thus, a saw-cut table can be made either using epoxy resin or without it; varnish, corners and various fasteners may be required. Tools that will be useful are a grinder, a plane, a saw (preferably a chainsaw), as well as a drill, drills, brushes, etc.
On a note! You should not use nails to secure the legs - the connections obtained in this case are not reliable. It's best to buy self-tapping screws.
DIY table made from cut wood
Table. Something you can't do without.
| Material, tool | Explanations |
| Spil | The cuts for the tabletop can be either end or longitudinal - it all depends on the selected table model and its appearance. The table can be made from one large-diameter saw cut, or you can also join together many smaller cuts using epoxy resin or wood putty. Here everything depends only on the imagination of the master, but it is important to choose high-quality cuts, the choice of which was discussed above. |
| Carpenter's glue | This substance may be needed for repairing/fastening various wooden elements. |
| Epoxy resin | A substance actively used in construction and repair work, as well as to create all kinds of products. It is necessary to fill empty spaces if the table is made from a mass of small cuts; it can also be useful when filling in recesses. The resin must be mixed with a hardener. |
| Grinding tools | Materials must be sanded, and the best assistant is a sanding machine. However, if you don’t have it, but you have time and patience, then you can limit yourself to a block and sandpaper. |
Grinding
After successful pouring, the countertop is sanded. A layer of approximately 2 mm is removed from both sides, then the ends are polished. Processing takes place using an eccentric machine. Replaceable round tips have different grain sizes: 80,120,180, 240, 320, 400, 500, 600, 700,1000 microns. The higher the indicator, the finer the abrasive. For better oil absorption into wood, 180 microns is sufficient. For hardened resin - from 120 -1000.
At the final sanding stage of the epoxy, polishing pastes are used.
How to make a small table for coffee from sawn wood?
Let's see how to make a simple small coffee or coffee table from a medium-diameter end cut. As we remember, to make tables you can use many cuts at once, but in this case you will use one, but a large one, which will become a full-fledged tabletop.
Step 1. First of all, you need to get the saw cut itself. The easiest way is to buy a ready-made one, but in this case the master decided to go into the forest and prepare it himself. It is best to do the cutting in the summer in very dry weather. “Winter” cuts may become deformed during drying or crack. So, you need to find a large and beautiful tree - walnut or oak, etc. And then you need to use a chainsaw to cut off a section from the trunk in the thick part of the required thickness. The saw chain should be sharp and the wood should not be rotten. The cut itself needs to be dried well for some time and only then can you start creating the table.
Suitable wood is being cut
Preparing a tree cut
Step 2. Next you need to carry out rough general processing of the cut. You need to use a plane to cut off all the irregularities from the surface and remove the bark.
Rough processing of saw cut
The bark is removed
Step 3. After roughing, you need to sand the surface of the future table well.
Sanding the saw cut
Step 4. There may be cracks on the saw cut, and in theory such a cut is not used. But sometimes the problem can be solved - the cracks just need to be strengthened. To do this, you need to purchase a small piece of wooden board and cut out “butterflies” from it, as shown in the picture.
The butterfly is marked
Then it needs to be cut
Step 5. Next, the butterflies need to be attached to the cut in the area of the cracks so that both sides of the tree relative to the crack look like connected butterflies, and then you need to outline them with a pencil.
The butterfly is outlined with a pencil
Step 6. Now you need to cut out the notches for the butterflies on the cut itself.
Notches need to be cut on the saw cut
Another photo of the process
Step 7. All that remains is to insert the butterflies into the places prepared for them and cut off their upper part so that it does not protrude above the cut surface (if necessary).
Excess butterfly is cut off
Step 8. Now you need to secure the butterflies with epoxy resin. You can also glue them with any wood glue.
Fixing the butterfly with epoxy resin
Step 9. After this, the tabletop must be carefully sanded again until perfectly smooth.
Re-sanding the countertop
Step 10. Next you need to coat the wood with a layer of varnish or epoxy resin. Can be applied with a brush. After applying the paint and varnish material, its layer must be thoroughly dried before further work.
Wood is varnished
Step 11. Now you need to drill holes in the underside of the tabletop to fix the legs. The markings must be applied in accordance with the location of the holes on the leg mount.
Holes are drilled in the tabletop
Step 12. The final stage is attaching the legs for the table themselves. In this case, metal ones were used. They need to be screwed to the tabletop, and the table is ready.
This is where the leg will be attached
Attaching the legs
Drying prepared slabs
Drying is the final and most critical stage in creating slabs. Violation of technology can lead to the fact that valuable material, for the preparation of which a lot of effort was spent, will be spoiled, and instead of a noble slab you will receive, albeit good, firewood.
Large pieces are dried naturally in the open air. The essence of this method is to lay the boards in stacks, maintaining ventilated gaps between them, through which air carries away evaporating moisture. Properly organized atmospheric drying ensures the most natural drying process for workpieces, which reduces the likelihood of warping and cracking due to the release of internal stresses.
How long does it take for a slab to dry? This question interests many.
Atmospheric drying is not a fast process. Over the course of a year, the wood dries out by 20-25 mm in thickness. Thus, it takes at least two years to dry an average slab. The final humidity to strive for is 10-12%. It is not recommended to dry furniture pieces to lower levels. Humidity control is carried out using electronic moisture meters. Advice! How to use a moisture meter correctly Humidity indicators in different areas of the board differ.
To obtain correct data, the sensor of the device must be stuck into the surface of the boards, placing it strictly across the fibers. The location of the moisture meter from the edges should be at least 3-5 cm. Measuring indicators near the ends can also provide incorrect data, so the sensor plug should be located at least 0.5 m from the ends. Do not forget that before you begin When processing an already prepared and dried slab, the workpiece should lie in the workshop for two to three weeks to even out the moisture balance.
7
How to make a table from several end cuts?
Above are instructions for making a table from one large end cut. Now let's see how you can make a table from many small cuts using epoxy resin.
Step 1. The first thing you need to do is make a base on which the pattern of end cuts will be laid out. To do this, you can take a sheet of plywood or chipboard and draw on it the shape of the future tabletop. Two contours are drawn - external and internal. The inner one should be the same size as the final tabletop, the outer one should be a little larger.
The future tabletop is being drawn
Step 2. Now the base needs to be cut out using a jigsaw according to the applied markings (along the outer contour).
The base is cut with a jigsaw
Step 3. You also need to cut several strips of small height from fiberboard to create edges around the base for the tabletop.
Strips are cut for the sides around the base
Step 4. You need to attach the fiberboard sides to the base of the tabletop using glue and small nails. This will create a unique shape for the tabletop. It is better to seal the joints with tape.
Fastening the sides
The sides are fixed
Step 5. Inside the mold you need to lay many end cuts of various diameters so that the desired pattern is obtained. The saw cuts need to be laid close to each other - this will affect the consumption of epoxy resin.
Saw cuts of various diameters are laid out
The cuts are arranged as tightly as possible
Step 6. Now you need to prepare the resin itself, mixing it with a hardener, and apply it to the end cuts, as well as pour it into the mold and be sure to level it as much as possible.
Resin is applied to saw cuts
Result of work
Step 7. The tabletop must be left alone until the resin has completely dried.
The resin must dry completely
Step 8. You need to remove the sides from the fiberboard. They are no longer needed.
The sides are removed
Step 9. Next, you need to sand the surface of the tabletop well using a grinding machine, removing all the unevenness.
Sanding the table top
Step 10. You need to cut the tabletop along the inner contour using an electric jigsaw.
Trimming the tabletop
Step 11. The edges of the tabletop need to be rounded.
The edges are rounded
Step 12. Next, you need to cover the perimeter of the tabletop with masking tape. This is necessary so that during the process of coating it from the wrong side with varnish or epoxy resin, the compositions do not get onto the end parts.
Painting tape is applied around the perimeter
Step 13. All that remains is to cover the inside of the tabletop with paint or another composition, dry it well and screw the legs to it. The table is ready for use.
Painting the countertop
Video – Sawed table
DIY wooden slabs
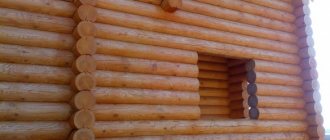
Solid wood furniture is a very expensive pleasure, so the question of how to make a slab yourself is of interest to many who have access to dead wood. In our latitudes, oak, elm, larch, poplar, and less often birch, aspen, and even pine are most often used for these purposes.
We wrote a separate article about the intricacies of choosing wood, transporting it, cutting logs into slabs and proper drying.
To cut a massive trunk (1 m or more in diameter) into planks without using specialized equipment is an almost impossible task. This procedure is carried out directly in the forest on a prefabricated band sawmill using loading equipment.
It is more realistic to prepare a wooden slab with your own hands by choosing oversized logs for cutting. For these purposes, they usually use mini sawmills - devices based on a chainsaw for longitudinal dissection of logs.
5