We invite you to master a very attractive and amazing arts and crafts art - plywood carving. It should be said right away that there are several types of carving - openwork carving on plywood, cutting out designs on painted plywood, sawing, as well as combined types.
Below we will look at each of them in more detail.
Contour thread
Cutting designs on painted plywood
This carving method is similar to engraving. Cutting is carried out on plywood coated with ink or other dyes. Such products can decorate homes, company premises, be used as elements of outdoor advertising, or simply enrich the home interior. Like any other work, creating such jewelry requires a certain consistency.
The basis
The basis is plywood on which the image will be cut. It must be of good quality, without delamination, knots or other defects. The thickness can be 3-12 mm. Accordingly, the shape and size must correspond to the pattern that will be cut out.
Advice! It is much easier to cut lines along the layer rather than across it. Therefore, the base from a sheet of plywood must be cut out in such a way that the lines of the future engraving are predominantly located along the outer layer.
Before you start painting the plywood, you need to prepare it.
To do this you need to do the following:
- First of all, you need to clean the edges of the plywood with a file. Movements should be made along the edge so that the base does not crumble or pinch off.
- Then you should process the working side of the base on which the design will be cut. First, it must be cleaned with coarse and then fine sandpaper. After this, the surface should become smooth.
- Use a clean cloth to thoroughly clean the base from dust.
Coloring
The base should be painted with dark tones. The most commonly used colors are black, brown and blue. You can also use watercolor and gouache paints, ink, and a solution of potassium permanganate. But it is best to work with nitro paint.
The advantage of this paint is that it covers the base with an even layer that covers the texture of the plywood. If you apply the nitro paint in a thin layer, it will be completely dry within 20 minutes.
Apply the paint with a foam pad, rather than with a brush, in an even layer and quickly to prevent subsequent touch-up. If touch-up cannot be avoided, it should be done after the previous layer has dried.
On a base painted with the above dyes, only silhouette and contour images can be applied. To apply shadow images, the base must be coated with an aqueous solution. In this case, after the image is cut out, certain areas are wiped with an ink eraser or sandpaper. Example of outline drawing
Drawing
For carving, you can use any graphic images that are made with complete, clear lines. Plywood carving patterns can be your own or borrowed from somewhere.
It is more convenient to transfer the drawings onto tracing paper, and then apply them using carbon paper to the base. If the original does not correspond to the intended image size, it can be enlarged or reduced using the grid. It is important to ensure that there are no gaps in the lines when drawing.
Tool
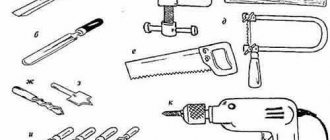
Cutters must be made of high-strength steel. The blanks can be old drills, needle files, reamers or scraps of alloy wire from 3 to 7 mm in diameter. Thread
The workplace should be well lit and comfortable. The table must have stops to prevent shifting during operation.
The cutter should be held in the right hand so that the handle rests on the palm and the shaft is pressed with the thumb against the index finger. In this case, the bent little finger should rest against the base and control the angle of inclination of the incisor in relation to the base.
The angle should be such that the cutter does not slide along the plywood and does not cut into it, but cuts. The angle largely depends on the sharpening angle of the blade.
The cutter should also be held with the fingers of your left hand to prevent spontaneous failure. In order for the line to have the same width along the entire length, it is necessary to monitor the pressure of the left hand on the cutter, which should be the same. When cutting curved lines, the blade should move without tilting.
Finishing
When the image is applied, it must be coated with colorless varnish to make it more saturated. The varnish must be applied in several layers. Each layer is applied after the previous one has dried.
Selecting Tools
Plywood carving technique.
As for the equipment, considerable attention should be paid to the cutters, which must be durable and well sharpened. Therefore, it is recommended to choose tools made of steel, preferably durable grades.
You can use old drills, scraps of alloy wire with a diameter of 3-7 mm, reamers or needle files. As for sharpening equipment, this is necessary for one end of the tool. It is recommended to pay special attention to this point, since a poorly sharpened tool will simply spoil the plywood.
There must be a special groove for the chips to avoid clogging. The working part must be of different shapes. For work you will need cutters of flat, triangular and semicircular shapes. The angle of inclination of the tool during operation is approximately 45 degrees.
Thus, to summarize all of the above, the following tools will be required for carving:
- File.
- Sandpaper.
- Awl or brace.
- A hand jigsaw (or an electric one will do).
- Eraser.
- Dye.
- Clear varnish.
- Set of cutters.
- Foam swab.
Openwork carving
Openwork slotted carving involves removing the background from the base. The techniques of such carving are quite simple, so it has been used since ancient times to decorate houses.
When applying a design, stencils for carving on plywood can greatly facilitate the work. If the design is not very complex, then it can be made with a hacksaw, which is called a trigger. It has a narrow canvas, shaped like a wedge. The final design can be completed with chisels, which can be either straight or curved.
The finishing work can be done with a knife if you can’t get it with a chisel. The product must be finished on both sides. This will help clarify the silhouette of the composition.
Saws that are used to cut out the outer contour of curved plywood pieces are called rotary saws. They can be narrow and wide. Using this tool, you can saw through the base in any direction without turning the base.
Example of complex slotted thread
Performing openwork carving
Saw threading is performed in several stages:
- Drawing a drawing, for which a template can be used.
- Filing and marking guide recesses.
- Making holes.
- Sawing along the inner contour.
- Finishing.
First of all, mark the workpiece. To do this, it is first secured, after which holes are drilled. Small holes are made with an awl, large ones with a brace.
Then the drawing is filed along the contour, cleaned and polished. Particular attention should be paid to recesses and corners, which should be clearly visible.
Sawing
Preparing for work
Slotted carving on plywood involves the use of grade 1 or 2 material. The presence of cracks or falling knots makes work much more difficult, if not impossible.
- Draw a sketch or drawing. The latter differs in that it includes a graphic grid. This makes the work easier, especially for a novice master. You can make a template: this way it’s even easier to transfer the image to the surface.
- Before work, the workpiece is treated with sandpaper - first coarse-grained and then fine-grained.
- If necessary, plywood is usually painted in a dark tone - gray, black, dark blue. Nitro paint is most often used. The dye is applied with a swab. The paint dries within half an hour. If necessary, you can paint the workpiece again.
Gouache or mascara are only suitable for drawing contours. If we are talking about an openwork pattern, then the carving drawings on plywood are transferred with ink. The photo shows the transfer of the image onto the workpiece.
- After transferring the pattern, the edges of the workpiece are cleaned with fine-grained sandpaper.
Sawing
Carving all kinds of figures from plywood is perhaps the simplest type of plywood carving. It is very simple in technique, but very effective in results. Combining this technique with cutting out designs looks especially impressive.
The tool used is a hand or jigsaw. (see also: Sawing out of plywood with a jigsaw: drawings and rules for working with the tool) At enterprises, sawing is carried out using a laser beam. An electric jigsaw increases the cleanliness and speed of work, however, in any case, you need experience, which will come with skill.
The photo shows a combined thread (sawing and contour)
The instructions for performing the work are as follows:
- First of all, you need to find or draw a contour drawing of the image. For example, it could be a human figurine, a tree or an animal. The first work is best done without internal holes with smooth contours.
- The workpiece must be secured with a clamp or pressed firmly with your hand against the stop.
- The saw should be positioned strictly perpendicular to the plane of the base. You need to cut evenly, at the same speed, without jerking. At the same time, the hand turns towards the drawing.
- At the end of the work, the part should be sanded.
- Then the decoration can be painted and varnished.
Warning! When working with an electric jigsaw, you need to press the workpiece more tightly to the table and smoothly move it towards the moving file according to the drawing. Perform this procedure carefully so as not to injure your fingers!
Trimming
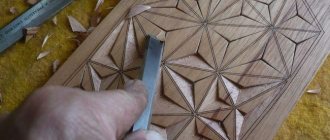
Trimming is performed with the same tool or with a flatter chisel, retreating from the center of the ornament line one and a half millimeters to the outside and deepening the chisel into the wood, cutting off the shavings with several movements. With a small rounding radius, the cut is not made with the entire chisel blade, but only with one corner, and the second corner should extend outward. This technique allows you to perform roundings of different radii with a minimum number of chisels. The technique is indispensable when working in the technique of not only contour carving, but also much more complex relief carving.
If semicircular chisels are not available, rounded elements in contour carvings are made with a regular oblique knife. However, when doing this kind of work, it is worth keeping in mind that the sharpness of the sharpening angle of the blade depends on the diameter of the circle: the smaller it is, the sharper the blade should be. The slanting knife can be moved in different directions to create the planned design.
To simplify and convenient the process of contour wood carving, the master can turn the workpiece in different directions. To do this, the wood is removed from the holders or machine, rearranged and clamped again. Over time, the carpenter learns to cut in different directions without touching the workpiece during work or rearranging it. For this reason, contour carving is performed standing up - this position gives greater freedom of action to the carpenter and makes all the lines more continuous and smooth, which is considered the key to high-quality execution of an artistic pattern using this technique.
Conclusion
With a little diligence and a certain amount of time, you can get amazing results. A masterfully executed painting is not only a wonderful gift, but also a fun activity for the person who made it. In this case, the price for the materials used will be minimal.
The video in this article will supplement the information with visual examples.
Various kinds of crafts made of plywood and wood, made by skilled craftsmen, are highly valued all over the world, causing universal admiration. Undoubtedly, carving is creativity and art, but you can certainly master it with effort and constantly honing your skills. This optimal hobby related to wood and plywood will not require too much free time from you and equipment that is not very expensive. Of course, this means carving plywood using jigsaws!
It is rapidly gaining popularity: who doesn’t want to make an excellent piece of decoration for themselves, decorating their home, furniture, and creating an artistic ambience! Cut-out products of different thicknesses are optimally integrated into many existing decorative styles, and we get, for example, frames for photo cards with ornaments, words, individual letters, figured shelves made with jigsaw carving on plywood. In addition, such creativity is an action that is accessible to anyone interested in the process, even a beginner. You just need to get an idea of “how it works.” And you can start creating!
Video to get started:
Wood carvings using different types of carvings
As already mentioned, wood cutting came to us “by inheritance” from our ancestors.
But few people know that such a craft originated in ancient times not far from the Sverdlovsk region. Here, on the eastern slope of the Ural Mountains, during the development of a gold mine in the 19th century, the Great Shigir Idol made of larch was found. Archaeologists date its age to the 9th century BC. Today it is the oldest historical monument made of wood in the world. Why, it’s made of wood, it’s older than the Egyptian pyramids, which attract millions of tourists every year. But few people know about our miracle. I just want to repeat the words of Pavel Vereshchagin from the film “White Sun of the Desert”: “Oh, it’s a shame for the state!”
With house carving
House wood carving – its name speaks for itself. Products made using this technique are intended for decorating the facades of wooden houses, stairs and fences. You look at these, and it’s as if you are transported back to the time of the existence of Ancient Rus'. Some elements are reminiscent of grandma’s house in the village... oh, there was a time...
This type of thread is characterized by two factors:
- non-cut background;
- the drawing is flush with the wooden base itself.
The main elements are geometric shapes of various types, curls and ornaments. Any beginner can make such products. The main thing is to stock up on a set of knives for cutting wood.
But the execution of entire paintings is the lot of real masters. To make many identical products, first draw the desired pattern on a piece of paper, and then transfer it to tracing paper.
When the scaling reaches the desired parameters, cut the prepared image into squares and transfer to a wooden blank. Congratulations, with a little effort you have created a template for further work.
Related article:
Carved wood decor with three-dimensional carvings
The technique of volumetric carving allows you to create not just patterns, but entire 3D images, paintings, products, furniture and utensils. Carved wooden pillars are most often made using this type of carving. Although you can create a real masterpiece from an ordinary log by combining different carving techniques.
Volumetric wood carving or sculptural carving is the most complex, as it requires from the master not only experience, dexterity, perseverance, accuracy and patience, but also artistic imagination and certain skills in this area. Here you can no longer make a template, it is drawn by the imagination, but embodied by hands.
With geometric wood carvings
Geometric carving is an artistic execution of designs consisting of various geometric shapes. Moreover, there can be not only squares, diamonds and circles. Graceful lines, ovals, angular and intricate figures - all this, intertwined, creates fancy ornaments for wood carving.
By the way, it is precisely this kind of carving that a beginner is advised to do initially in order to hone his technique and “get better at it.” Line your board into squares and cut out different geometric shapes until you achieve perfection. Just when performing such monotonous work, it becomes clear whether this hobby is “yours or not.”
With slotted
Carved wood carving can include all of the above types and is done using a free technique, with the only amendment - the base does not remain, but is completely cut out, turning an ordinary pattern into an openwork one.
If earlier craftsmen performed such delicate work manually with knives, then with the advent of modern tools the work has become much easier. A jigsaw simplifies the cutting process so much that it becomes accessible to any beginner. I transferred the image from the template to the board, carefully worked with a jigsaw, and the openwork pattern was ready.
Of course, an ordinary jigsaw will not be suitable for performing such delicate work. It is necessary to purchase a special power tool. For example, the Bosch PST 650 jigsaw is famous in carving circles. The model is not the most expensive, but practical and allows you to cut even the smallest and most intricate pieces.
Why do they use plywood to create carvings?
This wood material is chosen for the following reasons:
- moisture resistant;
- temperature changes do not have a negative impact;
- quite low cost;
- ease of learning to cut with a jigsaw;
- low weight of products.
It is also necessary to choose plywood of the 1st and 2nd grades for crafts. The rest are not suitable for creativity: the surfaces have cracks with knots and chips (unless they can be used for internal substrates). Birch plywood (3-10 mm thick) is most suitable for cutting.
Wood carving with a jigsaw - basic techniques
Wood carving with a jigsaw is a type of artistic design. For training, it is easiest to use plywood - it is cheap and pliable. There are several techniques for working with a jigsaw on wood.
Flat relief carving
It is characterized by a deepening of the pattern into the thickness of the board. The carved image and the background of the board are located in a single plane. One of the subtypes of carving is Abramtsevo-Kudrinskaya, in which the patterns, lines and cuts are uneven, everything is oval, with tubercles in the background. The emblem of this technique is the image of a bird.
Saw thread
It is a continuation of the flat-relief variety. The openwork pattern is sawn through. A jigsaw and a rotary saw are the most suitable tools for this technique. The location of future cuts is marked on the tree with an awl, after which straight or slightly curved lines are sawn.
Slotted thread
For this technique, large cuts of wood are used. Using a jigsaw, openwork patterns with relief are created. The peculiarity of slotted carving is that during its manufacture all parts of the background are removed. Coniferous wood is chosen as the base.
Overlay thread
A carving is considered overhead if its background is smooth. The finished image is placed on interior items for decoration.
Features of working with a jigsaw
A jigsaw is the most affordable cutting tool. Working with this tool does not require large financial costs and a separate workshop. Carvings made with a jigsaw can be used to decorate mirrors, boxes, vases, table legs and other furniture.
Jigsaws with a tubular metal frame will be preferable for work, since the file of the tool is tensioned more evenly. The axis of the handle is located in the plane of the frame. The file is selected individually for each type of thread.
To cut through large parts, use wide files with large teeth; the smallest parts are cut out with small files. Large sizes cut faster, small ones - vice versa. The sawing process proceeds in the direction of movement from top to bottom. The movement from bottom to top should be free.
If the technique is not followed, the forward movement of the jigsaw becomes difficult.
What additional materials and tools will be needed?
- Stencils and drawings with drawings for work. You can come up with them yourself or copy them on the Internet.
- Carbon paper to transfer patterns and lines according to the drawing;
- Glass paper and sandpaper, a set of files - for grinding parts;
- Joiner's (optionally casein) composition for gluing parts;
- Transparent varnish – for coating;
- To make holes inside the material to thread the blade through, use a drill and an awl.
- Before starting cutting with a jigsaw, carefully sand the material with glass paper, and only then transfer the patterns according to the drawing.
- Transfer elongated shapes of designs with narrow elements onto plywood so that they are located along the fibers of the “face” of the material.
Selecting material for work
When choosing wood, you should pay attention to three criteria:
- Weight. The heavier the block or board, the stronger the finished product. This rule applies to all types of wood.
- Humidity. Do not use damp wood for work. Sooner or later it will dry out, and this is fraught with deformation of the material, which can also affect the thread.
- General state. The more growths, knots and deformed fibers in the bar, the more difficult it is to work with such material. Such defects do not allow the master to move the tools in the desired direction, since they will constantly “stumble” over obstacles.
If the carver supplies wood himself from a neighboring forest, then the material must be dried. It is advisable to carry out this procedure in the summer, since the tree should lie in the open air for 1-2 weeks. If the workpiece has impressive dimensions, then this period is increased to 1-2 months. You cannot leave material outside during the rainy season. There will be no sense in such a procedure, since at a high level of environmental humidity, water will not disappear from the micropores. After drying outside, the wood is brought into the house, but not placed next to heating appliances. Remaining moisture will be removed within a week. For small-sized workpieces, the boiling technology is suitable. They are placed in a container of water, which is heated and boiled for 2-3 hours. This express method allows you to quickly “squeeze out” the remaining moisture from the micropores of wood. After the procedure, the workpieces are allowed to “rest” in the house for about a week.
Artistic cutting with a jigsaw: drawing, stencil and work
Let's get to know the devices
A jigsaw is a toolkit that is designed for working on different contours. The device includes a blade equipped with teeth small enough to cut the working material, practically without forming burrs or chips.
Manual
The “founder” of the genus is, of course, the manual jigsaw. Everything ingenious is simple: a metal U-shaped arc, and a working blade is stretched between the ends, which is secured with clamps. They hold the files during operation, and with their help, its tension is also adjusted. The handle for convenient operation is located on one side of the frame. The tool clamps can be rotated, thereby creating a different plane for carrying out work, providing opportunities for carving plywood with a jigsaw of increased complexity.
- When creating with a hand-held device, you must be extremely careful: the design is quite fragile, and with intense pressure, the blade sometimes breaks and needs to be replaced. Every novice craftsman should stock up on additional working files.
- When working with a jigsaw, it is convenient to use an auxiliary board: it protects the table and solves problems with the convenient location of the plywood workpiece.
Jigsaws
This device operates using electricity. It is a housing where the mechanism is located, and the control handle is also located there. The sawing element is located at the bottom of the device at the front. The blade is protected, and this allows you to cut along the contour very smoothly, without deviations. Professional models of equipment have many attachments that greatly facilitate the work process, for example, leveling the edge of the material. Jigsaw blades can also have teeth that vary in shape and size. They should be selected in accordance with the material for the saw to avoid damage to the plywood sheets during operation.
- Household electric jigsaws for non-production purposes are usually of low power (from 350 to 500 W). For beginners, this is the most common option when you are just learning to cut out crafts and figures from plywood (usually of small thickness). It is quite safe to operate such a device, especially when it is equipped with protection.
- A professional jigsaw is intended for industrial purposes, has a power of more than 700 W, high speed and cutting accuracy. It can cut sheets over 10 cm thick, aluminum, and thin steel.
Video: simple jigsaw:
Fraser
Sometimes this device is used for carving. It is a type of special hand tool, with the assistance of which you can perform various types of work on wood and plywood in everyday conditions. However, working with it requires some skill; but craftsmen who deftly handle this equipment can create real, highly artistic masterpieces of folk art.
Preparing the stencil
Drawings for creative work come in different sizes, depending on the scale of the products being manufactured. For example, for diagrams of a shelf or a piece of furniture, for a three-dimensional toy, you should take a sheet of whatman paper in A1 format, a roll of wallpaper left after repair may also be suitable, and for small figures (such as souvenirs) we take office paper (A4 or A3 format).
Types of patterns
To understand the main distinctive features of a particular ornament made using the technique of geometric carving, it is necessary to familiarize yourself with several types of patterns, as well as with the diagrams and basics of their execution.
Skolishki
The main elements that need to be learned are chips, which are the cutting and cutting of wood parts.
Then you can start pruning, following the instructions.
- The cutting part of the blade should be applied to the left side of the triangle, and the beveled part should be in the area of its apex.
- We move the knife handle back without breaking the parallel between the right side of the triangle and the edge of the blade.
- Press down on the knife and return the handle to its original position. When performing these actions, a part of the desired shape and size should break off.
Diamond
Cutting a diamond on the surface of wood is quite easy, especially if you have already mastered the technique of working with pegs. The thing is that this figure consists of two triangles that have the same base, so it can be cut out using the principle described in the previous version.
In order to get an even pattern, you must first work out the top row of triangles, and then move on to the bottom, forming the figure we need.
Viteika
Also a very interesting element, which is based on the operating principle used when working with pegs. The only distinctive feature is that the triangles do not have a common base, but, on the contrary, are shifted in different directions from each other.
Pyramid
The pyramid is the first complex design you will learn when mastering the art of geometric wood carving.
The work takes place by drawing several triangles - while maintaining a certain order and distance between them. Three triangles are drawn at equal distances from each other, two of which are in the upper part and have a common edge. In the middle between the figures it will be necessary to mark the point of contact of the corners. The cutting part of the knife should occupy a central position, and movements should be made in the direction in which the natural layers of wood lie.
Star
The next figure to study is a little more complex, since it is based on a larger number of triangles than in all previously studied options. But despite this seemingly important nuance, the principle of working with this figure does not change, and the basis is still the creation of chips.
To create a star, you need to apply four or more triangles according to the principle used in working with a pyramid.
Squares
Creating squares is radically different from working with all previous patterns, since a completely different technique is used - straws.
To create a square, you must proceed as follows:
- after applying the marking, you need to step back a couple of millimeters from its edge and deepen the tip of the knife by 3 millimeters at an angle of about 45 degrees, then make a cut along the line;
- then, according to the principle of mirror reflection, it is necessary to perform all the same actions on the other side of the marking strip;
- after this, you need to position the knife vertically in relation to the workpiece and make two punctures (at the beginning and at the end of the line).
If all of the above steps are performed correctly, you will get a thin cut in the form of a straw, and by processing all the edges of the marking using this technique, you will be able to create an interesting pattern of the shape you need.
This technique is most often used to frame products of square and rectangular shapes, respectively.
Socket
Perhaps the following geometric pattern is the most difficult to execute, and at the same time it can rightly be called the most beautiful of all the patterns already familiar to you.
At the next stage, it is necessary to mark the middle of each segment located within the boundaries of the small circle and connect it with the points of contact of the segments with the boundaries of the large circle, located on both sides of the center we have outlined.
Having received the markings, we can begin carving, using the first technique we learned for working with triangles.
Using this pattern, you can decorate the lid of a box, the bottom of a decorative plate, the surface of a round table and other products of a suitable shape.
Process of working with material
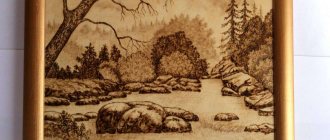
Wood carving is the act of cutting and trimming wood material. As a result, ready-made contour drawings emerge from under the carver’s knife. The outlines of objects, landscape compositions, and flower collages are embodied mainly in wooden panels.
How is the process of working with wood carried out? How do you get beautiful pictures? All work on a piece of wood, which later becomes a work of art, can be divided into stages:
- Initially, select an image.
- The drawing is transferred to a stencil for carving.
- A sketch is made from the stencil for carving on a wooden piece.
- Wood carving is carried out.
- The finished panel is sanded, polished, and varnished.
Wood carving requires special skill, the sketches of which involve the execution of a complex pattern.
A selection of sketches for contour wood carving
Each drawn line must be smooth and clear. For drawings in a particular case, the master decides how deep the lines should be cut. The expressiveness of the image on the tree depends on this.
Using the technique of contour wood carving, boxes, crosses and other products are made where it is necessary to reproduce the outlines of flowers, animals, and people. The work is carried out both on natural wood and on tinted wood, as well as on plywood.
Preparing the base
Deciduous wood species are best suited for contour carving - alder, linden, birch, aspen. Coniferous species are practically not used due to the different hardness of the layers and pronounced texture.
A homogeneous piece of wood is prepared for carving. If a light background is required, then the wood is processed with a plane. The dark background is achieved by tinting the workpiece. To obtain a shiny surface, the wood is coated with black varnish and treated with polish. When using simple and widely used dyes - gouache, ink, watercolor, tempera, aniline dyes, mordants and stains - the wood is either left matte or covered with a light varnish and polished.
Carpentry masters in the Carpathian region, when creating traditional Yavoriv carvings, tint the wooden base in different colors - not only classic black, but also green, red, brown and blue. This method can also be found in photos of contour wood carvings.
For further work, the wood blank is secured in holders or clamps of the workbench. Holders are planed boards mounted on a workbench and holding the workpiece.
Operating technique
Wood carving techniques are divided into cutting lines and curls. The lines are first cut, then trimmed. In this case, a special sharp knife is used - a joint. The knife blade should be positioned towards the work at a slight angle from a vertical position. This is how the cutting is done.
Then the tilt is done in the opposite direction. The cut part of the tree is trimmed. When cutting contour grooves, the jamb is clamped in a fist, and the movement of the blade is directed with the other hand. During the pruning process, it is important that even strips of wood emerge from under the knife. If you end up with sawdust, uneven stripes, there won’t be beautiful lines.
Wood carving for the purpose of cutting out curls and rounded lines involves the use of various chisels. But experienced craftsmen can cut sinuous contour patterns using only one joint. The technique for cutting curls and small circles is as follows.
Wood carving technique
The chisel is held in the fist, making a slight tilt towards the center of the circle. The blade is deepened into the wood a few centimeters, after which the board is turned in a circle along the axis. Then they make the cut. Rotation along the axis with cutting off the cut piece of wood is also carried out. Then the radius is increased if necessary.
Flat and rounded chisels are used for wood carving. An experienced craftsman, knowing the purpose of each, can cut out the most intricate patterns. The pinnacle of craftsmanship is contour carving with a pillow. The resulting pattern in the center looks as if raised above the rest of it. In reality, only the depth of the grooves differs. It can be made larger in the center, smaller at the edges.
Contour thread
Contour carving is the simplest in terms of its execution technique. Indeed, a linear, somewhat in-depth pattern of straight, winding or broken lines in the form of a dihedral or semicircular notch on a flat surface of wood, clearly outlining the contour of the image, looks somewhat sharp and harsh.
This technique is widely used in Russian folk carving: various ornaments are made on wooden carved elements of the house, in decorative carved panels, in the manufacture of furniture, dishes, and souvenirs. The absence of relief in contour carving does not reduce its artistic expressiveness. Contours are used to cut all kinds of ornamental elements - veins, meshes, details of large elements of compositions, lines of different depth and width, selection of backgrounds around linear, ornamental or figured compositions, as well as combinations with other types of carving are very widespread.
A cutting board with an ornament made using the contour carving technique. Volga region, beginning of the 20th century.
Contour carving requires fluent use of a cutting tool, accuracy and attention. To perform a contour drawing, depending on its complexity, they use jamb knives of various sharpening angles, cutters, jamb chisels, corner chisels, semicircular chisels, cranberries, sloping chisels, and in some operations straight chisels are also used.
The main tool for contour carving : 1, 2 - jamb knives; 3, 4 — cutters; 5, 6 — chisel-jamb; 7, 8 — corner chisel; 9, 10 - semicircular chisel; 11—sloping chisel; 12 - cranberry corner; 13 - semicircular cranberry
Now let's look at the sequence, technique and techniques for performing contour carving. First, markings are made on the workpiece and a drawing is applied. The design of the ornament (and mainly ornamental compositions are made using the contour carving technique) is applied to the surface of the wood with a pencil by hand or transferred from the original using a carbon copy. By the way, do not take carbon paper that is too fresh, because although it gives a clear drawing, this drawing gets dirty extremely easily - it is “reduced” by hand. And one more thing - first, the contour lines of the drawing must be worked out in detail on paper in template 5. Properly built and beautifully (gracefully)! the applied line largely determines the artistic value of the carved decoration.
The design can be applied both to a clean, unfinished surface and to a varnished one. To prevent the design applied to the unfinished surface from being erased during carving, its lines are covered with a transparent varnish using a brush.
At the beginning of mastering the technique of wood carving, contour carving is best done on soft wood - linden, aspen, and then, when the necessary confidence and work skills have been developed, it will be possible to work on harder wood. It is better to work while standing, as this will give you greater freedom of movement. When working, hold the cutter by the handle (handle) with your right hand, and hold and guide the blade with your left. Let's look at techniques for performing contour carving using various tools.
Carving with a jamb is performed in two steps - notching (sometimes also called “notching”) and trimming. When working, holding the knife-jamb with the blade towards you and somewhat obliquely, smoothly and confidently, overcoming the resistance of the wood, insert the blade into it and forcefully move along the line of the pattern, directing the movement of the blade with the thumb of the left hand, resting it on the side plane of the cutter, trying so that the depth of the cut is the same all the time.
Having cut a line on one side of the drawing, stepping back from the drawing by 1-1.5 mm in the opposite direction, they begin to trim the already cut contour, in which the position of the knife in the hand remains unchanged, except that it tilts towards the indentation by the same amount angle, as with notching. As a result of the described actions, a triangular strip of wood—a “straw”—comes out from under the knife, and a dihedral notch remains on the workpiece instead.
Carving with a jamb: 1 - sequence of work: a - cutting; b - trimming; 2 - work with one hand: a - for yourself; b - from myself; 3 - work with two hands: a - on yourself; b - from myself
To obtain curves of different radii, you need to use joints and cutters with a small sharpening angle of the blade. With a blunt knife you can cut both towards yourself and away from you, while tilting it in all directions.
When carving rosettes or ornaments with curved lines, the width and depth of the dihedral recesses are made different - this is necessary for greater expressiveness of the design and shape. In this case, the joint is held with the toe deep in the wood to thin the line, and the heel is used to reach the surface and narrow the line to nothing. If the tops of the sides of the rosette meet in the center, then start cutting with the toe from the edge of the circle, and be sure to bring the heel of the joint towards the middle, since otherwise the wood may chip.
| Carving lines with semicircular chisels (arrows indicate the direction of movement of the tool, numbers indicate the order in which the work is performed) |
Carving lines with semicircular chisels . The contour line with a semicircular notch is cut with steep, medium and sloping chisels. Let's look at carving techniques using the example of a small socket. Using a sharp chisel, cut the petal in a rounded shape with a small radius. In this case, the blade is inserted into the wood at the beginning of the line and, rotating the chisel, aligns the blade with the curve, tilting it towards the center of the rosette. Then the area with a large radius of curvature continues to be cut with a medium chisel, and in the area that is close in outline to a straight line with slight curvature, the incision is completed with a sloping chisel. Thus, all the petals of the rosette pass through. The central circle, which has a small radius of curvature, is cut with a steep chisel. Trimming the contour in areas from the outer sides is done with chisels that are flatter than cuts in these areas.
Carving lines of large ornaments with semicircular chisels and corners. In house carving, lines using the contour carving technique can be made with semicircular chisels with high sides and cranberries. The line cut with these tools is a semicircular notch on the plane of the wood.
The dihedral notch is cut with corner chisels and corner chisels. It is very convenient to cut curved lines with cranberries, since due to their design features they can be quite successfully rotated while drawing a line and changed the angle of inclination, which significantly expands the maneuverability of the cutter’s movements.
Carving large ornaments with deeper recesses using mallets. Note that in this case the chisels must be especially sharp. Also pay attention to the structure of the wood layers when planning to use this method. Do not rush to cover a long distance with one blow of the mallet.
Carving lines of large ornaments using: a - a semicircular chisel, b - a corner chisel, c - a mallet
This will only lead to the tool breaking and damage to the workpiece, sometimes irreparable. Work methodically, rhythmically; it is best if you choose a rhythm that is convenient for you when working. Some carvers do not like to hold the tool motionless, but prefer, while moving it under the blows of the mallet, to slightly turn it with a brush to the right and left, very slightly, thereby facilitating the advancement of the tip through the wood fibers, as if creating a preliminary cut for it, a kind of springboard, but at the same time avoiding wobbling of the tool along the axis of the pattern and the occurrence of waviness in the notch.
It is more convenient to clean the joints of thread lines with both hands, guiding the chisel blade with your left hand, and applying pressure and cutting with your right. It is good to correct and clean the dihedral recess when carving with a corner using blunt knives and cutters.
Embossing a background around the outline of a design is often done when plant and animal motifs are used in compositions. In this case, the background around the contour of the design is cut with semicircular chisels or cranberries in the form of shallow lines or chaotic grooves, reminiscent of traces of blows with a hammer or something else, which gives the carving a very picturesque appearance, allows you to visually “raise” the image from the background plane, make it more significant. If the ornament has a large and deep outline, then the background is sometimes made in the form of a fine grid of slots, which also better reveals the design. This technique makes sense to use only when the composition contains large closed sections of the contour pattern. It makes no sense to place a linear openwork pattern with open contours on a chased background - it will simply disappear in the chaos of notches.
Contour carving with embossed background: a - notch with a corner chisel; b - small cuts with a semicircular chisel; c - in the form of grids in a jamb; g - winding lines with a corner chisel
To enhance the expressiveness of the contour carving, the products are tinted in dark, often black, tones, in which the contour recesses look most clearly. The works using the contour carving technique, made “on black varnish”, look very impressive, in which the background is completely black with a mirror surface, and the carving pattern on it is surprisingly bright. However, I would like to warn novice carvers not to use picturesque or any other subjects for their work. Since contour carving is intended for decorating household items, it is best to limit yourself to purely ornamental motifs.
The ornament is cut with a joint using the contour carving technique. Curved lines must be cut smoothly, without breaking away, first from the outside and then from the inside of the contour. As the curvature of the line increases, the heel of the joint is raised above the material.
If the forms of the ornament are correctly identified by changing the depth and width of the cut lines, contour carving can be very expressive, despite the fact that it is limited in its artistic arsenal only to the execution of various lines. The largest shapes, for example, can be emphasized with sharper (deep and wide) lines. Thus, it is possible to achieve even a multifaceted division in depth of perception of individual parts of the ornament, depending on their place in the hierarchy of significance of a complex composition.
Modern carving artists use, along with classical carving techniques, their own. So, for example, a very expressive technique is in which the internal cut is made vertically, but the external one is made so hollow that sometimes the line of the drawing arises from the chiaroscuro alone from the step formed by this unusual cutting. In this way, the effect of spatial perception of large, illusory masses located in the plane of the board can be created.
This, one might say, exhausts the arsenal of basic techniques for performing contour carving, having mastered which, you will be able to cut ornaments of any complexity to decorate your home outside or in the interior.
Similar articles:
- Staple (nail) thread
- Carving with oval contours
- Wood chisel - the main tool for carving
- Wood carving technique - Flat relief carving
- The order of execution and types of flat-relief carving
- The procedure for performing flat-relief carving
Drawings for Wood Carving - more than 100 sketches
In this collection I would like to present to your attention only good new designs for wood carving. I will assume that you have mastered the technique, that you already have everything you need to carve wood, that you don't need to explain how to carve, what materials to use, and so on. Today there will be only ornaments and patterns for inspiration.
I must say that I know several craftsmen who make money from their creativity by selling their products to the West. If you are also in the mood for sales, then the ideas presented below may well be in demand.
There are many platforms for sale, I myself sell my creativity on Etsy - I give you my affiliate link, by registering with it you will have the opportunity to post 40 works without payment.
Cute wolf drawing for cutting out.
Stylized dragon pattern
Carving such a dragon will not be easy, but the pattern is very interesting!
Floral pattern for carving on wood - sketch of a rosette
Geometric wood carving - drawing of a round rosette Sketch of a carved rosette - octagonDrawing for wood carving - Posolon
Wood carving - drawing sketch of a frameFloral pattern for wood carvingSketch for contour carving
How to prepare a drawing for work: I usually print the pattern on a laser printer, and then transfer it to a wooden surface using decoupage, after which I work on the ornament with a tool.
Furniture pattern drawing
Example of a drawing - carved cutters
Example of ornaments for wood carvings Carved carving - sketches of platband patterns
Wood Carving Guide
Next, see Wayne Barton's complete guide to wood carving. With my comments.
It is best to start carving with simple patterns Examples of simple frame borders Before starting wood carving, mark the pattern on the workpiece You must have a knife for wood carving
Pay attention to knives from Kogatana, Narex, Tatyanka and Flexcut. An example of carving on a box - a border and a central round ornament. A pattern in the form of a rope or rope - wood carving. An example of the design of a carved box with a central round pattern and an ornament in the form of a rope. Gothic pattern of a border in carving on wood. An example of the design of a box with Gothic carvings. Examples of semicircular carved ornaments. Sketches of semicircular patterns for wood carving. Wood carving - pattern of hearts and leaves. Wood carving - plates with patterns. Example of a wooden carved panel on the wall. Carved wooden plates. Examples of diagonal patterns for wood carving. Examples of drawings of patterns of round rosettes. Carvings. on wood - triangular rosettesExamples of carving quadrangular rosettesExamples of carving pentagonal rosettesWood carving - pattern of hexagonal rosettesExamples of heptagonal rosettes in wood carvingExamples of patterns of nine-sided rosettesExample of a pattern of dodecagonal rosetteWood carving - pattern of a whirlwind ornament Anti-saltSketch and example of a pattern with leaves in wood carvingCircle evnoy pattern - sketch for carving on woodFour-dot patternCarved compass and hexafoilWood carving examples - platesHexagon and six-pointed starUnicorn pattern for wood carvingExamples of dot patternsCarving pattern - Edelweiss flowerWood carving pattern - tulipWood carving pattern - symmetrical bouquetWood carving on a chestWood carving - owl patternCarving woodworking on a wooden mirror and clock
Tools and materials
Wood
As a rule, soft wood species are used for cutting - linden, alder, aspen.
Even a fingernail can make a dent on soft aspen wood.
The general rule is: the softer the wood, the finer relief details it allows to form.
In addition, the wood should not contain any defects that could affect the appearance of the finished product:
- Fused and falling out knots (except when they are part of the composition);
- Sinev;
- Cracks.
Workplace
What kind of table should a woodcarver have? As a rule, this is a wooden workbench with a wooden clamp.
Carver's workplace.
The dimensions of the tabletop are determined, first of all, by the dimensions of the typical product on which the carver is working:
- To create small panels or decorate boxes, a tabletop measuring 75x50 cm is sufficient;
- For sculptural compositions, the table area can be increased to 5 m2 or more.
It’s interesting: in production conditions, 20 m2 of room space is allocated for 6 cutting jobs.
Basic tool set
What tools should a beginning carver buy?
The procurement instructions consist of a dozen points; the actual number of instruments will be two to three times greater.
- Jamb knife - a knife with an oblique blade (bevel level 35 - 60 degrees);
Knife for curved cutting.
- Cutter knife with a rounded blade;
Knife for cutting straight lines.
- Straight and semicircular chisels with different blade bending radii;
Several types of chisels.
- Clukars are curved chisels that allow you to select wood without resting the handle on the background;
Cranberries with different blade shapes.
- Angle chisels;
Chisel - corner.
- Stichel (U-shaped chisels);
The graver is used for hollowing out grooves.
- Klepiki - chisels with pointed tips;
Chisels are rivets.
- Spoon knives designed for scraping out depressions of significant cross-section;
Spoon knives.
- Punches are rods for embossing with a relief on the working end.
templates, with photos, on plywood with a jigsaw according to the drawing
You can make so many decorative items and useful little things from carved wood and plywood that it is stupid to limit the scope of the work. In fact, it can be absolutely anything that your imagination can handle: boxes, covers for decorative and collectible books, lampshades, panels, shutters, furniture elements, trim, cornices... But the most attractive thing about creating exclusive works is that anyone can do them willing, if he puts in a certain amount of effort.
Wood carving: photographs, drawings and sketches
The main key to success in creating interesting things with slotted carvings is the choice of pattern. It is he who conveys the overall concept and sets the aesthetic tone for the entire product.
The easiest way for beginners is to make geometric patterns, as in the photo.
Carved designs of floral and animal themes are classic ornaments for any field of application.
Inscriptions are a modern option for using wood and plywood carvings. At the same time, you are unlikely to be able to find drawings and sketches on the Internet - they will have to be compiled purely individually according to personal requirements for sizes, fonts, and words.
Stencils for slotted threads
However, unlike cut-out inscriptions on plywood, drawings with plant, animal and fantasy themes can be found on the Internet. So feel free to choose the stencils you like for your album, and you’ll have plenty of ideas for creativity for a long time!
The simplest sketches are suitable both for training at the very beginning of product manufacturing, and can become individual elements of a complex design. For example, this is how carved houses are decorated.
More complex templates will require some skill and patience, but the results are worth it. Such pictures can serve as an independent product, even as a gift.
Entire compositions with an idea and meaning usually serve either as a separate work or form the basis of a work.
Tools for slotted carving: jigsaw or router
However, choosing a design is only a third of the success. Another important aspect that must be considered before starting the work itself. Namely, the choice of tool that will be used to carve wood or plywood.
Depends on the equipment:
- how thin the thread will be;
- complexity of pictures;
- cutting speed;
- accuracy of work.
Therefore, it is important to evaluate all the pros, cons, capabilities and limitations of each of the traditional sawing tools:
A jigsaw is a device for shaped cutting of parts. Working with a hand tool is quite labor-intensive, but it allows you to cut very accurately according to the drawing.
Power tools allow you to quickly produce shaped plywood products, but require caution
A milling cutter is a tool thanks to which a flat-relief slotted thread takes on a thinner and more complete appearance. It is with its help that you can round edges, remove chips, make valances, and carry out the most complex cutting.
Theoretically, a milling cutter can do the same work as a jigsaw, and even more, but in fact, such handling of the tool is fraught with its rapid failure and frequent replacement of the frieze.
Materials for slotting threads
In most cases, plywood is chosen for this type of work - it is uniformly thin, has a pleasant color and structure, and does not suffer from further use or storage, unlike solid wood. It is the choice of material that becomes the third pillar of successful work.
The modern market is replete with different types of materials, so it’s easy to get confused. For this work you should choose:
- FC plywood – harmless to humans and the environment, durable, easy to cut, practical;
- FB plywood is also safe for humans, but resistant to aggressive environments, since it undergoes special processing and receives a protective coating, which is why it can cost an order of magnitude more.
Photos of carved wooden houses
For Russia, slotted carving is of particular importance as a decoration for building facades. Since ancient times, ornaments carved on birch bark and other similar materials have been decorating huts, bathhouses, and churches, as photographs colorfully demonstrate.
Video of wood milling with a hand router
If you have just decided to try your hand at curly slotted carving, it would be a good idea to watch a video with a master class. It will help you better understand how drawings are created and how such home beauty appears.
Materials for slotting threads
In most cases, plywood is chosen for this type of work - it is uniformly thin, has a pleasant color and structure, and does not suffer from further use or storage, unlike solid wood. It is the choice of material that becomes the third pillar of successful work.
The modern market is replete with different types of materials, so it’s easy to get confused. For this work you should choose:
- FC plywood – harmless to humans and the environment, durable, easy to cut, practical;
- FB plywood is also safe for humans, but resistant to aggressive environments, since it undergoes special processing and receives a protective coating, which is why it can cost an order of magnitude more.