The reliability of the entire roof depends on the correct installation work. The main structural elements are the rafter legs.
To provide stability, the elements are secured using side braces, a metal angle or staples. The beams are connected to each other at the ridge part of the floor; below, the rafters are attached to the mauerlat. The element can withstand the maximum load; lumber with a cross-section of 15 × 15 or 20 × 20 cm is used for its manufacture.
Methods for attaching rafters to the Mauerlat
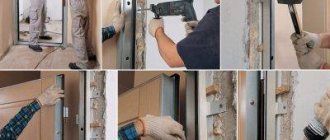
This is one of the most common methods of fastening rafters at their bottom. It must be said that not all craftsmen are able to complete this work without errors, which certainly affects the strength of the roof.
Attaching the rafters to the mauerat
A cutout must be made in the lower part of the rafter leg (builders often call it a “notch”). As a result, the leg seems to be put on the Mauerlat beam.
It is impossible to install rafters without this cutout, since the flat edge of the beam will simply slide off the beam; it’s only a matter of time.
Is it necessary to make a counter notch in the Mauerlat? It all depends on what material the Mauerlat is made of.
If it is hard deciduous wood, then it is recommended to make a slot (not a notch!), which, in combination with a specially made slot in the rafter leg, forms a persistent lock.
If the Mauerlat beam is made of coniferous wood, then such slots should not be made, this will only weaken the structure.
To clearly see how loads act on the roof, you can conduct a simple experiment. You need to take a hardcover book and, opening it approximately in the middle, place it with the cover facing up on a table or any other surface.
Now you need to lightly press on the spine of the book, simulating the pressure of snow, and just as lightly press on the side of the cover, creating a semblance of wind load. What will we see? That the edges of the cover are trying to move down and to the sides.
One of these solutions is cutting out notches in the rafter leg.
When connecting a beam to a rafter leg, the following connections are used:
- Tooth with emphasis;
- Tooth with a spike and stop;
- The emphasis is on the beam.
Cutting using the single tooth method. This connection method is used in cases where the roof has a large angle of inclination. In this case, the angle between the rafter leg and the beam exceeds 35 degrees.
A tooth with a tenon is cut out in the rafter leg, and a socket is created in the beam for the entry of the tenon.
It is recommended to cut at a distance of 25-40 cm from the edge of the beam to avoid the risk of chipping. It is recommended to create a single tooth in combination with a tenon, this will avoid lateral displacement of the connection.
Cutting using the double tooth method. This method is used for flatter roofs, when the angle between the parts being connected is less than 35 degrees.
Cutting can be done in several combinations:
- Two spikes;
- An emphasis supplemented with a tenon, and an emphasis made without a tenon;
- Lock connection with two tenons and other options.
The mortise depth for both teeth is usually the same. But you can use cutting to different depths. For example, the first tooth, supplemented with a tenon, is cut into a third of the thickness of the beam, and the second - by ½.
There is another method of raftering a roof, namely, connecting a rafter leg with a beam, although it is used quite rarely.
A stop tooth is made in the rafter leg so that one of its planes simply lies on the plane of the edge of the beam, and the second plane rests against the cut made, a third of the thickness of the beam.
To make the structure more reliable, in addition to cutting, connections are used using bolts, clamps, wire loops or strips of metal.
Instructions for attaching rafters to beams
How to properly cover a roof with metal tiles
It is important to know not only the order of connecting the rafters to the Mauerlat, but also the features of fastening these elements to other parts of the roof structure. One of these moments is the connection of rafters with beams
The latter rest on the walls of the house and are located in the same plane with the rafters.
Attaching rafters to beams
To make such a connection, you need to cut special recesses at the ends of the floor beams, into which rafter beams will later be inserted. To ensure the most even laying of the transverse beams, you can stretch a string over the outer bars and navigate along it.
Rafter pitch table
Complex roofs
Multi-gable, hip, half-hip or dome roofs are more difficult to calculate and build. The frame is a complex system consisting of parts:
- Mauerlat;
- main, slanted (diagonal), shortened rafters;
- racks;
- struts;
- runs;
- trusses.
In half-hip roofs, the gable section rests on a horizontal reinforced board. If the slopes are connected at an internal angle, there are grooves or valleys. The structural elements are fastened together with a notch and additionally with hardware. If you don’t have enough experience, you shouldn’t take on the installation of such roofs, even if you have a detailed project on hand.
Rafter system repair
How to properly pour concrete on a garage roof
Rafter system repair options
During the operation of the house, a situation may arise when it will be necessary to repair the rafters.
Since the destruction of the roof truss system can have serious consequences, it is advisable to regularly monitor the condition of the elements and, if any problems are detected, take immediate action.
If it is discovered that the end of the rafter leg, which rests on the mauerlat, has begun to rot, then proceed as follows:
- A log is laid on the attic floor, which should rest on 2-3 beams.
- Install struts under the rafter leg being repaired, resting on the log. The distance from the outer strut to the rotten place should be at least 20 cm.
- The damaged area is cut out, and a pre-prepared liner is installed in its place.
If rotting wood is detected in the middle of the rafter leg, then to strengthen the structure, overlays made from boards, the thickness of which is 50-60 mm, are nailed on both sides of the damaged part.
Nails are driven into the undamaged part of the rafters along the edges of the overlays.
If the Mauerlat is damaged by rot, then if the length of the affected area is insignificant, it is recommended to install struts to which the rafter leg is attached using staples. The struts are installed with support on the Mauerlat, attaching to its undamaged part.
If the Mauerlat is damaged over a significant extent, then an overlay of boards must be nailed to the rafter leg, which will be reinforced into a new Mauerlat, installed additionally, slightly lower than the damaged one. Strengthen the additional Mauerlat by driving it into the wall with pins.
If, as a result of the appearance of a crack in the rafter leg, a deflection of the roof is observed, then proceed according to the following plan:
- Prepare two strong boards, one of which will serve as a squeezing rack, and the second as a support for it.
- The support board is laid so that it is perpendicular to the load-bearing beams of the attic floor.
- The squeezing rack is placed on the support board, bringing it under the deflection of the rafter leg;
- Two wedges are driven between the support board and the end of the squeezing rack, positioning them towards each other.
- The wedges continue to be driven in until the deflection of the rafter leg is eliminated;
- Then, in place of the crack on the rafter leg, two overlays of boards are placed, the length of which is at least a meter longer than the length of the damaged area. Secure the linings with bolts.
- After securing the pads, knock out the wedges and remove the temporary stand and support board.
What affects the rafters
How to make a gable roof with your own hands
Before you start making rafters, you should decide on their type, method of fastening and linear dimensions. Only in this case can you be sure of the strength and safety of the structure.
How do various factors influence the parameters of rafters?
Physical factor Brief description of the effect on rafter parameters
Roof load size
The rafters must withstand snow and wind loads. During calculations, you need to take the actual maximum values of snow cover from the tables of building codes and take into account the strength and wind rose. The data allows you to find out the total load on the roof slope depending on its area and angle of inclination. Next, you can determine the size of the rafters, their number and pitch. In this case, a safety factor must be included. The fact is that lumber does not have stable and uniform strength values; too many unforeseen factors influence these indicators. In most cases, 50×150 mm or 50×200 mm boards are used to make rafter legs.
Roof type
Gable roofs can be layered or hanging. For hanging roofs, you need to make rafters from stronger boards
In this case, the method of fixing the elements to the Mauerlat is taken into account. If a notch is made, the width of the boards should increase by the amount of the notch
The fact is that the cut in this place automatically reduces the width of the material that takes the load. If you make a cross cut 60 mm long on a 200 mm thick board, then only the remaining width of 140 mm is taken into account. Accordingly, if, when calculating the loads, rafters from 200 mm boards are selected, but during fastening unintended cuts of 60 mm are made, then the width of the blanks for the rafters increases to 260 mm. This remark is made for those who like to abuse various notches and cuts for the persistent areas of the ends of the rafters. Currently, there are many special devices that allow you to firmly fix the rafter in the desired position without sawing.
Purpose of the building
For residential buildings, rafters must have a safety margin of at least 1.4 of the design values. For non-residential buildings the coefficient is reduced to 1.2. Conclusion - the size of the rafter boards on houses is larger than on garages and other extensions.
Purpose of attic spaces
Residential attic spaces (attics) must have an insulated roof. The width of the rafters must correspond to the thickness of the insulating layer. At the same time, you need to adjust the pitch between the rafter legs depending on the standard width of the insulation. If in a given climate zone the optimal thickness of roof insulation is 200 mm, then it is recommended to choose the same width for the rafters. Various extensions of narrow rafter legs during roof insulation are not considered the right solution.
This knowledge will help you make the right decisions both during the manufacture of rafters and during their fixation directly on site. Mistakes in the construction of a rafter system are too expensive; you should not be overly self-confident.
Why do you need a Mauerlat?
The rafter system absorbs the load from external forces and transfers it to the walls through the support beam - the Mauerlat. Its functions are to create a flat plane for attaching rafters and distribute evenly point forces on supporting structures.
As a rule, in private construction the mauerlat is made from softwood lumber - timber or boards. The size of the section and the method of attachment to the walls depends on the type of rafter system:
- With layered rafters, large bursting forces are transferred to the walls. The cross-section of the Mauerlat is powerful enough - 150x150-200x200 mm - to ensure load absorption. It is attached to the walls as firmly as possible.
- In hanging systems, the rafter legs are rigidly connected to a horizontal tie, forming a geometrically stable truss. Only vertical load is transferred to the walls, so the Mauerlat acts as a support pad. In this case, timber or boards are laid either on the entire surface of the walls, or in sections for each truss.
Lumber for the Mauerlat must be at least grade 2, dried to a moisture content of no more than 15%, and treated with antiseptics and fire retardants. To prevent wood from rotting, waterproofing is installed when laying on brick or concrete walls.
Joint location of the support beam
Methods of fastening rafter beams
How to secure rafters on a gable roof? How to do it right? There are several popular ways to help secure rafters to the Mauerlat, namely:
- The most common is the cutting method. This method of installing rafters is strong and rigid, so it is used only if a gable roof is mounted on a house made of bricks, blocks and other similar materials. You will have to work with a saw or an ax. At the lower end of the rafter, a notch is made, which in shape exactly fits the relief of the Mauerlat;
- Another hard method involves sewing on a support bar. It is reasonable to use this method of fixing rafters for gable roofs of small outbuildings. To perform it you will need one thick board about a meter long or two thin ones. They are used to make a drink with the Mauerlat configuration. After this, the boards are simply sewn onto the side of the rafters;
- You can also secure it using the moving method. It is often used in wooden construction. This method allows the rafters to “walk” while the house itself shrinks. In this case, additional devices are used. One part of the sliding support is mounted on the rafters, and the other on the mauerlat. This method is used only in layered systems, when there is additional support in the form of a ridge girder at the top of the roof.
In addition to fastening the rafter beams at the bottom, they should also be connected at the top point. There are several types of fixation. The easiest way is end-to-end. At the desired angle, the upper ends of the rafter beams are sawn off so that they exactly coincide with each other. They are then connected and secured with nails and metal plates. This method is not very reliable, so it is used for gable roofs of small buildings.
The most reliable option is considered to be half a tree, which is better used if a rafter beam is used. At the mating ends, cutting is made to half the thickness. Next, they are connected to each other and secured with nails, clamps or metal elements.
If a wooden house is covered with a gable roof, then the upper ends of the rafters must be connected in a movable way. In this case, they are connected by hinges. This will prevent the rafter system from warping during the shrinkage of walls made of logs or timber.
Comparing fasteners
These metal corners are used for attaching rafters to the mauerlat, beams and walls:
Types of metal plates
Note that there are two types of such plates: nail and perforated.
Perforated ones have many holes for bolts and screws, and it is with their help that such plates are attached to wood. The advantage of perforated plates is that they are able to connect the necessary elements of the rafter system at almost any angle. Moreover, such plates can be easily cut to the required size. Install perforated plates on both sides of the connections.
Nail plates do not have nails themselves. This fastener is used only in factory conditions, or in the presence of a special press. The fact is that you cannot hammer such a plate into the rafters with a hammer - you need proper, uniform pressure.
Additional items
Sometimes, in addition to the same metal corners and nails, support bars are additionally used:
And also like this:
Some valuable tips
If you use flat or shaped steel fasteners in joint connections, then:
- The thickness of the wooden elements should not be less than 5 cm. All because of the screws.
- Secondly, simple nails cannot be used here - only screw or rough nails, which simply won’t come out. Especially if the wood for the rafters has a moisture content of more than 18%, i.e. not completely dried, and after this material dries, the nodal connections are always weakened.
- Thirdly, take nails with a diameter of at least 4 mm and a length of at least 40 mm.
- Always use two angle irons per assembly if possible. Just place them symmetrically.
Mounting methods
Sliding joint (swivel)
It is clear that, by definition, a Mauerlat is a structural element rigidly fixed to the wall of a house. This means that the “leg” must have a certain degree of freedom. This method is most often used when arranging the rafter system of wooden houses.
In such buildings, the role of the Mauerlat is played by the upper crown. Consequently, the workpiece (timber or log) laid in the last row will also be mobile to some extent, since shrinkage of the material necessarily occurs. This fastening allows you to balance changes in the geometry of the workpieces and protects the structure from destruction.
Gash
With this method, a figured cutout is made in the rafters, and the connection to the Mauerlat is made using:
- staples;
- 2 nails. They are driven in at an angle on both sides of the leg;
- metal plates, which are fixed with screws or nails;
- a vertically driven nail that passes through the leg and penetrates the Mauerlat;
“Release” of the leg outside the perimeter of the house. Bonding is done with plates.
Fastening with special “sleds”.
“Rigid” connection
The purpose of such a joint is to eliminate the possibility of twisting, bending of the part or its displacement. But the peculiarity of this method is that the upper part of the rafter leg is not fixed to the ridge span. A connecting jumper is made between the rafters at the top.
- Cutout in rafter leg.
- Corner with additional installation of a support bar.
Any of the above are used as fastening elements, depending on the ease of their use.
https://youtube.com/watch?v=n41HnMb7zTU
Practical advice
When fastening the rafter legs to the Mauerlat, maximum tightness must be ensured. If cracks form, it is not allowed to make “linings”, as they can become deformed over time, which will disrupt the stability of the structure.
When using bolts, washers must be installed on both sides (under the head and nut). The fastening must be comprehensive. You cannot use nails (or self-tapping screws) alone, as the reliability of such a connection will be in question.
It is necessary to take into account the intended type of roofing material. For tiles or “soft” roofs, it is advisable to use a sliding fastening.
Given the large selection of various fasteners, you need to focus on the ease of their use in each specific location.
Recommendations for strengthening rafter systems from the inside
The question of how to strengthen the rafters arises in cases where it is necessary to eliminate defects in wooden structures that appear as a result of natural wear or loss of rigidity of the wooden frame and damage to its individual elements. As a rule, the rafter legs are the first to undergo deformation and begin to bend. This phenomenon can occur if, during the construction of a house or garage, the installation of gable roof rafters on a log house was not carried out according to all the rules.
The junction of the rafter legs with the roof ridge beam is one of the most important. If the slightest deviations are detected, the roof rafters should be strengthened in this place as quickly as possible. Sometimes a jack is used to tighten the rafters to the purlin or to each other. After this, the joint is properly strengthened with a perforated metal strip or a wooden overlay with a thickness of 2 cm. Such an overlay is installed under the ridge.
At the next stage, they move on to leveling the rafters. A hydraulic cylinder is used for this. Before strengthening the rafters and leveling them, triangular wooden stops are attached to them from the inside with self-tapping screws. After installing them, you can straighten the rafter leg with a hydraulic cylinder and install a spacer, which in the future will protect the roof frame from external loads.
The holes should be drilled with an indentation of 30-50 cm in a checkerboard pattern. Thus, an increase in the resistance of the frame to bending forces is achieved. The cross-section of holes and mounting studs must match. Threaded studs are threaded into the prepared holes, washers are put on and self-tightening nuts are tightened. They will ensure high-quality fastening and operation of the roof without the need to tighten the fasteners. You need to tighten the nut until the characteristic creaking sound of wood appears.
We attach the rafters to the mauerlat
In any roof truss structure, the rafters are placed with the lower end on the mauerlat, and the upper ends are connected at the roof ridge. Mauerlat is a special beam that is laid along the perimeter of the external walls. It is designed to support load-bearing rafters.
Now let's figure out when the rafters rest on the mauerlat, and when - only on the walls:
- If the walls are made of concrete, brick or foam block (in principle, any materials that are capable of transmitting moisture), then the rafter legs cannot be rested on them. Otherwise, the entire roof will quickly begin to rot. That’s why we use timber, called Mauerlat, and separate it from the wall itself with any roll waterproofing.
- In log and cobblestone houses, a Mauerlat is no longer needed for the rafters - it is enough to make notches in the top beam and use additional fastening in the form of metal corners and brackets.
And depending on whether the house shrinks, they make a rigid and sliding fastening of the rafters to the mauerlat.
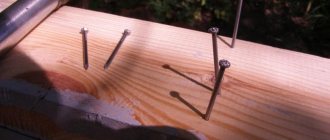
To provide a rigid, immovable fastening to the unit, you have two options. The first is to use special corners with hemming bars and special cuts on the rafter leg. The rafter here is fixed with corners on both sides, and therefore can no longer move:
In the second method, which is more common, you need to hammer the nails at an angle to each other. In the Mauerlat they are crossed, and the third nail is driven vertically:
Two nails on the sides keep the rafter leg from moving left and right, and the top nail already pulls the rafter to the mauerlat itself.
Or use long screws instead of nails:
But in this design, a certain movement of the rafters under the pressure of the entire roof is already allowed:
But let us immediately note that if we are talking about the ability to move horizontally, we are not at all talking about the fact that the rafter will literally “ride” along the beam. This is just a small opportunity to move by millimeters due to dynamic loads and temperature and humidity changes. Moreover, the slider will move only under maximum permissible loads, and you will not be able to see such changes with the ordinary eye.
The possibility of some movement remains even when fastening the knot with nails - if there are not many of them. But those hammered in a checkerboard pattern with a certain force will no longer allow the rafters to move.
Finally, to secure the rigid fastening of the rafters to the mauerlat, additionally use wire or anchors. You just need to think about this in advance:
Or here's another great visual example:
A sliding mount is a mount that has two degrees of freedom. That is, in simple terms, one of the two elements has the possibility of displacement:
And this makes sense. Thus, those rafters that rest against the mauerlat with a notch, and against each other from above, evenly transfer the load from the roof and the snow on it to the walls. But those rafters that are supported by horizontal notches on the mauerlat and on the ridge girder are called a non-thrust structure.
As we have already said, a sliding mount, even with three degrees of freedom, does not actually mean that the rafter will move loosely back and forth on the support. All this is only for invisible physical laws.
This is the most rarely seen in practice fastening rafters to the mauerlat:
It is usually used only under severe dynamic loads on the roof.
To install roof overhangs, you also need to make fillies from boards, 50x100 mm in cross section and such a length that it is equal to the overhang plus another 0.5 m for the junction with the rafters.
Then everything is simple: nail the fillies to the rafter legs and extend them beyond the roof. Are you wondering why this rafter element is called that? They just used to be cut in the shape of a horse - for beauty. And often today too.
Types of support units by level of rigidity
It is those places where the rafters are attached to the roof elements that are called the support unit:
The support unit is not always static - sometimes it has to be made movable if some structural element is subject to unstable loads. It's like a car wheel that compresses, spins, squeezes and turns.
Something similar is realized in support nodes, only the degree of freedom in them can be different - from zero, when the node itself is already motionless, to triple, i.e. maximum:
- Support node with zero degree of freedom. Both ends in this case are rigidly fastened with corners on both sides. A rafter on a beam or mauerlat with such a knot cannot move at all.
- Hinge joint with one degree of freedom. In this case, the beam has the ability to rotate in a circle.
- Hinge joint with two degrees of freedom. Now, in addition to circular rotation, there is also the possibility of displacement. This provides special fastening of the rafters to the mauerlat or beams, and you only need to install the sliders or slides.
- A hinge joint with three degrees of freedom allows the beam to move both horizontally and vertically. True, circular rotation may or may not happen here.
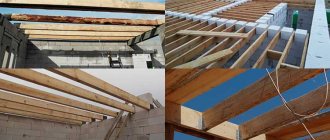
In what ways can rafters be attached to beams?
We will consider all possible methods of fixing elements, some of them are used extremely rarely and only during the construction of authentic houses using ancient technologies. Such work is performed by carpenters of the highest class who can work with an axe, chisel, chisel and other traditional carpentry tools.
Special metal mounting plates
Builders use two types of plates. The connection is strong and can be done quickly and without manual labor. In developed countries, house trusses are assembled on production lines, and all processes are almost completely automated. Assembly technology makes it possible to increase equipment productivity and reduce production costs. Elements of houses on the construction site are quickly assembled, the amount of manual labor is reduced to a minimum. A turnkey wooden house can be installed in just two to three weeks, depending on the number of floors and size.
Mounting plates
What plates are used to attach rafters to beams?
Serrated
In our country, unfortunately, they are little known, but in developed countries they have been used for a long time. Gear fastening - metal plates with different linear dimensions. There are teeth throughout the entire area that are driven into wooden structures. The length and distance between the teeth is selected taking into account the dimensions of the rafters and floor beams. This connection makes it possible to automate the production process of rafter system trusses. Toothed plates are installed on both sides of the unit being connected.
Steel toothed plates
The toothed plates can also be driven in by hand, but care must be taken to ensure that they are in the correct position.
Perforated
Well-known fasteners, universally usable. They can fix all elements of the rafter system and have different sizes and thicknesses. The plates are applied to the assembly, tightening is done with self-tapping screws, bolts or ordinary smooth nails. Can be mounted on one or both sides of the connection. Advantages - there are no strict requirements for the quality of lumber, a large number of holes allows you to choose the most successful places for screwing in self-tapping screws. Disadvantages - they require quite a lot of manual labor. They are harder to work with than gear ones. In addition, the installation time of the rafter system increases.
Using perforated fasteners
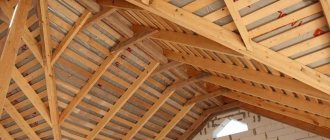
General view of the roof trusses
Attaching the crossbar to the rafters
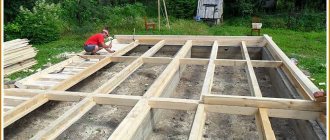
It is recommended to attach rafters to floor beams when both elements are made of the same boards. This method is considered the most common today.
Bolted
The roofs of small utility buildings and extensions do not have significant loads; during their manufacture, simplified methods of connecting rafters and floor beams are used. The most common option is bolts. Holes are made in the floor beams and rafters, the elements are placed side by side, bolts are inserted into the holes, and the assembly is firmly tightened.
Connecting rafters with bolts
Mortise connection
More complex connection, practical construction experience required. The insertion completely eliminates the possibility of movement of the rafters at the junction with the ceiling beams; the unit is more durable and static. A recess is cut out on the beam, and a protrusion on the rafter; the parts must fit tightly into each other.
This method of fixation is done only on the house, which complicates the construction process. In addition, each connection is prepared individually, which further increases construction time and increases its cost. Another disadvantage of the tie-in is that each connection reduces the thickness of the rafters and beams, which causes a decrease in their load-bearing performance. As a result, designers must, during calculations, provide for increased dimensions of lumber, taking into account the reduction in their width as a result of sawing. And this negatively affects the cost of the building.
Structural units for supporting rafters on floor beams
Notch connection
An ancient method, now used extremely rarely. The work is done by carpenters who know how to use hand tools and an axe. Notching is done only on thick rafters and beams. Using an axe, chisel and chisel, a tenon/groove connection is made at the required angle. The work is physically difficult; homemade metal staples can be used as an additional connection. The length of the staples and the diameter of the rod are selected taking into account the specific installation location and the expected maximum load.
Options for cutting rafters into beams
Advantages of wooden floors
Installation of wooden building elements does not require the use of special construction equipment and hired labor. This compares favorably with laying heavy concrete slabs. Moreover, such an interfloor ceiling in a wooden house with a second floor or attic is the only correct solution.
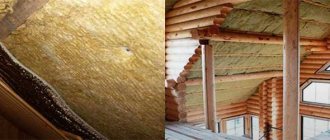
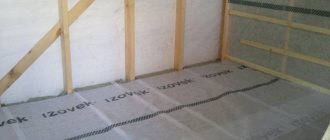
An important quality parameter for the wooden elements of a building is the absence of cold bridges. If sheet materials (foam plastic, mineral wool boards) are used for insulation, the sheets are cut strictly to the size of the openings between the beams. If the construction of a wooden floor between floors involves the use of bulk or fibrous materials, it is necessary to ensure that all cracks are filled.
It is extremely important to ensure high-quality vapor permeability. Therefore, when laying polyethylene on the insulation, and not a special hydro-vapour-permeable membrane, gaps are left
The installation of the wooden floor is completed by laying the finished floor and finishing work.