§ 5.3 Basic technologies for processing wood materials with hand tools
Home site | In the menu | Basic technologies for processing wood materials with hand tools
What methods of manual processing of wood and wood materials do you know?
When processing wood, especially when creating applied art products, predominantly hand tools are used. One of the most ancient tools for woodworking was the axe. Russian craftsmen used an ax to create the most beautiful structures without a single nail. An ax is necessary when building log houses.
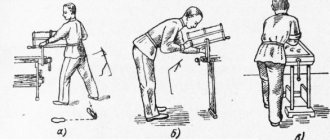
There are various technologies for processing wood materials with hand tools (see Fig. 5.2).
Rice. 5.2. Types of cutting wood manually: a - splitting; b - planing with a knife; c - planing with a plane; g - chiselling
Cleavers and axes are used to split wood (Fig. 5.7, a). Axes, cutlasses and machetes are used for cutting. The hewing operation can be carried out using an ax and an adze (Fig. 5.7, b). Selection of grooves and chiselling of wood materials is carried out with chisels (Fig. 5.7, c) and chisels.
Rice. 5.7. Mechanical tools for manual wood processing: a - ax; b - adze; c - chisel
For planing wood, knives, planes, scrapers, planers, planes (Fig. 5.8, a) and jointers with wooden and steel blocks are used, as well as their modifications for planing shaped surfaces.
For decorative planing and artistic wood carving, flat and shaped chisels and special cutters are used (Fig. 5.8, b).
Rice. 5.8. Tools for planing (a) and artistic cutting (b) wood
For sawing (sawing) wood, hand and electric saws are used (Fig. 5.9, a).
It is often necessary to make various holes and recesses in wood products.
The simplest and oldest hand tools for piercing and drilling holes are awls and drills (Fig. 5.9, b, c). Drilling operations are facilitated by a brace and a mechanical drill (Fig. 5.9, d). To speed up the drilling process and this technology, drills of various designs are used.
Rice. 5.9. Hand tools for sawing and drilling holes in wood: a - saw; b - drill; c - awl; g - mechanical drill; d — corded electric drill; e - cordless drill/driver
Electric corded and cordless drills are widely used for working with wood (Fig. 5.9, e, f).
The working parts of the rotator and drill are drills. They are secured in a device called a cartridge (Fig. 5.10, a). There are different types of drills (Fig. 5.10, b). The most common drills are (Fig. 5.10, c): spiral 1, twisted or single-spiral 2, feather 3, annular (crown), cylindrical Forstner drill.
Rice. 5.10. Chuck for fastening drills (a); drill samples (b); the most common types of drills (c): 1 - spiral; 2 - twisted; 3 - feather
Recesses and holes of complex shape in parts and products made of wood materials can be made using a chisel and chisel (Fig. 5.11). These tools are often used in manual processing of wood and wood-based materials.
Rice. 5.11. Making a hole with a chisel
A chisel is a more powerful tool compared to a chisel. It looks like a chisel. The chisel is used to gouge out deep rectangular grooves (sockets) or rectangular holes. When working with chisels, be sure to use a mallet (see Fig. 5.2, d). To prevent the chisel handle from breaking when working with a mallet, a steel ring is put on its end.
The surface of parts and wood products is sanded during final finishing. When grinding, the remaining irregularities and roughness are removed, and the surface becomes smooth.
For rough grinding of wood, rasps and special scrapers are used, which are called cycles (Fig. 5.12, a, b). They can be used to scrape off old paint on wood products.
Rice. 5.12. Tools for sanding wood: a - rasp; b - cycle; c - sanding paper
For finer grinding, sandpaper with different sizes of abrasive grains is used (Fig. 5.12, c). To make sanding large surfaces easier, you can use special pads.
Electrified tools and grinding machines are also widely used for sanding wood products (Fig. 5.13).
Rice. 5.13. Electrified grinder (a); grinding machine for preparing floors for varnishing (b)
Professions and production
There are many different engineering professions.
A tool engineer organizes work to provide the enterprise with the necessary tools and technological equipment, controls their timely repair and restoration. He must know the technical parameters of each manufactured part, make drawings, determine the necessary tools, equipment, fixtures and machines for the manufacture of parts and workpieces. In technology lessons, using knowledge of physics (physical characteristics of materials), mathematics, etc., you can obtain a basic level of necessary knowledge and skills and basic practical skills of this profession:
• rationally organize the workplace, comply with labor safety rules;
• perform basic operations for processing various materials, manufacture products according to drawings and technological maps;
• use a computer to solve technological and design problems and as a source of information;
• design and manufacture products;
• prepare tools, equipment and material for work.
The profession of equipment engineer can be obtained at technical colleges and universities.
Dictionary
splitting;
chopping; cutting; felling; chiselling; planing; sawing; piercing; drilling; grinding. Test yourself:
1. How can you make figured cuts in wood materials?
2. For what operations can the plow be used?
3. What tool can you use to remove old paint or varnish from a wood product?
4*. In what case is it advisable to use an electrified grinding tool?
5. What types of wood drills are there?
6. How is a chisel different from a chisel?
* Think about why the surface of a wood part cannot be planed or polished to a mirror finish. (Hint: What is wood grain and what type of processing can it affect?)
Wood processing
An open lesson on technology in the 6th grade on the topic: “Wood processing technology on a lathe.”
Lesson topic:
Wood processing technology on a lathe.
Lesson objectives:
- To consolidate knowledge on the construction of a lathe for wood processing STD-120 M.
- Introduce the types and purposes of chisels for woodworking.
- To consolidate knowledge on the use of devices for securing workpieces.
- Create conditions for the development of general educational and special skills. 5. To develop polytechnic, general education, and production skills in schoolchildren. 6. Foster a respectful attitude towards work.
Lesson type:
combined with the use of ICT.
Object of labor
:
1. Lathe for wood processing STD-120M. 2. Chisels for woodworking. 3. Devices for securing workpieces.
Equipment:
machine STD-120M, model of a lathe, chisels, textbook “Technology” - 6th grade, parts made on machines, test cards, multi-media projector, screen.
Form of training organization:
individual, group, frontal.
Teaching methods:
- verbal; 2. research; 3. demonstrative; 4. partially search;
DURING THE CLASSES:
I. Organizational stage.
1.1. Greeting students and checking attendance
- Checking work clothes and readiness for class.
1.3. Appointment of duty officers. 1.4. Induction training.
Lesson topic message.
Formulate the purpose of the lesson based on its topic. ( Write down the topic of the lesson in your notebooks).
2. Motivation.
Conversation to review theoretical information:
What tools did we use when processing wood on a wood lathe? (Maisel, Reyer). What devices are used when processing wood on a wood lathe? (cartridge, trident, faceplate).
3. Updating knowledge
Today you must learn to distinguish between the types and purposes of wood turning tools, the types of work they perform, and learn how to correctly use devices for securing workpieces. Turning simple parts on a wood lathe.
4
.
Checking homework.
Testing.
Students are offered test cards. Peer review
5. Questions for students:
1. Purpose of the STD-120M machine? 2. Name the main parts of the STD-120M machine on the screen and what do they serve?
3.What movement in the machine is called the main one? 4.What is the auxiliary movement called? 5. What is the purpose of the headstock and tailstock of a lathe?
6. What types of wood are best used for turning?
6. Explanation of new material.
Working methods and workpiece preparation.
Anyone who knows the structure of the machine and the rules of safe operation can learn to work on a lathe, since this process does not have complex operations and involves removing the surface layer in the form of chips from the workpiece being processed. In this case, the workpiece being processed rotates, and the chisel is moved relative to the workpiece, resting on the tool rest. Preparation of the workpiece for turning is of great importance. If the end of the workpiece has the shape of a square, then diagonals are drawn at the ends to find the center. Then, using a plane, the ribs are cut off, giving the workpiece an octagonal shape. At one end of the workpiece, a cut is made with a depth of 2-3 mm for a trident. After this, the workpiece is fixed on the machine, taking into account that the distance between the workpiece and the tool rest should be minimal (2-3 mm)
Types and purpose of chisels Turning the workpiece is done using special chisels. Semicircular chisels (a, c) are used for rough profile processing of wood, and chisels with oblique (angular) cutting edges (b) are used for finishing surfaces, as well as for turning cones and trimming ends. Chisels must be sharp and have intact handles. Only the teacher can sharpen chisels!
On the screen we demonstrate the types of chisels.
Routing.
Before starting turning, study the technological map for processing the product. The technological map can be made in the form of a table and contains the sequence of work, images in the form of a drawing or picture, and the types of equipment and tools can also be indicated.
7
.
An example of a technological map
| № | Sequence of work | Image | Equipment and tools |
| Prepare the workpiece. | Pencil, ruler, square, hacksaw. | ||
| Mark the workpiece and sharpen the edges. | Pencil, ruler, surface planer, plane, workbench, awl. |
8. Rules for working on the machine (preferably near the machine with a practical demonstration of the process)
Work on a lathe is carried out wearing safety glasses. After turning on the machine, take the chisel in your right hand, place it on the tool rest without touching the workpiece, and press it onto the tool rest with your left hand from above. First, rough turning is performed with a semicircular chisel. At the same time, slowly bring the blade to the rotating workpiece and smoothly move the chisel to the left and right to remove the chips. Finish turning is performed with an oblique chisel. In this case, the chisel is rested with its edge on the tool rest from the side of the obtuse angle. Do not allow the sharp corner of the chisel to cut into the workpiece - this can lead to the ejection of the chisel and cause injury! The workpiece dimensions are controlled after the machine is turned off and the spindle is completely stopped. If necessary, the part is processed using a grinding block. After stopping the machine, the workpiece is removed, the excess ends are cut off with a saw and cleaned with sandpaper or a file.
9. Safety rules.
1. Do not turn on the machine without the teacher’s permission. 2. Check the workpiece, it should be free of knots and cracks. 3. Securely fasten the workpiece. 4. There should be nothing superfluous in the workplace. 5.Check the working tool. The handles of chisels should be free of cracks and firmly seated. 6. Tuck in clothes. Fasten all buttons. Tuck long hair under the beret. 7.Before starting the machine, put on safety glasses. 8. Monitor the distance between the tool rest and the workpiece. When it increases, move the tool rest, stopping the operation of the machine. 9. During work, do not be distracted, do not leave the machine. 10. All adjustment operations should be carried out only when the machine is turned off. 11. Do not stop the rotation of the workpiece with your hands. 12. If any malfunctions are detected, immediately turn off the machine and inform the teacher.
10. Practical activities
Under the supervision of the teacher, students perform training work.
11. Repetition and generalization of material.
Solving test card tasks
Assessment of students' practical work; analysis of typical errors.
12. Homework assignment.
Select an object to be turned on the machine and complete a technological map for its production. Review the rules for safe operation of the machine.
13. Lesson summary.
Now let's summarize the lesson.
Hand tools for woodworking
An ax is one of the most common and well-known woodworking tools. It is used for chopping, splitting, and carving wood. It comes in different modifications and sizes, depending on the type of work.
- Hacksaw – helps to cut the product by hand. There are universal ones, they work in all directions, but slowly. There are also hacksaws for longitudinal and cross cutting, it all depends on which direction the wood fibers are directed. They are distinguished by the shape of the teeth.
- Chisel - used to make a hole in a tree.
- Chisel - used after the robot is finished with a chisel, for cleaning.
- Nail puller - helps to get rid of nails in unwanted places.
- Hand drill - used for drilling holes of different sizes.
- Clamp - will help to fix the part in the workplace; it is also used at the time of gluing or drilling products.
- Miter box - used when you need to cut a part at an oblique or right angle.
- Pliers - used for auxiliary work, or when you need to pull out small nails.
- A workbench is a durable and large table that helps make woodworking easier because it has fasteners that will hold the workpiece during processing.
We looked at hand tools that will help in wood processing, these also include: a tape measure, a folding meter and a screwdriver.
Now let's look at power tools. They cost several times more than manual ones, they are most often used for large-scale work, they are mainly found in factories, or among people who are professionally engaged in woodworking activities.