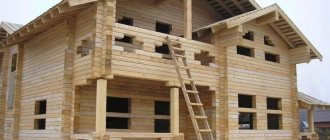
One of the most important operations during the construction of a wooden house is marking and cutting out the window opening. Mistakes at this stage will lead to many problems with insulation or to the need to strengthen the opening after it has been created. This review contains information on how to cut a window in a wooden house and avoid gross mistakes in marking and during installation operations.
Separately, we note that a window in a log house, in terms of its functional purpose, is a more important unit than a similar element in a stone house, since it additionally strengthens the connection between the logs. Therefore, the thoroughness of each stage of its production must be extremely high.
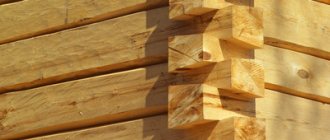
Window as an important power unit at home
Deformation of logs in a log house
A log house, despite its external solidity, is a rather unstable structure. The reason for this is the round shape of the logs and the change in their geometric dimensions during shrinkage and shrinkage.
Under the influence of the weight of the roof and attic in a log house, distortion of the walls in the vertical plane often occurs. If the crowns were laid without additional fixation, the lower logs can be squeezed out either inside the room or outside. In practice, such displacements from the vertical axis can reach up to 3-5 cm, while the entire wall is under significant stress.
If you cut openings for windows and doors in such a wall without installing casing frames, it will simply collapse. Therefore, the entire structure of the window openings is not only a place for installing double-glazed windows, but also a power unit that gives the frame additional rigidity.
Note that this feature is inherent in all wooden buildings, including houses made of profiled timber.
Casing: purpose and types
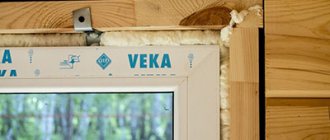
Casing diagram.
The casing is a wooden frame, for the manufacture of which 4 boards 60-80 mm thick are used. The bottom board is a window sill, the other three are slopes. A longitudinal slot 20 mm deep and 60 mm wide is made in the side elements. This slot is necessary in order to create a pliable joint between the casing and the wall. It includes a ridge made at the end of the opening, or a specially made cranial block that forms a keyed connection between the casing and the wall. This joint, when the frame settles, allows the timber or logs to deform, thus reducing the size of the gap above the windows and moving along the groove in the casing, without transferring the load to the double-glazed windows. A block is attached to the lower plane of the window opening, but its functions are different - it is necessary to prevent blowing through the junction of the wall and the window sill.
All plane joints must be sealed with insulation - tow or some other natural material. For these purposes, it is not recommended to use polyurethane foam, since during the process of settling the log house, the foam may come off the surface and cracks will appear.
Installation of the casing begins with the installation of the window sill at a level. After this, the side parts of the box are mounted and covered with the top block.
Features of installing windows in wooden houses
Taking into account the factors listed in the previous section, an additional strength structure is almost always installed between the window and the frame - a casing frame assembled in such a way as to counteract both vertical compressive forces and longitudinal ones.
There are three main types of casing frames:
- spiked socket (T-shaped);
- casing into a deck (U-shaped);
- pigtail in the embedded block.
How to properly make and install a casing is described in our other articles; here we note that a T-shaped pattern is most often used to arrange a window opening in a wooden house.
Please note that any casing option should not have rigid connections to the frame (nails, screws, etc.). The casing frame is connected to the opening using a sliding pattern through a tongue-and-groove connection.
Unlike stone houses, a window opening in a wooden building is cut out after the frame has been assembled, which immediately determines an extensive list of problems:
- the need to coordinate all sizes with the characteristics of a particular log house;
- change in the size of the opening due to changes in the structure of the log house during shrinkage;
- when calculating the size of the opening, it is necessary to take into account a large number of indirect factors (type of casing, type of seal, “age” of the log house, type of window, etc.).
It should be separately noted that the assembly of the log house and the installation of windows is carried out by different teams of builders, which very often leads to inconsistency in the technology of laying logs and preparing window openings. This is expressed in the fact that in those places where windows should be installed, when cutting an opening, power fastenings (for example, dowels) are found.
In view of this, it is advisable to study all the information on the issue of how to make door and window openings at the design stage.
Equipment and tools
When preparing to install a plastic window yourself, you should pay special attention to the preparation of tools and materials. Considering that in most cases, the installation of windows in wooden houses is carried out on-site (dacha, country house, etc.), the lack of one specific key or device can create considerable problems.
Let's look at the main groups of tools that are needed to properly install a window structure.
Mechanics
From a mechanical point of view, plastic windows have a far from standard design, so the usual kit of a home craftsman will clearly not be enough.
Tools
Below is a list of mechanical tools required to effectively work with PVC profiles:
- iron and rubber hammer (an elastic striker is used to position the frame);
- universal screwdriver;
- set of hex keys;
- handle for removing pins (with hexagonal tip);
- electric drill;
- drills for concrete and metal (diameters from 3 to 10 mm);
- mounting wedges and gaskets;
- universal adjusting key;
- measuring kit (tape measure, square, building level, plumb line);
- device for gripping double-glazed windows (“glass jacks”).
Please note that a regular hacksaw may not be enough for cutting expansion profiles, since some types of extensions can be reinforced with metal. Of course, it is possible to cut such a profile with a hand saw, but you will have to spend much more time on each detail.
Taking into account the above, it would be useful to supplement the above list with a mechanized version of the saw (a jigsaw or a circular saw), as well as devices for fixation (clamps).
It is advisable to take a clamp with a wide grip, since they may be needed not only for securing materials during cutting, but also for attaching expansion profiles.
Sealing
Sealing Tools
An integral part of the technology for assembling metal-plastic windows is sealing using sealing tapes and polymerizable substances.
When installing PVC profiles with your own hands, you can use sprayers supplied with cylinders of polyurethane foam, but for professional work it is advisable to purchase a separate device that will significantly reduce the cost of consumables.
We would like to separately emphasize that, in addition to polyurethane foam, when installing windows made of polyvinyl chloride, silicone is often used, which is extremely difficult to squeeze out of the tube without a special “gun”.
Waterproofing
Any polymer sealant - and polyurethane foam is no exception - in the case of constant contact with outside air and moisture is destroyed quite quickly. To slow down this process, the internal and external surfaces of the installation gaps must be protected with waterproofing (installed on the internal surfaces, such protection is called a “vapor barrier”).
This can be done either using special tape or through the application of special pastes (putties).
Depending on what type of waterproofing is preferred, the basic list of tools must be supplemented with scissors or a set of spatulas.
When to start installing windows?
There are two approaches to creating door and window openings.
Prevention of lateral movement
In the first case, they are cut immediately after installing the frame. At the same time, approximately in the center of the future window, one crown is left untouched, so as not to create fundamental changes in the power structure of the house. In the future, immediately before installing the casing, this crown must be carefully cut out.
In the second case, they wait until the end of the period of initial shrinkage of the log house (1-1.5 years) and only then cut the openings. The exception is houses made of laminated veneer lumber, in which you can start finishing without waiting for the end of the shrinkage period (theoretically).
It is difficult to say which of these options is more correct, since it depends on the characteristics of a particular log house, but it can be argued that during the “settlement” of a freshly built house, its future owners’ ideas about the size of windows and their location will change more than once with certainty.
We also note that recently the question “How to increase the window opening in an already finished house?” has become popular. This is a typical situation when new owners move into an old house and they are not satisfied with the format or size of the existing windows.
One of the advantages of a wooden house is that it is not difficult to expand a window if the proposed change in size does not change the strength structure of the house.
Shrinkage
But the most important difference between houses made of wood (does not apply to frame-panel houses) is the ability to shrink as a result of drying of the wall material (logs, timber). And this point is decisive in installing plastic windows in a wooden house, because if you install a window, as usual, in a bare opening, it will inevitably be crushed and deformed by the shrinkage process.
There is an opinion that the first two are the most active period of wood drying. But that's not true. After the construction of the house, the shrinkage of the walls continues for decades. But that is not all. Wood not only gives off moisture, but also absorbs it. Therefore, rigid fastening when installing windows in a wooden house is impossible in principle!
- Shrinkage in a log house is about 10 – 15 mm per log D = 250-300 mm
- Shrinkage in a house made of timber is about 7 – 10 mm per beam with a section of 150x150 mm
- Glued laminated timber - unknown.
There are other ways to calculate the shrinkage height of log houses as a percentage: approximately 10-15% of the original height. But in fact, the shrinkage of houses made of timber and logs depends on many factors:
- on the material (log, rounded log, timber, laminated timber);
- on the time of material procurement (winter procurement or summer);
- depending on the time of day (morning, evening) Yes-Yes!!! Don’t be surprised – we explored this too!
- from where the forest grew (swamp, field); on the degree of resinity and density of the tree;
- on the size of the material - both its length and thickness;
- from the moisture content of the material;
- on the size of the building; on construction technology (dowel, type of felling, etc.);
- from the material of inter-crown insulation; from the type of wood;
- depending on the time of year when construction is carried out.
The most severe shrinkage occurs in log houses made of ordinary logs, then rounded logs, profiled beams, timber, laminated timber go to a lesser extent. Even if the house is more than a dozen years old, it is still necessary when installing windows in a wooden house to take into account the vertical movements of the walls as a result of the increase and or a decrease in air humidity and temperature at different times of the year.
Please note: a large gap is specially left above the jamb, the size of which is designed for the maximum possible amount of shrinkage of the logs (beams). During the first years after the construction of the house, this compensation gap will gradually decrease to a minimum, but the upper log (timber) of the opening, if calculated correctly, will not press down or deform the frame. Thus, the shrinkage of the house will not in any way affect the size and shape of the window frame, and, accordingly, will not damage the plastic window located inside it.
If you decide to install windows in an old wooden house that has long gone through the process of shrinkage, then, when disassembling the window blocks, you will probably notice: they are made according to the same principle as the casing design described here, i.e. are not nailed to the logs of the opening, but are fixed in it using a simple “mortise and tenon” system on the sides.
This suggests that the technology of installing windows and doors in a wooden house in frames was invented a very long time ago, and is used successfully to this day. We will not invent anything new and will follow the same path.
Where to start?
When expanding an existing opening or cutting out a new opening, you should begin by calculating the size of the opening.
As a rule, the initial dimensions are taken as the dimensions of the future window, to which are added:
- thickness of the socket (taking into account the tongue-and-groove joint);
- thickness of the sealant layer (increase the size by 5 mm);
- compensation gap (additional 60-100 mm when determining the total height of the opening).
Please note that the bottom casing strip in windows is often a window sill, the thickness of which may be greater than the thickness of the boards used to make the casing frame.
What is casing
Next, they begin to mark the contours of the openings on the walls of the log house. During this operation, we recommend that you adhere to the following rules:
- the upper and lower edges of the opening should pass through the center of the log (or cover 1/3). This is necessary for the normal operation of the casing and to prevent problems with insulation;
- It is advisable to mark horizontal lines using precise level gauges;
- Make vertical markings only along a plumb line.
If you plan to do the work yourself, you should take care in advance to prepare the appropriate equipment.
The main tool used when arranging window and door openings is a chain saw (or its electric version).
If there are many windows, and you plan to chamfer for installation of platbands, we recommend making a special device based on an angle grinder, with the help of which the time spent on this operation will be reduced significantly.
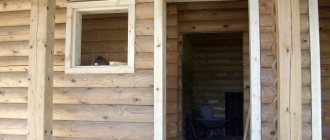
Construction of a window opening in a log house
Construction of a window opening in a log house.
- First you need to decide on the height of the window sill. As a rule, it is 80-90 cm. This height is optimal for comfortably leaning on the windowsill. The window opening is cut approximately 5 cm below the expected height of the future window sill, since the thickness of the polyurethane foam layer is 1-2 cm, and the thickness of the window sill itself is 3-4 cm.
- Next, you need to place the horizontal and vertical lines of the window opening. A building level and plumb line will help with this.
- The lower line of the window opening is placed according to the level, and then the upper one. In this case, the height of the window opening should be at least 14 cm greater than the window itself, since the distance from the bottom edge of the window opening to the window should be left 4 cm for the window sill and foaming, on top - 2 cm for foaming, and for shrinkage of the house - 4-5 cm .
- When marking the vertical lines of a window opening, it is also necessary to take into account that it must be at least 14 cm wider than the window itself, of which 2 cm each goes for foaming, and 10 cm for the casing (jam).
- The window opening is cut according to the markings.
First working stage: cutting out the opening
Alignment of walls
After the marking is completed, cutting out the opening begins. During this seemingly simple operation, the following rules must be observed:
- the cutting plane must be strictly perpendicular to the longitudinal axis of the logs;
- The cutting line should run in such a way that there are no distortions and spontaneous falling out of the logs.
After cutting the opening, it is necessary to check the condition of the end of the frame to ensure that the vertical axis is maintained. If deviations are noticed, then the next stage of work is leveling the wall.
This is done with the help of special devices that pull the logs into one line.
This screed is temporary and is dismantled after installation of the casing.
Please note that in cases where an increase in wall distortions is detected, it is advisable to install a U-shaped version of the frame.
Types of flashing (casing)
In order for the window to move freely during the shrinkage process, you can make a 50x50 rectangular groove at the ends of the logs of the window opening into which to insert the bars, and fasten the windows to the bars. This is a fairly simple method that is ideal for wooden windows. They are attached to the bars with nails or foam. However, this method is not suitable for plastic windows.
It is better to install plastic windows in a special carriage, which is a 150x100 beam with a 50x50 groove selected along its length, which is mounted on a ridge formed at the ends of the window opening logs. The ridge is a rectangular protrusion 50x50, that is, exactly the size of the groove.
What such a comb looks like is shown in the figure below:
Ways to fill the opening
There are several common solutions for how to remove a window in a wooden house:
- The most radical, but also the most reliable and aesthetic way is to disassemble part of the log house and replace the logs or beams. If we are talking about an attic or dormer window, this is not such an expensive solution, and it will allow you to forget about all the problems with blowing through the walls. But it should be borne in mind that old and new lumber will settle differently, so it is better to purchase dried wood and do not forget about laying insulation. When shrinkage is complete, re-caulking of the resulting cracks will be required.
- Installation of fragments of logs or beams of similar size and diameter into the hole. This is a rather labor-intensive method: the opening logs are cut at an angle of 45 degrees, the same angle is made at the ends of the insert pieces. There is also a minus: the new elements filling the hole will be very different in color. In this case, you will have to paint the entire wall to disguise the embedded part, or use another cladding option.
Frame method
How to install a window in a wooden building with minimal labor costs without cladding? There is a simple and effective method that will allow you to forget about the cold, and at the same time the structure will remain beautiful and neat. Sequencing:
- The old window block is being dismantled. The doors are carefully removed and the frame is removed. There is no need to throw away the plastic system: it will be useful for a summer house, greenhouse or gazebo.
- The resulting hole is cleared of accumulated debris and dust. After this, a frame made of thin timber or wooden slats is installed in it. It can be attached to the wall logs with nails or self-tapping screws.
- A frame is stuffed onto the frame from the outside, and material corresponding to the walls is attached to it. If the house is made of logs, they usually use a block house, if it is made of timber, a horizontal lining of the required size is used. As a result, the opening will not be noticeable from the street, and the surface will appear smooth. To avoid any difference in color tone, the wall should be painted.
Casing installation
The casing (edging) is carried out after the window opening is prepared. First you need to prepare a 150x40 board for the top of the window opening. You need to take the board along the width of the opening and cut out two rectangular recesses at both ends, which will help install the board so that the previously formed ridge fits into these grooves.
This is what the board looks like:
The board is installed on top of the carriage bars and attached to them with self-tapping screws. The height of the opening should be 3-5 cm greater than the height of the window being mounted to allow it to be foamed.
The distance between the log above the window and the board of the window opening formed using the flashing must also be at least 5 cm to allow shrinkage of the log house logs. This space should be filled with insulation.
After inserting the window and securing it with nails or mounting foam, the frame can be covered with platbands on top to give a beautiful appearance.
The diagram for installing a window in a log house is shown in the figure below:
You can also watch a video that shows the process of installing a U-shaped frame with your own hands (click triangle to play):
Now you know how to properly install windows in a log house. In the following articles we will learn how to sand logs after caulking and shrinkage, and we will also talk about how to carry out interior finishing and how to choose the right doors for a bathhouse.
Which windows to choose: plastic or wooden
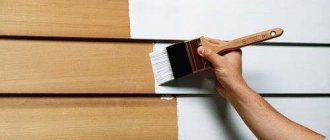
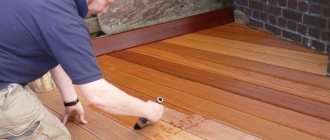
Today, many owners of country houses choose installations made of wood. Constructions made from natural materials preserve environmental cleanliness, safety and the atmosphere of a log house. Wooden windows are characterized by a pleasant forest aroma and attractive appearance, resistance to frost and temperature changes.
This material “breathes” and maintains a comfortable humidity level in the room. Among the disadvantages, one can note the high cost of products. In addition, wood must be periodically treated with antiseptics to protect living material from the negative effects of moisture.
Some people prefer to install plastic windows in a log house. Plastic is a more accessible, cheap material that is characterized by a long service life, good thermal insulation, and a wide selection of colors. Plastic products do not require special care and treatment, but they heat up when exposed to strong sunlight.
Plastic windows emit harmful substances and have an unpleasant odor. They attract dust and do not allow moisture to pass through, so a greenhouse effect may occur in the room.
If for a cottage you can still choose between plastic and wooden windows, then for a bath it is necessary to use windows exclusively made of wood. The wood does not heat up and does not burn the skin, and does not interfere with the healing effect of the bath. You will find interesting projects of bathhouses, country cottages and country houses at the link https://marisrub.ru/proekts/all-proekts.