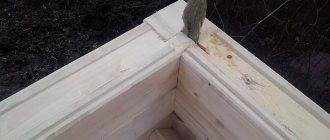
Dovetail design
Fastening the beams together in a “dovetail” manner is considered one of the most airtight and warm locking options for building a house from timber.
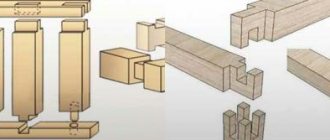
It is carried out in accordance with GOST 30974 - 2002 “Corner connections of wooden block and log low-rise buildings. Classification, designs, sizes." The design is similar in structure to a “root thorn”; we’ll talk about it in more detail below. A tenon and groove are cut out at the end of the beam. They must be identical and connected into a sealed unit. The shape of the spike is trapezoidal, this is the main difference.
Dovetail fastenings are used for T-shaped, long and corner connections. For a T-shaped structure, this technique makes it possible to build a house from timber without additional overlaps on the internal walls. This will make it possible to use timber of a smaller cross-section for internal walls.
During installation, the corner fastenings of the beams to each other are insulated with jute fiber, although the system does not have wind permeability. The dovetail in the corner fasteners can be cut off. The cutting is made in a manner similar to that of a half-tree log or timber, but it must have the shape of a trapezoid. Such beams are stacked half a tree on top of each other.
Cutting logs with corners without residue
As we said earlier, the corners are colder without any residue, but they allow you to significantly save on building materials.
Angle "to the paw"
Among the joints of logs in the corners, the “paw” method is popular. It is easy to implement, and at the same time provides high strength and reliability of the connection. Also, the presence of inclined cuts makes it possible to achieve high tightness. The method has been tested for a long time, even GOST standards have been developed: size tables for each log diameter (see photo).
Table of foot joint sizes for different log diameters
All dimensions are plotted relative to the found middle of the log and a vertical line drawn from it (it is drawn using a plumb line).
Connecting logs without leaving any residue.
Angle into the paw The order of work is as follows:
- Find the length of the cut part (called the block). It must be no less than the diameter of the largest log available (in the figure it is marked L). We set this value aside from the edge of the log (let it be 250 mm), draw vertical lines in these places. They will be the boundaries of the idiot.
- Let the diameter of the processed log be 200 mm. From the middle line, 1/2 of the value of A is set aside. D for a 200 mm log is 141 mm. We divide this value in half and put it on both sides of the center. We draw vertical lines.
- We trim (cut with a chain saw). As a result, you should get the same picture as in figure a).
- We take the appropriate dimensions from the table and mark them on the block.
- We trim off the excess (cut it off). The result should be a figure like in Figure b).
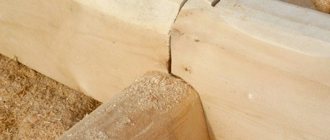
This is what the angle from the logs into the paw looks like (dovetail due to the fact that the connection is in the form of a trapezoid)
All logs are processed in this way one by one. As you can see, the dimensions depend on the diameters of the logs. In order not to have to worry about drawing every time, they make templates from thin plywood according to the diameters of the logs that are available (they label them). Then, having found the middle and made a block, they apply and trace a suitable template. With this order of work, there is less chance of making mistakes, and chopping bowls takes less time.
Tool
1. Roulette.
A 7-meter length is enough, because the timber is supplied in 6-meter lengths. 2. Construction pencil.
3. Metal square 25-30cm.
4. Chainsaw. In our opinion, it is more convenient and more mobile to work with a gasoline saw on a construction site. When working with an electric saw, you always have to keep an eye on the cord, which distracts your attention a little and limits your actions.
Addition: all our teams use the trustworthy Stihl MS 180 chainsaw model in their work. The model is very popular, so in order not to overpay or purchase fakes, it is better to buy it from official dealers. If you do not buy it from an official store, check the authenticity of the saw.
5. Ax
6. Chisel
7. Hand circular saw
8. Wood saw with fine teeth.
9. Template made of wooden board/plywood or metal sheet or prefabricated. Here, everyone’s ingenuity and imagination work differently, so there are a huge variety of options for executing templates. The main thing is to understand that a well-fitted template greatly facilitates and speeds up the work of marking the timber.
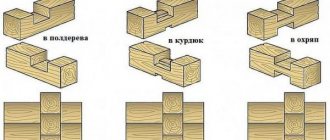
Joining the timber with the remainder
The easiest way to join timber in the corners of a log house is “into the floor of the tree”. A rectangular groove is cut, the dimensions of which depend on the thickness of the timber and are: The depth of the notch is half the thickness of the timber. That’s why it’s called “half a tree”.
We suggest you read: How to quickly dry firewood at home
Connecting the timber in the corners with the remainder - in half a tree, in a fat tail, in an okhryap
The “tail tail” method is distinguished by the presence of an additional tenon, which provides a stronger and more reliable connection, but requires more carpentry skill. More difficult is connecting the timber into an okhryap. Here you cannot make a mistake when calculating the width of the jumper, but it is much easier to implement than on a log: the geometry here is standard and you can use a template, which significantly speeds up the work, and then an error can only occur when cutting.
There are several types of connection. Traditionally, “half-tree” and “paw” are used for bathhouses and houses. They differ only in shape. Half a tree has smooth, parallel edges. It's easy to implement. When joining the timber “into the paw”, the shape of the tenons is made trapezoidal. It is a little more difficult to perform, but there is less chance of through holes occurring.
Joining a beam in a corner without leaving a trace: in half a tree and in a paw.
There are several other types of butt jointing of timber. They are not very reliable and do not provide proper tightness, although they are economical in terms of material consumption. They are rarely used for residential buildings, mainly for the construction of outbuildings.
A simple butt connection occurs with alternation. This makes the angle stronger. For reinforcement, you can use steel plates or knock down the beam with long nails at an angle.
Butt joint of timber
There are also methods for butt assembly with dowels of different shapes.
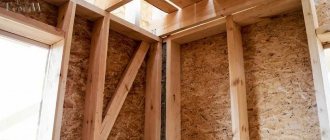
Another method of construction: using frame-timber technology. Then, in the corners and at the joints of the timber along the length, a vertical stand is placed with grooves formed in the required planes. At the ends of the beam, a spike is formed into the appropriate shape. When laying, you have to “put on” each element from above.
The advantage is that you can mold all the studs according to a single template, and then simply assemble everything like a construction set (not forgetting to lay inter-crown insulation). The connection turns out to be airtight and quite reliable, moreover, the joint itself is not visible and the appearance is very attractive.
Connecting timber using panel technology: quickly, warmly and reliably
Peculiarities of wood joining in log houses
Log buildings have a long history and, depending on the location of the building, they differ in construction technology. Visually, two types of connections are distinguished: with protruding ends of the log at the corners (log house with a remainder) and without them. The first option is warmer, but the second is more economical in terms of wood consumption.
Methods for joining logs:
Into the bowl. The oldest method involves cutting a notch at the top of the log in the shape of a transversely placed log. It is called a bowl or oblo. They cut it in place to ensure maximum fit.
This technique has several subtypes:
- Half a tree. It is distinguished by a longitudinal laying groove in the upper part of the log. Caulk is placed in it during the joining of logs. To increase strength, dowels in the form of wooden dowels can be used.
- the oval comb was more used in the north, as it is resistant to wind. In this case, the comb for the connection is oval in shape.
- In fat tail, which is the most durable, but rather complex method. In this case, there is both a ridge and a protrusion located at the bottom of the bowl in the longitudinal direction.
- Norwegian cup or Canadian felling, which have a self-jamming cutting system during the process of settling the structure.
- In a hole, in which the cup is cut out not in the lower, but in the upper region of the log.
- In okhryap, which is a transitional method. In this case, instead of a bowl, straight-shaped recesses are made in one of the logs in the upper and lower areas of each log. In this case, the ends extend beyond the boundaries of the joint.
- In the paw. The connection is used in structures without protruding ends. To make the structure more durable with good grip, rectangular nests and spikes are cut out at the ends of each log. They are called prisekom.
- Dovetail. In this technique, the connection is similar to the previous one, however, the planes of the cutouts are tilted in the opposite direction. These two types of connections are used in warm regions where logs are in short supply.
Such methods save material, but require highly qualified craftsmen.
Features of connecting elements in log cabins
Log houses made of timber are more neat in appearance and are easier to assemble. But they also have lower resistance to low temperatures. The beam is also connected by both corner and longitudinal connections. The latter is used when there is a lack of material. The corner connection, as in the situation with logs, has several techniques:
- Connection of timber into oblo. This technique assumes the presence of special one-, two- and four-sided grooves. A one-sided groove is selected in the upper part of each beam strictly according to the width of the contact beam. In the case of a double-sided groove, two grooves are made - below and above a quarter of the section of the beam. A four-way groove has grooves on each of the four sides of the timber. If profiled timber is used, assembly is greatly facilitated due to dimensional accuracy.
- In the paw. In this case, there are several subtypes of connection:
- Butt. In this case, the bursa is secured with staples or metal plates. The result is high strength, but the building is quite cold.
- On dowels. The connection requires the presence of hardwood pins. Maximum strength is achieved with oblique liners. However, the technology for their implementation is quite complex.
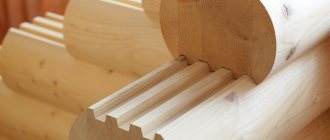
- In the root thorn. This technique is the most durable and warm. A longitudinal tenon is made in the lower bar, and a groove with the appropriate cross-section is made in the upper bar. During the installation process, a flax-jute cloth is placed between them for compaction. Each crown in the corner is reinforced with a wooden dowel.
Dovetail. In this situation, the technology is similar to log houses. At the end of each bar a trapezoid-shaped tenon is made. A groove of the appropriate shape is made in adjacent bars. The result is a tight fit. The result is high strength and heat retention. Although the latter is slightly lower than in the case of logs.
Which construction method should I choose?
The choice of methods for joining wood during the construction of buildings depends on the location and climate, as well as the capabilities and wishes of the owner
In general, more attention should be paid not to economy, but to the durability and strength of the structure. As a result, the building will delight its owners for many years with its warmth, durability and environmental friendliness.
Features of the “paw” knot
Fastening the beams together “in a paw” can be used not only for corners, but also for T-shaped joints for the construction of a house made of laminated veneer lumber. For the T-shaped look, a hidden tenon is made into the structure.
When constructing a knot “in the paw,” a cut is made, which is a distinctive feature from other types of knots. But it is not recommended to connect load-bearing walls in this way, since the ventilation of corners and walls is high. To prevent blowing, horizontal planes are made slightly inclined. It is better if the slope is in both directions.
With a “claw” corner connection, you can make walls with or without a remainder. Experts generally complete walls in this way without leaving a trace, but you can do the first option with your own hands.
To do this, a notch is cut out in the timber and secured. And to give greater strength, wooden dowels with a diameter of 25-30 cm are driven in. The design of the T-shaped connection of the beam “into the paw” is shown in more detail in the diagram - pictures below, with descriptions and drawings. Using it, it won’t be difficult to make a knot design with your own hands.
Support Modifications
The range of supports offered by manufacturers allows us to solve the following problems:
- Rigid T-shaped end fastening of the timber to vertical and horizontal surfaces;
- Laying corners without connecting locks and inserts;
- Connection of timber “end to end”;
- Sliding mount for rafters;
- Installation of vertical structures.
To solve the above problems, fastenings have different designs, can be open or closed, and are distinguished between right and left. Detailed information about the configuration and standard sizes is presented in catalogs, price lists and on the website of the hardware manufacturer.
Rectangular support brackets
Mounting on a support-bracket
Rectangular support brackets allow you to fasten building parts to various surfaces or make corner connections. Such fastenings are used for installing joists, installing ceilings and internal partitions. Fasteners are made from solid galvanized metal sheet 2.0-2.5 mm thick by cold stamping.
The support brackets are L-, Z- or U-shaped. L-shaped products can be right or left-handed, Z-shaped ones are used for multi-level installation. In U-shaped brackets, the timber is installed in the internal space and fixed with self-tapping screws; the landing dimensions correspond to standard sizes of lumber. For ease of installation, the working surfaces of the brackets are perforated with holes of different diameters for various fasteners. Depending on the weight of the structures and the design load, several holes can be used for fasteners.
Supports for timber, open and closed
Beam support closed and open
The edges of the sidewalls of the U-shaped brackets are bent at right angles and form two mounting strips (flanges). The planks can be bent inward or outward; in this design, the support brackets are called closed or open. Closed beam supports will allow timber to be laid in rows with minimal gaps, while open beam supports are used for fastening joists and load-bearing beams. Open beam supports are installed on brick or concrete surfaces and secured with screws. Closed-type supports are attached to a wooden surface with self-tapping screws.
End to end connection
Connection to MZP
Reliable end-to-end connection of timber is provided by nail plates; the product is a metal plate 1.0-1.5 mm thick with spikes 8.0 mm high. Spikes are formed as a result of cold stamping using a special stamp; 80-100 spikes are formed on one square decimeter of surface. The plate is installed on the side surfaces of the mating parts with the tenons down, the tenons are completely driven into the wood. The model range is coordinated with the standard sizes of lumber.
Sliding supports for rafters
The sliding support is installed correctly
The sliding support is not installed correctly
The beam supports for the rafters have a complex design, consisting of two parts fastened together. After attaching the rafter leg to the load-bearing element (mauerlat), a play of 50 to 80 mm is maintained in the support unit, allowing the rafter structure to move freely in the vertical plane. The use of such a compound counters the negative processes caused by shrinkage, snow pressure and seasonal deformations of wood.
Sliding support brackets are manufactured in open and closed versions from galvanized steel sheet 2.0 mm thick by cold stamping.
Embeds and driven ones
The support is installed during concreting
Embedded and driven supports are used for the construction of lightweight foundations, canopies and fences. The basis is a metal U-shaped profile or a similar welded structure; a pin, a welded cone or a piece of pipe is welded to the back side. The structure is installed in a concrete base or driven into the ground, the stand is secured in a vertical position with bolts through through holes in the U-shaped profile.
How to connect beads lengthwise
The easiest way is half a tree. Its configuration and shape are similar to those made when connecting a corner. But the disadvantage of this splicing method is that when longitudinal forces arise, which can occur during drying or movement of the soil, such a connection is easily broken. A continuous gap is formed.
Long beam connection
The oblique rim lock has the same disadvantage: it is easy to disengage. If you need reliable joining of timber, use a straight rim lock. As you can see, due to the protrusion, pressed by the crowns located on top and the weight of the roof, it will resist the forces of longitudinal tension (and compression too). It is more difficult to implement, but much more reliable.
Features of the “half-tree” node
The “half-tree” design bears this name because the cuttings that are made in the timber are half the size of the section. Half-tree installation is carried out mainly in the corners. It is possible to connect the timber in length in this way, but you need to use dowels for fastening.
We invite you to familiarize yourself with: Tape insulation for timber
For a corner connection, a notch is made at the top of one link and at the bottom of the other. To make the connection more durable, wooden bushings are used, which are mounted at the end of the cutting. Another option is oblique cutting, this option is shown in detail in the diagram below.
This corner fastening is used for residential construction, for example, for the construction of a house from profiled timber, only after carefully insulating the joint. In order to reduce the ventilation of the structure, the cuttings are made not at right angles, but with a slight slope.
Any of the listed types can be used for a T-shaped connection. But the most appropriate and cost-effective are those that do not require allowances, for example, “root spike”, “dovetail”.
Drawings and markings of logs
Before you begin assembly, you need to mark the logs. Early marking will greatly facilitate and speed up the construction process.
This operation is divided into certain stages that must be strictly followed.
- The logs are trimmed.
- A horizontal line is drawn through the center of each element from the end. The correctness of the procedure must be monitored using a laser level.
- A template is attached, pre-made from plywood or thick cardboard along the paw on the first log. Two vertical lines are drawn along it. A vertical building level will help check that the lines are drawn correctly.
- The threads are pulled along the pre-drawn lines of the cheeks of the paws. Along them, longitudinal details of the cheeks are drawn with a length equal to the diameter of the logs.
- Using the prepared markings, cut out the cheeks and check how well the part matches the template.
A log house in the paw is considered colder than, for example, the same log house with a removal. The reason is that the corners of the house are open to “all winds,” and from the outside, rainwater can get into the cracks between the parts and spoil the logs, while in a log house with an offset, the corners are closed by protruding parts of the logs.
A classic five-wall structure, even a small one (for example, 6x4), will require additional protection of both the internal sides of the corner joints and the external ones. Although this may spoil the appearance of the house, such an operation is necessary in order to make the house warmer and protect it from cold and winds.
When using round timber in the construction of houses, it is necessary to ensure the tightest possible fit of one element to another. To do this, most often a groove is cut along the entire length of the upper log so that it fits snugly against the lower one. In addition, the junction of the logs is carefully laid with tow, jute or any other insulation.
Detachable connections: with screws, screws, ties, wedges.
As a rule, we are all accustomed to standard connections, for example, detachable ones with screws. But even these ordinary connections can be made in a special way that is beautiful and functional! Connections with nails, pins and staples
This type of connection is used mainly for fastening or finishing, decorative elements or in frame house construction. We will not talk here about the “seven secret ways” of working with a hammer and show the “beauty” of joints made with nails. But let’s “stop” with special hammers, literally in a nutshell. Hairpin hammers:
Special hammers for frames and windows. They can be with a rotating striker.
Japanese hammers have become extremely popular. They are convenient for both hammering nails and working with tools, for example, chisels.
Jewelry hammers:
Pneumatic pins and nailers
Now they are used in a wide variety of areas: for installing platbands, fastening lining, boards and simply fixing two workpieces before gluing.
Fastening platbands to a micropin (0.6 - 0.64 mm) using pneumatic guns (pins):
Options for trim and door panels:
A micropin or finishing nail (up to 1 mm thick) is also used in the manufacture of caskets and all kinds of boxes:
Pneumatic guns working with staples or finishing nails are convenient for fastening lining, glazing beads and other wooden decorative elements.
In carpentry work, air guns with more serious nails are used
Screw connections Direct connection. This type of connection is widespread
And that’s why we focus a little on the types of screws
Types of screw heads:
Types of threads - single-start and double-start: To speed up construction and finishing work, primarily the installation of drywall, use screws in a tape and a screwdriver to work with them:
Oblique connection with screws
Due to the ease of use of the device, which provides sufficient accuracy, this type of connection has recently become widely used by both home craftsmen and professionals. The screws can be closed with dowel plugs.
Popular photo
The connection with an oblique screw allows a Craftsman with any level of training to make a variety of products, including furniture, quickly, beautifully and accurately. The screw, hidden in the oblique hole made with the help of the Conductor, does not spoil the front surface with its appearance. And decorative plugs installed in the holes make the product original. The workpieces are fixed to each other and tightened using special clamps - hand vices directly through the holes.
To make such “oblique” connections on a screw, the Kreg Jig system is used. Its essence is that the screw is wrapped at an angle of 15 degrees into both workpieces being connected, which allows you to hide the screw. The hole for the screw is drilled with a step drill using a jig that ensures drilling at a given angle. A step drill drills a hole for the working body of the screw and for the head.
Screw and bolt connections:
The photo shows examples of the use of screw and bolt connections:
The two parts are connected with 2 confirmation screws at an angle of 90 degrees; this is a simple and quick type of fastener. But unlike other types of fasteners, it remains visible, so plugs or overlays are used to hide the confirmation head.
Tie connections:
New connection from Festool using Domino connectors - essentially the same couplers, but with improved characteristics:
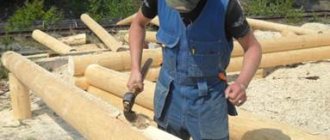
How to chop?
Building a house from logs with your own hands is not such a difficult task. The main thing is to prepare the materials correctly, follow certain rules, observe all the subtleties of this process, and then cutting itself becomes a fairly easy task.
The finishing of the corners is no less important. Any technology can be used here, the main thing is to protect the house from wind and cold, which can penetrate through loosely fitting elements or cracks in cracked corner joints.
From the outside, corners can be covered with siding, artificial stone, natural or pseudo-brickwork. The inside of the joint can be sewn up with the same clapboard. Another thing is that a house made of logs is aesthetically pleasing in itself, it is a real classic of its kind, and covering it with clapboard or, even worse, siding means destroying the very image of a log house.
We suggest you read: How to decorate a stove
For this purpose, it is better to use coniferous wood. Important indicators are natural humidity, the time when the tree was cut down (preferably in winter), the place of growth (optimally - northern regions). Pine is well suited for construction (its cost is lower); larch or cedar are also often used (these species are more expensive, but they have higher strength and a longer service life).
The assembly itself includes several main steps.
- Preparation of blanks. The top and bottom are hewn to a depth equal to the width of the workpieces. The appearance of the workpieces should be in the shape of a parallelogram, turned towards the master with the side that has a square cross-section.
- The parallelogram is divided from the end into eight horizontal components.
- Next you need to place the necessary points on the plane. The location of the points depends on the selected paw type.
- They indicate future challenges. Lines are drawn from them at an angle, which depends on the location of the intersections.
- Excess material is cut off and the connection elements are hewn out.
- A template is made on plywood or thick cardboard along the first joint, which will serve as a sample.
It is recommended to apply a special protective compound to the prepared blanks, which will reduce the risk of rot, protect against parasites, and increase the fire resistance of the entire building. In addition to protection, it is necessary to provide additional insulation of the log house.
To avoid the “spreading” of the paws during operation, the joints of the logs on the inside are equipped with a special spike, which reliably fastens the upper and lower logs.
Before proceeding directly to the assembly, the foundation is poured. A log house does not have a very large mass, so it is quite acceptable to use a columnar or shallow foundation strip.
Thicker logs go to the lower crown. They are laid directly on the foundation strip, laid with roofing felt or unloading board, the thickness of which is fifty-five millimeters.
Before you begin laying the next crown, you need to make a special semicircular groove on the logs along the entire length of the log. To do this, one log is laid on top of another, and, using a carpenter's line, a line is drawn on the overlying log parallel to the underlying one.
Next, the top log is removed, turned over, and a groove is selected in it. Once the sampling is completed, the log is re-laid on top and tapped along its entire length. The purpose of this operation is to determine how well the sampling was done and how tightly the logs are connected to each other. If everything is in order, the groove is made with high quality, the connection is laid with insulation (tow, jute, moss), and the log with the groove is finally installed in place. And so - with each log of the upper tier.
Adviсe
A log house is the most common option for constructing such a building. The assembly process itself takes a little time, especially if all the preparatory work was carried out efficiently.
Although it is possible to build such a house yourself, it is better to consult with an experienced craftsman before starting work. It is necessary to take into account every little detail, because the strength and safety of the new building may depend on it.
Of course, reviews about this cutting method are contradictory. But it is supported not only by its obvious, well-known advantages, but also by the fact that this method is still the most common, despite certain difficulties and disadvantages inherent in it.
A reasonable approach to business, strict adherence to all the necessary rules will help you successfully complete this work and get a warm, cozy, durable and safe log house.
See below for information on how to cut into a paw.
Tags: beam, paw, template
« Previous entry
Main stages of work
After the groove of the required dimensions is selected, the author screws a piece of plexiglass on top of the workpiece. Then you need to make a tenon on the second wooden piece. The tenon should fit tightly into the groove.
Next, you need to use a chisel to give the rectangular groove a trapezoidal shape. In the second workpiece you need to make two cuts with a hand saw. You will also need two wooden wedges.
Well, then everything is simple: we insert the wedges into the cuts made in the tenon, then we drive the tenon itself into the groove. The wedges push out the sides of the tenon, as a result of which it takes the shape of a groove and sits quite tightly in it.
For more information on how to make a “false dovetail” butt joint, we recommend watching the video on our website.
Comments
legal information
Dear authors, remember that the publications you post must not violate the laws of the Russian Federation and the copyrights of third-party resources.
*Extremist and terrorist organizations banned in the Russian Federation and the Republics of Novorossiya: Right Sector, Ukrainian Insurgent Army (UPA), ISIS, Jabhat Fatah al-Sham (formerly Jabhat al-Nusra, Jabhat al-Nusra"), National Bolshevik Party (NBP), Al-Qaeda, UNA-UNSO, Taliban, Majlis of the Crimean Tatar People, Jehovah's Witnesses, Misanthropic Division, Brotherhood "Korchinsky, "Art preparation", "Trident named after. Stepan Bandera", "NSO", "Slavic Union", "Format-18", "Hizb ut-Tahrir".