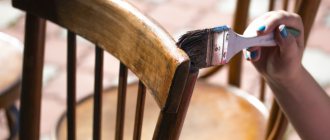
How to make aged wood at home and give it a vintage look with your own hands? This article is dedicated to just such tricks! Artificially aged items look very stylish and harmonious!
The 7 methods for aging wood with paint that we will look at here are interesting for their simplicity and excellent end result. They also do not require the purchase of any expensive special materials or tools.
We will analyze in detail the following 7 painting methods:
With a candle
This is a versatile technique that helps give wood or wooden furniture an antique look. It can be used on both untreated wood and already painted wood and furniture. Suitable for painting in one or several layers.
For example, this is the result obtained when painting white using this method (for a detailed guide, read the article “3 methods to paint wood white”)
Let's take a closer look at how to paint wood using this method, making three layers (brown, white and yellow).
Necessary materials:
- paint (brown, white and yellow)
- brush, candle, rag.
Step-by-step instruction:
Step 1: First coat of paint
- Decide on the color of paint that you will use as a basis. This will be the first, bottom layer of paint, which we will apply directly to the wood. In this case we use dark brown color.
- Paint the wood with slightly chaotic strokes, without painting the surface completely and evenly.
- Leave until completely dry.
Step 2: Use a candle
Take a candle and rub it on the surface of the wood in several randomly selected places (press the candle quite hard so that a clear trace of wax or paraffin remains on the wood).
- Step 3: Second Layer of Paint Select a color for the next layer and apply paint (we're using white here). At this stage, the paint can be applied evenly over the entire surface, and not in strokes, as with the first layer. Leave until completely dry.
- Step 4: After this, take a rag and wipe the surface with some pressure. In those places where wax was applied, the paint will come off the surface. If two layers are enough for you, then you can stop there, but if not, move on.
- Step 5: Third coat of paint Repeat steps 2 and 3, but the last one using a different color of paint (here it will be yellow). After the paint has dried, you can apply a protective varnish. The latter is not necessary due to the fact that we deliberately gave it an antique look, so if the paint starts to lag a little over time, it will not be noticeable.
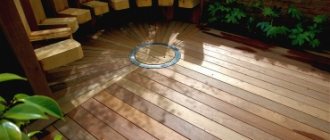
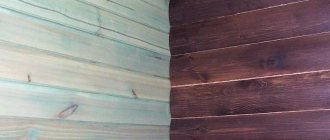
What is brushed lining
This is a board for interior work and finishing the facades of houses, buildings, and structures. Brushed lining performs the same functions as regular lining, and differs from the latter only in appearance. In addition to the standard name, it is often called mechanically aged, textured or textured.
Translated from English, “brush” is a brush. To obtain brushed wood, the board is dried in thermal modules, and then soft fibers are removed from its surface with special metal brushes, leaving hard ones intact. As a result, the board acquires a unique pattern and becomes stronger and more wear-resistant, because soft wood tissues are the first to begin to age.
Decorating houses with this material has a luxurious look and gives the home an aristocracy and respectability.
Aging using wet paper
This method of giving wood an aged texture is similar to the previous one with candles, only now instead of wax there will be wet paper (if you suddenly don’t have a candle at home, then everyone certainly has paper).
Necessary materials:
- dye,
- brush, paper,
- bowl of water.
Step-by-step instruction:
- Step 1: Attach wet paper. No base paint was applied here so that the natural color of the wood could be seen. Therefore, we immediately take a sheet of paper and tear it into uneven pieces of different shapes and sizes. After this, dip each piece into a bowl of water and place it on the wood you are going to paint.
- Step 2: Apply paint. Having laid out all the pieces of paper, immediately start painting in the chosen color, that is, you do not need to wait until the paper dries.
- Step 3: Peeling off the paint Next, carefully lift each piece of paper from the surface. You can do this while the paint is still a little damp, or after it has completely dried.
You can make several layers, for example, as in the previous method. To do this, follow the step-by-step instructions described there, replacing the wax with damp paper.
External use of aged wood
This decorative material is perfect for decorating rustic-style facades. First of all, this is the German half-timbered style: the original decoration of the walls involves the use of wooden beams of rough texture, giving the building a characteristic appearance.
Country-style finishing also allows for the use of aged wood: the cladding itself, shutters, entrance doors, as well as decorative elements.
Half-timbered
Aged door leaf
Aged shutter fabric
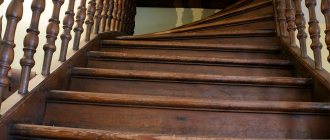
Railings, steps, support pillars at the porch - all this can also be made using the described wood processing methods. After practicing on small pieces, you will be able to handle any surface without much effort. Of course, large-volume elements, such as house trim, are not so easy to process manually, but there are special machines on sale for this purpose. The most important thing is to have the desire, and then everything will definitely work out.
Video - How to age wood
Video - Patination of wood
Video - Aging wood by firing
Dry brush texture "Loft"
This technique is great for creating an old and scratched look. The key to success here is simply to use a very dry brush. For example, old brushes with stiff bristles work well.
Necessary materials:
- brush with stiff bristles,
- water based paint.
Instructions:
This is what the process looks like:
- Dip the brush into the paint of your choice and leave as little paint on it as possible.
- Apply the paint in quick strokes in different directions. Be careful not to get carried away and cover the entire surface.
This technique is also suitable for painting with a loft metal effect, for example, for creating such artificial zinc letters.
You can also combine this method with using sandpaper to remove some of the paint after each coat.
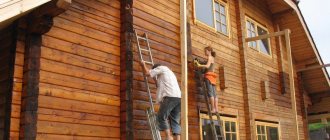
Facade cladding with brushed clapboard
To finish the facade you will have to stock up on time and patience - this process is not quick. First you need to make sure that all bricks, window and door elements are held tightly. You can fix the lining with nails, self-tapping screws, staples, clamps, and the specific method of fastening must be chosen in advance in order to prepare the tool:
- for self-tapping screws - drill, screwdriver;
- for nails - a special air nailing gun;
- for staples - a construction stapler;
- for clamps - a hammer or screwdriver, drill, screwdriver, additionally - nails or self-tapping screws.
Also, to cut out the panels you will need a jigsaw, a tape measure, a square, a pencil, a block for lining the lining, and a level. The slats can be attached vertically, horizontally, diagonally, or a combination of these techniques. The operating procedure will be as follows:
- attach the vapor barrier film with staples so that its parts overlap each other by 10 cm;
- Glue the open edges of the film with double-sided tape;
- make a sheathing from slats 20*40 mm in increments of 40-50 cm, secure it with self-tapping screws and dowels;
- if there are unevenness on the walls, place pieces of plywood;
- lay slabs of mineral wool, polystyrene foam, secured with dowels and nails, and on top with another layer of vapor barrier;
- make markings, then fix the lining, working in the direction from bottom to top.
Painting with scrapers in Provence style
The result will be approximately the same as using sandpaper. The difference is that sandpaper not only removes some of the paint, but also evens out the surface of the wood if there were uneven spots in that area (which is not suitable if you want to preserve the structure of the wood, leaving it as natural as possible). The second difference is that sandpaper is used only after the paint has dried.
Materials needed: brush, paint, scraper (or any unnecessary plastic card).
Instructions:
- First paint the wood.
- After the paint has dried a little (not completely dry, just a few minutes when the coating has already formed, but is still sticky to the touch), take a scraper or an old plastic card and scrape off some of the paint in some places.
TIP: If you paint furniture, scrape the paint off at the corners and edges, as this is where it most often comes off during use. Thus, the antique effect will look more natural.
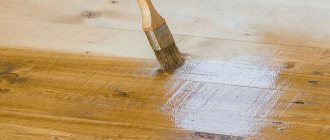
Chemical aging method
The use of chemically aggressive substances requires special care and precision in work. Protective gloves must be used and the room must be well ventilated. The workpiece is pre-treated with coarse sandpaper and wiped from dust. Then apply alkaline agents or ammonia with a brush and leave for several hours. To slow down drying, you can cover everything on top with film. Under the influence of ammonia and alkalis, the surface acquires a gray tint, characteristic of old weathered wood.
Chemical aging method
When the color of the workpiece has completely changed, it is rinsed with water and then wiped with a vinegar solution (a tablespoon per glass of water) to remove the remaining alkali. If ammonia was used, a vinegar solution is not needed. After drying, the wood is brushed, sanded and a protective coating is applied. There is no need to paint such material, because then there is no point in chemical processing, and it is easier to do everything mechanically.
Artificial aging
Rinse method
This method for creating the effect of old wood is suitable for elegant furniture in a rustic or Provence style. It is best used on damp wood.
Necessary materials:
- paint, brush,
- water, rag.
Instructions:
- Apply a coat of paint and let it dry for a few minutes (same as the previous method, so it's still tacky and not completely dry).
- After this, quickly rinse the wood with water , carefully wiping the surface with a rag. The goal is to wash away some of the paint on the surface. Leave to dry. That's all!
For example, a table painted soft green looks simply wonderful after using this method.
Features of brushed lining
The choice of lining type depends on the user’s needs, specific operating conditions and financial capabilities.
Types and sizes
Brushed lining has different textures, colors, patterns and differs in size, presence or absence of chamfer. According to the type of connections, the material can be classified into:
- softline;
- landhouse;
- eurolining;
- calm;
- block house;
- American;
- double-sided lining.
Depending on the type and quality of wood, the material is divided into four classes:
- "Extra". This is a premium quality knot-free lining with a flawlessly smooth surface. The presence of even small cracks, unplaned areas, and wood defects is excluded.
- Class A. High quality material that does not include cores. There are knots on the surface no more often than one per 1.5 meters of board length. The presence of small pockets and end cracks (up to 2 pieces) is allowed. For lining made of coniferous wood, a tar content of no more than 10% is allowed.
- Class B. The boards can have up to 4 knots for every 1.5 meters of length, 2-3 cracks or resin pockets. The formation of minor cracks during wood processing is not prohibited; there may be places affected by insects (no more than 5%).
- Class C. There are practically no restrictions on the parameters; holes from knots, cracks, resin pockets, areas of non-compliance with the overall color are acceptable; there should only be no obvious rot.
Another important parameter of the lining is its size (length, thickness, width). The material is available in different widths, while the length of the boards has increments of 10 cm. The optimal thickness of the lining for interior decoration is 12.5 mm, for exterior work - 15-20 mm.
Thick lamellas can easily withstand both their own weight and the mass of insulation materials. The wider the material, the higher the likelihood of its deformation due to changes in temperature and humidity. Narrow boards have better resistance to physical and mechanical stress.
Brushed lining can be solid or spliced, when pieces of wood measuring 15-75 cm are joined into one board. The joining is done using a special microspike, additionally coated with glue and fixed under pressure. Finger-joined lamellas are always quite thick (from 15 mm), therefore more expensive and heavier. When purchasing, it is important to find out what type of glue was used: toxic substances are strictly prohibited for use in interior decoration.
What is the material made from?
Many types of wood are suitable for brushing. It is important that the material has a beautiful texture and its surface is pliable for processing. The best material for brushing is lining made of coniferous wood, which contains the optimal amount of essential oils and resins that prevent moisture absorption and rotting. This material can be used to decorate facades, baths, steam rooms, and its service life is very long (several decades).
The following types of wood are most often used for brushed lining:
- spruce - used to create round boards, excellent for interior decoration;
- pine - is the most inexpensive option, but has low density, so it is scratched;
- larch - boasts a beautiful texture, ideal for making brushed boards, but is sold at a high price;
- cedar - has high heat-insulating properties, suitable for external and internal work.
Hardwoods are less suitable for brushing, since they do not have such a clear cut pattern, are less durable and are more expensive to produce. To make lining, you can use linden, alder, and oak.
Scope of application of lining
Originally processed lining will become a real decoration of the interior, giving it a noble look. The material is suitable for country, retro, vintage, classic, Provence and a number of other style styles.
More often, brushed boards are used to decorate offices, dining rooms and kitchens, terraces, balconies, and living rooms. It is attached to walls, floors, ceilings, beams and ceilings. In addition, lining is excellent for cladding baths, saunas, facades, and any premises that require additional protection from moisture and cold.
Method of painting with wooden blocks
This is a simple method that allows you to age wood or furniture using a wooden block.
Necessary materials:
- paint, brush,
- wooden block.
Instructions:
- Dip the end of a piece of wood into the paint and run it along the surface to be painted.
- Apply as many colors and layers as you like.
Here, for example, they made one layer of pale blue paint.
Errors when installing lining
Most often, inexperienced craftsmen do not leave gaps when laying the lining. Since the temperature and humidity of the environment are variable indicators, the size of the lamellas will change regularly, so if there are no gaps of 1-2 mm, the lining may warp.
Another “popular” mistake is ignoring the moisture and bioprotection of brushed lining. In this case, individual panels will have to be changed periodically, since without an antiseptic they can rot. Sometimes beginners are in a hurry to install the material and forget to check the position of the lamellas with a level, as a result, some of the elements are skewed.
To avoid problems, you need to carry out installation strictly in accordance with the technology and use only high-quality lining, and then the facade will last for many years!
Paint filling method
This is a one-step method suitable for any type of wood with a lot of texture on the surface.
Materials needed: paint, scraper (or plastic card).
Instructions: You just need to pour a little paint onto the surface of the wood and spread it with a scraper. Wait for it to dry and you're done!
Glaze
The glazing technique came into decoration from painting, and consists of applying paint in translucent layers. I didn’t have to look far for an example - a beautiful chest of drawers, painted in this style, stood right in the studio. Those gathered repeated this technique on tablets. The sequence of actions turned out to be simple: apply a base coat of paint to the item, dry it, and then work on top of it with a wet brush with a small amount of paint. Each layer should be allowed to dry so that the paint is applied in gentle layers without mixing.
Advice. Instead of water, use a special thinner - it will allow the paint to maintain its thickness and color saturation, the drawing will be transparent, but more clear.
Recommendations and tips
Now that we've looked at all 7 methods of painting wood with an antique effect, I'd like to highlight a few basic tips that you can apply to all methods:
- If the surface you are going to paint has been treated with sealant, wax or varnish, it would be best to sand it a little so that the new paint will adhere better.
- Don't be afraid to experiment; you can mix and match these techniques to create your own personal design style.
- first on a piece of wood or on less visible areas of furniture (such as the inside of a cabinet door to be painted) before moving on to more visible parts.
And remember that the main thing here is your desire! Good luck!
Imitation of metal surface
Metallic paint and “contours” for applying a relief pattern are easy to find in art stores, but this is not enough to create the illusion of a metal surface. Mikhail shared a trick with the participants of the master class: the finishing touch should be the application of patina. To do this, acrylic paint of the required color (blue for gold, greenish for copper) is diluted in water, and the item is simply doused with this solution. The liquid lingers around the circuit and, when dried, leaves traces of “oxidation” on the “metallic” thing.
Tip: to make an imitation of blackened silver, paint the item black, then use a stencil and putty or thickened chalk paint to apply a pattern, paint it in a dark background color and, after everything has dried, go over the surface with a dry brush with silver or pearlescent paint. It will linger only on convex surfaces, creating the effect of old metal.