A properly designed roof is the key to protecting the upper part of the facade from winds and rain. An important role in this matter is played by the wind bar. It is this that limits the intensity of exposure to winds and prevents the penetration of cold air, rain and snow under the cladding and sheathing. But the special role of this additional element is to decorate the roof and its ideal combination with the facade cladding.
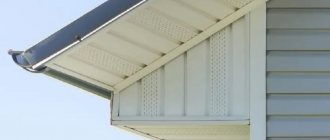
Wind strip for corrugated sheets
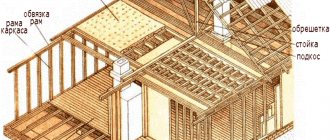
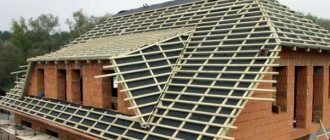
Roof scheme
Why do you need wind board protection?
The fastening of the wind board is located exactly at the junction of the rafter system and the wall of the house. This is done for many reasons. As it turns out, this small detail has a very big meaning. Firstly, it protects the entire attic space, and therefore the entire house as a whole, from blowing. Of course, this cannot be called complete sealing; natural ventilation will still be provided, but this is exactly what the house needs. But drafts, which blow out all the heat in an instant, will negate all your tricks with the thermal insulation of the building.
Secondly, not explicitly, but along with a decrease in air exchange, humidity fluctuations become significantly lower. This will maintain the microclimate in the house and reduce the change and shrinkage of the finish. Those who did not install a wind bar initially noticed that the overall temperature in the house quickly rises in the summer and also drops rapidly in the winter, the same thing happens with humidity. After correcting this oversight, the owners are surprised to notice that these jumps are eliminated without any additional measures.
The third argument in favor of a wind board is the absence of living creatures under the roof of the house. At a minimum, you won’t let large animals in there, birds won’t build nests, and rodents will also visit less often. Insects, of course, will visit your home, but with some types of roofing, even this can be avoided if the strip is nailed correctly and fits tightly to the rafters. So, in general, there will be significantly fewer nests and hives, but for such a result it is important to know how to make a wind board without mistakes.
Decor
Since the width of the eaves boards rarely exceeds 170 mm, well-known siding blanks can be used to decorate them. Standard sheets of material have very similar dimensions (from 170 to 200 mm).
Since the width of the wind board can be up to 190-200 mm, you can cover it all the way with a G-plank with an outer flange about 20 mm wide (including the vinyl sheet inserted into it).
Another approach to decorating the outer part of the board allows for its simple treatment with drying oil, which, due to its decorative appeal, will give the workpiece an ennobled appearance.
If desired, the roof element can be slightly tinted by diluting a small portion of dry stain in drying oil.
How to make a wind board - step by step diagram
Step 1: Align the edges of the sheathing
For such a roofing material, there is probably a sheathing on the rafters that was not aligned with the edge of the gable, so this will have to be done now. If possible, then remember this at the stage of its installation. You need to measure how long a row of roofing material will take from one side of the house to the other (from gable to gable), and mark the edges with a straight line, it is better to pull a string along it. All protruding ends of the sheathing slats are cut off along this line.
Step 2: Hemming the sheathing
After trimming, we cover the remaining protruding parts of the sheathing with eaves slats; these are non-massive boards (about 2-3 cm wide) that will fasten the sheathing slats and give us an additional way to attach the wind board. They are nailed perpendicular to the protruding elements of the sheathing.
Step 3: Nail the wind board
Now it's time to secure the wind board. To do this, it should be fitted quite tightly to the roof overhang (the part of the material that hangs over the sheathing); in the case of slate, it even needs to be brought under the wave until it rests. And then nail it to the sheathing and cornice battens alternately in a checkerboard pattern. You will get two rows of fastenings, it’s more reliable. This version of the wind board is often decorated in the lower part with carvings, which looks even nicer on the house.
Types of additional elements
Additional elements are an assortment of additional parts to the roofing, which are installed to perform a protective as well as decorative function at the same time.
In addition to the end strip, additional roofing elements include:
- adjacencies. Protect the junction of the roof with pipes and parapets;
- roof ridge. Connects the junction of the slopes;
- valleys, corners. Protect any corners of roof covering parts;
- low tides Helps direct water flows ;
- snow retention components. Prevents snow from melting ;
- gutters. Direct the drain .
Additional elements
In addition, there are quite a lot of decorative components that serve to give the building an individual appeal and a special style (vanes, spiers).
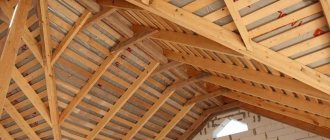
In total, all the structural components of the coating provided for its external equipment must be installed in order to preserve the roof from smudges, wind, snow, and dust. This ensures the reliability and functionality of the roofing structure.
Attaching a wind board for metal tiles - step-by-step diagram
Step 1: Attaching the Bar
Since there is also sheathing underneath the shingles, it is important to trim it as in the previous method. Then it’s time to attach the strip, one side of which is thrown over the last row of tiles, and the second hangs parallel to the gable, tightly pressed against the ends of the battens. Fastening is carried out with roofing screws the color of tiles, the distance between them is maintained up to 60 cm, it is important to ensure that they are located exactly at the level of the ends of the sheathing, because fastening to the air is stupid. The maximum length of such wind boards is 2 m, therefore, several will have to be laid along the length of the roof, making an overlap of 5 cm.
Step 2: Hiding Defects
You should avoid over-tightening the screws so that unsightly waves of metal do not form; it will be difficult to fix this if you do not notice it in time. But it is also better to eliminate scratches that will inevitably accompany the entire installation process immediately after work, otherwise corrosion will not keep you waiting. The easiest way is to paint them over. Use spray paint for this, just choose the color carefully.
Tips and tricks
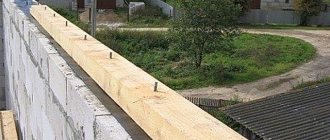
The main condition for successful installation of wind protection is to ensure rigidity of the edges of the roof overhangs. If the roof sheathing is made of thin edged boards, or the overhang is too large, then before installing the gable overlay, the lower surface of the overhang is lined with a pair of 40x60 mm beams.
The second condition is the correct splicing of the wind board. Usually, developers neglect joining the boards and stuff them onto the end of the counter-lattice, even without overlap. If it is not possible to connect the end boards into one element, then you need to at least knock them down at the ends with oblique nails.
How to make a wind board from siding panels - step-by-step diagram
Step 1: Preparation
The sheathing is leveled, as in previous cases, hemming boards are placed perpendicular to it. The finishing strip (or G-profile instead) and the panel (due to its width dimensions, is called “burdock”) are selected. The thickness of the hemming boards plus the width of the sheathing boards is measured, and the required width of the “burdock” is cut along its entire length. Keep in mind that the plank will be inserted into the finishing profile, and it cannot be pushed all the way, you need to take into account the seasonal expansion of the siding materials, so make a gap of 5 mm .
You will need more than one of these parts, but do not rush to cut everything, because you can make a mistake once and ruin a lot of material. You will do the subsequent cutting after installing the first set.
Step 2: Installation
First, the finishing strip is attached, its bent part is adjusted to the overhang of the roofing material, preferably not end-to-end, but quite close. Fastening is done with nails to the sheathing and hemming strips alternately, creating two rows of fixation. Then the “burdock” is inserted, and its bent part is placed under the hemming boards and is also fastened, do not create tension in this case, do not force it in or pull it. Then a soffit is attached to this bend of the “burdock”, which covers the hemming boards, and a finishing strip or G-profile is fixed on the pediment, which supports it on this side. Now the skeleton of your roof can be considered hidden.
General information
Goals
Through it, roof structures can be retrofitted with auxiliary devices that make the roof more secure and reliable. Wind slats for roofs are used to solve small but very important problems:
- Protect the end edge from moisture, most of the moisture will get under the roof covering through the edge of the end, and therefore the wind deflector is installed on the roof of the house at the same time as the roof covering, without delaying the installation of the protective mechanism for more than 2-3 days.
- Fix the outer part of the first roofing sheets, this makes it possible to avoid heat losses and mechanical damage to the vapor insulation film.
- Give the roof covering and the entire structure an additional look of decoration. With proper installation of roof wind boards, it is possible to cover overlaps, joints, insulation and waterproofing, which are clearly visible from the roof end.
Please note that roof wind barrier kits are offered by leading manufacturers as part of standard roof coverings. This will make it easier to choose protection while still getting the perfect board quality from all the different options.
After installing the wind strips, the roof slopes look like a homogeneous monolithic coating, without corners or curved edges. The overlay can increase the rigidity of the roofing sheet and at the same time protect the roofing edge from annoying birds. It is known that crows, jays and jackdaws love to hide various bookmarks and supplies, pieces of branches, chips, moss under the edge of the roof covering, creating small problems for the owners, including the spread of bark beetles and mites.
Types of wind slats for roofing
The design of the wind protection lining differs from the other 9 types of additional type end elements. The main difference will be that each of the structures used to protect the roof covering is profiled in a special way so as to protect its place on the roof as best as possible. The eaves strip along with the drip edges should be installed on the pitched edge, and the ridge corner should be installed on the roof top. Installation of the wind deflector on the house roof is carried out on the end roof extension above the gable. In order to effectively close the joints, and at the same time ensure the normal release of water vapor without the appearance of condensation, the board must be bent and profiled in a special way.
For each roofing type, they produce their own versions of wind-type planks:
For a soft roof, a wind-type plank with a U-shaped profile is used.- For metal tiles, slate, profiled flooring and ondulin, the G-profile is used.
The thermal and mechanical load on a protective type lining is usually greater than on conventional roofing sheets, and therefore the part is either made of thin-sheet galvanized steel coated with a polymer or polyvinyl chloride, resistant to ultraviolet radiation and temperature changes.
Requirements
On sale you can find a fairly large number of wind slats of various designs, made of impact-resistant polyurethane or polycarbonate. They are not cheap, and their suitability as a protective board is questionable, and their suitability as a protective board is a huge question, because both types of plastic have a high thermal expansion coefficient, much greater than that of slate or galvanized metal.
Please note that the windproof plastic roof board must be resistant and ductile to the influence of solar ultraviolet radiation.
Both polycarbonate and polyurethane-type plastic quickly deteriorate under the rays of the sun, and therefore only polyvinyl chloride is suitable for roofing, ideally in the same tone as the main roofing shade.
Video description
In this video, a home craftsman demonstrates in detail the construction of a gable overhang with wind strips for corrugated sheeting:
Sealant is used to seal the joints between the wind strip and the corrugated sheet. An alternative to paste-like material can be sealing tape or foamed double-sided tape. Experts prefer a special seal that follows the profile of the roofing sheet. The main reason is the unlimited service life.
An example of a universal sealing tape for corrugated sheets Source nohoho.ru
In the case of cornice strips, installation with direct joining of individual elements is often observed. But this should be abandoned, since the ends quickly become unusable under the influence of natural phenomena. That is, it is better to maintain an overlap in the range from 100 to 500 mm. The direction is chosen according to the flow of water so that it does not flow under the profile. Hardware is located in increments of 200-300 mm. The planks are fastened from the center to the edges.
Additional information about the appointment
The described plank is also called a shaped inlaid element. It is used for the construction of corrugated roofing. This element looks like a corner with one mounting shelf. The plank is attached to the sheathing, thereby protecting the overhang from snow, moisture and gusts of wind.
The wind strip for corrugated sheets is made of high-quality galvanized steel. The material is covered with polyester or pural during the production process. Some manufacturers produce shaped elements with stone chips. This node performs several functions.
Firstly, it protects the roof and gable overhangs from moisture. Secondly, it provides protection from the wind. Thirdly, it gives the roof structure an aesthetic appearance. Some believe that a wind strip for corrugated sheeting is not needed, because the outer surface of the roof is protected by a covering material. However, this is not entirely true, because rain and melt water, as well as snow, quite often penetrate into the rafter frame from below. This situation can cause the wood at the base of the sheathing or rafters to get wet. This can even deteriorate wood that has been treated with an antiseptic. But the described plank does not allow water to pass through, it extends the life of the roof and preserves the wooden elements.
If you are wondering what a wind bar is, you should know that it also protects from side gusts of wind, which is especially important for those areas where climatic conditions are difficult. The latter quite often cause deformation and failure of the roofing material. Unprotected edges of the deck may become broken due to intense wind loads. But if you install the bar, the roofing cake will not be damaged, and cold air will not end up under the sheathing.
Roof overhang lining device
Let's first figure out what roof eaves lining is.
The roof eaves lining has the following design options:
By the way, soffits are not necessary - in most cases, solid or partially perforated panels are sufficient:
The tree is always held in high esteem
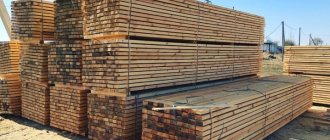
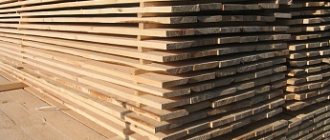
Wooden finishing is the oldest and most famous method of finishing an eaves overhang. The board for filing is produced at enterprises that produce carpentry products. Lumber for roofing
- This is wood that is divided into groups by cutting.
This type of building material, which has long been used in many areas of construction, is becoming especially relevant today due to its environmental qualities. To protect wood from bugs and rot, as well as to give it fire-resistant qualities, the starting material is treated with a large number of special products.
To hem the eaves overhang, an edged board of arbitrary length and width with a thickness of about 25 mm is used. To protect overhangs, pine, spruce or larch boards are usually used. The latter are more expensive, but also more durable. These boards have different ends: profiled tongue-and-groove, straight or notched.
With straight ends, they are mounted end-to-end and there are gaps between them, which means there is no need to make additional ventilation holes. If the boards have perforated edges or are attached with overlap, it is necessary to make ventilation slots and attach a mesh to them. The distance between two board fastenings should not exceed 100 cm.
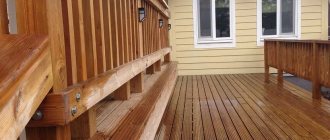
Wooden overhang lining requires constant monitoring of its condition. Approximately every 5 years, it must be treated with protective agents against fungus and rot, as well as bioprotection; after all impregnations, the wind board is tinted or varnished.
Work methodology
The algorithm for carrying out the work will depend on the installation location. Installation of the eaves strip is carried out on the eaves overhangs, until the roof covering is laid and the drain is installed. Installation is carried out with self-tapping screws, which must be 40 cm apart from each other. The overlap ranges from 50 to 100 mm.
You should start from the edge. The waterproofing film covering the sheathing must be lifted and laid over the lath. Proper installation means that the wind curtain element must be pressed against the inner surface of the gutter. In this case, moisture will not penetrate the rafters of the slope. Sometimes for this purpose strips made to individual sizes are used.
The final stage of roofing work is usually considered to be the installation of additional elements. They have two main functions: protective and decorative. These include such details as various junctions, ridges, corners, adapters, valleys, ebbs, gutters and so on. Among one of the most important such additions, it is worth highlighting the wind strips, which are also often called end, front, and final, thereby explaining the purpose of these elements. Therefore, it is worth knowing what the end strip is for, what it is and what features it has.
Construction dictionary
In wooden architecture, a board decorated with carvings covers the transition from the logs of the wall to the boards of the pediment of the hut.
See the meaning of Frontal Board in other dictionaries
Board - w. dska, dshtitsa, church. (Greek diskos, Italian desco, German Tisch), layer, plate, slab, flat beam, thin, compared with length and width; own gorge, hewn or sawn. Dahl's Explanatory Dictionary
Board - boards, vin. board, plural boards, boards, boards, w. A piece of wood of small thickness, flat on both sides, usually cut from a log. Inch board. Batten. Pine. Ushakov's Explanatory Dictionary
Board J. - 1. Flat on both sides, not very thick piece of wood, sawn or hewn from a log. 2. Plate, slab. // Such a plate, a special-purpose plate. 3. Wooden. Explanatory Dictionary by Efremova
Board - -i, wine. board; pl. boards, boards, boards; and. 1. A piece of wood of small thickness, flat on both sides, sawn or hewn from a log. Dubovaya village. Fence made of boards. Kuznetsov's Explanatory Dictionary
Board - - lumber 13-100 mm thick and more than double thickness. A board with a thickness of up to 32 mm inclusive is called thin, over 32 mm - thick. They are differentiated by the degree of processing. Economic dictionary
Dashboard - (slang) - summary tables, sometimes accompanied by diagrams, presenting basic information about the state of affairs at the enterprise; contains technical, economic, marketing. Economic dictionary
Insurance Board - A metal plate (usually made of tin) mounted on the facade of a building, structure, etc. Certified the existence of a fire insurance contract. On S.d. usually depicted. Economic dictionary
Bulletin Board System - Electronic Bulletin Board - online systems from which users can download software, leave messages there for other users and thus exchange information. Economic dictionary
Board - This word was borrowed from Germanic languages (in English disc - “disk, plate”, in German Tisch - “table”, etc.), and goes back to the Latin discus - “circle, disk, dish”. Krylov's etymological dictionary
Board - - according to the Pskov Judicial Charter, a type of written loan agreement for a small amount; an informal written document. Legal dictionary
Dashboard - (slang) - summary tables, sometimes accompanied by diagrams, presenting basic information about the state of affairs at the enterprise; contains technical, economic, marketing. Legal dictionary
Memorial Plaque - a slab (most often made of marble, granite, etc.) with an inscription (sometimes with an image) perpetuating the memory of a lyceum or event; usually installed on the wall. Large encyclopedic dictionary
Board - - according to the Pskov Judicial Charter, a type of written loan agreement for a small amount; an informal written document. Historical Dictionary
Border Board - A metal or wooden board with an in-depth pattern for stamping borders - dyed dough. Culinary dictionary
Salting Board - A device used for proper professional salting of lard. Consists of two one-and-a-half-inch boards (“forty boards”) ranging in length from half a meter to. Culinary dictionary
Raina Board - See Zenera, flashcards. Psychological Encyclopedia
Frontal Thrust is the ratio of engine thrust to its frontal area, which refers to the largest cross-sectional area of the engine (midsection) without components. In a turbojet engine. Encyclopedia of technology
Instrument Board - a structural element of a crew member’s workplace; serves for placement in accordance with certain rules or requirements of information display systems. Encyclopedia of technology
BOARD - BOARD, -i, wine. board and plank, pl. boards, boards and boards, boards and boards, w. 1. A cut of wood that is flat on both sides, obtained by longitudinal sawing of a log. Thick, thin. Ozhegov's Explanatory Dictionary
Board - 1. A long plate sawn or hewn from wood, the width of which is much greater than the thickness, ranging from 3/8 to 3 inches. 2. Rectangular stone. Architectural Dictionary
Mortgage board - A board (2) placed in the foundation of a building with information about the time of construction and the persons present at the foundation. (Terms of Russian architectural heritage. Pluzhnikov V.I., 1995) Architectural Dictionary
Artificial Board - A board (1) made from sawdust bonded with Portland cement. (Terms of Russian architectural heritage. Pluzhnikov V.I., 1995) Architectural Dictionary
Red board - Frontal board. (Terms of Russian architectural heritage. Pluzhnikov V.I., 1995) Architectural Dictionary
Frontal board - covers the transition of the logs of the wall to the boards of the gable of the hut, usually decorated with carvings. (Dictionary of architectural terms. Yusupov E.S., 1994) * * * (red board, frieze. Architectural Dictionary
Wane board - A board (1) in which each of the two narrow longitudinal sides has retained the bark - wane, or oblivin. (Terms of Russian architectural heritage. Pluzhnikov V.I., 1995) Architectural Dictionary
Edged board - A wooden board (1) having a rectangular cross-section along its entire length. (Terms of Russian architectural heritage. Pluzhnikov V.I., 1995) Architectural Dictionary
Wedge cladding board - : A type of wall board. (Architecture: an illustrated reference book, 2005) Architectural Dictionary
Casting board - A board (1) covering the upper edge of a brick or stone plinth at the base of wooden walls and embedded with an edge into the lower crown. (Russian architectural terms. Architectural Dictionary
Feather Board - A board (1) one and a half inches thick. (Terms of Russian architectural heritage. Pluzhnikov V.I., 1995) Architectural Dictionary
Half-edged board - A wooden board (1) with unequal large planes and ends - due to partially remaining bark. (Terms of Russian architectural heritage. Pluzhnikov V.I., 1995) Architectural Dictionary
Installation features
Before attaching the wind strip for corrugated sheeting, you should familiarize yourself with the features of the technology. You can do the work yourself, because the installation of an additional element does not require the master to have construction experience or special tools.
The technology involves the use of roofing screws with rubber seals. One plank will require approximately 6 fasteners. Among other things, you should prepare:
- sealant;
- screwdriver;
- hacksaw for metal.