by Alexey | Crafts Decor Workshop Furniture Cheap Accessories | Saturday, September 23, 2017
| Follow Make-Self.net on Facebook and be the first to read our articles. |
Using the simplest tools and materials, you can give wood the most original texture of patterns and ornaments. Sometimes the most ordinary nails can turn a simple smooth board into a beautiful textured building and finishing material or piece of furniture. This list is by no means complete, but is just a starting point to start working with wood and transforming an ordinary board into an element of art. You need to pick up a hammer and a nail and use your imagination to start working with wood.
We always try to provide you with simple ways to transform your home. This material confirms this.
Now let’s look at specific examples with photos of 12 simple patterns on wood that you can make with your own hands using simple tools.
How to create brushed, stained, waxed and patinated wood (texturing)
Natural wood attracts the eye with its beautiful texture.
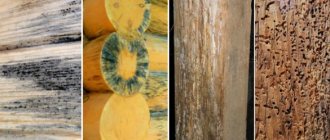
The alternation of soft and hard annual rings creates a fascinating pattern with twists, waves, unusual knots, cracks and wormholes. This truly creative texture was created by nature itself, and our task is only to highlight it, reveal it, and make it tangible. All technical processes associated with this are called wood texturing.
To texturize wood, brushing, staining, patination and waxing techniques are used.
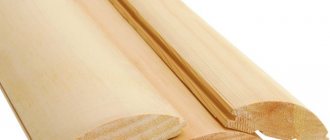
Brushing , from English. Brush is a technique aimed at enhancing wood grain by combing out soft fibers. The wood species has its own specific texture due to the peculiarities of the growth of fibrous layers.
EVERYTHING YOU NEED FOR THIS ARTICLE IS HERE >>>
Soft fibers perfectly absorb water and coloring compounds and simply lend themselves to mechanical action, namely, combing, while hard fibers, on the contrary, appear after combing with hard combs. The soft fibers are combed out using special iron brushes.
The working part of such brushes consists of bundles of solid corrugated wire, fixed in several rows on a wooden or plastic base with a handle (for manual combing) or clamped into an iron disk as attachments for power tools (drills, grinders, engravers) to mechanize the process.
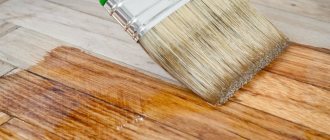
You can purchase such brushes at any construction or hardware store. After brushing, the wood grain acquires a pronounced relief, but only to the touch. To visually highlight the resulting texture, you need tinting with stains, waxes, paints and patinas.
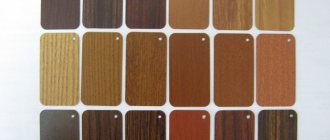
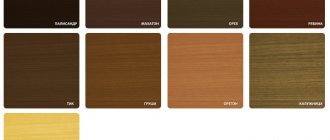
Stain, stain or glaze is a special composition in the form of water for impregnating and tinting wood.
Modern stains are mainly divided into aqueous and non-aqueous (based on organic solvents, alcohol or wax). The main difference will be that water stain is easier to apply sparingly to the surface and deal with streaks, but after drying it is still afraid of water.
Non-aqueous stain dries faster and is moderately more difficult to apply. Thanks to the presence of waxes and oils and other additives, it is able to withstand atmospheric conditions, but has a pronounced odor. For decorative interior work, aqua stain is the best choice.
Stains are applied to dust-free wood with a brush or cloth swab. At the same time, the composition does not form a surface film, but penetrates to a certain depth, being most actively absorbed into the soft fibers, due to which the texture of the wood is emphasized even more.
For the most intense color, you can alternately apply several layers of stain with constant drying of each layer.
Compositions for tinting wood (stains, stains, glazes) can be purchased both in construction stores and in art stores.
I will give more high-quality examples of compositions (one might say beloved ones)
Wood glaze HobbyLine, C.Kreul (Germany)
Water-acrylic translucent composition. Perfectly suitable for painting wooden objects: it gives a wonderful color and reveals the structure of the wood.
Unlike building stains, azures have a rich range of colors and small packaging, which is very convenient if you need to purchase several colors.
Colors can also be combined to obtain additional colors.
FolkArt stain © Stains, Plaid (USA (United States of America - a state in North America)
)
Non-toxic composition on an aqua base for application to wood surfaces.
The stain is quite thick and concentrated in color, so before use it must be thoroughly mixed and better diluted with water. After application, you can wipe off excess with a soft, damp cloth.
After drying, water stains become lighter and create a matte, cloudy surface; in order to restore depth and richness to the coating, you need to apply a final varnish or wax.
Waxes-polishes perfectly protect wood and give its surface a silky and very pleasant shine. They perfectly highlight the wood grain, sand and polish well.
There are neutral (transparent) waxes-polishes and colored ones, which serve not only for finishing the product, but also for additional tinting (we talked about some of them in the article about covering the floor with oil and wax).
Waxes are applied to the surface with a hard bristle brush and polished to a shine with a fleecy cloth or iron polishing wool. They are sold in tins in hardware stores, and can also be found in craft stores.
Wax polish, Stamperia (Italy)
Paste wax polish for final coating. Available in three colors: neutral, ancient (rusty brown) and dark (dark brown). Based on natural waxes with a pleasant fragrance.
Simply apply to the surface; after a few hours you can polish it with a piece of thick felt. Can also be used for interlayer waxing when working with acrylic paints to create abrasions and chips.
Transparent finishing materials for wood
It is preferable to select transparent finishing materials for wood in order to preserve the decorative natural texture of the wood. Of course, in times of global shortages it was easier to make repairs - whatever materials were available in the store, they bought them. With the current variety of products, buyers' eyes run wild. In this article we will try to understand transparent finishing materials for wood.
Varnish is a material that forms a uniform transparent film. At the same time, the varnish itself will not necessarily be transparent; sometimes it looks like PVA glue. If the varnish is mixed with various miks (pigments), then this composition is called glaze. Oil varnishes are included in a separate group. They contain less resin and more oil, and this coating takes up to 4 days to dry.
You need to choose a varnish based on the load that the surface treated with it will experience. For flooring, it is better to buy a varnish with high wear resistance; for furniture, a varnish that can withstand medium or low loads is suitable.
Before applying varnish, the surface must be thoroughly sanded and sanded, then apply the coating along the grain with a wide brush. Usually the varnish is applied in 2-3 layers.
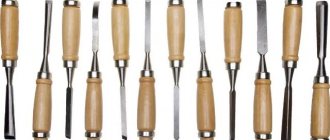
Brushing tool
The introduction of aged wood parts in the decoration of furniture and premises is a well-known technique, but this is no less relevant today. One of the methods for creating such a visual effect is brushing, performed with special brushes on machines or manually.
Professional woodworkers have been familiar with the term “brushing” for a long time.
The technique is used along with grinding and sharpening. This method removes small imperfections from the surface in the form of protruding fibers, which give an unpleasant roughness to the eye, but at the same time a large ordered relief (fiber pattern) appears.
On parts that have aged naturally, it appears due to uneven drying and abrasion of the summer (soft) and winter (hard) layers of wood. In the case of brushing, the erosion process is accelerated by mechanical processing.
The brushes used for this are not the same and can have different purposes depending on the bristle material (alloy or polymer-abrasive), its rigidity and shape (straight or in flagella).
Since the decorating process is a creative one, there are no general tips on choosing equipment: every master has his own secret, only the ability to choose a tool and the affordability of its price are important.
In the case of occasional use and/or small volumes (up to 10 m2 of surface), it is advisable to purchase hand-held power tools; they are created under several professional brands. With all this, it is necessary to keep in mind that the most intensive implementation of such equipment is not economically feasible: labor costs are significant, and the equipment often requires replacement. It is also important into whose hands the instrument falls - just as anyone you wouldn’t trust such work to.
Wood structuring equipment
Brushed wood in a loft style bathroom interior
Brushing is the most accessible and easy-to-perform method, allowing you to quickly visually age natural material. This process can be carried out in a home workshop using a minimum of equipment.
Brushing wood with your own hands is not difficult
This is one of the few technologies that allows you to achieve excellent results using exclusively manual labor. For this you will need:
- metal brushes of varying hardness, which are used to roughly remove soft fibers from the surface of the workpiece
- sandpaper of various grits for rough sanding and final polishing
- stains and other means to give wood maximum decorativeness
- varnish for opening the product at the end of the brushing process
Strict desk with aged wood effect
Brushed wood floors look very interesting
To further simplify wood structuring work and make it significantly more productive, it can be mechanized. For this, variable speed drills or special brushing machines are used. They come with three types of flat or wide brushes: metal, polymer with abrasive, and sesal or hair brushes. By observing the order of work, with the use of mechanization, you can get impeccably executed work for various products.
Tags: brushing, structuring, highlighting natural texture, woodworking, decor
Comments 19
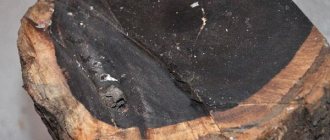
This piece of wood is in 1 photo. on right. smiles O_O
Are sparkles visible on Supi Arctic?
Yes but not much. Although it very much depends on the terrain, light and application method. Plays with one word. The valtti arctic is more visible.
I still haven’t figured out how the wonderful texture comes out in the end, but I’m very curious.
It pulls out soft fibers, forming such a texture, and if you also burn it later and into a transparent varnish, then it’s beautiful.
Despite the greater information content of this entry for us, the log on the right in the first photo still somehow looks askance at the whole thing