Wood planing
TO
category:
Carpentry and joinery work
Wood planing
Next: Chiseling wood
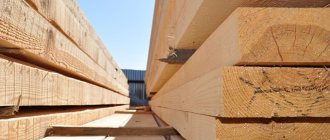
Wood is planed in order to obtain a smooth surface of wooden parts and give the rough blanks the correct shape and exact dimensions.
Depending on the degree of surface cleanliness and the dimensional accuracy of the parts being processed, manual planing of surfaces is divided into rough (for sherhebel), medium (for a plane) and fine (for a jointer).
Machine planing has one degree of planing purity.
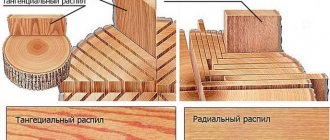
Based on the shape of the processed elements, a distinction is made between planing of flat surfaces (straight parts with a square or rectangular cross-section) and profile planing (parts with a curved outline and a figured cross-section).
Hand Planing Tools
Tools under the general name of planing are used for planing.
Every plow consists of a wooden or metal block, a steel cutter (piece of iron) and a wedge.
To make it easier to work with plows, some of them have handles on the blocks. The plow cutter is placed in a special socket of the block, the so-called tap hole. The lower part of the block (sole) has a narrow slot for the cutter to exit, called the span.
The leading edge of the span provides support for the chips. To prevent the leading edge of the span from collapsing, an insert made of hard, low-wear wood (boxwood, backwood, etc.) is embedded in the sole of the block.
The angle between the back of the tap hole and the plow base is called the cutter attachment angle. It is equal to the cutting angle.
The cutters in all plows protrude beyond the plane of the sole - from 1 to 3 mm in plows for rough planing and from 0.1 to 0.3 mm in plows for fine planing. The cutters are either solid or welded - with a working part made of high-quality tool steel.
Blocks and wedges are made from dry (no more than 12% humidity) hornbeam, beech, maple and ash wood. The sole of the shoe must be smooth, clean and free of distortions and curvature.
The following planes are used for planing flat surfaces of wood: bearer, sherhebel, planes (single and double), sander, jointer, semi-jointer, tsinubel (Fig. 130).
The bearer is used in carpentry for rough sharpening of logs, beams and boards. The width of the piece of iron is 50-60 mm. Planing with a bear is carried out by two workers, who usually sit astride the material being planed, facing each other. For this purpose, the bear has four side handles.
Rice. 1. Tools for planing flat surfaces: a - bear; b - sherhebel; c - plane; g - double plane; d - jointer
Scherhebel is used in carpentry and joinery work for the initial stitching of parts before processing surfaces with a plane. Sherhebel has a piece of iron 30-40 mm wide, protruding 3 mm beyond the plane of the sole. The cutting edge of the piece of iron is oval, thanks to which it is possible to plan wood not only along, but also across the fibers without tearing them. Scherhebel removes narrow and thick chips, leaving quite deep hollows in the wood.
A single planer is used to level the surface planed with Sherhebel. The blade of the iron is straight with slightly oval edges.
A double plane differs from a single plane in that it has a second, chip-breaking piece (hump). The closer the edge of the hump is located to the cutting edge of the cutter, the cleaner the processed surface is. A double plane is also used for clearing burrs and chamfering edges.
The sander is used for cleaning burrs, twisted places and ends only in carpentry work. It is a shortened double plane with a cutting angle increased to 60°. Removes very thin shavings and can be used on very hard wood.
The jointer is used for precise processing of large surfaces under a ruler and for aligning (jointing) edges. The length of the jointer block is 700-900 mm, width 85 mm, height 75 mm, width of the iron 65 mm. There is a cylindrical insert in the front of the block (impact button); hitting the button knocks the jointer piece out of the tap hole.
In addition to the listed tools, planing tools include a cycle, which is a plate 100-150 mm long, 60 mm wide and up to 1 mm thick. It is often made from old hacksaw blades, bow saws and band saws.
Cycles are used (in carpentry) to clear hardwood after processing it with a double plane. Cleaning the scrapers gives a high surface cleanliness.
The following plows are often used for shaped planing of wood: humpbacks (wooden and metal), zenzubels, folding gobels, tongue and groove, fillets, figares, staff gobels, federgobels, ground tubes and moldings.
Humpbacks are used when processing concave and convex surfaces. Therefore, their pads have a concave or convex sole, respectively. The sole of a metal humpback is made in the form of an elastic steel plate, which can take a concave and convex shape with the help of special screws. The humpback's iron is the same as that of a double plane.
Zenzubel is used for selecting and cleaning folds of different sizes. Last length 250 mm, width 40 mm, height 80 mm. The sole of the last is straight. To throw out the chips, a sink is made in the side of the block. The gland of the zenzubel has the shape of a blade, its width is 20 mm at the blade and 7 mm at the tail; it is inserted into the block from below and secured with a wedge from above. The blade can be straight or beveled.
The rebate serves the same purpose as the zenzubel, but it can only select a rebate of one specific size. After selecting the fold (quarter) with a folding tape, they must be cleaned with a zenzubel.
The tongue and groove pile is used for selecting the edges of tongue and groove boards. It consists of two blocks connected to each other with screws. One of the blocks has a hole for the piece of iron, and the second is a guide bar. The depth of the tongue is adjusted with screws, and the width depends on the width of the iron.
The tongue and groove has a set of pieces of iron of different widths.
The fillet is used to plan grooves of various depths and widths with different radii of curvature. There are fillets with glands of different profiles and sizes. The cutting edge of the iron is rounded.
Rice. 2. Tools for figured planing: a - humpbacks; b - zenzubel; c - tongue and groove; g—fold tapestry
Figarei is used in carpentry for selecting a wide profile or wide chamfer on the edges of solid wood panels. It has a wide figured or inclined sole, a figured or oblique piece of iron up to 90 mm wide.
The headstock is used in carpentry for profiling posts (thin blocks) covering gaps in places of detachable joints, etc. The blocks come in different widths. The blade of the iron and the sole are usually concave.
Federgobel is used to select ridges on the edges of boards that are inserted into the tongue. The federgobel iron has a U-shape.
The primer is used for cleaning the trapezoidal groove in the direction across the fibers and for sorting it after cutting along the edges with a reward.
The molding is used for shaped processing of the front edges of parts.
Sharpening and adjustment of hand planing tools
A piece of iron with a straight or oval cutting edge is first sharpened on a wet sharpener, and then on a fine-grained whetstone. After sharpening, the final editing (finishing) of the blade of the piece of iron on the whetstone is carried out.
The blades of tools intended for profile planing, in cases where the profile of the blade does not allow them to be sharpened in the above manner, must be sharpened with files of the appropriate shape, having a fine notch. Straightening after sharpening with files should be done with shaped hardwood blocks, soaked in oil and sprinkled with emery powder.
Rice. 3. Techniques for sharpening pieces of iron: a - sharpening on a wet sharpener; b - sharpening on a block; c - editing on the touchstone
Techniques for sharpening bits on a sharpener and whetstone, as well as straightening and finishing blades on a whetstone are shown in Fig. 3.
When sharpening a piece of iron on a wet sharpener, you need to hold it with both hands. With one hand, hold the piece of iron motionless, slightly moving it across the width of the working surface of the sharpener, and with the other hand, lightly press the piece of iron with the cutting edge against the sharpener.
When sharpening a piece of iron on a block, you also need to hold it with both hands. Sharpening is done using linear and circular movements. To keep the block motionless, it is usually placed in a special nest, hollowed out for it on a wooden stand.
The whetstone, just like the sharpener, must be moistened with water. When dry sharpening, the iron heats up and the steel of the blade loses strength; When sharpening, the piece of iron must always be at the same angle to the working surface of the sharpening tool and adjacent to it with the entire plane of the chamfer. You should not press the sharpening tool hard with a piece of iron, as this will not speed up the sharpening and may worsen its quality.
The editing of the piece of iron on the whetstone is done using circular movements of the chamfer. The whetstone should be moistened with water or lightly oiled. When making final adjustments to the touchstone, the piece of iron must be turned either with the back or the front side.
After finishing sharpening and straightening, you should check the sharpness of the iron blade by running a finger moistened with water across it in several places, or by holding the blade up to the light. When the iron is rotated around the transverse axis at a sharp chamfer, the transition from illumination to darkening should occur immediately along the entire blade.
The straightness of the blade is checked by applying a ruler to it with the edge; The presence of a right angle between the blade and the edge of the piece of iron is checked with a square. The sharpening angle is checked with a special template, which is a plate with angles of 20, 25, 30 and 45° cut into it.
Setting up a manual planing tool involves setting the pieces of iron to the required chip thickness. The glands of the mole cricket and sherhebel extend beyond the plane of the sole of the block up to 3 mm. When setting up single and double planes, the blade of the pieces of iron is released by a very small amount (0.1-0.3 mm) so that the thinnest chips are removed.
The correct installation of the piece of iron is checked initially by eye inspection, and then by trial planing with a tool.
When checking by eye, the instrument must be held with the sole up, the front end facing the eye. The blade of the iron should protrude evenly across the entire width of the sole without distortion.
If during test planing it turns out that the tool removes too thick chips, the output of the piece of iron must be reduced somewhat. This is done by lightly hitting the rear end of the block with a mallet. In cases where the tool does not plan or takes too thin chips, the output of the iron should be increased. To do this, you need to lightly hit the front end of the block with a mallet, or, if this does not give results, lightly hit the top of the piece of iron with a hammer.
In Fig. Figure 4 shows the basic techniques for disassembling, assembling and setting up a plane. During all operations, the plane must be held in the left hand, holding the piece of iron with the thumb through the blade.
Planing techniques with hand tools
For planing timber, workbenches equipped with special clamping devices and stops are usually used.
Before planing, you must carefully examine the surface of the wood and determine the direction of the fibers and annual layers, as well as the presence of defects.
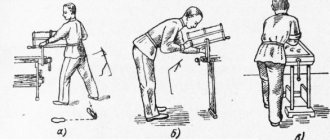
Before starting work, you need to select the necessary tool and check its condition (adjustment). You should stand at the workbench to the left as you plan, slightly half-turning, turning your right shoulder towards the workbench; The foot of the left leg should be parallel to the workbench, the body tilted slightly forward. When planing, only your hands should move; The less the body moves, the less tired the worker gets.
Rice. 4. Techniques for assembling and setting up a plane: a - inserting a piece of iron; b - holding the piece of iron; c — releasing the blade by hitting the front end of the block; g—releasing the piece of iron by hitting its top with a hammer; d - securing the piece of iron by hitting a wedge; e - checking “by eye” the correct release of the piece of iron
You need to plan at full swing in a straight line, pressing evenly on the tool. Do not press too hard on the tool, especially at the ends of the parts, so as not to “overwhelm” them. During the return movement, the rear end of the tool must be slightly raised, otherwise the blade can be damaged (grinded).
Planing with a sherhebel should be done at a slight acute angle to the direction of the wood grain, since when planing along the grain, the material can be imperceptibly re-planed against the specified dimensions. When planing across the grain, flakes are obtained at the edges of the material.
Planing with planes is carried out along the grain. Deviations from this rule can only be allowed when cutting through (cleaning) twisted areas on the surface of the wood with a double plane.
Rice. 5. Planing the end: a - in the usual way; b - using the bottom
Planing of surfaces should be performed without removing the jointer from the material along the entire length of the material. It is advisable to joint the edges of the boards in pairs, this makes it easier to achieve the required jointing accuracy.
Planing of the end of the part must be done before planing the plates and edges, so as not to spoil the planed surfaces with flakes. When trimming parts, the plane must be held obliquely to the direction of planing. Trimming is done first from one side to the middle of the end, and then from the other side. Narrow bars end up on a special device - a bottom, or with a stand of an auxiliary bar. The quality of the planed surface is checked either by eye (by viewing against the light) or by applying a ruler to the planed surface.
Planed bars must have mutually perpendicular edges. The correctness of planing “into the corner” is checked with a square.
The correctness of the jointed edges of the boards is checked by applying the jointed edges to each other, and there should be no gaps between them.
The check is also accompanied by an inspection of the quality of the planed surfaces (absence of roughness, scoring and other defects) and control measurements of the dimensions of the processed parts, taking into account permissible deviations.
Planing with hand electric planers
Manual electric planers are used for planing logs, beams and boards, planing floors and planing various blanks for joinery. There are several types of electric planers with a blade shaft rotating from an electric motor. Recently, planes of the I-24 and I-25 brands have been used, the electric motors of which have an external rotor, which is also a blade shaft. The rotor has four knives. The planing width of the I-24 electric planer is 100 mm, and that of the I-25 is 60 mm.
Rice. 6. Manual electric planer I-24: a - general view; b and c - planing techniques
The I-24 electric planer has a rigid frame in which a three-phase squirrel-cage electric motor is mounted.
An aluminum drum with four knives attached to it is pressed onto the engine rotor. The planing depth is adjusted by lowering the front panel using special screws. The knife shaft is protected by a safety valve, which ensures safe planing.
The planer can be used as a tabletop permanently installed planer. To secure the electric planer (on a workbench or wooden frame), there are four special legs with holes for bolts. For planing parts “in the corner” there is a removable guide ruler. The electric planer has a hand brake, which ensures a quick stop if necessary.
When planing with electric planers, you can remove chips with a thickness of 1 to 2 mm.
Figures 6, b and 7, c show techniques for planing wood with electric planers.
Electric planers, as a rule, operate from a lighting network with the cord plugged into a regular outlet. The operating mode for electric planers is the same as the mode established for other hand-held power tools. When working with them, you must follow the general safety rules when working with electrified tools.
Sanding wood
After all the work is completed, all you have to do is level and clean the treated surface after the plane. To sand the surface, emery cloth is used, which is an abrasive coating on a paper, fabric or cardboard base. Depending on the size of the grains and the type of abrasive, several types of sandpaper are distinguished. On the inner surface of the roll, pay attention to the letter and number designation. The letters indicate the types of abrasive used in the sandpaper, and the numbers indicate the degree of grinding of the abrasive. The smaller the number on the inside, the finer the grains applied to the surface of the skin.
If you see the letter “C”, then this means that crushed glass was used here. “KB” in this case means quartz, and “KR” means silicon. These are one of the most commonly used abrasives.
Rough, coarse-grained sandpaper is used for rough surface treatment, but for final sanding it is better to use fine-grained sandpaper, which will not leave traces of grains on the surface.
To prevent your fingers from getting tired of holding the skin correctly, take a small block and wrap it in the skin. In addition, such a block allows you to smoothly clean the surface without the formation of bumps and depressions. The evenness of the surface also depends on the force of pressure on the block. The harder you press, the more likely it is to create an uneven surface. The direction in which you sand is also important. If you sand across the direction of the grain, the marks will remain more noticeable than when sanding in the direction of the grain or slightly obliquely.
Mechanical restoration. Tools for work
To carry out mechanical processing of wood using this method, an electric plane is used. Models for operation IE-5707A-1 and IE-5701A.
As for the first hand-held electrical apparatus, it is most often used in carpentry workshops, if the place of work is equipped with a workbench. To plan wood with a plane of this type, it must consist of an electric motor, a V-belt drive, a cutter with replaceable knives, movable and stationary skis, a head, and a handle. The essence of the processing technology is as follows. The rotor of the electric motor rotates in two ball bearings. A fan is installed on the shaft. In addition, a drive pulley is also attached to the end of the shaft. The torque created by the rotor is transmitted to the cutter using a V-belt drive. This unit has the ability to adjust the planing depth. To do this, the front ski can be lowered or raised. The equipment can also carry out roughing and final processing. The difference is that a grooved cutter is used for roughing, and a flat cutter is used for finishing.
The second type of electric planer consists of approximately the same parts. The difference is that the V-belt drive drives the blade shaft, not the cutter. The knife shaft itself consists of two knives.
Wood cutting
Used only when processing ridges, plates and quarters. This processing technique involves separating the bark from the solid wood. The main tool used in the work is an axe. All actions of the ax are directed from the top to the base along the circle of the trunk. In this case, the ax blade should not penetrate deep into the bark layer, so as not to damage the wood itself. As work progresses, protruding knots should be cut off along with the bark, thereby maximizing the preparation of the wood for subsequent processing.
Tool setting and operating methods
Before starting work, you need to check the equipment. It is important that the knives on electric planes are installed correctly, sharp enough and properly sharpened. It is very important that the blades extend to the same length and are flush with the back panel. Another important rule is that the mass of the working knives should be the same. The electric planer itself must be grounded, and any adjustment, adjustment or repair can only be carried out if it is disconnected from the electrical network.
The process of operating an electrical apparatus is carried out as follows. The plug is plugged into the network, after which pressing the power button will start the electric motor. After the electric planer reaches the required rotation speed, it can be lowered onto the wood workpiece. It is important that the workpiece is completely cleared of any debris, dust, dirt or ice if the work is carried out in winter. It is very important that the plane descends slowly enough, otherwise there will be a shock when the workpiece and the knife come into contact, which will most likely destroy the lumber. The unit must move along the material strictly in a straight line. It is also worth saying that after processing is completed for the first time, the machine is turned off, the wood is returned to its original position and the operation is repeated.
It is also very important to follow safety precautions here.
It is important to ensure that all live parts of electrical equipment are properly protected. In addition, only an employee who has undergone special training is allowed to work with an electrical unit. It is also important to ensure that the knives do not touch metal parts during operation.
Wood cutting
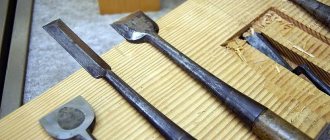
Cutting is always done either with chisels or a blunt knife. Most often, wood is sampled with chisels, which allow you to make precise holes and recesses of various shapes and depths. A blunt knife can only somewhat replace a tool that does not exist.
When using the tool that is most suitable for the job, you will understand that replacement should always remain only a temporary phenomenon. The faster you find the tool you need, the faster and better the work will be.
Chisels are used in the same way as a chisel, only the impact on the wood is done without a hammer.
Cutting wood is carried out as follows: on the marking, place the chisel blade with a chamfer inside the future recess. Then cut the chisel 2-3 mm deep into the wood. After the first cut, place the chisel 1-2 mm deep into the intended socket and make the same cut. As a result, you will end up with a small notch. By gradually moving deeper and grabbing more and more wood at a time, you will make the hole you need. In the middle of the recess, the cut can be made to a depth of approximately 5~6 mm, but near the edges, so as not to damage the sides, only 2~3 mm, no more.
In order to make a through hole, make a cut from the very edges to the full depth. If necessary, pruning can be done in several steps.
After removing the wood, be sure to clean the bottom and sides of the resulting recess with a narrow straight or semicircular chisel.