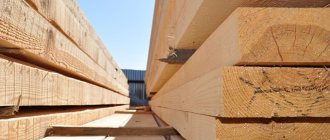
Half-timber cutting is a simple and reliable way to connect two identical parts at right angles. This method is useful when creating corner, cross and T-shaped joints. By marking and selecting half the thickness of the material in each part, you will get a neat and durable connection, which will become indispensable when assembling frames and timber structures.
Cutting into half a tree is done in different ways: using a router, circular saw or band saw. We'll show you how to create perfectly tight joints using a classic set of hand tools.
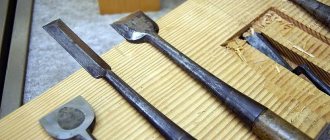
Read on the topic: All about carpentry chisels: types, characteristics, subtleties of choice
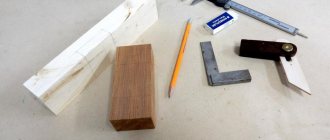
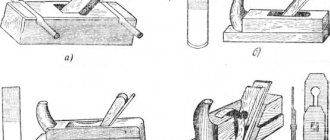
TOOLS
- carpenter's square;
- marking thicknesser;
- pencil or marking knife;
- axing saw;
- wide carpenter's chisel.
Half-tree connection type
The next version of cutting that we will consider is cutting “in half a tree” - this is a method whose name was fixed due to the removal of the upper or lower half of the thickness of its mass at the corners of the beams. Assembly begins with drilling holes for the dowel in the corners of the beams so that one dowel could connect several beams at once.
After laying the first crown, connected by dowels at the corners, a seal is placed on it and the bars of the next crown are placed. Having completed the corner connections of the second crown, they begin to connect the crowns together. To do this, holes are drilled in the second crown every 100-150 cm and dowels are driven in. The dowel hammered into the second crown must enter the body of the first crown by at least half its thickness. If the dowels are long - at least 2.5 times the thickness of the crown, and the tool allows you to drill holes to such a depth, then a third crown is laid and three crowns are joined together at once.
Marking
For marking you need a square, thicknesser, knife or marking dowel. Use a pencil to mark only on material with a rough, untreated surface. On a fine-fibered or smooth surface, the marking line is drawn with a knife or dowel: a shallow groove will also serve to guide the saw evenly.
The prepared bars or planks are laid side by side parallel to each other and marked at the same time. This ensures complete coincidence of the marking lines, which guarantees a flawless, distortion-free connection of all parts. It is important to get everything right the first time, as it will be quite difficult to make corrections in the future.
This is how the groove is marked.
Use a thicknesser to mark half the thickness of the plank on the narrow sides.
To mark, never use ballpoint pens, felt-tip pens, ink or ink, as they leave virtually indelible marks on the wood.
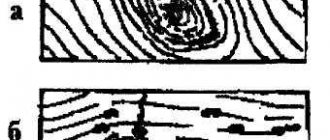
When treated with a chisel, soft wood can easily split in the place where the growth rings pass. To avoid this, you need to make several additional cuts. In this case, if the tree splits, it will be between two adjacent cuts, and not across the entire width of the groove.
Kinds
A warm corner improves the external and internal appearance of the building, since its walls are free of irregularities and unnecessary protrusions. To make a high-quality warm corner, it is necessary to consider different methods of cutting joints, which have their own characteristics, however, they have the same fastening mechanism.
Styling with remainder
Such connections are called “in oblo”. It has two main advantages - a high level of sealing, as well as joint strength without fixation. This locking design system provides different types of joints.
- The one-sided key groove is a transverse notch in each bar, and its width corresponds to the same parameter of the bar. It is located at the top and is most often applied to profiled wood, as it fits perfectly into its structure. The grooves are made straight and square. In some cases, it is allowed to secure the connection using dowels.
- More complex is the two-way connection. For this, the timber is sawed from the top and bottom sides to 1/4 of the thickness. Double fixation makes the structure more durable, which completely eliminates displacement. An indispensable requirement is a smooth wood structure with no defects in the form of cracks and knots.
- The four-way connection is the most reliable in terms of sealing, but it has a more complex preparation of the beams, so it is used quite rarely.
Joints without residue
Cost-effectiveness is the main advantage of this technology, while the end parts of the timber do not protrude from the walls. However, there are also disadvantages of such a connection - it is less durable than with other joining methods.
There are several options for obtaining even corners of a log house.
- Half-wood is a joining in which the beams from one and the other wall are cut down to 50% of their thickness, after which these cuts must be fixed with dowels, because such a connection is quite weak. In this case, caulking is applied later. In the paw - this is a similar method, which is distinguished by more complex work with the preparation of the material, due to which the quality of the connection is higher and more durable.
- Connection using dowels, which are made only from hard and durable wood. They perform the task of inserting in the grooves. In fact, they are used to fasten the beams together at the side and end. This joining promotes a tight fit and prevents any displacement. These spare parts can have any shape - oblique, longitudinal and transverse. Dovetail dowels are especially relevant. Unfortunately, it is difficult to make them yourself, because this requires a special machine.
- The simplest is considered to be a warm butt corner, and there is no need to saw the timber. The ends of the material are fixed in a checkerboard pattern using squares, staples, clamps or metal plates with nails. Bonding occurs along the length. If damp building materials are used, it is extremely difficult to avoid deformation, therefore, as a rule, careful insulation of the gaps is required in the future. You can do the work yourself, but it is better to use dry wood.
- The most common fastening is in the root tenon. When all the necessary cuts are precisely calculated, and there can be quite a lot of them, since up to 5 grooves and tenons are used, then this design is the most reliable and stable. Simultaneously with the connection, linen or jute insulation is placed in the grooves. This prevents blowing and no additional protection is required.
Direct joining is often carried out in the main tenon or involves connecting the longitudinal beam end-to-end using dowels. The oblique lock, in general, is rarely used, since it is unprofitable in all respects.
Longitudinal fastening is carried out using tongues, usually birch, and high demands are placed on them - defects such as delamination and knots are simply unacceptable, moreover, the wood fibers in these hardware should only be located parallel to the axis. Qualified craftsmen, of course, can carry out such work, but does this make sense when there are simpler and better types of warm corners?
Double tying a house with timber
This foundation is made when it is necessary to increase the reliability of the pile foundation piping. This is: to raise a house due to high soil moisture, to build a cellar, etc. Double piping compared to single piping provides:
- better heat retention;
- high strength, since there is no need to make cuts under the joists, which also makes it easier to replace them if necessary.
For the first crown, a beam with a cross-section of 200×200 mm is taken and laid in the above manner. A second row of material measuring 100×150 mm is mounted on top, overlapping the joints (if any) of the first crown. The elements are installed at the end to form a shelf inside the perimeter. Logs are installed on it and secured with nails.
If desired, the harness can be mounted from boards assembled in a checkerboard pattern. This design is stronger than a solid beam against fracture, since wood defects do not coincide in one place. The boards must certainly be fastened with nails with a bend.
Spike in eye
Corner and T-shaped (example: T-shaped connection of a window frame) intersections are conveniently performed using the tongue-to-ridge method. In this case, the eye is made at the end of the vertical part, and the cuts for the tenon are made in its horizontal component.
The work begins with marking the eyelet. The thickness of the workpiece is divided by three. With a thin hacksaw, cuts are made to a depth equal to the width of the other workpiece. Excess wood is removed using chisels, and the walls of the eye are smoothed with sandpaper.
Mark the second workpiece. The width of the tenon should be equal to the width of the first workpiece, the thickness should be equal to the thickness of the tenon. The cuts are made with a hand hacksaw, carefully controlling the depth and angle of inclination. Remove excess with a chisel.
The final adjustment of thickness is carried out using sandpaper. The parts should connect with light force and not fall apart under their own weight.
How to properly lay the crown molding?
The first and most important operation is laying the first (flashing) crown. The dimensions of the first row of the frame are determined at the design stage; they are commensurate with the length and width of the foundation. Using a building level, a basic horizontal line is applied to the flashing crown to control the current height of the masonry.
The foundation material and wood have different physical properties: the concrete base freezes and forms moisture when it thaws, dew also forms in the summer, concrete has a loose structure and is easily saturated with soil moisture. If waterproofing is insufficient, mold and mildew will appear on the lower beams and under the floor. The trim crown is reliably isolated from the negative effects of moisture.
To waterproof the base of a log house, roofing felt, fiberglass or woven geomaterial with bitumen impregnation are used. To adhere to the foundation, eliminate cracks and air cavities, the waterproofing layer is treated with open fire.
Tips for getting the perfect joint angle.
Even after making a cut with perfectly right angles of 45 degrees, the corners do not always fit perfectly together on the wall. The corners of the walls may have deviations during construction, window and door openings in the wall may differ slightly from the size of the frames, protrude or be recessed in the openings. That's when you start fiddling with the corners to get a tight fit. In most cases, you will be making adjustments at n-degree angles. If the gap in the connection is small (about 2 mm), trimming one corner is necessary. If the gap is larger, you will have to cut both boards.
Here's a trick that will make the corner joint look great, but it only works if you've installed the side trims and have the top trim ready to install. Apply a thin layer of wood glue to each edge of the trim. Using a damp (not wet) cloth, remove excess glue along the seams, and use 120-grit sandpaper to sand the joint, moving the paper in two directions along the seam. The sawdust from sanding will mix with the glue and fill any small gaps. In this way, even any minor differences in levels between trims can be removed.
If the corner joint in the baseboards has a slight tear at the outer corner of the cut, it can be hidden by rubbing the tip of the cut with the round part of a screwdriver. Curved grain will mask the gap, and a slightly rounded corner will be less likely to chip or damage. The best way to fix this problem is to cut the corners 1 degree sharper than the actual corner. This will leave a small gap at the back of the corner where it is barely noticeable.
There are many ways to find angle differences, but this is how most carpenters do it. The angle between these two walls appears to be less than 45 degrees. On the first block we cut an angle of 30 degrees, now we divide 30 degrees and on the second block we make a cut at an angle of 15 degrees. As you can see from the picture, there is a gap in the joint, so we must increase the cutting angle to 16 degrees.
Half-tree oblique connection
A miter half-timber joint is cut in the same way as a regular cross joint, but the cuts are made at an angle. The main difference is the marking of the shoulders.
Connection marking
Marking a 45° angle does not cause any difficulty when using a jig. To mark the other corner, use a small marker placed on a protractor or an accurate drawing. Apply one line for the bias shoulder markings on the front side of the bottom piece. Place the top element on the line and mark its width (1). Draw a second shoulder marking line along this mark. Draw perpendicular lines to the middle of the edges and mark the line between them with a thicknesser along the central axis of the edges.
Place the top piece right side up and mark the width of the bottom piece on both side edges of the top piece (2). Mark the cutout on the underside using a marker or a marker.
Cutting the connection
Using a saw and chisel, cut out the waste part of the material from both elements in the same way as when making a transverse connection in half a tree, but taking into account the marked angle.
Joining logs in corners without leaving any residue
With this connection method, there is no part of the log protruding beyond the outer perimeter of the wall. For a reliable connection, a “cut” is required: the ends of the logs are fixed with spikes. To prevent the cut from being blown by the wind, the horizontal planes of the cut are made inclined.
This connection is called a “dovetail”: the wedge-shaped part of one log is wedged between two inclined planes. If it is necessary to attach a partition to the wall, a T-shaped connection is made. The end of the partition log is given the shape of a truncated cone, at the base of which is a square.
The outer part of the cone is expanded. A similar recess is cut out in the corresponding part of the wall. The connection will be reliable due to the jamming of the parts.
Connecting a log frame from timber “to the paw”
When connecting timber “into a paw” there are also several options. The simplest of them is end-to-end, in which the timber is secured with metal plates or brackets. This option is quite cold, does not have increased strength, and is not suitable for a bath. The “doweled” connection involves assembling the frame using wooden pins. They are made from hard wood, which ensures strong adhesion of the crowns of the log house. The greatest strength is obtained when the liners are made oblique, but their implementation is more complex. The warmest and most durable option is to connect the bars into a main tenon: when a longitudinal protrusion is made in the lower bar - a tenon, and in the upper - a groove of the corresponding section. During installation, it is necessary to lay flax-jute fabric between the tenon and groove. At the corners, each crown is reinforced with a wooden dowel.
Advantages of a log house
Natural wood is the most environmentally friendly material of all possible basic building materials. It is easy and pleasant to breathe in any log house. A natural microclimate, saturated with oxygen, with specific microelements and resins of a particular type of wood will always contribute to the stable health and well-being of residents. Cedar lumber also has an antiseptic and cleansing effect on humans and the environment as a whole. Read more about the properties of cedar in construction.
Fast construction time.
From the moment the material is delivered to the site until the log house is completely erected, it can take only a few days. The construction process by skilled craftsmen does not take much time. With the exception of the construction of large-area log buildings and complex projects. Another thing is its shrinkage, which we will talk about later in the article.
Low thermal conductivity.
A high-quality log house does not need to be additionally insulated with artificial materials. But the wall thickness should not be thinner than 25 cm.
Good sound insulation.
Wooden walls practically do not allow noise to pass through. At a moderate noise level, residents in adjacent rooms will not hear each other. The exception is extreme noise coming from the street, which can be heard in a house made of any material.
Durability.
With normal care and permanent residence, a high-quality log house will last up to a hundred years. In our time, there are quite a lot of examples of such log houses preserved, the strength of which would be the envy of many modern materials.
- Breathing house. The natural and natural gas exchange of a log house always creates an atmosphere saturated with pure oxygen inside the house. At the same time, the log house does not require the installation of additional ventilation. For such a house, natural air flow through windows and doors is sufficient.
- Quite a light house. Compared to heavy stone and brick houses, a wooden frame does not require such a massive and heavy foundation, since it is much lighter. Thus, some savings are possible when constructing the foundation.
- Beautiful appearance. A log house is a structure on which the gaze of any person involuntarily and for a long time lingers. You want to look at it and want to admire it again and again. The log structure, the unique wood pattern of each log and timber makes each log house beautiful in its own way. It is possible to build an ugly stone house, but it is simply impossible to build a log house. Just looking at your own, chopped-up house brings great pleasure.
- Unique and cozy atmosphere. It is impossible not to highlight this ability of a log house as a separate advantage. This kind of atmosphere is created naturally. In such a house, the tree itself seems to endow the residents with its strength and natural inspiration. The beneficial environment of the log house promotes maximum productivity and the creative spirit of its owners.
Types of joints in corners without residue
The main advantage of this method of raising corners is its cost-effectiveness. The construction of a log house with corners without residue requires a significantly smaller amount of material, since the ends of the wooden parts do not protrude beyond the boundaries of the corners of the log house.
There are many ways to remove corners without leaving any residue. There are four main ones:
- "At the butt";
- Half-tree connection;
- With a root thorn;
- Fastening using dowels.
The method of laying corners without residue is also called “claw” fastening.
Butt
The simplest type of fastening “in the paw” is connecting wooden parts “at the butt”.
This type of fastening does not require additional processing of lumber. The logs are laid end to end and fastened together with auxiliary fasteners. Studded plates, nails, angles or staples are used as fasteners.
T-shaped corners are reinforced with metal corners - this significantly reduces construction time. However, the required tightness of the corners in this case can be achieved only with a perfectly flat beam without geometric flaws.
Important: it is not recommended to use a metal corner for fastening corner joints of profiled or laminated timber - in this case it will be visible and the walls will require additional finishing.
Butt fastening does not have the necessary reliability for permanent structures. It does not provide maximum strength of the structure and its tightness. Therefore, you should not use it when constructing a residential building - this type of fastening of wooden corner parts is more suitable for outbuildings.
With root thorn
A connection with a root tenon, or a “warm corner,” helps prevent the walls from moving and drafts from entering the room.
With this method, the forest is prepared in advance in a special way:
- On one of the joined beams, the edge is cut so that a spike is formed, equal in length to 1/3 of its thickness. The tenon should have a rectangular shape with a slight expansion towards the outer edge.
- A corresponding groove with small gaps is cut out on the transverse beam to allow the tenon of one log to fit freely into the groove of another. The gaps between the groove and the tenon are sealed with insulating materials.
- After the tenon is inserted into the groove, the wooden parts should be secured together with dowels.
On dowels
The corners of the log house with dowels are an improved type of butt fastening.
In this case, a notch is cut at the end of one mating beam and on the corresponding surface of the other; when they are connected into a corner, a common groove is formed into which the key is inserted. This method can give strength and tightness to the structure in only one direction.
To ensure maximum joint strength and tightness in both directions, the key is made in a dovetail shape, where the middle is narrower than the flared edges. The grooves in the beams are cut in the same way. A rather complex method that requires scrupulousness and precision when preparing grooves and making keys.
“Half the Tree”
Fastening “half-wood” also requires additional processing of the mating parts of the tree.
The ends of both mating parts are cut down to half the thickness, ensuring the required joint density. Additionally, the logs are secured to each other using dowels. In this case, it is imperative to insulate the resulting grooves with tow or other construction sealant.
T-joint (notch) in half a tree
This relatively strong frame connection is used when one of its elements must, when intersecting with another, end flush on the outer edge of the second.
Marking connection elements
After marking the cutout on the cross member using the half-timber cross joint method, cut the end of the vertical member at a right angle and mark the width of the cross member on the underside of the vertical. Continue the line to the edges and use a thicknesser to draw lines along the edges and at the end (1).
Cutting connection elements
Using a saw and chisel, remove the waste wood from the cross member (2). First, cut to the thicknesser marking line (the saw moves along the waste part of the wood), and then the shoulder line to separate the waste in the vertical element (3).
Advantages of cutting a warm corner
The advantages of this assembly method are so significant that they are worth mentioning separately.
- The assembly of the walls is so strong and dense that there is absolutely no need for additional strengthening of the joints.
- Due to the absence of seeping moisture, mold, rot and mildew will not form in the house, the corners will remain warm even in the most severe frosts.
- A building fixed in this way is so strong that it is not at all afraid of ground movements, earthquakes and other force influences. This indicates the high reliability and durability of the structure.
- The house looks nice both outside and inside.
- The design of a warm corner of a timber house is carried out without any fasteners, which significantly reduces construction costs and allows the design to be simplified to the maximum.
- The construction of the house occurs quite quickly due to the fact that the grooves on the timber are prepared in advance, at the sawmill.
Reasons to choose timber for building a house
Timber made of wood eliminates some of the properties of wood that complicate the construction process and make it more labor-intensive. The beams are made of a standardized profile and length. You can quickly build a house out of it. If you carefully calculate the required volume, you can avoid unnecessary waste of material, which will significantly reduce the estimated cost of construction.
Glued laminated timber is not subject to shrinkage and does not crack due to exposure to the surrounding climate. It does not lose its properties during long-term use. When laying timber with flat edges, a smooth wall is formed; it can be easily covered with finishing material or insulation.
Connecting corners with remainder
Pairing the timber with the rest has two main advantages:
- High degree of tightness;
- High strength and reliability of the connection without additional fixation elements. The strength of the joint is achieved due to the pressure of the weight of the upper rims, so displacement or change in the size of the surface of the walls is impossible even under seismic influence of moderate force.
Corner joints without remainder and with remainder
A locking (key) one-sided groove does not use a tenon in mating - a groove is selected along one side of the beam, perpendicular to the longitudinal axis, with a depth of ½ the thickness of the beam. The groove is made square so that another beam fits into it equally evenly. When implementing this interface, each of the timber elements is firmly fixed in relation to the lower beam, laid in one direction. Typically, such a connection made of timber is reinforced with dowels, so it is possible to connect both a square beam and a profiled rectangular one.
A double-sided locking groove is a little more difficult to implement due to the fact that the lumber is taken from both the bottom and the top. With this pairing, the sample is made at ¼ of the thickness of the timber. Double-sided sampling makes the pair of connecting elements rigidly fixed in two directions, and their displacement is almost impossible even with strong fluctuations in temperature and humidity. Before making a groove in the timber, it is necessary to check the sampling location for the absence of knots, chips and cracks.
Lock connection
A four-sided keyway is not a solution for every case. Such a connection is indeed the most airtight, but it has no other advantages - the strength of the connection remains the same, but the complexity of the work increases. More complex joints “tenon-groove”, “tenon-ridge”, “toe-foot”, “to-head”, “dovetail” and others are made using milling equipment.
Connecting corners without leaving any residue is the most economical solution, since the ends of the beams do not extend beyond the wall. Such savings lead to a decrease in the reliability and tightness of the interface.
Four-sided keyway
Existing methods of connecting timber in corners without leaving a trace are end-to-end, on dowels, half-timber, in a paw. Let's look at each in more detail:
Butt jointing is the simplest and does not require additional processing of the timber. With this connection, the lumber is laid in a checkerboard pattern, and displacements and shifts are avoided by additional fastenings of the timber with dowels or other hardware, including metal ones - staples, clamps. This connection is made along the length, and its simplicity allows the work to be completed without any practical skills. The only condition for such a pairing is dry timber. The disadvantage is the need to insulate (seal) the gaps, which will not prevent the beam from deforming when air humidity changes. Therefore, it is recommended to impregnate the timber with moisture-resistant compounds.
Types of butt joints
» alt=»»>
A keyed connection from a timber is a selection of wood at the end of one timber and at the side of another timber product. These openings are fastened with a key, which helps to avoid large drafts in the gaps and displacement of the timber in one direction. The use of a dovetail key can minimize movement in the other direction. This groove widens towards the edges of the opening, and it is more difficult to make such a shape yourself - usually, when ordering a project from a factory, such connections are made using the machine method.
Interfacing from half-timber timber is a technology in which the ends of the timber are cut to ½ of their thickness, and the length of the tenon is equal to its width. Such a connection must be strengthened with dowels, since in itself it is weak. The tightness is also low, so caulking will be required.
Half-tree pairing
A variation of this simplest technology is “paw-to-paw” pairing. This method involves making more complex shapes of the ends of the timber, which provides higher strength to the connection.
The connection in a warm corner (in the root tenon) makes it impossible to move the timber walls on both sides, and also provides complete wind protection.
Connection to root tenon
How to prepare lumber for joining into a warm corner:
- The end of one beam is cut so that a tenon remains, the length and width being equal to 1/3 of the cross-section of the product. The shape of the tenon can be widened towards the tip or rectangular;
- The second beam has a groove, which does not have to be made exactly the same size as the tenon, since this connection will be compacted;
- The tenon is inserted into the groove from above, the beam is additionally reinforced with dowels.
» alt=»»>
Marking
First, a clear marking line on the parts indicates the contours of the grooves. In order not to confuse anything when processing parts and to prevent mistakes, the areas to be removed should be marked with shading. There is a particularly great danger of making mistakes when processing parts that are to become lintels and crossbars.
The areas to be removed should be marked with hatching so that the contours of the grooves are not blocked: the main markings should be clearly visible during subsequent operations.
Light shading on the parts marks those areas that should be removed. In this case, you must not block the marking line.
To cut parts along the markings, use hacksaws or bow saws with thin, frequent teeth to make the cut as smooth as possible.
The cut line should pass through the area of the part that will go to waste. First, make a small notch with a saw. Then they saw along the front edge along the marking line to the lower limit. Thus, the marking line will always be in front of your eyes, which means you can accurately guide the saw and immediately make adjustments if the cut begins to move away from the marking line.
We suggest you read: How to make a groove in a board with your own hands
When the cut of one corner is ready, turn the part over and do the same on the other side. Only after this the saw is positioned horizontally and the cut is completed in this way.
When processing even wide parts in this way, the cut is very precise. Excess wood can later be removed with a chisel and file or sandpaper.
During the first movements, guide the saw blade with your thumb until you make a notch.
Saw along the front edge of the piece first, moving the saw at an angle exactly along the marking line.
Then do the same on the other side until the entire horizontal marking line is captured.
At the final stage, guide the saw horizontally.
Angles with remainder
The main disadvantage of fastening “with a remainder” in a wooden frame is the increased consumption of wood.
The advantages of such angles include:
- Highly tight connections, preventing outside air from penetrating into the structure.
- Structures cut from wood into corners “with a remainder” are distinguished by high joint strength and can withstand even moderate earthquakes.
Fastening when laying in a corner “with remainder”
The most common method for laying corners “with a remainder” is the corner connection of the beams “into a bowl”.
To do this, notches are cut at the ends of the beams, allowing the transverse logs to be laid on top of each other quite tightly, crown by crown, forming a castle. This technology is easy to implement and reliable in operation. Due to the ease of connection, it is widely used for fastening profiled timber.
A – a simple half-wood bowl B – fat-tailed bowl C – okhryap-shaped
Locking grooves for this type of fastening can be made in three types:
- One-liners
- Double sided
- Quadruple
Single line grooves
In the upper part of each of the corner beams, a perpendicular recess (oblo) is made, the width of which is equal to the cross-section of the perpendicular log. In this case, the wooden parts are placed in the corner one by one, with the bowl up. In this way they are placed in a kind of lock.
Double-sided groove lock
In this case, cuts are made in the upper and lower planes of the beams to a depth of about ¼ of their height. This is a very high-quality lock, but its preparation requires meticulousness in the work of the carpenter in order to avoid cracks and chips of the wood when preparing or laying it.
Four-sided groove lock
For a four-sided groove lock, cuts in the timber are made on all four sides. This greatly increases the reliability of fastening and the tightness of the crowns being laid together. However, preparing building wood material in this way requires precision and care.
So, we have become familiar with the main types of corner joints of timber in wooden log houses. Taking into account the features, advantages and disadvantages of each type, you can without mistake choose exactly the mounting option that is acceptable specifically for your building - be it a bathhouse, a residential building or an outbuilding. Having the necessary knowledge and a little experience, you can safely begin the construction of your future building. Good luck to you!
Types of T-shaped fixings for the construction of internal partitions
This fastening method is intended for creating partitions. To do this, you can use the following options for fixing the partition to the wall:
- frying pan (dovetail) - a trapezoidal spike is created;
- straight groove on the main tenon;
- locking groove on the insert tenon.
The T-shaped fastening of a wall with a partition is practically no different from the longitudinal and angular installation of timber. A tenon is cut out from the end of the raw material, and a groove is made in the wall. The timber intended for the internal partition is inserted into the groove and fixed.
I think we have sorted out the question of how to connect two beams.
What else to say? Timber is often used for attic floors, residential floors and basements. In this case, of course, it is recommended to use solid lumber. Joints and joints will greatly weaken the structure, and the load-bearing loads here are incredibly large.
An off-topic joke: When a gentleman invites a lady to the sauna, the lady views it as a dirty proposition.
Thus, from the many options for connecting timber, each person will be able to choose the method that will give stability, reliability and strength to the structure. Choose!
Warmth and comfort for your wooden structure, be it a house or a bathhouse! Bye!
Wisdom Quote: Nothing can be beautiful from all points of view (Horace).
Connecting logs in corners with remainder
First, let's talk about log houses. Recently, they have become popular again, especially in suburban construction: they look attractive and are also natural. Moreover, even despite a significant overconsumption of material, the corners are made with a remainder. These methods of joining logs are traditional. They came to us from our great-grandfathers, this is how they built their houses.
Log house in a bowl
As has already been said, a longitudinal recess is made in each log - a groove. In the corners they are trimmed more, according to the shape of the log lying across. This notch is round in shape, which is why it is called a bowl, and the method of cutting a corner is called a bowl. The second name is “in the oblo”.
Marking the upper and lower bowl
Depending on the location of the bowl, there are upper and lower bowls. The upper bowl is so called because the log rests on top of the crown, clasping the lower one. This connection is also called “clap”. Remember: the bowl is upper, despite the fact that it is formed at the bottom of the log.
The work is carried out in several stages. The log is first placed in the log house and leveled. Then they outline the contours of the groove and the bowl, place it on a flat surface and process it there - cutting the bowls. When the excavation is ready, the log is raised again and placed in place, trying it on. If necessary, they are adjusted (removed again, trimmed where necessary) and only then laid on a compactor (tow, jute, moss). All these movements are compensated by the fact that with this method of cutting, sediment simply flows down the side surfaces of the wall, and they, as a rule, are well protected by several layers of impregnations and paints.
Types of bowls for joining logs in corners
The lower bowl can be molded directly in the log house: all manipulations can be done on the laid crown. When the walls are already raised high, it is very inconvenient to do this if you lack dexterity, so you still have to drag the logs up/down. Perhaps this is why this method is less popular.
It is easier to make a frame into a bowl: it allows you to correct almost all mistakes. In addition, despite all the apparent complexity, it is this type of joining of logs that is easier for beginners to do. All others require more carpentry skill.
How to make a joint from a log frame into the lower bowl is shown in the video below. The explanation is detailed, showing techniques for working with an ax and the full procedure. First you just need to talk about the tool that is used to draw the log. This is a carpenter's trait or scriber.
The device is very similar to a school compass. There is also a sharp stop on one side and a pencil on the other. Just like in a compass, the required distance is fixed with a screw. Having placed the ends at the required distance, the sharp part is guided along the log for which the bowl needs to be cut. Using a pencil, respectively, according to the one in which the groove and bowl will be cut. This produces markings, which are then drawn with a marker. It will become clearer when you see the process of marking the bowl in the video.
Actually, now a video about how to connect logs into the lower bowl. The first part deals with molding the longitudinal groove, the second directly deals with cutting the bowl.
Connection in okhryap
This type of connection consists of two semicircular bowls. In order for a corner folded using this method to be warm, considerable experience is required: even minor errors in the width of the groove or the thickness of the lintel will cause drafts.
Log in okhryap
A. In the corners of the house
Connection with remainder
This means that the ends of the blanks at the corners of the building will protrude somewhat beyond its perimeter. The disadvantage is the increased consumption of building materials. But there is also a “plus” of such a connection - it is more durable, moreover, the corner parts of the building (the most problematic areas) are better protected from precipitation.
The most common method is “in the oblo” (“castle” type). It is also sometimes called "chalice", but this only applies to logs.
Locks:
- Unilateral. It is already clear that the “drank” is done on only one workpiece.
- Double-sided. Accordingly, approximately ¼ of the material is sampled on each of the beams (joining grooves).
- Quadruple. In this case, “cuts” are made on all faces. This connection is much more complex in execution, but is considered the most reliable. In addition, installation is simplified - all that remains is to assemble the individual parts of the “constructor” together.
Without a trace
This means that the corner edges of adjacent walls are absolutely smooth, without protruding ends of the beams ("joint joint").
From the pictures it is clear that there are many varieties of such fastening of workpieces.
Technologies for corner connection of timber “without residue”
With the first technique, the fasteners are distinguished by straight butt edges; with the second, the timber ends at a certain distance extend beyond the wall plane at an angle of 90°. Of course, this is reflected in the overall material consumption of the structure, since the consumption of beams increases by 50 cm in comparison with end-to-end cutting. But the corners of a house made of timber “with a remainder” of protruding fragments of logs are better protected from negative climatic influences. In addition, this technology makes the walls stable.
Excess fastening is carried out in 3 configurations:
• in the oblo (cup); • in the okhlop (Siberian bowl); • in the okhryap (in the girth).
The first method of connecting timber is the simplest type of corner arrangement. Its essence lies in the fact that a spherical (shaped) bowl is formed on top of the timber. Then a log with a prepared bowl is placed crosswise into the treated area. Corner fastening of logs using this method is performed in the following variations:
• half a tree; • into an oval ridge; • in the fat tail.
A half-tree oblo is the simplest type of connection. In order to increase the required packing density, an additional longitudinal groove is formed at the top of the beam, in addition to the bowl. After laying and securing the cross beam, the logs of the next crown are installed. Before laying each tier, the longitudinal groove is sealed with insulation. For structural strength, each new log is attached to the previous one using dowels, which enhances the vertical stability of the surface.
The second method of fastening log walls is to leave a small rounded ridge at the bottom of the bowl, which follows the contour of the longitudinal groove made at the bottom of the log. This fastening increases the stability of the log house and increases its protection from the wind.
The most labor-intensive is the third type of angular joint - “in the tail”. Here, in addition to the oval ridge, another protrusion is cut out at the bottom of the bowl along the block and across the cup bottom. And at the bottom, across the groove, a special recess is formed, onto which the fat tail is placed during installation.
Another type of cutting corners is “in the clap”. This technique copies the above options “in the log”, but the main difference is that the notch is formed not from above, but from below the log.
Okhryap is an intermediate type of connecting timber in the corners between the classical methods with and without a remainder. The difference between cutting “in okhryap” is that bowls of 1/4 diameter are cut from the bottom and top of the beam.
The timber joint of the corners without any residue (“in the paw”) is devoid of end fragments protruding behind the wall surface. To increase its instability, the ends of the logs are made with spikes and recesses (cuts). A standard undercut paw is characterized by a predisposition to air leakage. To avoid this, the horizontal surfaces of the notch are tilted in different directions. This type of fastening is called “dovetail” (inclined planes jam the corner structure).
When fastening beams with excess “in the burl”, they are articulated with locking grooves (1-, 2- and 4-sided). Fasteners with a 1-sided groove have a shallow cut in the bar in the form of a transverse groove. As a rule, profiled timber is connected in this way. When fastening with a 2-sided groove, cuts are made on both sides, top and bottom, with a depth of 1/4 of the thickness of the beam. When making a 4-sided groove, cuts are made on 4 sides. The presence of transverse grooves significantly simplifies the process of installing crowns - the logs fit tightly against each other, the stability of this method of connecting beams in the corners increases significantly.
Features of connections, materials used
What carpentry joints do you know? An experienced master will be able to name several dozen of them. The fact is that there are no universal connections. In each specific case, you need to choose the most suitable option.
You might be interested in: What is this to announce? Interpretation and synonyms for the word
In construction, the furniture industry, and in the production of natural wood products, it is often necessary to connect a variety of parts. They can be fixedly connected, but there are also collapsible connections. In the first case, fastening is carried out using glue, nails, screws, staples or other additional means. It is impossible to disassemble such a connection during operation. Permanent types of joints are used in carpentry much more often.
You may be interested in:Medical College, Gorno-Altaisk: address, faculties, reviews and photos
However, in the production of, for example, folding furniture or transforming models, sometimes it is necessary to create collapsible connections. In this case, glue or other fixing elements are not used.
Wood joinery involves combining certain parts in a certain way. They can be bars, boards, shields, etc. These are the primary elements of the product. Parts can consist of one piece, two or several elements that are previously glued together. In some cases, parts are made by veneering.
After connecting two or more parts, a knot is obtained. This could be a shield, box, frame, etc. Using existing connections, a finished product or part of it (unit, plant, etc.) is obtained.
When choosing a connection, you should take into account that the finished product must be durable, strong, functional, and aesthetic. Therefore, the master must not only have theoretical knowledge about the correct choice of the type of joint, but also be able to handle the appropriate tool. Only in this case will he be able to create a connection that meets all modern requirements and standards.
Benefits of technology
The method of such a connection as a warm corner, in fact, has a significant impact on various aspects of construction and operation, namely:
- with high-quality assembly, the junction of the corners of the walls is so strong that you can do without inter-crown insulation;
- a building erected using this technology is not threatened by force loads and impacts in the form of soil movement or earthquakes, since it is strengthened several times;
- this method eliminates such unpleasant moments as corrosion, fungus, mold, and the penetration of insects into the interior;
- significantly reduced costs for fasteners, since these fittings are irrelevant for fastenings with residue;
- Pre-prepared beams with grooves and tenons cut into them allow for quick assembly.