Aging of wood: goals and methods
Before studying the question of how to age wood, you need to find out what such an operation gives. Giving it a noble appearance is only one advantage, the second plus is a significant increase in the service life of the product. In this competition, aged wood wins over “rustic” wood, and by a large margin. Such items are more reliably protected: both from any living threat and from unfavorable conditions.
There are quite a lot of methods for aging wood: there are simple techniques and more complex ones. Methods of “transformation” are divided into:
- mechanical;
- thermal:
- chemical.
They differ in the end result. Mechanical processing includes brushing and patination. The first is aging with a stiff brush, the second is painting followed by sanding. Traditional thermal “transformation” involves burning (or charring) the surface of the lumber with a blowtorch or gas torch. The original is the use of hot sand.
The chemical method is the treatment of wood with caustic compounds that change the color of its fibers. All methods do not involve any complex actions, however, any operation requires compliance with all rules and safety precautions.
What is brushing
This is a technology for artificial aging of wood. Brushing is a decorative treatment of wood using a stiff brush, which removes soft fibers and exposes the natural pattern of hard fibers. After such exposure, the material will have a relief surface with a clearly defined structure of growth rings.
The essence of brushing is to imitate the natural aging process of wood. In the spring, when the tree grows quickly, many soft, loose fibers form in its trunk. After cutting, they are the ones that are subject to rapid abrasion and weathering. Hard rings that grow in summer and autumn are more durable and resistant to damaging factors. Soft fibers are easily removed with a brush, as a result the surface of the wood acquires the relief that is inherent in the old material.
When brushing, the depth of treatment and the degree of soft tissue removal may vary. The brush is capable of penetrating 0.5-3 mm or even more. Typically, the deepest processing is carried out to give the wood a highly aged effect. Brushing of 0.5-1 mm is considered optimal, which provides the product with a slight vintage touch.
Processing, painting, patination
Texturing wood is only half the battle. Brushing has the ultimate goal of visually highlighting the wood texture; most often, this is achieved by painting using special techniques.
You need to make sure that the fiber selection is done well and the surface is ready for painting. For this purpose, water-based stains are used with a light tanning or cauterizing effect. Application should be done with a brush, carefully wiping along the fibers and monitoring the lifting of small fibers in the process. If such are present, the surface must be thoroughly dried and lightly treated again with a grinding brush, breaking off dried and hardened burrs.
Instead of a brush, it is convenient to use a soft sponge - the paint is distributed more evenly and without excess
When painting, most often the arrangement of tones repeats the play of light and shadow on irregularities: depressions are painted in a dark color, ridges in a light color. To do this, the surface is first opened with a richly dark varnish, and then wiped with a sponge or rag, removing the remaining varnish from the hard fibers, where it does not have time to be absorbed.
When working on a large surface, uniform coloring is achieved after complete drying of the dark dye and subsequent light processing with a petal disc with grit P400–800. When the bulges are highlighted, they are opened with colorless or light-colored parquet varnish.
Another coloring option offers inversion: the upper tier of the relief is planned to be dark, and the depressions are painted in a light tone. In this case, the surface is first tinted with dark polyurethane varnish and dried. This is followed by the application of a light opaque composition, the excess of which is removed with a rubber spatula to reveal the dark substrate on the ridges.
Brushing wood is its artificial aging
, produced carefully, painstakingly and sometimes taking a lot of time and effort. But looking at the end result, we can confidently say that it’s worth it. This is exactly the case when “old age” brings extraordinary joy and transformation! Creates coziness, comfort, harmony with nature.
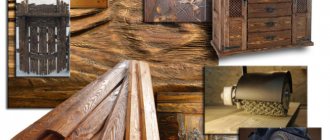
Purchasing antiques, furniture, kitchen utensils, antique finishes, antiques, mirror and picture frames has always been an expensive and costly endeavor. Only collectors, celebrities and wealthy people could just buy a table from the last century, a baby's cradle, chairs, etc., paying huge sums of money.
But the years change, technologies change, but the craving for antique accessories and utensils remains unchanged. Now everyone can afford the luxury of living in an old Russian mansion, with cracked, seemingly shabby walls and beams, furniture from those times, wooden benches and a dining table made of natural aged wood. And all this thanks to the wood brushing process
.
We constantly feel a craving for something new, observing the natural, natural processes of aging wood, the visual end result, the demand for such items, people decided to achieve a faster process of extinction of the life of wood and invented their own technology of artificial aging with a fairly short period of time.
Photo 1. Regular larch planken wood
Photo 2. Aged planken wood grade BC (C)
Photo 3. Primer with pigment for brushed larch
Photo 4. Finish painting of brushed planken wood with varnish
So, why do you need wood brushing?
Currently, this is a fashion trend, with a lot of followers, with genuine envy and a desire to have such things in their homes. Designers are those representatives who do not limit their fantasies and ideas within certain limits. They create masterpieces of art, their appearance reminiscent of exotic varieties of trees, worth fabulous investments, but in fact these are quite affordable and ordinary materials for anyone who wants to buy them.
Wood brushing technologies are capable of any transformation and color from dark chocolate to gray-green
, as if covered with dust and mold from age and time, with visible veins and cracks, roughly hewn, with chips or eaten away by beetles, with gold embossing or silvering, with noticeable wood pores and even imitation of cobwebs, any tones and colors.
Features and benefits of brushing
Brushing (from the English brush) is essentially nothing more than structuring wood through additional rough processing. The latter consists of removing soft fibers from the surface of the material; the annual rings acquire additional texture. The technique got its name due to the fact that brushes are used to give the desired structure to the wood.
A similar aging effect is observed in wood sandblasting technology, when soft fibers are removed by a powerful sand stream. Unlike brushed wood, sandblasted wood is smoother.
Types of brushing directly affect which brushes are used:
- Deep – brushes with thick metal bristles are used.
- Light - created using brushes with synthetic hard bristles.
Brushing wood can be done with your own hands; most often this method is used for small amounts of work, since it is quite labor-intensive and time-consuming. Brushing of massive elements (parquet, stairs, large boards) is most often done in a factory, where special machines with replaceable brushes are used, and the process is as automated as possible.
There are several brushing methods, but the most popular are the following:
- Manual - brushes and abrasives are used. Manual processing is of great decorative value, but is more labor-intensive and is suitable for small elements.
- Electromechanical - an angle grinder or brushing machine is used for the appropriate materials, as well as suitable attachments for a drill or grinder.
Natural aging of wood is a long process. Under the influence of external factors (ultraviolet radiation, temperature changes, precipitation, wind), the tree trunk wears out. The surface literally crumbles, leaving only the hardest fibers in place. There is a decorative effect, but during natural processes the material loses its basic properties: it becomes less durable, susceptible to destruction and rotting.
The advantages of brushing wood include:
- Improving the original properties of wood. The material becomes stronger, less friable, and resistant to external factors, mold, and fungi.
- High decorative qualities based on noticeable contrast and brightness of the texture after removing the soft layer of fibers. Such materials and decorative elements are universal, fit into almost any interior, making it more solid and exclusive.
- Large selection of wood for subsequent processing.
- Wood tinting can be done in several colors at once. For example, the base is painted in a light shade, and the pores in a contrasting dark or bright shade.
The only disadvantage of brushed wood is the difficulty of processing; the process will take a lot of effort and time.
By the way! After brushing, the wooden surface can be varnished, stained, waxed, oiled or tinted using impregnations. Decorative coating is necessary to emphasize the texture of the product; without this, the wood will not look expressive enough.
There are many possibilities for using brushed wood, especially since the finished product can be given almost any look, based on the general style of the interior. It can be a monotonous or combined color, the effect of a dusty or moldy surface, imitation of chips, cracks, gold or silver embossing.
Work plan
First of all, you need to draw up sketches based on which you will assemble wooden furniture with your own hands. The drawings must contain all the necessary dimensions of future structures.
It is advisable to schematically draw the location of objects in the interior. If complex structures are to be assembled, sketches can be drawn up in several projections. After drawing up the diagram, you need to start preparing the material.
Wooden furniture made by yourself should look neat. Therefore, all parts and areas of their connection should be pre-treated. The joints and dimensions must be precise and consistent with each other.
Elements can be fixed using metal corners. Decorative processing of objects is considered a very important moment. Here you need to be extremely careful. Experts recommend first practicing on samples, drawing the boundaries of the intended thread.
There are several methods of artificial aging
Mechanical restoration
The whole process consists of:
- pre-treatment of the top layer with metal brushes;
- sanding with coarse sandpaper or a polymer abrasive brush;
- by applying paints or stains to complete the look of aged wood;
- varnish coating in several layers, and before each new layer, sanding with fine sandpaper is required.
The work is done manually or using an electric drill, a brush router, a machine with various devices, in the form of brushes: aluminum, steel and copper, as well as synthetic bristles for polishing and grinding the surface.
Types of brushing
There are two ways to do the job, which have different results:
- Mechanical. It is a classic version of the technology, when wood is treated with a stiff brush, and then painted and polished. The finished surface is embossed.
- Chemical. It involves treating wood with special compounds (acids or alkalis) that corrode soft fibers. The relief of the finished board will be less pronounced.
Some masters use a combined brushing method. First, the wood is rough processed using a chemical method, removing a significant part of the soft fibers. Then the finishing is done mechanically, completing the brushing process.
According to the depth (degree) of processing, brushed wood can be as follows:
- Structured. This type of treatment is superficial and is intended to highlight the growth rings and the natural appearance of the wood.
- Highly structured. Brushing creates deep furrows along the natural lines of the wood.
- Retro. It has an average processing depth, is combined with coloring with special compounds, and gives the “appearance” of a material that has been used for a long time.
- Retro 3D. Allows you to obtain highly aged material with sharply emphasized knots and uneven chamfers.
READ Geometric wood carving for teapots
Method of brushing wood using a wire brush
The simplest method of artificially aging wood is to use a metal or nylon brush.
The algorithm of actions is as follows:
- The board or plank is processed with a metal brush along the location of the fibers; if this rule is not followed, there will be many scratches on the surface and the desired decorative effect will not be achieved.
- The fibers need to be removed by 1-1.5 mm; if it is necessary to achieve a deeper aging effect, it can be deepened to 3 mm.
- After this, the surface is sanded until smooth, first using coarse sandpaper and finally fine sandpaper.
- To brush wood to obtain different textures, several types of metal brushes are chosen. The thickness of the wire matters.
To speed up processing, the hand brush can be replaced with special sanding discs. Externally, they differ little. The procedure is accelerated using an angle grinder. The nozzle is attached to the grinder. The thickness of the wire can also be selected to obtain different results.
A better artificial aging effect and greater decorativeness can be achieved by using thin-wire brush attachments. In this case, a light grinding process occurs at the same time, the surface becomes smooth, reminiscent of varnished.
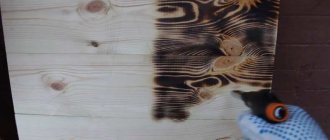
Pre-firing or singeing method
The method also involves using a metal brush or grinder with a wire attachment. Brushing wood like this is a simple process.
The surface of the wood is burned using a gas burner.- Then it is processed with a grinder equipped with a metal brush disk.
- It is also important to process wood along the grain, varying the depth of penetration.
- Preliminary singeing allows you to burn the outer soft layer and at the same time tint the wood.
The decorative processing process does not end there. Next comes stain and varnish. Depending on what color needs to be given to the product, colored stain is used. Processing is also not a complicated process. Water stain can be used in its pure form, then the color will be more saturated; if this is not necessary, it is diluted with water. The solution is applied in a thin layer with a brush for painting, if necessary - in several layers. If it is necessary to preserve the natural shade, a stain matching the color of the wood is used. After the composition has dried, the wood is coated with clear or colored varnish.
Tips for bending lumber using hydrothermal preparation
- Select the quality of the blanks for bending very carefully. It is better not to use material with cracks, knots (even live and fused ones), or sloping fibers. If there are no options for this, then orient the part in the bending device (machine or template) so that the defects fall into the concave radius zone, and not into the tension zone at the outer radius. Give preference to the splint bending method.
- When selecting a workpiece, it is necessary to provide for a change in the size of the part after molding. For example, the thickness of a coniferous beam can be reduced by 30 percent if bending with pressing is performed.
- Even if you plan on extensive finishing, don't leave too much material. The thinner the workpiece, the easier it bends without breaking.
- If the amount of work is small, then it is better not to cut out the workpieces, but to prick them from lumps. This way it is possible to avoid cutting the fibers and, as a result, defects during bending.
- For bending, it is advisable to use lumber with natural moisture. If you use dry preparations, then preference should be given to those that were not processed in a drying chamber, but were dried under a canopy - in an atmospheric way.
- After steaming, work with softened wood very quickly, as lignin begins to harden almost immediately, especially in the most vulnerable outer layers of solid wood. Usually you need to focus on a time reserve of half an hour to 40 minutes, so there is no point in making large cameras if you simply do not have time to install all the material from them into templates.
- Place the material in the steaming chamber so that the surfaces facing the outer radius are freely exposed to the steam jets.
- To save time, many carpenters refuse to use templates with clamps. Instead, they use metal brackets and wedges or stop posts on the templates.
- Keep in mind that a curved bar or rail will still tend to straighten. And this straightening always occurs by a few percent. Therefore, when high precision in the manufacture of a part is required, it is necessary to conduct tests and, based on the results obtained, adjust the shape of the template (reduce the radius).
- After the part has cooled in the mold, let it stand some more. Some experienced furniture makers prefer to cure for 5-7 days. The tire, as a rule, is left attached to the part during this entire time.
Bending a wooden blank according to a template
Using wood bending tools
Wood aging methods
Artificial aging of wood is actively used by designers in creating unique interior projects. This popularity is explained simply: the wood retains all its physical characteristics, while acquiring a new, spectacular and original look.
There are three methods for aging wood:
- Mechanical – a wooden surface is either treated with a metal brush, as a result of which the soft top layer is removed and the texture becomes embossed (brushing); or tinting compounds are applied followed by sanding the board (patination). Often both methods are combined to obtain a more expressive texture and color of wood.
- Chemical - a special composition based on alkali or ammonia is applied to the surface, changing the color of the upper layers of hardwood.
- Thermal – lightly burning wood of any type with a torch, followed by sanding with a wire brush and tinting.
Hard wood species are suitable for brushing - oak, walnut, almost all conifers. Patination is used mainly on wood with a weak texture - beech, cherry, maple.
Despite its complexity, wood brushing technology today is one of the most popular among all types of decorative processing. It is used in the manufacture of antique-style furniture, parquet, wall and ceiling panels, doors, stairs, and flooring. Such decorative finishing is appropriate in the interior of apartments, cafes, shops, galleries, and studios. Aged wood adds expressiveness to any setting and hints at the “historicity” of the place.
Hand tools
The simplest is the ax. Using it, you can split wood, trim it, cut it.
A carpenter's ax must be properly sharpened. If the chamfer of the tool has a concave shape, then it will bounce off the material, thus reducing the quality of work. A tongue and groove tool is used when cutting on the edges of grooves. An end plane is needed for processing the end elements, respectively. A humpback (a type of planer) is used when working with shaped (oval, cylindrical, convex, concave and other) surfaces. The stanchion is used in the manufacture of gutters of different radii and sizes. The jointer is needed for planing and leveling a large surface. A set of chisels is used for artistic carving.
A straight chisel is used to clean up the background, and a “jamb” is used to make geometric patterns. To create the necessary relief, cranberry is used. To make three-dimensional elements and cut through contours, use jamb knives.
The main stages of brushing wooden blanks
In general, brushing technology is accessible and can be performed by anyone who knows how to use carpentry tools. The key to quality work is the correct choice of wood and the availability of the necessary tools.
The production process of wood brushing consists of the following stages:
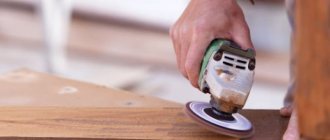
- The initial stage is cleaning. The dried wood is cleaned with a metal brush. Coarse sandpaper is also suitable for removing the top layer with soft fibers.
- Sanding - performed using a polymer brush or other abrasive to remove loose fibers. Coarse-grained sandpaper will also cope with this task if a metal brush was previously used.
- Coating a treated wood surface with stain or other dyes that will help highlight the structure of the wood.
- Polishing is done with a special lint disc or the finest sandpaper.
- Varnishing is carried out repeatedly. Each new layer is applied after the previous one has completely dried. The number of layers is determined by the color factor. To obtain a beautiful rich tone, it is recommended to coat the surface at least 3-4 times.
With the help of manual processing, the antique effect is obtained of high quality. Brushes of different hardness remove fibers sequentially until a beautiful pattern of the wood structure is obtained.First you need to prepare the tools and materials. In addition to the tree itself you will need:
• sandpaper of varying degrees of grain;
• set of brushes for brushing;
• stain (to obtain a beautiful shade you need to use several coating colors);
• transparent varnish intended for wooden surfaces.
Manual brushing steps:
• spray the wood with water to reduce the formation of dust in the air;
• with measured movements, moving along the grain, begin cleaning the surface with the coarsest brush (the intensity of work is selected individually depending on the type of wood);
• spray some water again and repeat the treatment, but with a synthetic brush;
• if the fibers are poorly separated from the base of the wood, it is necessary to burn the surface followed by cleaning with a medium-hard brush;
• sand using soft bristles or the finest sandpaper;
• apply a generous layer of stain to the wood, immediately removing excess;
• repeat the coloring using the same tone or a more saturated one (this will help to obtain a surface of different shades);
• dry the wood;
• apply a protective layer using transparent varnish (to create an expressive texture and reliable protection, it is recommended to repeat the varnish treatment 1-2 times).
The use of special chemicals (acids, alkalis, etc.) will help reduce the complexity of the process. But an aggressive environment greatly destroys wood; it is not always possible to obtain the desired effect, especially if there has been no previous experience in using chemicals. Therefore, when trying to create a brushed surface for the first time, it is recommended to choose the manual method.
Scope of application of wood structuring technology
The structuring method is very popular in the manufacture of interior items and room elements. Such wooden products will become an original addition to classic and vintage interiors. In addition, the advantage of brushing technology is the ability to independently create exclusive items. In addition, this method falls into the category of simple processes accessible to everyone.
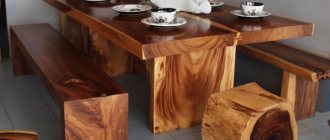
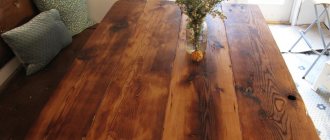
Brushed boards are used to decorate fireplaces, shelves, columns, wall panels, and aged wood is used as ceiling beams. This material creates a unique ambience for living rooms and halls, cafes and restaurants. The interior design is filled with aristocracy and luxury, and aged wood creates warmth and comfort in the room.
An easy-to-use brushing technique allows you to transform an ordinary interior into an elite, expensive and stylish one.
Wooden furniture with brushed elements looks stylish and sophisticated. Artificial aging and patination of wood with your own hands allows you to make absolutely any furniture: cabinets, chests of drawers, pegs, beds. The use of brushed elements in furniture and interior design has no restrictions or prohibitions - it all depends on your imagination and creativity.
Features of working with floor coverings
Not only furniture elements, platbands and all kinds of decor can be brushed. This processing technique is often used to imitate the aging of parquet and parquet boards.
The main difficulty in working with wooden floors is the large amount of work involved. The drill is of little use here: uniformity of processing and productivity suffer. At such volumes, it is reasonable to purchase or temporarily use a brush sander. This will allow you to maintain a uniform scratch depth with the brush and then quickly sand over a large area.
For the floor, it is not recommended to show deep wood relief, otherwise the coating will get very dirty and difficult to wash. The optimal depth is 0.5–0.8 mm, so the wood on the floor will become warm and pleasantly rough, and the unnatural gloss will disappear.
General information
Making wooden furniture with your own hands can easily turn into a creative hobby.
The resulting masterpieces will be able to take their rightful place in an apartment or country house. Do-it-yourself wooden furniture can also become a wonderful gift. Designing objects for yourself is considered more of a creative process than a technological operation.
Do-it-yourself wooden furniture is not only a source of pride for the owner of the home. From simple bars and boards you can construct many necessary things: from a stool to a bed or wardrobe. The most important thing is that the items you make yourself will fit perfectly into the existing interior.
It is also important that the furniture produced will be exclusive. After all, its creation will use its own schemes. Well, among other things, during the manufacturing process you can practice carpentry.
Rules for finishing wood this way
If brushing will be done at home, then it is important to do everything according to the instructions, this way you can be sure that the result will be of high quality.
If you do not follow the advice, the wood will simply deteriorate.
During preliminary work, it is important to know the moisture content of the wood. If the surface is very dry, then it is moistened with a sprayer. If, on the contrary, it is wet, then it needs to be dried a little.
Materials such as maple, beech, and alder are not suitable for brushing, because their structure is almost invisible. This technology will not be attractive on these trees because the fibers do not provide the layering effect.
An excellent option would be trees in which the structure consists of many layers and has a unique pattern: cedar, larch, spruce, pine, oak.
This treatment is not suitable for tropical trees, they do not have annual rings, it depends on the climate in which they grow.
If we talk about the hardness and softness of wood, then the technology is carried out on trees of different hardnesses.
You can also make antique plywood, plywood slabs, or veneer, thus obtaining a more beautiful relief on the base.
To carry out aging you need to have certain tools. Simple tools are often used at home, they are low in price and can be purchased at any home improvement store.
If mechanical processing is to be done, then you need to have a brush with metal bristles (steel, brass). It perfectly cleans the soft layer of fibers from the base, but the hard layers are not affected.
When purchasing a brush, you need to pay attention to:
- Butt. It needs to be wide, in the shape of a roller. This way the finish will be the same over the entire surface.
- Thickness of the bristles. It should be 10 times thinner compared to the soft layer of wood fibers, so this parameter is chosen in accordance with the type of wood.
- Pile shape. It is better to use straight bristles than curled ones. If you purchased the second option, you can trim the curled ends yourself.
- Hardness level. If the bristles are short, then the stiffness will be stronger. At the very beginning, for basic finishing you need to use tougher tools.
Using a brush you can remove most of the soft layer. Next, use tools to remove roughness on the surface; nylon brushes with abrasive powder are suitable for this.
The price of such tools is not small, so fine-grained sandpaper is used instead. This is not the best option, but if there is no other choice, you can do it this way.
For fine polishing of wood, sisal or wool brushes are suitable.
Of the hand tools you need to have:
- Chisel. With its help, deep grooves are obtained, if necessary. You can also make special cracks, different patterns and breaks.
- Coarse grit sandpaper. Used to maximize the natural structure of the material. During finishing, the sandpaper is moved along the hairs.
If you need to do a large amount of work, it is better to use electric ones instead of manual ones. A specific aging machine that allows you to choose different speeds is great for this. In addition, you can take a drill or grinder with a special attachment.
After finishing the material with tools, we proceed to finishing - applying paint, tonic, and stain to the base to improve the external decorative appearance.
Toning gives contrast to the pattern and texture of the material. For this procedure you need to have a brush or sponge.
The simplest option is painting with stain; it quickly saturates the wood in the soft layer, and more slowly in the hard layer. A large amount is applied, and then the excess is immediately removed to create light parts on the surface.
Wood impregnated with gold or silver stain looks very beautiful; such a coating shines very beautifully in the sun's rays.
In addition, the following tricks are used:
- The depressions are painted with darker colors, and the top with light colors.
- The upper tier is covered with dark tones, and the recesses are covered with light tones.
- Patination – painting cracks in the darkest possible tone.
It is important to keep an eye on the fibers while tinting. If they stick out strongly on the base, then you need to sand the surface with fine-grained sandpaper.
Dry wood must also be painted with a varnish so that the appearance remains attractive for a long time and has good surface properties.
This technology makes it possible to obtain an original appearance for any wooden product. In addition, anyone can do their own brushing, and you can save a lot on different types of work (design, repairs).
Console table
To make this item, you need plywood, the thickness of which is 1 cm. It is advisable to immediately cover the ends of the sheet with self-adhesive film. You can iron narrow strips with a flat, heavy object (an old iron, for example). Before starting work, the plywood should be thoroughly sanded.
Its surface should be smooth and even. Using a drill, you then need to drill holes in the connection areas. Self-tapping screws will be screwed into them.
The table will consist of 3 wide parts, arranged in the shape of the letter “P”. For greater stability, 2 narrow boards should be screwed to each element. For better joining, you should step back two to three centimeters from the edges of the plywood.
A thin narrow strip is glued to the sides. It will hide the joint areas. PVA or simple wood glue is suitable for fixation. Pre-prepared metal corners should be secured to the underside of the tabletop.
They are fixed with self-tapping screws. Having lubricated the joint areas with glue, you should attach the tabletop to the supports and tighten both sides at a right angle. For greater convenience, rollers are screwed to the legs at the bottom.
A hole should be drilled according to the shape of the wheel. The roller is fixed with bolts, which are usually included in the kit. Here you should try to fix the elements at the same level.
Wood quality
For brushing, use soft but durable wood with good structure. Beech, cherry, and birch are not suitable for structuring.
Pine, spruce, larch, walnut and oak are suitable choices for all artificial aging techniques (with the exception of oak - it is difficult to fire, but is perfectly tinted). Pine is the most affordable material - frames, boxes, and shields are often made from it.
Boards and wooden products for brushing must be dry (dried industrially to 10-12%). A simple edged board will not work, since the moisture will evaporate for months and years and will affect the appearance of the treated surface (the board may “sink” and become warped over time).
Do-it-yourself wood brushing: how the process is carried out
In this case, the wood is processed using special brushes that have durable (usually metal) bristles. The meaning of the actions performed is to ensure that the annual rings on the tree become noticeable. This makes the surface visually embossed.
The origin of the term is associated with the English word brush. Many people know such a tool as a cord brush. It is suitable for brushing wood.
Nowadays, completely manual processing of wood with brushes is becoming increasingly rare. Automatic devices are used much more often. Moreover, there are even special large-sized machines equipped with appropriate fleecy parts. With their help you can quickly process a large surface.
Brushing is ideal for working with larch, pine, spruce, alder and oak. In other words, we are talking about hard wood.
Binding of wood is not recommended for species such as pear, maple, teak, beech and cherry.
Mastering the process of brushing wood with your own hands is not that difficult. To get started, you will need a set of necessary tools:
- Brush (with metal or other dense bristles)
- Paint (one or more shades)
- Solvent
- Surface to test (a kind of “palette”)
Advice:
Even before starting work, think about what color scheme the wood should appear in the end. Depending on your wishes, you can provide the most natural shades, close to the color of the wood itself, or create the appearance that the wood has been painted, but the paint has partially come off with time. Here it is also appropriate to think about whether there is a need to “fit” the piece of furniture into the overall color scheme of the room, to make it look like some other decorative elements, etc.
When everything is ready, it's time to feel like an artist and do some brush work!
- Degrease the wood
- Apply a sufficient amount of carefully selected shade of paint with a brush; excess can be removed with a rag.
- Check the color and visual effect on the “palette”. If all is well, you can continue.
- Start applying paint to the wooden surface with a brush, making movements strictly along the grain of the wood. It is recommended to go in one direction, without reverse movements and repetitions, but this is not so necessary. While working, do not put pressure on the brush - the bristles should not tuck or wrinkle.
- When everything is ready, simply let the product dry.
Do-it-yourself wood brushing is complete!
Advice:
When checking on the “palette”, you should pay attention to how “aged” the surface is. Ideally, each bristle of the brush should leave its own noticeable mark, and all such marks should not merge together. The result is uneven coloring - both the original tone of the wood and the newly applied color are noticeable.
Direct maximum effort to processing the protruding parts of the product - carefully go over the edges, corners, etc. This will create the illusion of a 3D effect and emphasize the relief, which always looks advantageous.
Bonsai in a pot
We offer another way to easily make an artificial bonsai tree with your own hands. The operating algorithm is simple:
- We select the container. A ceramic flower pot with holes for draining water is ideal.
- Fill the pot with soil. The soil should not be collected from the yard. It’s better not to save money and buy a ready-made mixture at a flower shop. Why is this necessary if the tree is still artificial? We will be growing moss or lawn on top, so good soil is essential.
- For the trunk of a decorative tree, we select a branch that is thick enough and intricately curved to resemble a spreading plant.
- We attach decor to the branches of the wooden frame. It can be made from matte paper, fabric, satin ribbons or any material. The more original the decor, the more spectacular the final result.
- We plant the lawn mixture in the ground and water it generously daily. Very little time will pass, and under the original tree a bright and lush summer lawn will spread out.
By combining natural and synthetic materials, you can achieve unprecedented results in the art of bonsai, turning your favorite hobby into a successful business.
Other original aging methods
Naturally, the list of answers to the question of how to age wood does not end there, since representatives of creative professions related to works of art contributed. One of the well-known methods has already been discussed: this is patination, which allows you to give the products an antique look. However, there are other options - both simple and complex. In this case, the effect is achieved by experimenting with a decorative coating, and not with wood: it remains in its “pristine form.”
Crackle (craquelure)
This is the most effective way to get not only an “ancient” tree, but also to change any material beyond recognition. Crackle is a method of creating a web of cracks on the surface of objects. The set for such creativity is quite modest. It includes PVA glue, paints of two shades (acrylic or facade) and a hair dryer. There is a special varnish (primer, paste) for craquelure, but here we will only talk about the folk recipe for cobwebs.
- First, the surface is covered with dark-colored paint, then wait for it to dry completely.
- Apply the next layer: this time it is PVA, and there should be a lot of it. But one condition must be fulfilled: the layer must be thick but uniform.
- To speed up the process, the glue is treated with a hair dryer so that a thin dried film forms on the surface. Complete drying at this stage is not only not required, but it is harmful because it will not allow you to achieve the desired effect.
After obtaining the PVA crust, a layer of lighter paint is applied to the surface, which is also left to dry on its own. Then the glue is applied again in a thick layer. The last step is to dry the surface until the PVA film begins to crack. Thus, cobwebs will begin to appear on the surface, which is the best proof of the age of the product.
If traditional “wooden colors” are not used for objects, then you can swap the shades: first apply light paint, and then dark composition (contrasting).
Dry brush
This method was invented by artists, but now it is actively used by decorators who successfully use the dry version for “forced” aging of wood products. The work requires a minimum set - paint, a wide but thin synthetic brush and sheets of thick paper, which is necessary to rid it of excess mixture.
- Use a brush to pick up a small amount of paint, then move it across the paper until the tool begins to leave thin lines on the sheet.
- Then, with a brush, stripes are drawn along the growth of the fibers. Here, order is also contraindicated: the best results are guaranteed by erratic movements.
It should be noted that the “Dry Brush” operation is optimal for aging furniture or other products with convex elements.
Glaze
This is the application of two or more layers of paint, the first of which is brighter, and the subsequent ones are translucent. The advantage of this method is that it produces a non-uniform, iridescent, changeable surface. For such aging, you can use different types of paints. The largest assortment of colors is distinguished by acrylic compositions, watercolors and oils are a little more modest. Even strong tea leaves can serve as a “decorator”. Any wood can be processed. For glazing, use either a sponge or a synthetic brush.
The first layer is applied unevenly, trying to achieve the natural shade of the wood. If this does not work, then add another thin layer. After the operation is completed, the product is left to dry completely. When several tones are applied, they create an interesting translucent effect.
Spray
These are droplets that age the product in a chaotic manner. This creates the image of an antique item that has passed through decades.
The spray looks nice and is textured to the touch. It leaves an impression of antiquity; a product with such decor brings coziness to the house. For processing you will need: a hard brush or toothbrush, paints, a glass of water.
Wood aging technology:
- Wet the brush and pick up some paint.
- Perform a test spray on a white surface to determine the droplet size. To do this, run your finger or a toothpick along the bristles of the brush.
- If the brush is wide, then you can simply tap on it and the drops will fall.
- The product should be placed on paper, which can then be thrown away so as not to spoil the table.
- Spray the product and wait until it dries completely.
- Cover with varnish. If there is a desire to achieve a three-dimensional effect of antiquity, the drops are sprayed in a second layer on top of the varnish. They will not look so bright, but they will age with a double layer of drops.
Spraying is combined with other techniques for aging.
We create bonsai
The tradition of creating bonsai was born in Ancient China more than two thousand years ago. The name “bonsai” is written in two hieroglyphs, which mean “bowl” and “tree”. Later, already in Japan, the unusual method was actively developed and rose to the rank of fine art.
It was the Japanese who brought the method to perfection, creating a special system of canons and proposing rules for exposure. Miniature trees are an aesthetic pleasure for perfectionists.
Many people claim that looking at an elegant bonsai, they are overcome by an extraordinary feeling of calm, tranquility, and anxiety goes away, as if by magic. Decorate the world around you, try your hand at creating amazingly beautiful products.
Do you want to create a luxurious miniature garden at home that does not require special care? Then an interesting master class will help beginners in creating a bonsai tree with their own hands.
Step-by-step instruction:
- We select materials for work. Any gifts of generous nature will be needed: intricately curved twigs, driftwood, juniper, spruce or pine branches, moss, reindeer moss.
- We preserve the branches. For processing, we will prepare a special solution consisting of denatured alcohol, acetone, and glycerin. We take everything in the exact proportion 1:1:2.
Important: The solution for preserving natural materials should be stored in a tightly closed container, as it has a pronounced chemical odor.
- Initially, we wash the branches under cold water, thoroughly cleaning them from dust and dirt, then place them in the solution for at least a week.
- Next, dry the decorative material and paint it if necessary. Let's reveal a little secret: before painting, you need to dip the branches in hot paraffin, the treatment will help to apply the paint evenly to the surface.
- Let's start making a decorative bonsai tree. Cut the branches to the required length and carefully glue each one to the base. To prevent the structure from falling apart, we will wrap the individual elements with wire; after gluing, it can be removed.
- We decorate individual areas with moss, reindeer moss, white sand or decorative pebbles. In our work, we will definitely designate the center of gravity of the structure in order to give the craft greater stability.
After completing the painstaking work, a unique live composition will open to your eyes. An eco-style bonsai will delight the eye for a long time; all that remains is to occasionally brush off the dust from the elegant creation.