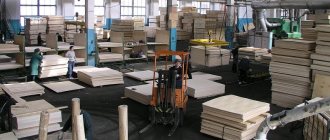
Starting repair work involves searching for materials, deciding to hire a team, or relying on your own. And even if it was decided to improve your own home yourself or the utility room needs to be repaired.
In any case, you will have to watch master classes and get acquainted with the advice of experts. After all, the microclimate in the room will often depend on the selected material.
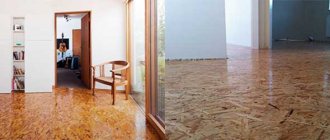
And then a fair question arises: which material will be better for cladding indoors or outdoors. The sheathing is not the final layer; carpet or linoleum is often attached to it without any problems, tiles or tiles are laid, wallpaper is applied and paint is applied.
First of all, various similar building materials are used for insulation, sound insulation and moisture absorption. Let's compare the advantages of gypsum fiber sheets and oriented strand board.
Laying on boards
If the floor has a minimal slope and almost no unevenness, then the rough layer of plywood can be laid directly on the wooden floor boards. In this case, it is advisable to follow several immutable rules:
- The moisture level of the floor when laying the flooring can be checked using a regular piece of polyethylene. If condensation forms underneath, it means the floor is not yet dry enough, and laying the plywood should be postponed.
- Experts in interior finishing work recommend taking at least 14 mm in thickness. If the floor is perfectly flat, then a layer 8-10 mm thick is allowed.
- Squares should have no more than three joints at one point. This is the so-called “brick” laying scheme.
- The length of self-tapping screws (less often nails) should be 2.5-3 times the thickness. For example, for a subfloor with 14 mm thick plywood, the screws should be no shorter than 40 mm.
- The plywood is placed on glue or attached directly to the boards with nails. At the same time, you must remember to clean the boards from dust, shavings and other construction debris.
- Quite often, standard pieces of plywood are divided into four squares to make them easier to work with.
There is also laying a plywood floor directly on a concrete screed. But this method is suitable for non-residential premises, where differences in height and aesthetics are not particularly critical.
You can find out what the price of USB plywood is in this article.
What types of finishes are suitable?
Those who have already dealt with cement particle boards talked about the difficulties in finishing. There are no particular difficulties at this stage of construction, you just need to know about the features of DSP, this will help you figure out what material to use for finishing inside and outside.
The slab has a low level of hygroscopicity and adhesion - to apply layers of plaster or putty you will need a special primer and reinforcing mesh. The seams should be filled with elastic plaster or covered with decorative elements.
Interior decoration
Interior decoration depends on the interior style you choose. DSP are smooth panels that can be easily painted or applied with decorative textured paints and putties. It is important to fill the seams correctly so that they do not crack, and to choose a composition for application to the wall surface.
The simplest and most cost-effective finishing method is painting with preliminary filling of the seams with acrylic sealant (displacement coefficient 7.5%), sealing them with a non-woven construction bandage and leveling them with putty.
If you are still worried about possible cracks, there is a more expensive but reliable method. It is necessary to sew up the gypsum board walls in one layer without lathing (after all, the slab is smooth, there is no need to level the surface). After this, any coating can easily be placed on the wall. The same method is suitable for bathrooms and toilets where ceramic tiles are planned.
Without preliminary preparation (economy class), you can purchase thick vinyl wallpaper for painting and paste it on the walls. They have the ability to stretch and compress, so the movement of the slabs under the influence of changes in humidity will be completely leveled.
Exterior decoration of the house
The most common way to finish a DSP frame is to imitate half-timbering . The seams are securely hidden behind the slats, and the main area is covered with paintwork of the selected color. But not everyone likes the style itself.
- Application of elastic paint. The method is convenient and reliably prevents the appearance of cracks. The downside is the high cost, especially in turnkey configurations from developers offering the construction of houses.
- Using elastic mastics to fill seams for further painting. Acrylate enamels for exterior use and organic solvent paints are used as the main coating.
- Ventilated façade. The minus is a large-scale complex of works, the plus is the attractive appearance of the facade, a long service life without repairs and maintenance.
- Sheathing with siding and other sheet materials. It is rational if in your region there is a possibility of a strong drop in temperature in winter. An additional thermal insulation layer with wind protection can be installed under the cladding. Disadvantage: high cost, large-scale work package.
To briefly summarize, we get the following facts. A frame house covered with cement particle boards is a strong and durable home without the need for frequent repairs. Easily withstands low temperatures, changes in humidity, does not rot, is not flammable, and is not susceptible to damage by insects and rodents. Technologically, the material provides ample opportunities in the choice of finishing materials. The only difficulty is to find a conscientious developer who will erect the building exactly according to the technology, without mistakes or hackwork, and only in this case the building will be able to show all its positive qualities.
Advantages and disadvantages
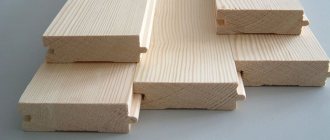
How to lay a chipboard floor.
Laying chipboard on a wooden floor, on a concrete floor with your own hands, instructions, photos. When it is difficult to decide which substrate is better: plywood or chipboard, you need to consider the advantages and disadvantages of each material. Plywood covering has the following advantages:
- Withstands heavy loads.
- Light weight.
- It is flexible, has high bending and deformation strength.
- There is no foreign chemical smell.
- High leveling abilities.
- Easy to process and saw.
- Easy to use.
- Smooth beautiful outer surface.
- Retains heat in the room.
Advantages of using oriented strand boards:
But all wood materials have a common drawback - moisture has a great influence on them. Humidity will quickly destroy wood raw materials, so it is better to lay moisture-resistant types of coatings. The other negative side of moisture-resistant panels is environmental friendliness. They emit formaldehyde, which is harmful to health, but it is this that helps fight moisture.
If you lay the flooring on joists, you lose up to 10 cm in the height of the room. This is not always acceptable in certain situations. To lay the sheets, it is necessary to make a clear calculation so that there is no waste and unnecessary rework. It is recommended to fasten these materials using self-tapping screws with an average pitch of 20 cm.
The price differences between plywood and OSB of the same brand are not the most significant, but OSB is cheaper. In suitable and unpretentious conditions, OSB boards can be laid, but plywood is suitable for a durable, wear-resistant coating.
Manufacturability
In our case, manufacturability means ease of use. Let's try to analyze this quality using the example of different actions.
Wood boards are stored and transported in the same way. The only difference is the laminated particle board. It requires careful handling so as not to damage the decorative layer.
These sheets are cut in the same way, using the same equipment and tools. When cutting with a hand jigsaw, large flakes may appear on OSB due to the structure of the material. When fine-tuning parts using a belt sander, OSB may require more work.
Drilling
When drilling holes in OSB, flakes may also appear that are absent or almost absent on chipboard. For some cases this is important and must be taken into account when working.
Installation of fasteners
Self-tapping screws (screws with a sharp end) fit into the particle board without pre-drilling. OSB is also included, but it requires a force close to the tensile strength of self-tapping screws. Pre-drilling may be required to install fasteners into OSB.
When installing countersunk screws in OSB, countersinking must be done. In chipboard, in many cases this is not required - the head is recessed due to the pliability of the material.
In terms of manufacturability, a slight advantage remains with chipboard.
Laying technology
The process of laying plywood under linoleum on a wooden floorTypes of plywood for flooring
The installation process does not require special knowledge or talent, so even a beginner can handle this work. OSB, chipboard or plywood is laid on the floor in two ways - on a flat surface and on logs. The first option requires the presence of the most durable and even base, which can be either a regular screed or a boardwalk. The floors must be clean so that nothing interferes with the adhesion of the glue to the base.
The second option is more labor-intensive, but it allows not only to level the surface, but also to efficiently insulate the underground space. Preliminary measurements of the area are carried out so that plywood and OSB, the dimensions of which are slightly different, are laid with a minimum number of joints.
To install the slabs on the screed you will need:
- roulette;
- level;
- a circular saw;
- OSB sheets;
- primer;
- notched spatula;
- dowels;
- rubber based adhesive.
First, the screed plane is checked with a level to eliminate differences in height. Next, chipboard or OSB is laid out on a dry surface and cut lines are marked for precise fitting of the sheets. After cutting, cover the back side with glue and place it in pre-marked places. Press firmly with your hands to the floor, be sure to check the horizontal level with a level. Plywood (OSB) is laid on the floor quite quickly, so the work will not take much time.
When installing USB, a gap of 10-15 mm wide should be left around the perimeter of the room and seams 3-4 mm wide between the plates themselves. This is necessary to compensate for material deformations due to changes in humidity and temperature conditions. After installation is complete, you need to wait for the glue to dry and additionally secure the flooring with dowels. They are screwed into pre-drilled holes in the corners of each slab.
OSB or plywood is installed on a wooden floor in a similar way. The base must be strong and level, without serious defects. If there are large gaps or the board bends under your feet, you first need to fix the problem and only then begin installing the sheets. In this case, OSB can be laid on the floor without glue, using only wood screws for fastening. The latter are screwed in increments of 20-30 cm around the perimeter of each slab.
To lay the floor along the joists, you will need:
- strong timber with a section of 100x150 mm;
- OSB sheets;
- level and tape measure;
- self-tapping screws;
- anchors;
- screwdriver
It should be noted that the choice of sheet thickness depends on the distance between the logs: with a step of 40 cm, the minimum thickness is 15 mm, with a step of 50 cm - 18 mm, with a step of 60 cm - no less than 22 mm. The logs are laid on the floor, which is best done with an assistant, and set strictly according to the level. Next, holes are drilled for the anchors and the timber is secured to prevent it from moving.
Clean sheets are tried on and cut out, after which they are laid on top of the joists, with the seams obligatory to be shifted in each subsequent row. The flooring is fixed with self-tapping screws every 15 cm around the perimeter of the sheets and at a distance of 10-15 mm from the edge. This is how plywood or OSB is simply laid on the floor, after which the finishing coating is laid.
Stage two: foundation
While working as a designer, most likely you have already decided on what kind of foundation you will make.
There are many options, but, as a rule, you choose from three main ones:
- tape
- columnar
- pile or pile-screw
If you are choosing a foundation for a residential frame house in which you plan to live for decades, it is better to choose a strip foundation.
If you are building a small house for a summer residence or temporary residence, you can install a lighter, columnar foundation.
If your territory has large differences, proximity to a body of water or underground rivers, it is worth considering the pile-screw option.
Strip foundation
Since the most preferred foundation for construction is a strip foundation, I will briefly tell you how it is made. First, checking the plan, we make markings.
Of course, we use pegs and rope for this. The foundation must pass under each load-bearing wall, since the walls are the main support for the roof.
When the marking is completed, we dig a trench. You can dig a trench with your own hands with a shovel, but it is much easier to order equipment for construction.
The cost of a small excavator or tractor with bucket depends on the distance, the total length of the trench and the time spent on the job.
It is better to choose several offices and call each one. The difference in price is sometimes up to 50%.
Foundation with formwork
When the trench is ready, it is necessary to install the formwork. If you don’t want to bother, you can purchase ready-made, removable or permanent formwork in the store.
If you want to save money, put it together with your own hands using boards and thick film.
When the formwork is ready, pour in the cement mixture and wait a couple of weeks for it to dry and harden.
If the weather is dry and warm, this process goes faster. If the weather is humid or it starts raining, the foundation should be covered with film.
Plywood or OSB for flooring
Do-it-yourself - How to do it yourself How to properly paint the wooden facade of a house Beautifully painted and decorated facade with your own hands
More than 30 years ago, when there was a shortage of plywood, mass production of OSB began. Although a lot of time has passed, it is difficult even for experts to tell plywood or pox which is better for the floor.
Oriented strand board (OSB) is a multilayer material based on pressed small chips. Since the latter are also used in chipboards, these boards are often confused. But they have a significant difference: in OSB, the binding component is not toxic glue, but numerous resins, boric acid and synthetic wax. Thanks to this, high environmental friendliness and, accordingly, safety for health are achieved.
When choosing OSB, you should pay attention to the class markings:
- Possibility of use at low humidity and light load.
- Used in dry rooms under moderate loads.
- It is characterized by high resistance to both moisture and stress.
- The most durable and moisture-resistant materials that are not usually used for flooring.
Moisture-resistant OSB-3 boards are characterized by the presence of tongue-and-groove ends, which improve the joining of the boards. These OSBs were previously much cheaper for plywood, but prices for the latter have dropped significantly and now we have the following indicators:
- The price of a moisture-resistant OSB sheet 2800*1250 mm, having a thickness of 10 mm, is 680 rubles. That is, the cost per square meter is about 180 rubles.
- A sheet of grade 4 FC plywood 1525*1525 mm of the same thickness will cost 400 rubles. Accordingly, the cost per square meter is 172 rubles.
As you can see, OSB sheets are more expensive than plywood. But it is worth noting their undoubted advantages:
- homogeneous structure: no knots or pockets;
- low vapor permeability, which allows not to use waterproofing;
- high degree of strength;
- light weight;
- high environmental friendliness among similar products;
- moisture resistance: the material does not deteriorate even after being in water for 24 hours;
- compared to softwood plywood, fasteners hold 25% better;
- not exposed to harmful insects.
We have already mentioned the advantages of plywood, so now we will only note three main ones:
- Long term of use without various deformations and shrinkage.
- Aesthetic appearance.
- Flexibility, thanks to which it perfectly adapts to uneven floors.
If we compare the materials according to their main characteristics, they are almost equivalent. Most often, when deciding whether plywood or OSB is better for the floor, they focus on environmental friendliness, cost and appearance.
Ordinary material
And now for the plywood sheets. They are canvases of different sizes, which consist of knitted small peeled wood veneer. Birch is usually chosen as the basis for such veneer. Again, plywood is initially completely harmless. But the veneer in the sheets cannot be unconnected. Here again the already known phenol and formaldehyde resins are used.
Security groups
Advantages and disadvantages of plywood.
But, unlike OSB boards, plywood has a slightly different degree of environmental friendliness and its own subtleties
It is also important to take into account that today the World Health Organization has identified 3 main groups of environmental safety of plywood, which are characterized by the letter “E”. Next to this letter there is a number from 0 to 2, depending on the degree of environmental friendliness of this type of sheet.
As a rule, the auxiliary binder in plywood is methanol. It to some extent increases the same characteristics of formaldehyde. But at the same time, due to this formaldehyde, a significantly smaller amount is required for binding. That is, these materials seem to mutually compensate for each other’s harmfulness.
And yet there is a degree of harm. Therefore, it is advisable to consider in more detail the main types of plywood based on their three levels of environmental safety according to the “E” quality standard. So let's get started.
Comparative table of performance characteristics of wood-based panel materials.
E0 type plywood contains less than 6 mg of formaldehyde-type binder resins. The optimal permissible content for this category is 6. This means that 100 g of clean dry plywood sheet contains 6 mg of harmful resins.
But the main catch is that this type of plywood has been produced quite poorly lately, so you can’t buy it everywhere and not always. The explanation for this is the insufficiently high functional characteristics of the material.
The second type of plywood for environmental safety is E1. Here, according to standards, the content of harmful resin is from 7 to 9 mg per 100 g of clean dry sheet material. But such plywood is produced only in some countries of Western Europe, so there is also no wide access to it.
And finally, the third type is E2 class plywood. The resin content ranges from 10 to 20 mg per 100 g of material. Such sheets are already being produced en masse in almost all developed countries. But, accordingly, the harmfulness of this plywood will also be slightly higher.
Fire safety
Advantages and disadvantages of OSB.
It makes sense to consider the types of plywood according to another important parameter - flammability class. Not only the degree of release of toxins into the room, but also fire safety will depend on this
As a rule, today the most common type of plywood produced is G4 flammability class. This is a completely combustible material that releases all toxins into the air when burned.
But if you look hard enough, you can also find G2 type sheets on the market. They have a higher degree of fire safety. And during combustion, accordingly, they do not emit such amounts of harmful substances. Therefore, if we take into account all the factors, then it is necessary to give preference to G2 class plywood. After all, at the same time, such a material will emit much less harm into the air, even when exposed to sunlight.
As a conclusion, it must be said that even despite these classes, not a single type of plywood is one that can be safely used for interior work in residential premises. The explanation for this is quite simple - an increase in the release of toxins harmful to the body several times with even a slight increase in ambient temperature or an increase in humidity in some cases.
And the use of G2 and E1 plywood for domestic purposes at the same time will make it possible to minimize the release of toxins into the air. At the same time, there is a possibility that you will not feel this harm indoors, therefore, the harm to your health will be less.
So, the main environmental characteristics of plywood and OSB boards have been reviewed. The bottom line is that it is not recommended to use either one or the other for residential premises. But if such a need arises - plywood or OSB - then it is better to choose ordinary non-moisture resistant plywood, since it is more environmentally friendly.
Frame house from CSP UralPlitProm
Building a house using frame technology promises many benefits to the future owner of the house. Such a house is built much faster than traditional brick or wooden houses. It does not require a powerful foundation, since it has significantly less weight, and with the right choice of materials it also allows you to save on interior and exterior decoration. However, if construction technology is violated, all the advantages of a frame house instantly turn into disadvantages. How to avoid this? There are a few trivial things that you shouldn’t forget:
- Build a house according to the project. Having a project linked to the area, with a pre-calculated estimate, and linking all communications on the site has never harmed construction.
- An experienced team is always better than covens. And having an agreement listing all the main responsibilities and stipulated responsibility for failure to complete the work will undoubtedly add confidence in the final result.
- Use of quality materials. A dry calibrated board as a frame is significantly superior to other lumber. Of course, there is always a desire to save money, but this is exactly the case where saving can lead to large losses in the future.
- Use suitable materials for insulation and sheathing. The insulation can be polystyrene foam, polyurethane foam, basalt or mineral wool, ecowool, etc. The cladding can be made of OSB, DSP, Plywood and even edged boards.
Let's look at the last point in more detail. Plywood is an excellent material for building frame houses, and if it were not for its price, frame houses would be built primarily from plywood. The cost of covering a house with plywood will be about a third higher than the cost of OSB or DSP. Edged boards require a large amount of manual labor: planing, drying, fitting, and so on. Therefore, construction may take a long time. But DSP and OSB wood boards do not have these disadvantages. Let's talk about them in more detail.
OSB in frame houses.
So, OSB (OSB) is an oriented strand board, a building material with unique properties. This material was specially created for the construction of houses, and combines the properties of chipboard and plywood. For the production of OSB, coarse shavings are used, compressed by a special machine. As a rule, OSB has a layered structure, due to which it has high strength and excellent strength characteristics. In terms of its qualities, OSB is much closer to plywood. What types of pox boards are used in the construction of frame houses?
OSB 3 board is highly resistant to moisture. OSB-3 contains phenol-biphenyl, a methane-diisocyanate adhesive that provides increased moisture resistance of the board. At the same time, when heated to temperatures above 40 degrees Celsius, the stove begins to release quite toxic substances that can be harmful to health in high concentrations indoors. For this reason, OSB 3 board is used for external work and external cladding of the building. Thus, all negative effects from the use of this material are eliminated; evaporation goes outside, and not inside the house.
For interior decoration of a building, it is recommended to use OSB 2 board. In the production of this type of OSB, an adhesive mixture based on urea or melamine resins is used, which does not emit toxic fumes into the air. However, OSB-2 itself does not resist moisture as well as OSB-3. All other characteristics of these materials are completely identical.
OSB is perfectly processed with hand tools: sawed, drilled, sanded. The stove is not susceptible to insects and fungi. OSB is inedible for rodents.
In terms of flammability, OSB board belongs to class B2 - normally flammable boards, which is close to well-dried wood. Therefore, it is recommended to do interior decoration using plasterboard sheets in one layer.
Well, the main advantage of OSB panels is the price. OSB is one of the most affordable materials for construction.
DSP in frame houses.
Cement particle board (CSP) is a modern building material ideal for building a frame house. The main components of CBPB are wood shavings and Portland cement with the addition of water and special additives. The main difference between DSP and OSB is the environmental and fire safety of the material. There are no toxic or flammable adhesives in the DSP composition.
Fire safety
Both materials being compared belong to the same flammability group - G4. They are included in this group according to all classification characteristics:
- relatively flammable;
- continue to burn after the heat source is removed;
- burn with intense smoke;
- flue gases have a high temperature (more than 4500C), which leads to ignition or damage to surrounding structures;
- burn almost completely, destroying the sample.
The degree of fire hazard of the materials is the same.
Floor plywood
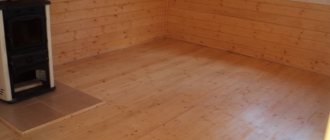
The use of plywood sheets to create flooring can be explained by several circumstances. Plywood for flooring is inexpensive, looks great in the interior, and makes it possible to level the floor with the least amount of time and resources, which significantly simplifies the repair procedure. Plywood is perfect for finishing work indoors and for installing a base for finishing materials, as well as for repair work or eliminating small flaws.
Most often, the difference in floor level in old apartments fluctuates up to 10 cm, so the simplest option of laying the floor covering head-on cannot be implemented. And if you are going to lay laminate flooring or parquet tiles in your home, the site must be perfectly level. But those with a crooked floor should not be upset, because plywood is an excellent raw material for leveling the surface. This procedure can be carried out independently.
The main advantages of plywood include:
- naturalness of the material, because plywood, unlike OSB and fiberboard, is created from natural raw materials, and not from production waste
- Humidity levels range from 12 to 15%
- plywood takes the brunt of variable loads. As a result, the screed remains intact, but microcracks form in the wood. However, they have absolutely nothing to do with the quality of the floor
- Due to the fact that it is made from wood, it creates good contact with finishing materials. Consequently, the period of operation of the latter increases
- Using this material, you can obtain a floor covering that meets the specified parameters with less time and money.
- No special preparation is needed to lay plywood on the floor; this work can be carried out in several stages
- it acts as a certain kind of insulating material because it reduces heat loss through the base
- plywood sheets can be used to create both rough and finished floors, it all depends on the type and nature of processing.
However, this material is not suitable for rooms with significant temperature differences (for example, for summer houses or buildings for seasonal residence), as well as with high levels of humidity.
Briefly about the main thing
There is no clear answer to the question of which is better OSB or plywood.
OSB boards and plywood, if they are not moisture resistant, are recommended to be laid in any rooms where there is no humidity. In other cases, it is still worth giving preference to moisture-resistant plywood, since under the influence of moisture, it retains its strength.
In irregularly shaped rooms, it is advisable to use OSB - the boards are sold in different configurations. But plywood is easier to cut. When the room has non-standard corners, it is recommended to use this material.
The plywood is ideally attracted to the base of the floor, thanks to which its installation is carried out as tightly as possible. But, its installation is not recommended without the use of sound insulation.
Read later
Laying tiles on oriented strand board
After a reliable, durable floor has been created, you can glue ceramic tiles onto OSB.
Selection of adhesive composition
It is not an ordinary sand-cement, but a multicomponent composition with microfiber, silicone, and other polymers, it is easily distributed over the entire surface of the tile without tapping, and after hardening it is characterized by elasticity, which ensures the most durable attachment of ceramic tiles to the base of OSB boards.
The glue is applied to the surface of the base using a spatula in small portions. The adhesive layer should be thin.
You can solve the problem in a non-standard way and use other means instead of tile adhesive, for example, liquid glass or liquid nails. You can glue ceramics with NC varnish mixed with foam shavings soaked in acetone. However, the use of specialized adhesive mixtures provides a higher guarantee of fastening strength.
Stages of laying tiles
- First of all, choose the pattern according to which you plan to lay the tiles and make the initial markings.
- Installation begins from the center of the room, less often from the far corner. When laying, adhere to the chosen scheme. Whole tiles are laid on the floor first, they are lightly pressed and carefully checked for evenness of laying. If necessary, use a rubber mallet for tapping.
- It is convenient to use plastic crosses, which are used to separate adjacent tiles. 24 hours after the flooring has been laid, the crosses can be removed.
- For speed, glue is applied to several tiles at once, laid and leveled at the same time.
The tiles laid on the adhesive composition can only be moved from their place for a few minutes, after which the glue will set. Complete drying time varies for different compositions and must be indicated on the packaging.
Grouting joints
A day after the floor is laid, you can remove the crosses and fill the tile joints with a special grout. To apply it, use a rubber spatula.
Grouting is the final stage of laying tiles on the floor.
Most often, the color of the grout matches the main tone of the tile, but you can make a contrasting pattern. You should immediately clean the entire tile with a damp cloth, because it is quite difficult to remove the hardened mixture.
Aquapanels
Aquapanel is a joint development of Knauf and USG companies specifically for individual and industrial construction. This is a slab based on cement (without asbestos) and reinforced mesh fiberglass. Such a board is not only resistant to moisture, but, like DSP boards, it is fire-resistant (G1), resistant to pests (including fungi and bacteria) and rotting. Among other things, aqua panels are very easy to install. Lightweight (up to 15 kg per square meter) slabs can be cut with a regular construction knife without the use of special tools and equipment. Reinforcement of aqua panels with fiberglass allows them to be bent with a radius of curvature of one meter. The ideal geometry of the slabs and their flat surface make it possible to use a minimum of finishing materials.
Leveling the floor with plywood 4 installation options
If you need to get an even and durable base for laying flooring, then one of the fastest and easiest ways is to level the floor with plywood. Compared to floor screed, this method has many advantages: it does not require special skills and tools, repairs can be continued immediately after installation, and the price of plywood is cheaper. Depending on the thickness and impregnation used, the price for a sheet of plywood can vary from 300 to 1200 rubles.
Plywood, OSB, chipboard, fiberboard or fiberboard?
Not every sheet material is suitable for use on the floor.
Plywood, DSP and OSB are best suited for leveling the floor.
- Plywood is the best option. It consists of glued sheets of veneer, with each new sheet laid perpendicular to the fibers of the previous one, which increases rigidity. Moisture resistance, durability and environmental friendliness depend on the binder material used. You can distinguish it by its markings.
- The most commonly used brand for flooring is FC. It is made on the basis of urea glue, and has lower moisture resistance and easily swells from moisture. Suitable for rooms with normal humidity, as it is safer for health.
The FSF marking has increased moisture resistance, but is not very environmentally friendly; it is made on the basis of phenol-formaldehyde glue. It is better not to use it indoors due to phenol emissions.
To level the floor, you can buy grade 3-4 plywood, since the presence of knots will not affect the final quality; they will be covered by the floor covering.
Laying tiles on plywood is not recommended as wood has a high coefficient of expansion and may fall off as the season changes.
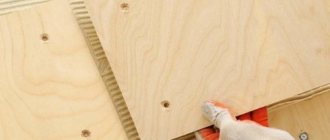
- Option 1: if plywood is laid on a wooden floor. This method can be used if you have an old wooden floor in more or less normal condition: with minor irregularities and cracks. If the boards are poorly secured, wobble and creak, they will need to be replaced or repaired first.
- Option 2:
Gluing plywood to a concrete floor.if plywood is laid on a concrete floor. This case can be divided into 3 alignment methods:
- Adjustable plywood with studs. The sheets are installed on anchor pins, which can be twisted to change the evenness of the surface.
- Plywood floor on joists. A standard frame is constructed from logs and sheathed with sheets of plywood.
Before starting work with any wooden materials, you need to keep them at room temperature for at least 2 days.Covering a wooden floor with plywood
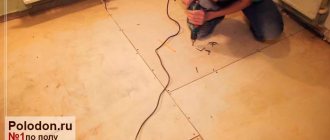
- Remove the baseboard.
- To fix this, you first need to duplicate all the nails - screw the boards to each joist using self-tapping screws. For this, self-tapping screws 5-10 cm long are used (choose a length so that they fit completely into the board and joist, but do not reach the concrete base). To screw it in, you will need a powerful screwdriver, or in extreme cases, a hammer drill in drill mode with an attachment.
If the floor wobbles and creaks, determine the cause of the squeak. Most likely, it is associated with poor fixation of the floorboards, due to nails that have become loose over time.
No comments yet!
Gypsum fiber sheet
Gypsum fiber sheet (GVL) is a modern environmentally friendly homogeneous material with excellent technical characteristics. It is produced by semi-dry pressing of a mixture of gypsum and cellulose waste paper. In terms of its physical properties, gypsum fiber sheet is a fairly strong, hard material, also famous for its fire-resistant qualities.
Gypsum fiber sheet, due to its versatility, has become very widespread in the construction industry. It is used for the installation of interior partitions, floor screeds, suspended ceilings, wall cladding and fire protection of structures. GVL for the floor, which is used to assemble the base of the floor covering, is popular, as well as the facing option, with which, for example, wooden surfaces are sheathed, thereby increasing their fire resistance. Depending on the area of application, gypsum fiber sheets are divided into two types: GVLV (moisture resistant) and GVL (regular).
Gypsum fiber sheet. Floor installation
Advantages of gypsum fiber sheets:
- GVL, compared to gypsum plasterboard, can more easily withstand sawing in any direction, since it is homogeneous in composition;
- Higher strength due to cellulose fiber reinforcement;
- Increased sound insulation.
Disadvantages of gypsum fiber sheets:
- Less bending strength than gypsum board;
- Less suitable for interior decoration than gypsum board;
- The need for pre-treatment before painting.
Glass-magnesium sheet or glass-magnesite sheet (SML) is white, reinforced with fiberglass, 40 percent lighter than GVL, flexible, durable, fire-resistant, moisture-resistant. Thanks to the reinforcing fiberglass mesh, the SML can bend with a radius of curvature of up to three meters. This quality allows it to be used on uneven surfaces.
High moisture-resistant qualities allow it to be used in rooms with high humidity. Any finishing materials can be glued to the front side of the slab. With a sheet thickness of 6mm, it is capable of holding fire for 2 hours and can withstand heating up to 1500 degrees. Sheet thickness: 3-20 mm.
Glass-magnesium sheet (FMS) is a universal sheet finishing material based on magnesite and fiberglass. The manufacturing technology and composition of the material give it such qualities as flexibility, strength, fire resistance and moisture resistance. Its qualities allow it to be used on uneven surfaces and reduces the possibility of sheet fracture during installation and transfer.
The scope of application of glass-magnesium sheet is extremely high. Like plasterboard, it can be used to make ceilings, walls and interior partitions. Moreover, glass-magnesite sheets can be used to decorate the external facades of cottages and houses. SML is a reliable basis for any type of finishing. The new material is ideal for showers, saunas, and swimming pools - after all, the glass-magnesium sheet can withstand high humidity, temperature changes and open fire.
The front (smooth) surface of the sheets is intended for painting, wallpapering, laminating and applying various types of decorative textures without preliminary, final puttying and priming of the entire surface of the material. The back (rough) surface of the sheets is designed for strong adhesion when gluing piece facing and decorative materials (ceramic or tiles, veneer, etc.
Along with conventional glass-magnesium sheets, laminated glass-magnesium sheets with a variety of patterns and thickness of the outer coating have recently begun to appear more and more often.
SML Glass magnesium sheet, glass magnesite sheet or glass magnesite
Advantages of glass magnesite:
- Moisture resistance - does not undergo deformation, does not swell and does not lose its properties;
- Fire resistance - magnesite panels are non-flammable material;
- Good sound insulation - a 12mm panel in terms of sound permeability corresponds to four layers of twelve millimeter plasterboard sheet, or a 150mm thick brick wall;
- High strength and flexibility - can bend with a radius of curvature from 25 cm to 3 meters;
- Lighter than similar slabs made of wood or gypsum;
- Low thermal conductivity, can be used as additional insulation;
- Can be used for finishing both outside and inside.
Disadvantages of glass magnesite:
- More fragile than gypsum fiber sheet;
- When filling joints, it is necessary to use putties with chemical adhesives;
- Properties vary significantly depending on the manufacturer and class of LSU.
How to choose the brand and thickness of plywood for floor joists and carry out installation correctly
When starting to install a floor, as a rule, any builder is faced with choosing the method that is best used to achieve maximum effect. This is usually due to the need to level the surface and provide thermal insulation. One of the well-known and widespread options is the use of lag. To do this, you need to know how to choose the right brand and thickness of plywood for floor joists and avoid mistakes during installation.
Why are lags used?
The floor in any standard house or apartment, unless it was made to order, always has unevenness, height differences and lacks insulation. Any floor covering, which is represented by a wide range, in accordance with current rules, must be installed on a flat horizontal surface. Otherwise, the manufacturer may refuse to provide a warranty.
There are only two ways to level the floor:
Use a concrete screed that perfectly levels the surface.
The advantages of this method:
- Smooth surface.
- Rigid base thanks to cement.
- Labor-intensive process.
- Long drying period, usually several weeks.
Use lags.
- Perfectly flat surface.
- Fast installation time, which can be done on your own.
- There are no strict requirements for the joints of slabs with each other, unlike boards.
- Low cost.
- Possibility of placing any insulation.
The disadvantages include:
- Forced raising of the floor relative to the original level, usually at least 5 cm.
- Some brands cannot be used indoors due to toxicity.
For the latter method, a mandatory element of the technological process will be laying a rough base, for which plywood is most often used, which compares favorably with wood or chipboard in cost and reliability.
How to make the right choice
The choice is determined by two parameters:
Variety For rough coating, 3 or 4 grades are sufficient. It is desirable that the material is moisture resistant.
Thickness. For coating, a material of at least 10 mm is required. According to SNiP requirements, the floor spacing cannot be more than 600 mm. Based on this, to ensure floor rigidity, the optimal sheet thickness should be 15 or 18 mm. What thickness of plywood for floor joists is determined for a specific room, taking into account the specified range.
Important! You can use two layers, giving the total required size. The main thing is to arrange them in a checkerboard pattern.
A size larger than 22 mm is considered inappropriate, although there are no restrictions.
Installation is carried out sequentially using household tools. There are several stages:
First, the floors are laid. Changes in height can be filled with sand or gravel.
Important! If insulation is planned, it is better to take a step no more than 60 cm
Location on the floor with insulation
- The beams are set according to level. The installation begins from the perimeter of the room and then only the internal intermediate elements are installed.
- The dimensions of the cells must be a multiple of the dimensions of the sheets.
Important! The distance of plywood from the wall must be at least 10 mm to ensure ventilation. After preparing the sheathing, plywood is attached
The sheets are arranged with a mandatory offset. The size of the joint should not exceed 5 mm. Fastening occurs in increments of no less than 20 and no more than 40 cm
After preparing the sheathing, the plywood is attached. The sheets are arranged with a mandatory offset. The size of the joint should not exceed 5 mm. Fastening occurs in increments of no less than 20 and no more than 40 cm.
Any floor covering can be laid on the resulting base.
Plasterboard
Plasterboards are a practical, modern and environmentally friendly material, as they are made without the use of toxic substances from natural gypsum, which does not conduct electricity and is odorless. The plasterboard meets all fire safety requirements. Gypsum board, gypsum tongue-and-groove plate (GGP) is the main material in the construction of partitions, suspended ceilings, and various decorative projections.
Used for leveling ceilings, walls, and “sealing” communication systems. Gypsum plaster can be moisture resistant and standard. Standard is used in buildings with normal humidity. Boards with hydrophobic additives are intended for damp rooms. Such slabs are easily distinguished by their characteristic green color.
Gypsoplate, gypsum tongue-and-groove plate (GGP)
Advantages of gypsum boards:
- environmental and sanitary safety;
- easy to process: cut, drill;
- low flammable material, flammability class G1
- relatively cheap.
Disadvantages of plasterboards:
- low strength, fragility;
- greater vulnerability to moisture, even of a moisture-resistant variety.
Recommendations
Some useful tips for building a private house:
- Do not join two panels at the seam. The material consists partly of wood chips; they can increase in size if water gets into the joint;
- It is much faster and easier to sheathe a house and only then make windows, rather than start cutting in the slab and adjusting window openings in advance;
- It is better to use white self-tapping screws in construction; they are much stronger than their black counterparts and also have excellent corrosion resistance;
- It is necessary to seal each seam with sealant; this is a necessary step, because the slabs can swell.
It’s better to entrust the construction of your future home to professionals who have been building frame structures for many years, such as.