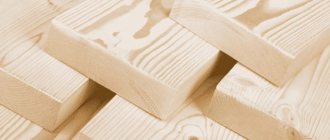
It's no secret that making something entirely from solid wood without a single fastening, without dividing the product into parts is quite difficult and practically impossible. In addition, deforestation is not happening at such an accelerated pace as before, so purchasing a large amount of wood is not a cheap pleasure. And there is a high probability that once you make a mistake, you will ruin the entire block.
It is quite easier to divide the drawing into separate parts, rather than sawing out each bend or notch, constantly turning the entire product over. In this case, all individual parts must correspond to size, and when connected, form a single whole. In addition, an important factor in the strength of the product will be the accuracy and strength of the connections.
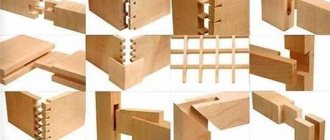
Joinery connections of parts
All connections, whether carpentry or carpentry, are called fits, because they are based on the principle of fitting a part with a tenon onto a part with a groove. Depending on how tightly the parts in the fastening are in contact, all fits are divided into tense, tight, sliding, loose and very loose.
At the heart of all connections is a node - the attachment point. Depending on what shape the connected parts resemble and how the node is located, there are several types of connections. Among them are end, side, corner, T-shaped and cross-shaped.
End connection of boards
There is another definition for such a connection - build-up. It is characterized by the fact that all parts are fastened together at the end part, thereby increasing the length of the whole part. Depending on the type of fastening, these end connections can withstand high loads in compression, tension and bending. An ordinary whole board here is in many ways inferior to a board obtained by extension.
The end connection of parts that resist compression can have a different design. The main feature of this connection is that each block has both an overlay and a groove, which are most often made equal in thickness and length. You can make an extension with a straight half-tree overlay, or you can make an end connection with an oblique overlay.
Compression Resistant Extension with Straight Half-Wood Overlay
Compression Resistant Extension with Oblique Overlay
If you are not sure of the strength of the future connection, you can further complicate it with spikes or various joints. Naturally, this connection requires additional adhesive fastening or fastening with nails and screws.
The end connection of parts that resists tension at the core of its design contains a lining in the lock. First of all, you need to outline the overlay. Then make a groove on one part and a protrusion on the other. It is this lock that will allow both halves to avoid separation.
Just like a compression-resisting joint, this type of joint can have a straight overlay and a miter overlay.
Straight Resistant Straight Overlay Extensions
Tension Resistant Extensions with Oblique Overlay
For additional fastening, you can use glue, nails or screws.
An anti-bending end connection is based on either a beveled cap or a stepped joint.
Bend-resistant extension with oblique joint
Bend-resistant extension with stepped joint
A feature of the first type of connection, where an oblique joint is used, is that the end sides of both parts are cut at an acute angle. At the same time, when cutting out the ends, you must maintain the cutting angle with nanometer accuracy.
The second type of connection is characterized by the fact that there are small grooves and tenons on the end sides of the parts.
Both of the listed types of connections must have a straight surface of the linings. Overlays with an oblique surface are used quite rarely, although they are not inferior in strength to straight ones. For additional fastening, glue, screws or nails can be used to the same extent.
Additional fastening of large beams used in the construction of houses can be metal or wood. Both hollowed out and inserted tenons are used as wooden fastenings.
Metal fasteners can be in the form of clamps or wrapped with thick wire. Fastening with bolts is often found.
What is
Before you find out the installation details, you will need information about what a dowel is. This is the name for fasteners that allow you to securely fix different parts of furniture. It looks like a small cylindrical rod with rounded ends. The dowel does not complicate the disassembly of objects, but at the same time can withstand even heavy loads. Any material can be used for its manufacture: plastic, metal, wood. For a tighter fit, its surface should be corrugated (straight, helical, transverse).
The optimal circumference of the furniture dowel would be equal to no more than a third of the wall thickness; this will make the assembly reliable and maximally resistant to high loads. The length is selected individually, taking into account the base. Such parts are used both in the production of factory furniture and in self-assembly of the structure.
Side connection
Lateral connections are also called joining. Most often, this connection is used when constructing floors, doors or gates. This is a fairly strong connection. Large arrays that result from such a connection are additionally secured with transverse boards or shields.
If the parts have a smooth surface on the side edges and simply stick together when connected, then such a connection is called a side connection with a smooth reveal.
Rallying on a smooth fugue
If each part has a groove on the side along its entire length into which a connecting rail is inserted, then this type of connection is called a side connection with an insert rail.
Rallying plug-in on the fugue
If a quarter is removed from the sides and the parts are fastened with their help, then such a connection is called a quarter-side connection.
Rallying in a quarter
The next type of this connection is the lateral groove and tongue joint, which has several types depending on the quality of the ridge. This groove can be either triangular or rectangular. The first type is most often used when installing parquet, the second is used when creating a door leaf. Both of these structures require additional fastening with glue.
Rectangular groove and tongue joining
Triangular groove and tongue joining
To construct the external walls of a building or roof, the following type of lateral connection is used, which promotes better drainage of precipitation from the surface and greater protection of the coating from the destructive effects of atmospheric phenomena. This type of joint is called a side lap. And you need to connect the parts in the following way: place a thin strip under the bottom plank and secure the upper side edge of the part with nails, then install the next plank, making a small overlap with its lower edge, equal to 1/4 of the thickness of the plank, and also secure it with several nails.
Rallying overlap
Also, to connect several parts at once into one whole using only one, you can use bonding with a tip. This type requires the same notch on the side of the single piece and on the end of the pieces being joined. Most often it is used in the preparation of parquet floors.
Rallying with tip
As a decorative technique, a side connection with an overlap is most often used, which not only decorates the surface, but also contributes to greater sound insulation and thermal insulation. This connection is made as follows: first, the first row is laid over a gap equal to half the width of the plank. Then a second row is installed on top of it on the part, which closes the voids.
Overlapping bonding
Spikes for fixing timber: which ones to choose and why?
The most popular are dowels made from hard wood. The most durable options are spikes made of oak or birch. It is not possible to deform, bend, or break them. However, there is one condition. They must be properly secured. What are their shape and sizes? The optimal solution is details with rounded contours. Their length should not exceed 25 mm. Wooden dowels must be smooth and even not only at the point of installation, but over the entire surface. It is these nails that guarantee the longest possible service life.
Installing dowels in timber is a mandatory rule for timber and log structures. Birch thorns are the most common option. Such dowels cannot become an analogue of self-tapping screws or primitive nails. If they are used, it is impossible to guarantee the stability and reliability of the structure. It is also worth abandoning the use of reinforcement. Metal versions can lead to a number of negative consequences, which is explained by the direct interaction of materials with different thermal conductivity parameters. What can the use of metal dowels lead to? It could be:
- condensation formation;
- coating the surface of the spikes with rust;
- rotting of the entire layer of wood.
T-joint
This compound is named because of its appearance. After securing the parts, the inserted part seems to grow out of the array of the other. Most often, this type of connection is used when connecting floor joists and partitions with the piping of a house. The angle at which the parts are connected must be 90°. At other angles, the connection turns out to be fragile and very quickly becomes unusable.
Among the many varieties of T-joints, two types are the most common.
The first type uses a hidden tenon, which has a trapezoidal shape and is inserted into one side of the beam.
T-joint with hidden tenon
The second type uses a stepped straight overlay for fastening. In order to make such an overlay, you will first need to make a regular overlay, choosing wood from one part for 1/2 of the entire width, and from the other part for 1/3. Then, on the first part, select the wood on half of the overlay by another half, thereby the thickness of the unaffected part of the block will be 1/4 of the width of the whole block. On the second part of the structure, where initially only 1/3 of the wood was selected, make another small recess so that the unaffected wood makes up 1/2 of the entire thickness of the block.
T-joint with straight stepped escutcheon
This stepped overlay is considered the most durable. For additional fastening, glue is mainly used here. Screws and nails can only damage the integrity of the steps.
For the installation of roofs and trusses, the type of fastening most often used is a cross fastening. It somewhat resembles a T-shaped one. But here both strips can be called equally leading.
Cross connection
The varieties of such a connection differ only in the depth of the fastening pad: from U6 of the thickness of the bar to 2/3.
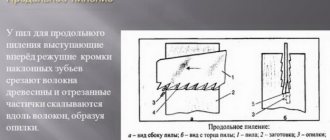
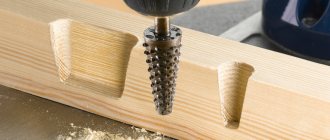
Cleaning the cut
No matter how thin the saw is, sawing alone will not produce a perfectly smooth cut.
Therefore, each cut is carefully processed. First of all, you need to remove the “fringe” from the back side of the workpiece (such a flaw is inevitable, since the saw works in jerks). It is also necessary to clean the entire cut surface. Only then will the connection be tight.
Using a plane
It is customary to clean surfaces with sandpaper. But in this case, it is better to use a plane and place the workpiece in a device that will “allow” the plane to remove the “extra” without changing the angle of the cut.
Such an auxiliary device can be made from a piece of board or a piece of wood slab, as well as a small block and a piece of plank. The block is hewn on one side, and the plank is sawed off at an angle of 45 degrees, after which it is sequentially (see photo above) screwed to the board with screws.
The plane must be carefully guided along the cut (with the right side of the plane facing the workbench). Only the workpiece should be hemmed, but in no case the auxiliary device, otherwise the cut itself may be damaged.
Using a simple device, you can process a cut better with a plane than with sandpaper.
Gusset
This type of fastening is most often used in fastening window, door blocks and greenhouse frames.
The corner connection differs from others in that the parts to be joined are located at an angle of 90° to each other. Depending on the fasteners used, all corner joints are divided into tenon joints and miter joints.
Tenon corner joints come in several varieties. A through connection to a tenon can use from 1 to 3 tenons in its design, and with an increase in the number of tenons, the strength of the fastening also increases.
Angled through tenon connection
A non-through connection differs from a through connection in that the tenon fastening occurs in the middle of the parts and remains invisible from the outside. In this case, make small recesses inside the blanks for the tenons, which will be slightly deeper than the tenons themselves, so that there is room for glue.
Corner non-through tenon connection
Miter corner joints are distinguished by the fact that the sides of the parts connecting to each other are cut at an angle of 45°. Just like tenon joints, miter fastenings can be through, in which the joining is visible, and non-through, when the fastening itself is fixed inside the parts.
An end-to-end miter connection can be reinforced with either one or three tenons. The principle of fastening here remains the same as with an angular non-through tenon.
Corner miter through-connection
With a non-through miter connection, it is impossible to discern the position of the tenon. Here, both round and flat tenons can be used equally - this will in no way weaken the fastening. Only when selecting wood for tenons, be sure to make the nests a little larger than the tenons themselves, so that later the workpieces can be easily connected to each other.
Corner non-through miter connection
When building a house and erecting a roof, you will need to master two more types of connections: corner notch and foot notch.
Corner notch
This type of connection can be classified as an angular type of fastening, since the parts are located at a certain angle relative to each other. Depending on the magnitude of the angle, two types of such connections are distinguished, which are equally perpendicular to the acting force of the connection - compression.
The first of them is used only when the angle between the parts does not exceed 45°. First, the wood with the insert part is hewn out, and then the base surface is adjusted to it.
Corner notch. Type I
The second type of connection requires an angle of at least 45° between the connecting parts. The notch here is done slightly differently than in the first type, and consists of two planes located at different inclinations to the original surface of the base.
Corner notch. Type II
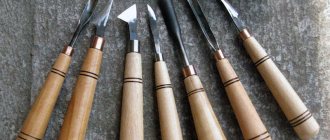
Measuring tools
The quality of the joinery product directly depends on the correctly selected parts and accurate marking of the location of the connection elements. To work, you will need various measuring and marking tools:
Measuring tools for work
- A tape measure is a flexible steel tape up to 200 cm, it rewinds automatically. Used to measure linear indicators.
- A folding meter is suitable for measuring small quantities; it is made of plates with divisions connected by hinges.
- A square is used to check for right angles and is often made of wood or steel. One side is marked with divisions.
- Center finder - it is necessary to determine the center of a cylindrical part based on the diameter of the circle.
- The thicknesser is made in the form of a bar with inserted strips; it is used for making parallel marks with special points.
- Erunok is a square consisting of two slats, convenient for marking an angle of 135 degrees.
- Malka is a tool designed for measuring and transferring angles to a part; it consists of elements on a hinge.
- A compass is necessary for drawing a circle of a certain diameter on a workpiece.
- The bore gauge works on the principle of a compass and is used to measure the diameter inside a part by using the ends turned outward.
- A level is a ruler equipped with an ampoule containing liquid. A bubble inside a liquid indicates whether the surface is vertical or horizontal.
- A plumb level is a weight on a rope, with the help of which the vertical deviation is determined.
- The carpenter's bracket is intended for marking a socket or eyelet.
Cutting into the paw
This type of connection is used only when constructing log walls or a well. Most often, such fastening is made simple, since it is already strong, but there are also some design complications in the form of additional linings. To make a notch, you need to trim the end of the log, forming a cube, and then divide its sides into 8 parts. Then cut out a trapezoid from the cube on the end surface, one base of which should be 6 parts, and the other 4 parts.
The paw from the side along the fibers should also have the shape of a trapezoid, gradually tapering towards the base of the bar. Near the block, the thickness of the trapezoid should be approximately 2~3 parts, and at the end no more than 6 parts.
Cutting into the paw
When connecting logs with this type of fastening, the finished log house will look like this.
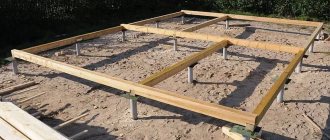
Log house Mounting diagram
Hole depth and width
When assembling furniture, confirmat size 6.4*50 is usually used. Because the thread diameter is 6.4 mm, and the diameter of the confirmation body is 4.4 mm, then for high-quality fastening of parts, the hole diameter must be in the range of 4.5-5 mm and a depth of at least 50 mm.
If the thickness of the hole is greater than the specified one, the confirmat will not hold the parts well; if it is less, its thickness can tear the chipboard.
For drilling, use a confirmat drill with a diameter of 4.5 mm, which is equipped with an additional head for drilling an enlarged hole for the neck of the confirmat, which also makes a countersink for its head.
Of course, you can use a regular drill with a diameter of 5 mm, but for high-quality fastening in the hole you will additionally need to make space for the neck of the confirmat and its head.
Additional fasteners used when connecting parts
Often bonding and building up is not enough, and the connection itself has to be repaired after a few years. In order for the connection to last longer, it is specially secured with various wooden or metal parts.
Among the wooden parts, we can distinguish such fastenings as dowels, dowels, wedges and dowels. All of these types are made from hardwood that has been dried for a long time.
Nageli
Pins are wooden nails made from hardwood. Most often, dowels are used to strengthen joints in window frames and greenhouse frames, and when attaching parts for mirror frames. Before hammering the dowel into the wood, you will need to drill a hole of the appropriate size in the wood, making it slightly deeper than the length of the wooden nail. Then, to prevent the wood from cracking after driving the nail, sand and round the dowel on all sides. After this, you can place the nail in the gap of the hole, place a board on it and hammer the nail in with a hammer. You need a board so that during driving the dowel does not crack or split.
Dowels
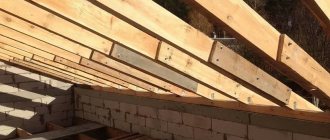
Dowels are most often used to secure rafters to the ridge of the roof. Unlike dowels, which are predominantly round, dowels can be round, cylindrical, square and rectangular. For greater convenience in the process of penetrating the dowel into the hole, its end is always made pointed. In addition, to prevent the dowel from flying out later, it is driven in with some tension. To do this, the diameter of the hole for it is always made smaller than the dowel itself. Most often, dowel fastening is further strengthened by the use of glue.
Wedges
Wedges are used in carpentry and carpentry quite widely than the above-mentioned fastenings. It is an indispensable part of hand tool fastening structures, tension structures, structures for strengthening and leveling walls, floors and roofs. According to their shape, the wedges are divided into two parts: one has only one side hewn, the other part has two sides hewn. Most often, coniferous wood is used to make wedges.
Keys
Dowels can be either wooden or metal. But they all represent various inserts into the sockets between two beams and are designed to increase their strength. This fastening is additionally equipped with steel bolts, which can pass through the key or not touch it, compressing only the beams.
Wooden - dowels. Depending on what part of the tree trunk was used in the manufacture of the dowel, there are longitudinal, transverse, longitudinal oblique and tensioned dowels.
The resistance across the fibers is much less than along them, so cross keys are not very popular. They are called transverse because the direction of the fibers of the dowel is perpendicular to the direction of the fibers of both beams.
Longitudinal keys provide a more durable fastening. The direction of the fibers of the dowel here completely coincides with the direction of the fibers of the beams.
Longitudinal oblique keys require a certain accuracy of the socket. Most often they are located at an angle of 45°. They provide even greater strength to the beam, preventing it from bending in two directions at once: along and across.
Tensioned dowels are used where it is necessary to simultaneously strengthen the beam and increase internal tension. To do this, two wedge-shaped dowels are driven into the slot between the beams at once. Both keys must be driven all the way.
Metal dowels can be recessed or pressed, ring-shaped or square.
Recessed keys are used for lateral fastening of several parts. For the key, a socket must be hollowed out, then the key itself is installed, and then the entire structure is tightened with bolts.
A nest is also prepared for the pressed-in dowels, they are secured and then covered with the other half of the structure.
The connection is also secured with bolts.
Nails
In carpentry and carpentry, nails are a convenient, simple and common metal fastener. Depending on the thickness of the planks being connected, nails of a certain thickness and length are used. The thicker and longer the nail, the stronger it will hold in the solid wood. But this does not mean that all planks need to be nailed only with thick and long nails. A thin and narrow board from such a nail can simply split into two halves.
This effect can also be achieved by driving a nail into the end surface of the block, and here there is still the possibility of the nail falling out of the resulting hole. This is explained by the fact that the nail is driven not across the fibers, but along them. During drying, the tension here will weaken significantly, cracks will appear, etc.
The number of nails (the combination of their length and diameter) is always selected depending on the thickness of the plank - the length of the nail itself must be at least 3 mm greater than the thickness of the plank so that it can be firmly attached to the base.
Before nailing the plank to the base, make several marks on the surface of the board. This way you can drive in each nail evenly, beautifully, neatly and economically. But just do not place the nails too close to each other - it is enough to nail the board in 2-4 places so that it holds tightly. Using more nails will not only not make the joint stronger, but you will probably split the board in half.
Also, try to position the nails to prevent possible warping and bending.
Another important rule is to not drive nails close to the end side of the plank: this is where the wood is most weakened, and a crack that starts from the end will split the entire board or split several centimeters of the board.
To make the fastening more durable, place a thin one on a thick board, but not vice versa. In addition, the connection will be even stronger if you drive the nail at a slight angle, rather than exactly perpendicular.
Sometimes it happens that the head of the nail will only spoil the appearance of the surface. To ensure that the head is not visible, you can do the following: drive the nail 3/4 of its entire length, then use needle-nose pliers to bite off the head and drive the rest into the mass.
The same effect can be achieved if you first flatten the cap, then drive in a nail and straighten the remaining cap in the direction of the grain. Then such a surface must be puttied to fill the resulting depression.
If, after driving a nail, its sharp end comes out, then bend the end and then drive it into the mass.
In some cases, you need to remove a nail that is embedded in the wood up to the head. To do this, you will need to knock it out from the back side if it has come out, or trim the wood from the outside, then pry off the head with pliers or a hammer, place a board under the resulting gap and pull out the nail either with pliers or a nail puller. You will need a plank in order not to crush the wood near the head.
Screws
Using screws when fastening parts, you will get a better and more reliable fastening. Most often, screws are used to fasten door and window hinges, handles, glazing beads, trims, etc.
When fastening with a screw, the integrity of the inner layers of wood is practically not compromised, and they do not move, as when fastening with a nail. This is explained, first of all, by the fact that the screw is screwed in and not driven in. Just like when driving a nail, you need to choose the correct diameter and length of the screw. The screw should be 3-4 mm larger than the thickness of the attached strip so that it can adhere well to the base.
The screw number (the ratio of its length and thickness) is selected for a specific type of plank. For the thinnest plank, a screw 6 mm long is selected, while the thickest plank is secured with a 12-15 cm screw. Also, depending on the purpose of the screw, its head can be countersunk or convex. The first type of cap is intended for fastening furniture parts with subsequent putty. Such screws should not be visible on the surface. The second type of screws is intended both for fastening parts and for decorating the surface.
Depending on the size of the screw, it is screwed in one of two ways. If the screw is small and the wood is soft, then you can limit yourself to just marking it with an awl on the surface at the place of screwing. But if the screw is large or its diameter is too large, then drill a small hole at the fastening point, slightly smaller in depth and diameter than the screw, so that it can fit well into the array. If you want to fasten two fairly thick planks with such a screw, then you will have to drill both parts so that the wood does not crack when screwing in.
In order to hide the screw head in the solid wood, you will need to make a small conical recess, screw the screw in as far as it will go and putty.
But in any case, regardless of the size of the screw, it is screwed in using a screwdriver of the appropriate size and type of blade. The screwdriver is inserted into the slot - a small slot on the head of the screw - cross-shaped or straight.
To make your work easier when screwing in screws, use several proven methods.
If you have to screw a screw into solid wood, then lubricate it with laundry soap before starting work. In the event that paint is applied to the surface of the fastening or it is located inside the product, you can use grease or ski wax as a lubricant. If desired, the remaining small greasy traces can be removed with alcohol or another degreasing solution.
If you have to work with particle board, first drill a hole slightly smaller than the screw, then coat it with glue and insert. there is a piece of plastic tube in it. Then screw the prepared screw into the modified hole.
It often happens that a screw needs to be screwed into the end part of a board or block. But such a fastening was never considered durable. In order to increase the strength of the fastening, you can use two techniques. The first is that the hole drilled for the screw must be impregnated with oil- or alcohol-based wood varnish. The second way to strengthen the structure is to use a dowel, which is driven into the end of the block, and a screw is screwed into it.
During work, it also happens that a screw that is already tightly screwed in interferes with the connection of certain parts. The following few techniques will help you remove it.
To begin, find an adjustable wrench, fix the blade of a screwdriver between its frames, which you then install in the slot of the screw. Then press down slightly on the screwdriver and turn the wrench. Even the oldest and most stubborn screw should come out without difficulty.
For the other method, you will need a hammer. First, insert the tip of the screwdriver into the slot, grasp the handle of the screwdriver with your whole hand so that the top remains open, and, carefully hitting the top with a hammer, turn the screwdriver in unison.
The following method will help you replace a screw with a decorative head that has broken off halfway. To do this you will again need a wrench, a screwdriver and a thin small piece of wood.
If the screw is screwed close to the edge, you can simply use a wrench. You will need to firmly grip the remaining half and turn the key until the screw is completely removed.
If the screw is located in the middle of the part and it is impossible to use one wrench, then take a screwdriver, install it in place of the former slot and move the prepared board as close as possible to it. Secure this entire structure with a wrench. Then carefully turn the key and make sure that it does not fall off. In a few seconds, this unfortunate screw will be in your hands.
Bolts
The main purpose of bolts is to connect logs, beams or thick boards together in load-bearing structures. Depending on the thickness of the beams, their diameter can range from 10 mm to 30 mm, and the length of such fasteners can reach 70-90 cm. When choosing the size of the bolt, the width of the beam must be taken into account.
In order to install a bolt into a log, you will need to drill a through hole slightly smaller than the diameter of the bolt. Then a washer is placed on the selected bolt, which will prevent the bolt head from being pressed into the solid wood. A locknut is also placed on the bolt to prevent the fastener from loosening. This assembled bolt can now be driven into the array. The protruding end of the bolt is also equipped with a washer and a lock nut. A nut is put on it, which tightens the entire structure to the limit.
Clamps
Also, to fasten two beams or thick boards, a fastener such as a clamp is used. Many people know it from plumbing, when it is necessary to temporarily repair a hole in a water pipe before the plumbers arrive.
Most often, stainless steel clamps are used to fasten load-bearing structures, which are strips 8-16 mm thick and 28 to 105 mm wide. Clamps can be rectangular, square or round and are used depending on the shape of the parts being connected. At the place where two or more boards or beams are fastened, install one half of the clamp, on the other side at the same level, install the second part and tighten them with bolts.
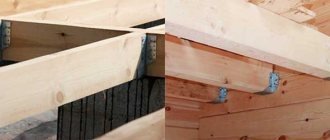
Corners
The corners are metal strips made of stainless steel with several holes for fastening. Such corners can be straight or combined, i.e. in the middle there is another bar located at an angle of 45°. The different thickness and width of the corners allows them to be used when fastening window frames, door panels, gates, etc.
Overlays
Overlays are used for end connections or extensions. They are steel plates of varying thickness, length and width, depending on the parts being built up.
Construction staples
Construction staples are used to secure all kinds of wooden structures. Externally, they are U-shaped or s-shaped rods made of thick square or cylindrical steel, reaching a length of 45~55 cm. Different types of staples are used for different types of connections. The most common are straight staples, the ends of which are directed in one direction. A better connection between the beams can be achieved if you take an expanded bracket or an s-shaped one. The ends of such a bracket are located parallel to each other. If you need to secure a wooden connection as much as possible, it is best to use a rotated bracket, one end of which is bent at an angle of 45°.
List of required tools
To work with wood, you need various tools and equipment. The speed of making carpentry joints, their strength and quality depend on the condition of the tools.
You will definitely need general purpose tools, used not only for carpentry, but also for other types of work:
Tools for carpentry
- A regular hammer is necessary for driving nails and wedges.
- A wooden hammer or mallet is used for grinding surfaces treated with glue, as well as when working with a chisel.
- A carpenter's hammer has a hammer tail divided into two parts; it is used to remove nails.
- Pliers (needle-nose pliers, pliers, round-nose pliers) are used for working with fasteners and for other auxiliary actions.
- A nail hammer is used to drive a nail into a wooden surface.
- A screwdriver is required to work with screws. For different types of grooves on screws, wedge-shaped or Phillips-shaped screwdrivers are used.
When joining carpentry, various fixing devices are also needed: vices, clamps, clamps, presses. But such metal structures can leave unwanted marks on the wood, so ropes, rubber, wooden blocks and wedges are often used to secure assembly elements.