Features and methods of dismantling
You can dismantle the building yourself or use the services of specialists; here, there is demolition of buildings at Techno-Digger LLC, where professionals work. You need to understand that there is a risk of destruction and fall of individual elements of the building.
There are three main options for dismantling timber houses:
- Manual, used if you need to disassemble a small structure, allows you to save material for future use.
- Automated, using special equipment, the most popular method.
- Combined, combines the use of the two previous methods.
To choose a method for demolishing a house, you need to take into account criteria such as the perimeter of the structure, the presence of additional buildings and a number of other factors. Please pay attention to the fact that you need to obtain permission to dismantle the house, prepare a demolition project, and draw up a report after the demolition.
How to dismantle a log house for assembly in a new location
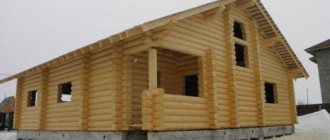
The need for careful dismantling of a log house most often arises for the following reasons: a relatively new house has been decided to be moved in parts to another location, or the owner is saving on building materials
If you decide to buy an old log house in order to dismantle it, transport it to your site and start building with used wood, you will need a specialist. It is very important to determine the quality of the logs, find out whether they are affected by fungus, and whether they can serve for many more years in a new place. The question is: is it advisable to buy this old log house or is it easier to purchase new logs? Only a person who is well versed in the quality of wood, an expert in his field, can answer this question.
Before any dismantling of an old log house for the purpose of re-building it, it is necessary to stock up on a detailed plan of the building so that the assembly at the new location is successful. It’s good if you have ready-made plans, documentation for the house indicating all the dimensions and layout. Otherwise, you will have to start drawing up a plan. It would be a good idea to take a lot of photographs of the house from different angles, including during the dismantling process. This will help you follow the building layout accurately during assembly.
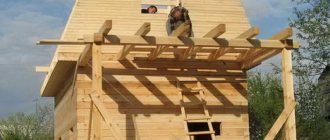
Usually the length of one log does not exceed six meters; it can be lifted by two people, so dismantling is carried out manually so that the tree is not damaged. The process includes the following steps:
- First, all external and internal wall decoration is removed;
- The platbands are removed, the double-glazed windows are removed, the entrance and interior doors and casing are removed;
- Utilities are being dismantled;
- The floor covering is removed;
- The roof and rafter system are removed;
- The internal partitions are dismantled, and then the external walls;
- The last stone elements to be dismantled are the fireplace or stove, if there are any in the house.
Important! Before transporting a disassembled log house, you should take care of the presence of a foundation in the new place, because it must be stable. The dimensions of the foundation must correspond to the dimensions of the old house.
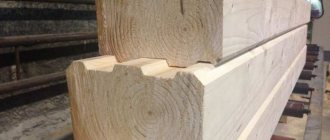
All parts of the log house must be numbered in order to clearly know in what order to reassemble it. Numbers are applied to all parts: logs, rafters, parts of partitions, windows.
Be sure to keep the removed dowels and metal fasteners; they will be useful to you during assembly if they are in good condition.
Important! Even if the log house being disassembled is relatively new, be prepared for the fact that you will still have to purchase individual parts. For example, the lower crowns could become unusable, one of the rafters turns out to be too rotten. All these elements need to be updated.
On average, careful dismantling of a log house takes from 5 to 10 days, depending on the number of participants in the process and the size of the house. All parts of one house with an area of up to 70 m2 can be transported on two trucks.
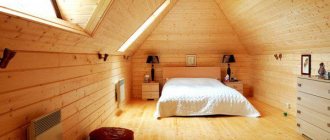
Assembly at a new location can be completed even in two weeks, but most often it takes about a month, taking into account the installation of communications.
Rebuilding a dismantled log house has three advantages:
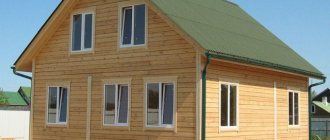
- This wood has long gone through shrinkage, so after the new assembly you can immediately begin finishing work, installing frames and doors;
- If the house has stood for several decades and the wood is well preserved - this is a guarantee of quality, we can confidently say that for another couple of decades the newly assembled log house will last for sure;
- Saving money, because used building materials are at least 30% cheaper than new ones. And a log house put up for dismantling can be bought at a bargain price. And you don't need to pay for the project.
Important! During re-construction, wood must be treated with an antiseptic and fire retardant, even if the house previously stood without such treatment for many years.
We state: the practice of purchasing a log house for its secondary construction in a number of cases justifies itself, it turns out to be faster and cheaper than building from scratch.
The main disadvantages: possible damage to individual parts, which necessitates their replacement, as well as difficulties with expanding and changing the layout of the house. As an option, you can assemble a cozy bathhouse on your own site from a dismantled log house, saving significantly on building materials. published If you have any questions on this topic, ask them to the experts and readers of our project here.
PS And remember, just by changing your consumption, we are changing the world together! © econet
Restoration of a wooden frame
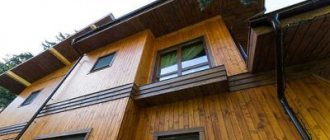
Often, a wooden building is not completely dismantled, but only restored: some logs or beams, window blocks, etc. are replaced. In such cases, it would be useful to take care of replacing the old insulation (caulking) with more modern materials, namely wood sealants.
Also, when restoring old wooden houses, you should think about reliable protection of the wood: using various primers and impregnations, you can not only protect the wooden structure from all sorts of aggressive factors, but even return old darkened or blued wood to its original natural appearance.
Safety precautions
To avoid injuries, respiratory tract blockages and other unpleasant situations, it is better to prepare for work in advance, namely:
- Put on old, thick clothes and button them up so that there are as few bare areas of the body as possible.
- Always wear a helmet and safety glasses to avoid accidentally getting hit on the head by a log or glass wool in the eyes.
- When working, use protective gloves, because without them you can, at a minimum, catch a splinter, and at a maximum, lose your fingers.
Proposed circumstances
Of course, first you need to talk about the conditions in which it took place.
dismantling
. And they were not the simplest, although the house was small (50 m²), one-story, made from old factory panels. A long time ago they were erected as summer cottages for workers of some newspaper (so the legend says), but over time they were converted into permanent housing, gradually completing
bathroom
And
terrace
.
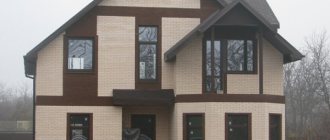
An old panel house that needed to be demolished. Photo by the author
So what did we have? Firstly, it was not the entire house that needed to be demolished, but part of it: initially the building was for two families - that is, there is one house, and there are two apartments in it. The neighbors have already built a nice house instead of the old panel ruins, preserving the adjacent wall. Naturally, it was impossible to damage it under any circumstances.
Another huge problem is the area around the house, that is, practically its absence. The building (that part of it that needed to be demolished) stood on 2 acres of land. Some were occupied
aerated concrete blocks
for the future
the buildings
. There was no way to expand anywhere, since there is quite dense construction nearby and a road that is constantly used by neighbors.
And one more unpleasant moment - in order to approach the site, you need to go through a couple of turns, into which not every truck fits with great difficulty. An ancient place, overgrown with huge
pine trees
And
birch trees
, is another obstacle on the way for technology.
In general, one task contains quite a lot of conditions that significantly complicate its implementation. The only possible method of analysis in this case is manual, that is, without the involvement of technology.
Material storage.
Why did I start with nails? The point here is not only about savings, but also about the convenience of subsequent storage. Boards with protruding nails take up about 3 times more space. And when you have only 6 acres with an old garden and buildings on them, you quickly begin to understand that you need to save space.
The time spent on pulling out a nail and bending it is almost the same.
You need to be careful when storing material so that you don’t have to drag boards and logs from place to place several times. It is necessary to think through all further actions during construction in advance.
For example, if excavation work is planned, then it is better to move the boards away from the future foundation pit so that they do not interfere with the work. In addition, it is better to choose a higher place for stacks. Then they will not end up in a puddle after rain or from melted snow in the spring. It is also advisable to put opaque material under them to prevent grass from growing under them. For this purpose I used roofing felt, which I removed from the walls and roof.
In addition, I used an old greenhouse as temporary storage. Many of the windows in it were broken, so to prevent rain from dripping on the boards, I also covered it with roofing felt.
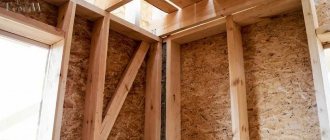
Sawdust, glass wool and safety precautions. After dismantling the interior decoration of the attic, I went down to the first floor. I would like to note once again that at the first stage I did not touch the racks in order to prevent collapse, but only tore off the sheathing.
Sawdust and small shavings mixed with lime were used as insulation in the ceiling of the first floor. Adding lime is a very old and reliable way to get rid of mice. In any case, I did not find any traces of these annoying rodents in the sawdust. But they lived comfortably in glass wool...
The sawdust turned out to be dry, so I also decided to save it “just in case” - I poured it into plastic bags and put it under the roof. In the future they may be useful for their intended purpose, and if not, they will be used as fertilizer.
Glass wool was installed under the first floor sheathing. This created an additional problem, since it was not safe to work with, and after so many years it fell apart in the hands, which created unnecessary difficulties.
To avoid itching later, I took precautions. First, I put on clothes made of thick fabric and fastened all the buttons. He put a special helmet on his head, and two pairs of gloves on his hands (first fabric, and rubber on top). It must be said that the glass wool often pierced this protection, and then I suffered, trying to pull out the brittle splinters.
Secondly, I put on goggles and a respirator.
And thirdly, so that the glass wool generates less dust during disassembly, I first sprayed it with water, and immediately placed the extracted pieces of insulation into 120-liter plastic bags. This, in my opinion, is the optimal size in terms of weight and volume. However, if the glass wool is very wet, then it is better to use 60 liter bags, making several holes at the bottom with a nail for water drainage.
Here it is appropriate to say a few more words about safety precautions. The work of demolishing old buildings is often not without injury.
For example, when dismantling the roof, I was standing below on the stairs, trying to tear off the gable cornice board. But I didn’t calculate my strength, it came off and fell on my head, unprotected even by my cap. It’s good that the rusty nail only tore the skin on my head and didn’t stick into my head. But I still had to get stitches at the emergency room. Therefore, I strongly advise everyone who is preparing for such work to follow safety precautions!
House upon purchase: everything is deplorable
My husband has always dreamed of his own house in nature. He spent his entire childhood in the village with his grandparents in the Pukhovichi region and became very attached in his soul to that place. No matter how warm and cozy it is in your grandfather’s house, having your own, you are absolutely free in terms of repairs and creativity. And then one fine day an offer appeared to buy a house next to my grandfather’s property.
After weighing all the pros and cons, we decided to buy. From the modest budget of our young family, $3,000 was allocated (we used the money donated for the wedding), and we became the owners of our own home. Its condition was so deplorable that we initially considered demolishing it and building a new one in its place. But, after some thought, we decided to take on the repairs.
When is the best time to start work?
As practice shows, dismantling it yourself is a fairly long process, so it’s better to start it in winter. At this stage, internal preparatory work is carried out (dismantling the casing, dismantling communications, etc.). By early to mid-spring, it will be just the walls and roof. Accordingly, if it is planned to build a new one on the site of an old house, it will be possible to start building it by the summer.
Dismantling of wooden houses begins with interior work
Dismantling walls and basement ceilings.
After the outer wall cladding was removed, what remained was a frame consisting of old beams and logs. The greatest difficulty was presented by the logs that were used as floor beams - they were the heaviest. After pulling the logs out of the nests, I rolled them along the guides onto the edge of the frame and threw them down. Easier to ride than to wear. When the top logs were removed, I piled the wall frames in different directions.
The lower ceiling, which had stood in water for almost 2 years, was damp and heavy, but disassembling it no longer presented any difficulties for me. A neighbor helped me with the long logs that served as the bottom harness. (Be friends with your neighbors and help each other!)
TOOLS FOR CRAFTSMAN AND CRAFTSMAN, AND HOUSEHOLD GOODS VERY CHEAP. FREE SHIPPING. THERE ARE REVIEWS.
Below are other entries on the topic “How to do it yourself for a homeowner!”
Subscribe to updates in our groups and share.
Let's be friends!
House dismantling with transportation and assembly
Dismantling work is not only the dismantling of a house, building, structure, but also the preparation of documents, coordination of the demolition of the building with government agencies. “DismantazhSPb” takes care of all the troubles and works in the following settlements of the Leningrad region: St. Petersburg, Gatchina, Sosnovy Bor, Kirishi, Tosno, Kudrovo, Kommunar, Murino, Priozersk, Boksitogorsk, Syasstroy, Vyritsa, the village named after Sverdlov, Mga, Vyborg, Tikhvin, Kingisepp, Luga, Kirovsk, Nikolskoye, New Devyatkino, Podporozhye, Shlisselburg, Ulyanovka, Staraya, the village named after Morozov, Vsevolozhsk, Sertolovo, Volkhov, Slantsy, Otradnoye, Pikalyovo, Lodeynoye Pole, Svetogorsk, Roshchino, Siversky, Volosovo, Kuzmolovsky.