Manufacturers of building materials offer a wide range of ready-made solutions for finishing the facade of a building. However, even today many people prefer conventional lumber to modern achievements. Let's look at how to cover a house with overlapping boards. Let's look at the technological features and procedures, including wall insulation. Let's get acquainted with the recommendations of specialists, following which you can get a high-quality and durable result.
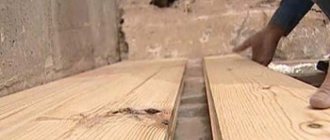
Facade cladding with unedged boards Source pinimg.com
Overview of materials
For decorative cladding of a house with herringbone boards, both smooth polished blanks and unedged planks of different widths with protrusions and small remnants of bark can be used. Natural wood looks good on the facade, lasts a long time and helps improve the thermal conductivity of the walls. The material is easy to process, lightweight and environmentally friendly. Thanks to these advantages, wood is in high demand in construction.
However, before finishing a house with unedged or finished boards, the materials must be properly prepared for use. This allows you to eliminate the disadvantages of wood to one degree or another. Natural fibers absorb moisture well, can rot, and are a breeding ground for fungus and mold. Wood is also a combustible material. That is, before covering the walls, it is important to soak the workpieces 2-3 times with special products that contain fire-retardant and antiseptic components.
Line of wood protective products from Neomid Source zotongroup.ru
More often, coniferous trees are used as raw materials for the production of lumber: pine and spruce. On the one hand, they contain resinous substances that have a positive effect on the moisture resistance of the board. However, budget material does not cease to release internal juices over time, which is reflected in the appearance of the finish. Therefore, many craftsmen prefer to use hardwood blanks for herringbone trim. Most often it is larch. They, as a rule, have a denser structure and cope with natural phenomena longer.
If it is customary to sheathe a house with unedged overlapping boards, then it is worth choosing in advance blanks that meet the following criteria:
- cutting quality - no chips, gouges;
- few knots - the more there are, the higher the risk of deformation of the lumber during drying;
- absence of cracks - their presence negatively affects the strength of the workpieces and the durability of the finish.
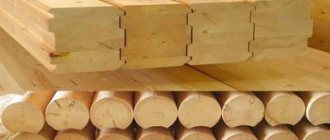
Unedged board with bark remnants Source prom.st
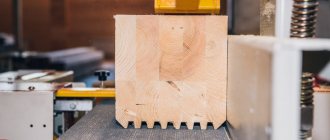
The physical parameters of the lamellas can be different, especially in the case of an unedged board. But builders focus on the following parameters: thickness - 20-30 mm, width - from 300 mm. Depending on the design solution, the second size can reach 700 mm.
See also: Catalog of companies that specialize in finishing materials and related work
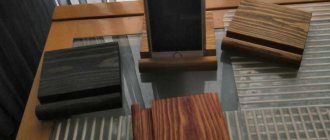
Wood species for board cladding
Cut and uncut boards are made from larch and pine needles. The cheapest materials will be made from pine and spruce. But they have disadvantages - under a layer of sheathing and thermal insulation, the house risks being damaged by precipitation, but additional protection can be created using fire retardants, varnishes and antiseptics. Let's look at the main types of wood suitable for cladding:
- Hardwood boards are denser and provide reliable protection from excess moisture. By the way, it is resistant to rotting and fungal infections. It is easy to process, holds nails and the degree of warping is noticeably lower.
- Pine, on the other hand, quickly warps and deteriorates, so it should not be used for exterior finishing.
- Spruce is wood that is naturally impregnated with resin. In terms of characteristics, it is slightly inferior to larch. A pile of knots is a beautiful decoration, but after a while cracks form around them. Therefore, spruce is rarely chosen for facade decoration.
- Hardwoods look beautiful and last a long time. They are not difficult to process. The high price and the risk of splitting when driving nails are the main disadvantages.
Work technology
Before finishing, it is recommended to first keep unedged boards and blanks with the correct geometry under a canopy for about 1-2 weeks. So, regardless of the initial humidity, the material will acquire the condition necessary for construction. Then shrinkage and deformation of the skin under natural conditions will be minimized.
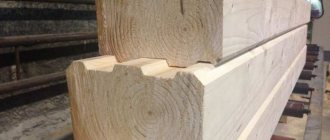
Fastening the herringbone sheathing is done only on a flat plane. Here, a lathing made of wooden beams with a cross-section of 50*50 mm is used as a supporting base. The frame consists of a starting and finishing horizontal strip, vertical posts and edging elements in the area of window openings.
Lathing for cladding a house with boards Source yandex.net
The arrangement of such lathing allows not only to evenly fasten the boards overlapping without the risk of them sagging under their own weight. Between the racks it is convenient to place mats of fibrous insulation, polystyrene foam boards, and fix a vapor barrier or windproof membrane. Based on this, the pitch between the bars is selected taking into account the width of the thermal insulation or the range of 1-1.5 meters accepted for a façade made of unedged boards and precision lumber.
Let's look at a step-by-step algorithm for finishing a house by covering it with overlapping boards. First, a starting and finishing plank is installed with a small protrusion against the background of the main plane to create a slight slope for the first plank. For fixation, nails, self-tapping screws, and dowel nails can be used, depending on the type of base. Next, a plane is formed from vertical elements taking into account the level. Here, hangers for the plasterboard frame can additionally be used to secure the guide beam as rigidly as possible.
Hangers for plasterboard frame Source teplostroy.org
What are complex problems
Look at two problems. Think about how you would solve them and how they differ.
Problem 1. The mother instructed her son to bring home exactly 7 liters of water from the river. She gave him two jugs with a capacity of 3 and 5 liters. How can a boy measure out exactly 7 liters of water using only these two jugs?
Task 2. Imagine that regular private flights into Earth orbit have become possible and are comparable in cost to an average trip to another country. Think about what representatives of the tourism industry on Earth should do? Write down the thoughts that come to mind.
The first task is a “task”. It has a specific correct answer, which can be arrived at through a series of calculations. This is an excerpt from Stanford Terman's classic 1916 test of intelligence, The Measurement of Intelligence. Correctly and quickly solving such problems shows high values in tests of cognitive abilities and has been a source of heated debate in the professional research community for more than 100 years. However, even despite high cognitive abilities, people tend to fall into mental traps, make decisions based on erroneous assumptions and rely on stereotypical ideas.
The second challenge is a complex “problem.” She doesn't have one right solution. There are a large number of factors to consider and conditions that will shape different scenarios; In this case, the emotional background of the decider will play a significant role.
In management practice, managers have all the necessary data to make decisions and solve problems. According to a Harvard study, 68% of executives have confidence in the accuracy of most of the data underlying their business decisions. That is, cognitive abilities provide the ability to solve problems, but the quality of solutions does not depend on them.
Advantages and disadvantages
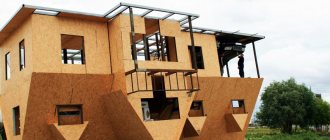
A house made from unedged boards looks original despite the budget. Finishing with overlapping workpieces does an excellent job of draining rainwater, as it creates an obstacle to the penetration of precipitation into the coating and a slope for gravity flow. Thus, if protective measures are taken, the cladding will last for several decades.
Also important advantages include the following points:
- low thermal conductivity of wood and air cushion between the base and finish;
- the gap in the cladding structure ensures natural ventilation of the facade;
- good vapor permeability of wood contributes to the rapid drying of the finish, that is, the formation of condensation inside the structure is virtually minimal.
There are few disadvantages that can be identified. One of them is the high consumption of lumber due to overlap. That is, the working width of unedged or prepared boards for finishing a house will be reduced by the recommended 20 mm.
The second disadvantage comes down to the woody nature of the sheathing. It requires mandatory treatment with compounds against fungus, mold and anti-fungus additives.
Universal wood protection product Source cloudinary.com
The end parts, so that they do not rot from the active influence of natural phenomena, also need to be impregnated and covered with decorative corners. Additionally, the finish can be painted with paints and varnishes for wooden facades.
Cladding a house with other types of boards
The facade cladding is made with smooth or rough boards and even clapboard. The elements must be overlapped. This is done easily and simply, because the materials have quarter or tongue-and-groove joints. This cladding is relevant when finishing walls made of blocks or bricks.
Strengthening the facade from boards with your own hands
Over time, plank cladding is increasingly exposed to precipitation, so it is advisable to think about its protection. The facing material is varnished, painted and treated with special decorative impregnates. Please note that before applying the coating for protection, the wood is coated with a fire retardant compound. But there are exceptions - coating with fire-resistant paint, which prevents the boards from catching fire even after prolonged contact with fire.
Important: boards need to renew their protective layer every few years. When choosing cladding made from expensive types of wood (teak or cedar, for example), you can forget about painting. This wood has an important advantage - it does not deform for a long time.
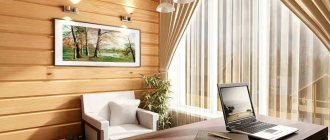
If the cladding is made vertically using Finnish technology using uncut boards, then it looks more beautiful only indoors. On the outside, horizontal cladding is suitable. Use a combined option - outside horizontally, inside vertically.
Please note that today on the market you can find already processed boards that have been painted and processed. Thin-sawn facade boards have good adhesion of the paint layer to the surface. This is lumber with a fleecy face. In other words, the paint coating adheres to a thin-sawn surface much better than on a planed surface.
Siding finishing
Professional builders call siding the most inexpensive and practical material that can be used to cover a pediment. Siding refers to decorative panels made of polyvinyl chloride, metal or asbestos cement. They are equipped with hook locks along their entire length. To install the siding, a metal profile frame is mounted on the pediment. This finishing method has the following advantages:
- Durability. Siding retains its appearance and integrity for 50 years or more. This is the most durable cladding option. Considering the low cost, this is the most practical material.
- Varied color palette. The polymer coating applied to the surface of the panels makes it possible to obtain any color and even texture. Therefore, it will match the shade of the walls or roofing material.
Important! The peculiarity of polyvinyl chloride is that when the temperature changes, the dimensions of the panels change slightly. Due to thermal expansion, they deform, burst, and unpleasant gaps form between the elements.
How to install imitation timber: preparing the base
Finishing a wooden house with imitation timber begins with preparing the wall surfaces.
Clean the walls from dust and dirt. You may need to apply a primer solution (we wrote about it above).
Then, you need to put a waterproofing layer for the wood - most often it is a film membrane, sometimes it is replaced with glassine - a coverless, rolled material, impregnated with petroleum bitumen.
Fastenings for imitation timber may differ - the film sheet is attached from below, connected with construction tape, glue or self-adhesive strips, while the overlap of the membrane should be no more than 15 cm.
Plastic dowels are not suitable for attaching profiles to a concrete wall - only self-tapping screws, clamps to imitate timber (a curved plate with a hook and two holes) or galvanized nails.
If the wall is without flaws - unevenness, potholes or chips, the sheathing is installed tightly. If there are defects, then synthetic linings are inserted into the gaps.
To prevent the sheathing from turning out crooked, apply a level to it. The distance of one beam from another should be no more than 80 cm.
Then pipes and wires are laid, a layer of insulation is laid, another sheathing frame is installed and a film membrane is stretched over it. The second sheathing is necessary for air circulation.
Preparing timber before installation
The next step is to unpack the panels. It is not recommended to lay the canvas right away; wait a few days for the wood to absorb all the moisture (the wood may increase in size). This way you will avoid possible distortion after installation.
Installation of imitation timber for the exterior of the house begins only after applying a protective composition to the surface of the wood.
Install panels from bottom to top only.
Where to begin? Facing and fastening of false beams
Imitation of timber for exterior finishing of a house should be carried out only in sunny, dry weather. It is better to mount light-colored timber on the sunny side - if it fades in the sun, the differences in color will not be as noticeable as on dark panels.
Attach the first board to the sheathing using a screw, clamp or nails. Drive the nails into the longitudinal groove of the panel (ridge).
The first (starting) board should be placed with the ridge up - level it with a building level and secure it. If the first panel is placed unevenly, then all subsequent boards will lie crookedly. The result will be a severe bevel.
The next step is to install the second board.
When attaching the second panel, insert the tenon into the groove of the first board. Do not drive it close to the first block, leave a small gap (no more than 4-5 mm). The gap is left so that the canvas does not deform due to possible temperature changes indoors or outdoors.
Using this technique, install the boards to the top of the ceiling. To ensure that the parts fit together beautifully, file the corners (a 45° angle is suitable for external wall mounting) or install a decorative strip.
Imitation of timber vertically will “raise” the ceilings, making a room with a low ceiling higher.
Installation of imitation timber inside rooms
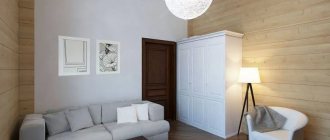
The interior decoration of a wooden house with imitation timber differs little from external installation work on the street.
The only thing is that when installing vertically in the rooms of a house, to fasten the boards you do not use screws, but nails intended for furniture.
Otherwise, all actions are repeated.
New panels can be attached to an old wooden surface using a construction stapler.
The last step is to treat the surface with a protective solution.
How to attach imitation timber to the ceiling: installation sequence
Ceiling cladding is considered the most difficult job due to the intense pressure on the hands during installation.
To reduce the load, choose boards that are not too wide (a wide panel visually makes the ceiling smaller).
The length also needs to be selected - the fewer joints, the better.
Ceiling installation begins with the installation of a wooden frame and film (if the beams are crooked). Start attaching the boards from the side of the window (width no more than 3 cm).
The technique is the same as for wall cladding - if necessary, place a layer of insulation between the crossbars.
If there are already floor beams on the ceiling, then it is enough to stretch a layer of vapor barrier, without sheathing.