A circular saw is specialized equipment that is used for cutting wood, laminate, some types of wall panels, sheet materials such as plywood, OSB, chipboard. When carrying out a number of construction and repair work and carpentry operations, the presence of a stationary sawing installation can significantly reduce time costs and improve the quality of the result. If it is not possible to purchase a factory-made model, then you can assemble a circular saw with your own hands. To make it yourself, you will need the most common metalworking tools and the skill to work with them. The more necessary materials and parts are available, the cheaper the project will cost.
Design of a stationary circular saw
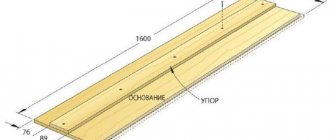
A stationary circular saw is designed to perform fairly large volumes of work. The design of the implemented option in two forms is presented in the diagram below. It also shows the main dimensions of the installation, which are recommended to be used as a starting point for self-assembly.
In the drawing, the numbers correspond to the following structural elements of homemade equipment:
- 1 – frame (bed);
- 2 – side panel;
- 3 – starting device;
- 4 – mechanism for adjusting the height of the table, 13 – its stops;
- 5, 6 and 7 – two halves of the sawing table with a base;
- 8 – electric motor;
- 9 – platform for installing the motor;
- 10 – studs (M10);
- 11 – saw;
- 12 – shaft;
- 14 and 16 – driven and driven pulleys, respectively;
- 15 – belt;
- 17 – switch.
Advice! To improve personal safety when operating a homemade mechanism, its rotating parts located under the table should be covered with lids. A protective cover must be installed over the disk during equipment downtime.
It is better to place the starting device in a visible place on the panel (made of dielectric material) so that access to it is free. It is also recommended to equip the machine with an emergency switch. It is convenient when it is large in size.
Focusing on your own needs, you can improve the unit by making it with a jointer or planer. To do this, it is enough to secure a drum with knives on the existing shaft, and make a slot of the appropriate size in the table for it. This will allow you to expand the functionality of the created installation: plan lumber on it, chamfer and select a quarter from wooden blanks.
If you plan to regularly perform carpentry operations using homemade equipment, it is recommended to equip it with a coordinate table with several guides. They need to be fixed at different angles. To organize productive work, it should also be possible to regulate the speed of the electric motor and quickly replace disks if necessary.
Create a drawing
The first stage of creating a machine for processing wood is drawings of a sawing table. You don’t have to compile them by choosing the appropriate option on thematic sites or forums. But it’s better to make at least the simplest diagram yourself, taking into account the available materials and the selected sizes.
READ MORE: DIY changing tables (29 photos): how to make a table from a chest of drawers, options for newborns
The drawing notes all the nuances that will be needed to prepare the materials, indicate the mounting locations for the supports and their angles of inclination if the table legs are not perpendicular to the table top. In the figure it is also worth noting the place for attaching the unit to turn the saw on and off. When drawing up a diagram yourself, maintaining scale and exact proportions is not necessary. The main thing is to correctly indicate the dimensions of all future parts for the sawing machine.
Selection of materials and parts
When creating a homemade circular saw, it is necessary to maintain an optimal balance between its functionality, safety during operation and manufacturing costs. To achieve this, you should select materials and parts with the desired characteristics. To reduce costs, you need to start from old or unused equipment that is available.
Materials for making a bed with a table
To make a bed (frame), you can use a channel or metal corners (sizes from 25×25 mm to 50×50 mm are sufficient). If these materials are not available, then the most economical option is to purchase them at a scrap metal collection point. The legs of the machine will use water pipes or profile metal pipes.
Advice! Frame elements must be connected to each other using electric welding, because bolted connections unwind under the influence of vibrations.
When assembling the frame, it is also necessary to weld spacers at the corners to impart rigidity to the structure. To make it easier to move the machine, you can equip it with durable wheels (with a metal rim) equipped with locks. It should be borne in mind that the more massive the unit being created, the more stable it must be in order to avoid injury.
Metal pipe frame
The main requirements for a table for a circular saw: resistance to mechanical influences (vibration, shock), the ability to withstand workpieces weighing more than 50 kg without deflection, and surface smoothness . These properties characterize sheets of the following materials:
- become;
- duralumin;
- silumin;
- PCB;
- moisture-resistant plywood;
- organic glass.
If you use moisture-resistant plywood, then it should first be covered with zinc-coated sheet metal. The use of chipboard or OSB is not recommended due to the instability of these sheet materials to vibration influences.
Important! The strength of the table is of great practical importance. If it cracks or becomes distorted due to deflection, the disk may jam. This can lead not only to damage to the workpiece, but also to injury.
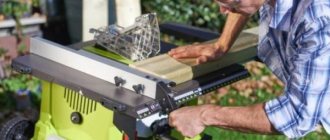
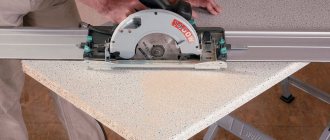
To carry out various work (for example, cutting logs into boards), you need to equip the table with a side support. It performs the same function as a guide bar for a hand-held circular saw: it ensures even sawing of lumber. Moreover, its use makes it possible to obtain workpieces of different sizes.
The guide stop must be strictly parallel to the disk to avoid jamming of the latter. It can be made from a wooden block or a metal corner. In the first case, only hardwood should be used. To be able to adjust the working gap, the stop must be removable. It can be fixed using clamps or in special grooves (bolts) made parallel to each other on the working surface of the tabletop.
Selection of engine and starting equipment
It is easiest to use a single-phase electric motor as a drive for the considered version of a homemade circular machine. Its power must be selected taking into account the upcoming load. Indirectly, you can navigate by the diameter of the installed disk:
- if it is 350 mm, then for normal operation of the unit you need an electric motor with a power of 1000 W;
- for a disk with a diameter of 170 mm, a 500 W motor is sufficient.
In the latter case, you can make a drive mechanism from an engine from an automatic washing machine. It is able to work for a long time at an average load level. For disks with a diameter of 350 mm, an electric motor from an industrial ventilation unit is suitable. It should be secured firmly to ensure proper engagement of the belt drive. For this reason, it will not be possible to reduce the level of vibration by installing the motor on shock absorbers: it will constantly oscillate.
You can also equip homemade equipment with a three-phase electric motor (380 V) of suitable power. To start it from a 220 V network, you will need to additionally install working (phase-shifting) and starting capacitors into the electrical circuit. It should also be taken into account that the engine power will be less than the nominal value indicated on its plate or in the passport.
Starting equipment should be selected based on the power of the motor, on which the maximum current in the circuit will depend. A good option is to use a start button in conjunction with thermal protection - this will protect the electric motor from burning out the windings if the current increases when the disk jams . It is better to install the protection in a separate electrical panel attached to the side panel of the machine on the convenient side.
All connections must be well insulated so that the wires do not short-circuit to the frame of a homemade circular electric saw. The on and off buttons should be pressed without any effort. Due to the frequent storage of equipment outdoors, it is necessary to protect the electrical part well from getting wet. The simplest thing is to cover the installation with oilcloth or similar waterproof material.
Gear, shaft and disc
To transmit rotation from the electric motor to the disk, the best option is to use a V-belt in conjunction with pulleys from the car engine. The use of gears is not recommended for safety reasons. This is due to the fact that if the disk jams, the belt will simply slip, and the gear drive, due to its rigidity, can cause failure of the entire drive unit.
Advice! If you use pulleys of different diameters, you can change the speed of the disk and install different types on the machine. This is true if there is no motor speed controller.
It is better to entrust the manufacture of the shaft to a specialist by ordering it from a professional turner. Moreover, when you plan to make a circular electric saw more functional by equipping it, for example, with a plane. But the simplest option is to buy a ready-made factory-produced part. A sample of it is shown in the photo below.
It is recommended to use self-aligning ball-type bearings together with the shaft. The mounts for them will fit from the car hub kit. In this case, the bearings should be well protected from dust.
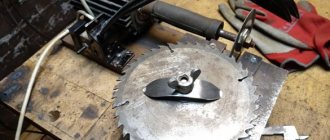
It is easier to buy a disk for a circular machine ready-made than to make it from a sheet of tool steel. The problem is one of balancing. An imbalance of the saw during operation of the equipment leads to its rapid failure and reduces the level of safety of the work process. If you have a circular saw for wood, you can remove the saw blade from it.
It is necessary that the diameter of the disk corresponds to the corresponding parameter of the sawn timber: for example, for 100 mm logs you will need to use a saw measuring approximately 350 mm. This is due to the fact that the disk should not protrude more than a third of its diameter above the working surface of the table.
Ignoring this requirement not only leads to a deterioration in the quality of sawing workpieces, but also increases the possibility of injury.
Selection of dimensions
It is worth choosing the size of the sawing table depending on the square footage of the workshop. The small area of the room allows you to use a tabletop of 50 x 50 cm. Making the sawing table smaller does not make sense - it will be difficult to use it when processing long workpieces. The universal size, ensuring convenient sawing of laminated chipboards, is 80 x 80 cm.
To comply with safety requirements, it is recommended to place the saw in the middle of the tabletop at a distance of at least 25 cm from the edge - it is this indicator that leads to the minimum width of 500 mm. The location of the saw blade also depends on how it will be used. There are three types of design:
- for longitudinal sawing;
- for cross cutting;
- universal.
The depth and location of the disk installation depend on the workpieces processed on the machine. For boards and plywood, it should protrude above the tabletop by 50-80 mm, for logs - by 110-125 mm. The height of the upper part of the frame made of sheets of plywood or chipboard can be in the range of 35–40 cm. If you make the frame only from timber, this parameter depends on the cross-section.
Algorithm for assembling a homemade circular saw
The assembly of a woodworking machine according to the drawing given earlier is carried out in the following sequence:
- a rectangular frame is made from the corners;
- four legs are welded to it at the corners of the required height;
- at a height of about 200 mm from their lower edge, they make a binding from the corners;
- a shaft is mounted on the upper frame;
- fix the driven pulley on one side and the disk on the other;
- a table with a lifting mechanism is made and attached to the frame;
- on the lower frame they make a platform from corners or sheet metal for the electric motor;
- the drive pulley is fixed on the motor shaft;
- put the belt on the pulleys;
- On and off buttons and an electrical panel are mounted on the side panel of the unit;
- using wires of a suitable cross-section, connect the elements of the electrical circuit of the equipment (motor, buttons, protection);
- supply power to the machine from a stationary network.
The final stage is to check the functionality of the assembled equipment. First, you should make sure that all moving parts rotate freely: to do this, simply twist the drive pulley by hand. After which you can start the unit in test mode. If strong vibration is detected, you will need to check the reliability of the bolted connections and fixation of the disk.
You can make a circular saw with a table consisting of two halves or a solid one. In the latter case, you will need to cut a rectangular slot in it for the disk. The design of the machine with a table consisting of two halves is shown in the video below. This video also demonstrates the design of the lifting mechanism for these parts.
Important! To prevent the possibility of the saw jamming due to the connection of fragments of the workpiece being cut, it is recommended to install a riving knife. It should be located at a distance of approximately 3 mm behind the disc.
Chip removal
After the first launches, another unpleasant feature was revealed - when you start cutting the sheet from above, all the shavings fly in a beautiful fountain directly onto the operator’s head. Therefore, they quickly began to solve the issue of chip removal, while the operator had to wear a technical jacket with a hood and glasses.
By that time, it was time for us to purchase a chip extractor in order to extract dust from 2 CNC milling machines, a circular machine, a sanding area with a sander, and from the future format machine. Since there are a lot of devices, we took a Jet 2300 2.2 kW chip ejector with 2 bags for 35 tr (a similar one for 1 bag costs 25 tr).
Chip ejector, without which the worker’s head was constantly covered in sawdust from sawing
In principle, if I had only one format machine, I would attach a vacuum cleaner with a long hose to it. In this option, it makes more sense to choose a circular saw with a connection for the vacuum cleaner hose. It’s better to take a vacuum cleaner with a large bag and a built-in socket for hand tools (connect the formatter through it). Then, when you turn on the formatter, the vacuum cleaner will turn on automatically and also turn off after turning off the saw (I use a Karcher vacuum cleaner with fabric bags, but I would prefer a larger bag). But in my case, the choice in favor of a chip extractor was obvious - you can’t install a vacuum cleaner on every machine (the money will be the same, but it will be very noisy and there will be a large load on the network). I assembled air ducts under the ceiling from sewer pipes, taped them inside with aluminum tape to remove static, and routed them to all the machines.
This is not a sewer under the ceiling))), but air ducts for removing chips to the chip suction
In order not to have to run to the chip ejector every time to turn it on, the power button was taken out and hung from the ceiling in the middle of the room.
To connect it to the formatter, I made a small casing from the same plywood and a small casing from the air duct (bought at a hardware store), which fits over the circular. It fits tightly, so no fastenings were required. You can easily remove it at any time to change the disc. I admit, it looks collective farm, but I had no time for beauty - I needed to resolve the issue as quickly as possible, and there was no time for beauty. As usual, everything temporary becomes permanent. Maybe I'll change it somehow.
The nozzle was made by the collective farm in a hurry, but it was necessary to quickly resolve this issue
The nozzle fits elastically, so there was no need to come up with any fastenings
By the way, regarding changing the disk, my circular saw has a submersible design, that is, the disk can be pulled out completely without removing the circular saw from the machine. This again simplifies operation.
Recommendations for simplifying the assembly process
To regulate belt tension, the electric motor must be installed so that it can be moved. The easiest way to achieve this is by creating larger slots than required for the motor mounting bolts. In this case, the expansion of the holes should be carried out in the direction of belt tension.
If you completely follow the drawing, you will need to make a more complex belt tensioning mechanism. The process will be carried out by pulling up the platform with the electric motor using studs and fixing it with locking bolts in the desired position (in the drawing these structural elements are indicated by the number 10).
The entire design and assembly process can be greatly simplified if you make a circular saw from a circular saw. In this case, there is no need to install a number of parts (motor, disk, shaft, belt, starter). But the capabilities of the created model will be limited by the power of the tool used.
In any case, a homemade circular machine must be grounded. It is also additionally recommended to install a residual current device or differential circuit breaker in the panel. These measures will protect against electric shock if the machine body is energized, for example, due to breakdown of wire insulation. It is better to select components for the electrical part of a circular saw so that they are suitable for repair and easy to maintain. Free access to equipment components will help you easily replace failed parts.
Manufacturing stages
Before assembling the machine for cutting boards, logs and blanks, you should prepare all the necessary materials and tools. To work you will need:
- moisture-resistant plywood;
- sheet material suitable for making the body;
- elements for the body and legs (bars 40 by 40 mm).
Fastening will be done with self-tapping screws using a screwdriver. All necessary parts are cut with a jigsaw. A saw with a disk of suitable diameter is also prepared.
Algorithm for creating a table:
- Sawing all parts into pieces with the required dimensions.
- Marking the mounting areas for the saw and legs on the table top.
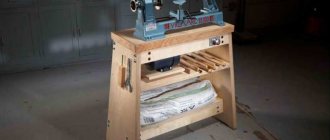
- Making a case, which is usually a rectangular box without a lid or bottom.
- Installation of countertops.
- Cutting a hole that should be 5–10 mm longer and 4–6 mm wider than the disc.
If you cut the material at a certain angle, the resulting slot should resemble a trapezoid (inverted) in shape. For smooth sawing, a regular hole is made. Before cutting out the groove, you should apply a saw and adjust the marks.
Sawing all parts into pieces with the required dimensions
Marking the mounting areas for the saw and legs on the tabletop
Case manufacturing
Installing the countertop and cutting the hole
Preparing to install the saw
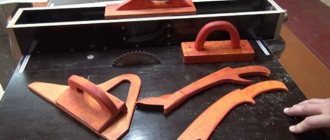
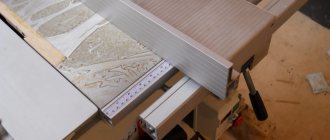
The last stage of making a sawing table with your own hands is installing stops. A standard part of most circular saws is a rip guide. Traditionally, the stop is made from an aluminum cornice or a wooden block. Its size is chosen so that the part runs across the entire table - parallel to the saw and from edge to edge.
Cross stops are also often used on sawing tables. They are used to cut parts at an angle of 90 degrees and trim boards. To make a stop, follow these steps:
- Prepare an ordinary plywood sheet 1 cm thick.
- Secure a block at least 2 cm high to it.
- Attach a second rail perpendicular to the first on the bottom side of the base.
- Cut off excess base.
READ MORE: Foam block baths: projects, drawings, DIY construction. Projects of bathhouses made of foam blocks with a swimming pool photo
The transverse stops are attached to the workpieces using clamps or fastening devices made from wooden washers. Such homemade clamps provide fastening of guides to parts of almost any width. If you fix the block on the underside of the base at an angle of 45 degrees, you get a corner stop.
Perhaps such a table does not look as attractive in appearance as a factory one. However, from a technical point of view, it is in no way inferior to it, so even a novice carpenter can safely take on its manufacture.
Prepare parts for the longitudinal stop
Assemble mounting brackets
Place the bar on the table
Clamp the crosscut pieces together
Attach the cross supports using clamps
Cross stop is ready
How to make a format-cutting machine using improvised materials with your own hands
In the production of cabinet furniture, it is impossible to do without a machine for cutting material.
Furniture structures such as kitchen walls, computer tables and even beds will require parts with high dimensional accuracy. Make no mistake, you can start making furniture using just a circular saw for cutting. You will have to resort to making a format-cutting machine with your own hands. The fact is that a circular saw can cut at a low speed, while the quality of the finished part depends entirely on the craftsman. Thus, the production of furniture will not only be slow, but also possibly unprofitable, because there is a high possibility of producing defective products.
A vertical format-cutting mechanism for slab material allows you to remove responsibility from the master and make precise linear movements during cutting.
Furniture blanks turn out to be accurate, and their production speed reaches 15 parts per minute.
Comparison of homemade and finished products: which is better to choose for your home
Factory machines are capable of making high quality longitudinal cuts. Any angle can be set.
The main advantages of circular saw cutting from the manufacturer:
- functionality;
- equipped with a security system.
The cost of factory products is not always suitable for the budget buyer. Compared to ready-made machines, do-it-yourself metal trimming does not always have enough power. They do not have high-quality protective equipment.
Homemade saws are not equipped with a graduation scale. In most cases, improvised parts are used, which are not reliable. Therefore, cross-cutting from a manual circular saw is not always of high quality.
An excellent do-it-yourself grinder trim is obtained using a piston and connecting rod of a car engine. This design is indispensable in a workshop environment.
Advice. Before making your own circular miter saw, you should decide for what purpose it will be used. The type of future construction depends on this.