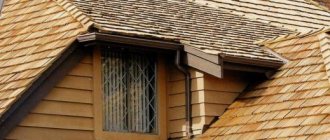
Shingled roofing is strong, durable and extremely beautiful. Evidence of this is the buildings of our ancestors, which have survived to this day.
Once considered easy to install and cheap, wood roofing has now become a luxury. The material is absolutely environmentally friendly, therefore expensive and difficult to install. But there are few craftsmen left who know how to make shingles with their own hands correctly according to long-standing traditions. However, the price justifies the investment, since a properly covered roof will last for decades.
Return to content
Main fixture
Through trial and error, studying a bunch of specialist forums and watching a ton of videos, I made three knives of different sizes.
I made a small one, 20 cm long, from a piece of metal and sharpened it on a lathe. It will be needed to remove small knots and bark.
I made a medium-sized knife from car springs. Its length is 35 cm. This is the main tool in the manufacture of shingles. I used it most often. However, he could not withstand the load. Since the design of the spring involves holes, plus the length of the cutter played a negative role.
For a large knife, I used a piece of hardened metal 12mm thick, 50cm long, 10cm wide.
How to prepare the horns and skull?
If a skull is also important to you on the wall, then know that the process of processing it is labor-intensive, and it is important to follow the technology correctly. Otherwise, you should saw off a small section of the bone along with the horns with a hacksaw or a special surgical saw. The main thing is that you have a blade with fine teeth - the edges will be smoother and will not crack. By filing the skulls of large animals - elk, deer, deer - we remove the base and teeth. It is better to leave the nasal, intermaxillary bones and eye sockets (they can be outlined by immersing the skull in water to the desired level).
Important! The skull must be filed in a damp state so that it does not crumble. If we make mistakes, we correct them using a grinding machine.
As a rule, the skulls of deer, rams and goats are not filed. The trophies of these animals are valued more when they retain their teeth, which can be used to determine the age of the animal. The lower jaw can be fixed with wire.
Now let's talk about the skull itself, if you want to keep it. The head of a dead animal should be separated from the carcass using a sharp knife. The incision area is between the second and third vertebrae. We cut off the largest muscles, tendons, cut off the eyelids, remove the eyeballs and tongue. After this, you need to clear the cranial cavity from the brain. To do this, use a wire - twist it into a spiral and insert it inside the skull through the occipital part, shake it and remove it through the hole. Remove the remains with long tweezers and wash under a strong stream of cold water. You can store the head in salt; it will not rot for several days.
Important! During all steps of processing the skull, do not allow water to get on the horns - it can damage the structure and lead to mold.
Clean the horns from dirt with a soft brush. It is better to wax it using a flannel cloth or other natural soft material.
Next, the skull must be boiled in spring or rain water until the meat is completely separated from the bones. We take such dishes so that the skull can be completely immersed. The horns should remain on the surface and be dry. You can tie a transverse plank to them, and wrap the lower part with dry cloth. Cook the skull until the flesh is completely separated from the bones; this can take several hours of continuous cooking. The evaporated water will have to be constantly replenished. As soon as everything is ready, do not rush to take out the skull, leave it to cool for 8 hours at a temperature of 10-20 degrees. Then take it out and let it dry in the shade.
The water should not contain any chemical impurities or chlorine. Otherwise, the skull may change color or even collapse during boiling. If the skull remains dirty after boiling, it can be washed with water and table salt or soda. Then wipe off grease stains with ammonia or chloroform.
If you are not satisfied with the color of the bone, then the skull can be bleached using ammonia and hydrogen peroxide in a ratio of 5:1. Cotton wool soaked in this solution is wrapped around the skull, tied with a cord and left for 15-20 hours (depending on the size of the skull). The main thing is not to touch the horns. At the final stage of processing, the skull can be polished with paraffin.
Now let's start processing the horns. If the size allows, then soak them in a saline solution and leave for two days. After this, rinse with running water. Then it's a matter of taste. They can be sanded with fine sandpaper to smooth out any irregularities. You can use a milling machine if possible.
Shingles manufacturing process
Here it is worth saying that I extracted shingles of the following sizes: length 35 cm, width 5 cm, thickness 1 cm. And now I will describe the process in detail.
Step 1 - preparation
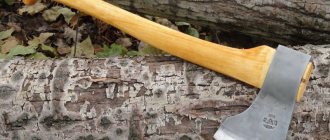
The first thing to do is to split the round timber. It is easier to do this not from the end, but from the side. I take an ax and begin to gradually hammer it with a wooden mallet.
I learned this method from Siberian hunters who go to the taiga for the winter and make skis from pine or spruce.
Having split the log into two parts, I examine it inside. There should be no defects, large resin ducts, or bark beetles. The structure should be smooth.
Then, I split one of the halves of the log into two more equal parts.
Step 2 - production
Let's move on to making the records themselves. I take a large cutter and a wooden mallet. Smoothly tapping the knife, first on one side, then on the other, I tear off the plate. Thickness no more than 8 - 12 mm. You need to hit not just vertically downwards, but slightly towards yourself. In order not to cut but to tear off. When extracting shingles, it is important to place the bark butt down. This way the blade will move along the growth line of the fibers. The shingles will be smooth and not rough.
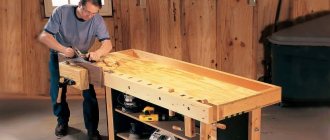
Step 3 - Sanding
When making shingles, it is impossible to achieve a smooth and even surface of the plate. For a better fit, I use a two-handed knife, it’s called a struk. I place the plate with the butt side down and begin to trim off all the excess. I use it to remove the bark.
And for better water drainage, I chamfer at an angle of 45° from the top of the plate.
Laying shingles
When laying shingles, there is a rule - the butt should point down. The way we made it is how we lay it. If you lay the plates backwards, water and snow will be retained and the roof will leak.
Methods for laying shingles
The first method is overlap laying. The plates are placed on top of each other, approximately one third. This method is the simplest and easiest.
The second method is multi-layer styling. The first layer is laid evenly. The distance between the dies in one row is 3-5 mm.
The next layer overlaps the joints of the first row. And so on. Four or five layers are laid in this way. This method can be used to make the roof of a house, terrace, veranda.
When making shingles for the first time, you need to be patient. However, having gained experience, you will be able to make an unusual and environmentally friendly roofing option with your own hands.
Hunting trophies and their collecting
Looking around the room of an avid hunter, you can create a vivid picture of the adventures of its owner: bear claws and teeth, paws of birds of prey and ducks, various feathers and skins. But the classic and most honorable decoration is a skull with antlers, for example, a deer, elk or deer. A beautiful decoration can be made from just one horn, but sometimes the walls are covered with entire branches of these solid things.
The antlers of a large animal, such as a deer or elk, are heavy things, and before hanging such beauty on the wall, it is customary to make a special shield or medallion for it. You can either buy it in a store or make it yourself - it’s all up to the hunter’s choice. On sale you can find medallions for every taste and budget, but the best thing for an enthusiastic person who has himself obtained the skull of an animal is to make a worthy medallion for him. We'll talk about the techniques for creating such a thing.
Surface preparation
First, you need to remove all old finishes and plaster, if any, and completely clean the wall of sagging, dust and dirt.
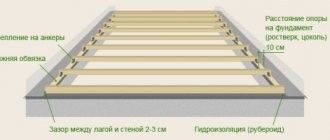
Shingles are mounted on a wooden base, which can be made from plywood scraps or thin slats. It is recommended to stuff the material diagonally. The result will be a lathing that will serve as beacons and hold the plaster on the wall surface. Instead of wooden slats, it is allowed to use a chain-link mesh. The wire reinforcement is attached to the plywood strips so that the distance between the mesh and the wall surface is at least 3 mm.
On a smooth concrete wall, using a hammer and teeth, notches are made with a depth of 3 mm and a length of 15 mm. The number of notches depends on the area and is calculated using the formula 250 * m2.
Brick wall. To improve the adhesion of the mortar to the wall surface, depressions of up to 1 cm are made between the bricks.
Before applying plaster, wooden and brick surfaces should be moistened with water using a garden sprayer or an ordinary broom. Concrete walls are treated with a special soil mixture - “Betonokontakt”. For porous wall surfaces (sand-lime brick, aerated concrete, foam concrete), a deeply penetrating primer is used. The highly absorbent base is processed twice. After the primer has completely dried, you can proceed directly to plastering the walls.
Video: how to prepare a wall for finishing
How to attach antlers to a medallion?
All you need to do is fix the horns on the medallion, and you can hang it on the wall. If the horns are small, then it is enough to fasten them with wire. If you have antlers of deer, elk, or other large ungulates, then we will attach them using self-tapping screws. Calculate their length and cross-section according to the size of the horns. In the area of the skull that you cut out with a hacksaw, we drill two holes for self-tapping screws. If you are afraid of making a mistake, then attach a piece of paper to the skull and make a template. Cut it out with scissors and attach it to the front side of the medallion and make holes.
If you have one horn without a piece of the skull, then under its base in the surface of the medallion you will have to hollow out a cavity using a chisel. Approach the final stage with all responsibility - the fastening must be strong and reliable.
Important! Please note that in the skull of large animals there is a small hole that is best closed. We take a wooden block approximately the same size as the hole, fit it and seal it with putty.
Some tips
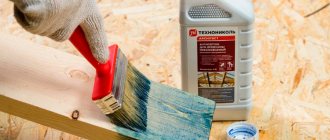
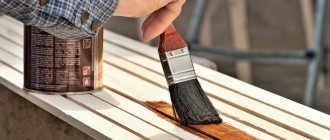
In the future, to protect the horns from external influences, microbes and time, treat them with stain. If you wish, you can apply a couple of layers of varnish on them - this will give your trophy shine.
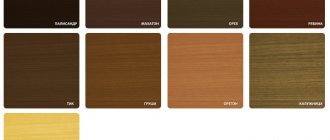
If you think that the horns are too light, you can darken them by rubbing a walnut shell with a solution of potassium permanganate or an alcohol solution. In order not to spoil the skull, wrap it in a plastic bag, and do not get carried away with potassium permanganate, so as not to spoil the material. If desired, go over the ends of the horns with fine sandpaper.
Treat your trophies and stands with the utmost care and attention. The appearance of your room and trophies can say a lot about its owner. In addition, the moral satisfaction from quality work is worth it.
Plaster mixtures for wooden surfaces
For plastering walls and partitions made of wood, you can use compositions based on cement, lime and gypsum. Fine quartz or slag sand with a fraction size of about 1.2 mm is used as a filler.
The cement-sand mortar is prepared as follows: 3-4 parts of sand are mixed dry with 1 part of cement until smooth, then water is added and the solution is brought to the desired consistency. This plaster composition is suitable for rooms with different operating conditions.
For rooms with normal humidity levels, you can use a lime-gypsum mixture. When making such a solution yourself, you must adhere to the following proportions:
- 1 part lime;
- 1 part plaster;
- 2 parts sand.
Since gypsum sets very quickly, reducing work time, it is better to use gypsum mixtures with retarders instead of pure gypsum. Gypsum starting putty is suitable for these purposes.
Lime-cement mortar is suitable for damp areas such as the bathroom and kitchen. When preparing it yourself, you will need the following components:
- 1 part cement;
- 1 part lime dough;
- from 2 to 5 parts of sand.
What is shingles?
The material consists of narrow planks with a thickness of two to five millimeters, their length can be up to 4 m. Inch boards or veneer of aspen, pine, spruce, and larch are cut into shingles. Coniferous wood species are used as raw materials, since they contain a large amount of resinous substances. Resins are a natural antiseptic and will not allow putrefactive bacteria and moldy fungi to appear and develop during operation.
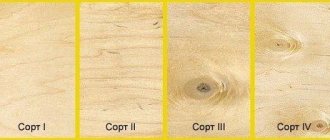
Plaster slats are made from third-grade wood, their price is low, so it is much more profitable to buy ready-made slats. Since making shingles for plaster at home using a circular saw is a long and thankless task. As they say, “the game is not worth the candle.”
The right technology
! Note ! It is better to split the workpieces rather than saw them. This is the secret of the unprecedented durability of shingles, shingles and shingles made by splitting. Sawing reduces the service life of the material by a third. This fact is explained by the fact that when splitting hemp into planks, the wood fibers break without damaging the internal capillaries of the wood, as happens during sawing. Only splitting gives the shingles an original relief surface, thanks to which the noise of rain and wind is well absorbed. .
Preliminary surface priming
If the wall has a highly absorbent base - sand-lime brick or aerated concrete, a deeply penetrating primer (Tifengrunt or its analogues) is used. In addition to the fact that such a primer significantly improves the adhesion of the solution to the base, it also additionally strengthens the wall. Before starting work, the primer must be thoroughly mixed. Highly absorbent surfaces are treated twice.
For priming smooth surfaces that do not absorb moisture, a special mixture is used - “Betonokontakt”. Before applying the primer, it is necessary to clean the wall surface from dirt and dust, remove the flaking old plaster with a spatula or brush. Before use, “Betonokontakt” must be thoroughly mixed and diluted with water (no more than 1 hour per 2 hours mixture) if necessary. Plastering the surface should begin only after the soil layer has completely dried.
Video: is it necessary to prime the walls before plastering?
Location of shingle roofing production
What does a novice entrepreneur need to start a shingle roofing installation business? For the production of shingle tiles in a stream, as well as for its continuous sale, an entrepreneur needs the following:
- This is, of course, a plot of land. The area of the site must be at least one hundred square meters. The site must have convenient access for a vehicle transporting timber, as well as a place to place the timber for sawing. The volume of raw timber should not be less than 60 cubic meters per month.
- A production workshop will also be required. It can and should be combined in function with a warehouse where finished products will be stored.
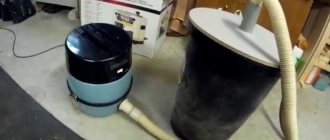
- Woodworking Machine. Required for final processing and giving the finished shingles a marketable appearance.
Economic side
In order to produce shingles and store a monthly supply of products, it is necessary to organize a production facility with an area of one hundred square meters, no less. To reduce costs, it is possible to rent a workshop without heating. Relatively speaking, such a room will cost about two hundred thousand rubles.
A woodworking machine to bring tiles to marketable condition will cost approximately 120 thousand rubles. Equipment and other tools for working with wood, such as chainsaws, axes, mallets. This will cost about fifty thousand rubles. Based on a monthly volume of 50 cubic meters, the purchase of raw materials will cost one hundred thousand rubles.
Of course, any business activity must be registered with the tax financial service. Costs for ordering printing, opening a current account, as well as other expenses. All this will cost 50 thousand rubles.
In total, to open a shingle roof manufacturing business, you will need an initial payment of 520 thousand rubles. The profitability of producing shingles for wooden roofs averages 55 percent . Taking this into account, we can say with full confidence that all costs are recouped in exactly one season.