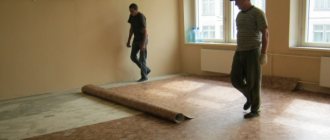
The list of modern floor coverings is very wide and includes linoleum, laminate, parquet, and cork. These coatings have a number of advantages - they have an attractive appearance, create a smooth, easy-to-use coating, and maintain high performance qualities for a long time. However, modern coatings place high demands on the surface to be laid: the surface must be of high quality and without changes. An excellent solution would be to use a plywood backing. If you are planning to update your wooden floor and change it to a more aesthetic one, read to the end and the task of how to lay plywood on a wooden floor will become much clearer.
You can lay linoleum on a plywood backing Source beton-house.com
About using plywood flooring
Natural wood is widely used in construction for the manufacture of floors. It has good thermal insulation, a pleasant-to-touch surface, and creates a cozy, warm environment in the house. However, over the years, such a coating loses its attractiveness - the boards dry out, begin to sag and creak. There are ways to renew wood flooring, but often it fails and the wood floor needs to be completely replaced.
If you need to lay laminate or parquet instead of an old floor, it becomes necessary to prepare a high-quality substrate. Modern floor coverings are extremely demanding on the surface, and an uneven wooden covering is not suitable, even if it is well preserved. But if the wood floor is still in good condition, you can lay a subfloor made of plywood sheets over it. This substrate is distinguished by the quality of the resulting surface, speed of installation and low cost.
A wooden floor can retain sufficient strength, but be visually unattractive Source bricoleurdudimanche.com
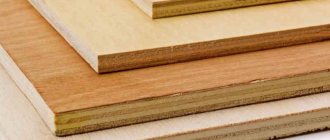
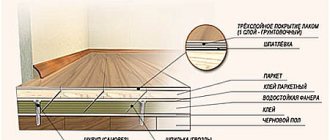
Plywood is a material made by pressing together an odd number of sheets of rotary-cut veneer. The veneer is made on a special peeling machine. Adjacent sheets are laid in a mutually perpendicular direction, which ensures high physical and mechanical properties of plywood. The material is used in construction, furniture production, carpentry and carpentry. Plywood is often chosen as a substrate for parquet, linoleum or laminate due to a number of advantages:
- The plywood backing provides a smooth surface.
- Large sheet area ensures quick installation.
- Plywood sheets have high strength, wear resistance, and load resistance.
- The subfloor extends the life of the underlying floor covering.
- Creating a plywood backing does not require large financial costs.
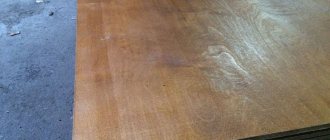
You can lay flooring on multilayer plywood Source fanerasnab.ru
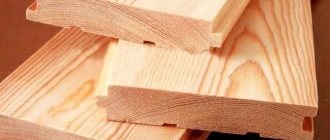
Types of plywood (wood species):
Birch - the main advantage is strength. Optimal where increased loads and pressure will be placed on the building material;
Coniferous – the main advantage is durability and light weight;
Combined – the main advantage is the price. Combined plywood is closer in quality to birch, but much cheaper.
Plywood is also divided according to its intended purpose:
- furniture;
- ship;
- construction;
- aviation;
- formwork;
- decorative;
- transport.
In principle, we have examined the main points by which plywood sheets are classified. Be sure to take into account the properties of the material depending on the varieties, brands, etc., in order not to make a mistake in your choice.
And you can buy plywood in Minsk in our Temple store. We offer high quality products at very affordable prices. You can place an order for plywood and get the necessary advice from our specialists by calling the numbers listed on the website.
Which variety to choose
To determine which plywood to choose for your floor, you should consider the existing varieties. Plywood is classified according to the following criteria:
- According to wood material
Plywood can be made from softwood and hardwood. Hardwood material has higher mechanical properties, but is also more expensive
- By moisture resistance
Moisture resistance directly depends on the adhesive composition used in plywood. For example, FBA plywood uses natural albumin-casein glue, so it is resistant to moisture. FSF plywood contains formaldehyde glue, which ensures high moisture resistance
- By defects
Based on the presence of knots, wormholes, curls, etc. in the veneer, 4 grades of plywood are distinguished. Grade I is the highest quality and most expensive, grade IV has a large number of defects
- For surface grinding
Plywood can be sanded on both sides (Sh2), sanded on one side (Sh1) or unsanded (NS)
- By number of layers
There are three-, four-, five-layer and multi-layer plywood
There are many varieties of material Source amazonaws.com
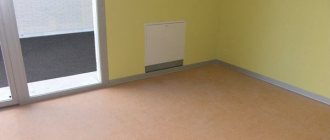
To determine which plywood is best to lay on the floor, you need to know the conditions of its use. The room where the subfloor will be laid must be heated. Temperature changes are allowed within 16-28 °C. The relative humidity in the room should be within 60%.
If you plan to make a substrate in rooms with low humidity levels (bedroom, living room, hall), you should use FBA plywood, as this is the most environmentally friendly material. In rooms with humid air, it is better to use moisture-resistant varieties - FK or FSF.
A typical solution to the question of which plywood is best for the floor is to use birch plywood Ш1 or Ш2 grade II or III with a thickness of 10-22 mm. This solution combines a fairly high quality surface combined with an acceptable cost.
It must be said that the thickness of the plywood should be 2-3 times thicker than the final floor covering. Using thick plywood will provide greater rigidity to the subfloor, but working with such material will be inconvenient. In addition, the price of plywood will be higher.
Mid-price plywood is suitable for the substrate Source remontnik.ru
What kind of plywood is used on the floor?
In addition to the thickness and size of the sheet, you will also have to choose the type and grade of plywood. First, let's look at the type. If you plan to lay plywood on the floor under some kind of coating, you can use unsanded sheets. Under a hard finishing coating, such as parquet or parquet boards, grades 1 and 2 will be used. For a soft surface - such as carpet - you will have to use only the first one with a minimum number of knots.
The grade of plywood is determined by the number of knots, their condition and the presence of other defects. The best is first/highest, but some factories also produce “luxury” or “elite”. They use veneer for the outer layer(s) without any flaws at all.
If you plan to use the plywood floor as a finishing floor, that is, “for painting,” you need one sanded on one side and of the highest grade. If your budget is strictly limited, you can take a lower grade. But the defects will have to be puttied and sanded. This is an additional waste of time without guaranteeing an ideal result.
You need to choose the type of plywood depending on the planned finish coating
Types of moisture-resistant plywood
In general, it is advisable to use moisture-resistant material for the floor. There are the following types of moisture-resistant plywood:
- FC. Suitable for rooms with normal humidity. Urea glue is used in production. It is environmentally friendly, but the water resistance of the material is average.
- FKM. It is also safe, and has higher water resistance, since melamine glue is used. But the price is more expensive. It makes sense to use it when installing floors in the kitchen and hallway.
The most popular types of plywood - FSF. Cheap, waterproof. But the layers are glued together using a phenolic binder. So for use in residential premises, a hygienic certificate indicating the formaldehyde emission class is required. A material with a formaldehyde emission class no higher than E1 is considered safe. Can be used for installing floors on an open balcony or loggia, in a bathroom or toilet.
- FB. Plywood with bakelite binder. Lightweight, highly moisture resistant, safe. But darling. Used in the construction of aircraft, often called aviation.
- BS. Alcohol-soluble glue is used for gluing veneer. Plywood is moisture resistant, durable, expensive. Does not withstand exposure to some chemicals. It is used with caution when laying ceramic tiles - modern tile adhesive may contain various additives that can cause destruction of the adhesive layer.
So, when laying plywood in residential premises, the optimal choice is FC plywood. For the kitchen, bathroom and corridor in a private house, it is better to take FKM or FSF (but check its safety).
Before installation
It must be remembered that plywood sheets can be laid in a relatively dry room. Before laying plywood on the floor, you should check that the humidity conditions are suitable for installation. To do this, a sheet of polyethylene with dimensions of 100x100 cm is laid on the floor, its edges are pressed tightly, and the polyethylene is left for 2-3 days. If after 2-3 days no drops of vapor appear on the polyethylene, the room is dry and you can lay a rough covering of plywood.
The next stage of preparation is to determine the condition of the old wooden covering. It is necessary to check whether there are any deflections, creaks, or whether the floorboards are rotten. Loose areas need to be strengthened, damaged areas need to be replaced. This stage should not be neglected, since the quality of the future coating will depend on the strength of the wooden base.
After restoring the old floor, you need to check the height difference using a building level. The smoother the old covering is, the denser the plywood sheets will lie on it and the more reliable and durable the final floor covering will be. Therefore, you need to use the rule to determine the protruding areas of wooden boards and level them with a plane.
Leveling the floor before laying Source ironflex.ru
Before installation, you need to remove the baseboards, adjust the length of the door leaf and door jamb taking into account the calculated floor level. The prepared old floor must be cleared of debris. If desired, you can coat the surface with antiseptic primer or fire protection. In this case, it is necessary to dry the base for 2-3 days.
Before laying plywood on the floor, you need to prepare it. The plywood sheets should be brought into the room where they will be laid and left in an upright position. If there is enough time, it is better to let it sit for 5-7 days. During this time, the material will “get used” to the conditions and will not expand much in the future due to temperature changes. After drying, it is recommended to soak the plywood with antiseptics and water-repellent agents and ventilate it.
Impregnations increase moisture resistance Source neoplus.spb.ru
After all the manipulations, you need to bring the plywood sheets into the room where the installation will take place, lay them out horizontally and leave them for another 3-4 days. A long preliminary stage is necessary, since the place where the plywood was stored before purchase may differ greatly in conditions from the room where the plywood will be laid. Due to a sharp change in temperature and humidity, the sheets will begin to evaporate or absorb moisture and change their size. Laying such plywood is highly not recommended, because the quality of work can be greatly affected as a result of thermal expansion of the sheets.
Material calculation
To correctly determine the quantity of products, you must follow the step-by-step instructions:
- The floor surface is measured and all data is transferred to paper. You should get a detailed diagram of the foundation with a lag laying system. This allows you to immediately calculate the order of placement and adjustment of all parts, which is especially important in rooms with ledges and niches.
- The appropriate sheet size is determined and a layout plan is drawn up.
- According to the data obtained, the required number of slabs is calculated.
When installing a floor using joists, first of all it is necessary to draw up an installation diagram for the joists, and then plan the laying of plywood based on it
If the room has the correct shape, it will be easier to calculate the consumption: for this, the size of the object and the dimensions of the sheet are converted into area, and the data in square meters is divided.
On a note! To make the task easier, you can use a table with the exact sheet area provided by the manufacturer.
Choosing a installation method
There are 2 main ways to properly lay plywood on a wooden floor:
- Laying on an old wooden base
The method is used if the horizontal difference of the old base is less than 1 cm, and also if it has sufficient strength. This method is simple, but can be used only in limited cases, since the difference in the old floor is often more than 1 cm
Laying over old coating Source chudopol.ru
See also: Catalog of companies that specialize in home renovation
- Laying on joists
If the difference in height of the old base is significant, plywood is laid on logs made of timber. This method is longer and more labor-intensive, but it allows you to deal with significant horizontal differences and damage to the base. Can also be used if the old floor has failed and cannot serve as a solid base for a plywood underlay
Laying on pre-prepared joists Source slavasozidatelyam.ru
Next, we’ll take a closer look at which method to choose in a particular case and how to properly lay plywood on the floor.
Installation of logs under plywood
Thus, installation of plywood on joists can begin immediately after marking and securing the pads. The beams are laid parallel to the wall with window openings in order to be perpendicular to the sunlight entering the room. For the distance between floor joists under plywood, it is best to choose an interval of 40-50 centimeters (read: “What is the distance between floor joists when installing a floor”). Only the two outer beams at opposite walls should be installed at a distance of 30-40 centimeters.
All other logs should be fixed at the same distance, strictly parallel to each other. The height can be checked using the horizon line previously drawn along the walls. Closer to the center of the room, such a tool will usually help determine how smooth the surface is. Naturally, all beams should have the same linear dimensions, but for the outermost logs near opposite walls it is best to use beams that are larger in width than those located between them.
The logs are secured to the prepared linings using screws. The fastener must be recessed into the beam so that the head does not protrude on the surface. It will probably not be very aesthetically pleasing if the laid floor covering is damaged. In the photo and upon visual inspection, such a floor can no longer be called high-quality.
To increase the strength of the lag in the places where the pads are located, you can additionally fix the beam using a special wooden profile (crossbar), which will also be fixed to the pad, enhance the adhesion effect and increase the stability of the base.1
The design becomes even more reliable if, after installation, each wooden element is coated with parquet glue or a similar mixture. It is advisable to fill the space between the joists with insulating or soundproofing material. Most often, mineral wool, expanded clay or polystyrene are used for these purposes. Various communications are also laid in the voids. From above, the contents of such areas are covered with parchment or bitumen paper (more details: “Laying plywood on a wooden floor - which one to choose and how to lay it”).
An alternative way to secure the joists does not require the use of spacers. In this case, the logs are also leveled with pieces of roofing material, and secured with long anchors or dowels, the length of which exceeds the thickness of the beam by 5-6 centimeters.
The first method is laying on the old coating
If the wooden floor in the house remains in good condition and does not have major defects or flaws, but you need to lay a new floor covering, then laying a subfloor made of plywood on the existing wooden floor is the best solution. It is important that the old coating is fairly even: the height difference should not exceed 1 cm. This installation method is demanding on the surface, so it is necessary to prepare the wooden floor by renewing defective old boards and leveling the surface.
For ease of work, pre-dried plywood sheets can be sawed into squares measuring 60x60 cm. If plywood is laid in a room with a large area, you don’t have to cut the sheets into squares, but sawing allows you to identify possible delaminations in the middle of the sheet that are not noticeable from the outside. It is better not to use plywood with delaminations for subflooring.
For large premises, it is permissible not to cut sheets Source couo.ru
After preparing the old wooden floor and plywood sheets for the new one, the installation process begins, consisting of several successive steps:
- Marking
The sheets are laid out on the base so that adjacent rows are offset from one another by approximately one-third of the width of the sheet. Protrusions, niches, etc. are marked on the sheets.
Lay out sheets prepared for marking Source parket-sales.ru
- Sawing
According to the markings made, recesses are cut out in the plywood. Sheets are cut so that the number of seams is minimal
Cutting plywood with a circular saw Source pinimg.com
- Laying the substrate
To smooth out minor unevenness in the floor, you can lay a polyisol backing between the plywood and the boards. It consists of polystyrene granules enclosed between two layers of film. In addition to smoothing out unevenness, the underlay provides sound insulation and also removes moisture from the plywood flooring. Polyizol is spread on a wooden base, the seams are taped
Polyizol can be laid not only under laminate, but also under plywood sheets Source stroyday.ru
What are lags
The bars that form the sheathing when installed are called lags. With their help, the surface in the room is leveled, and they also serve as a basis for attaching sheets. They can be made of metal or concrete, but the use of plywood requires the use of wooden blocks.
The construction of the floor will not be practical enough without lathing, since it gives the necessary rigidity to the sheets. Of course, there is a way to lay plywood without lathing, but this type of fastening can only be used if the room has a flat base. Without this, leveling the floor with plywood without joists will not be done well.
Laying joists on the street. First, they build a frame and connect the sections together.
For logs, timber with a cross section of 50×100 mm is usually used. The rectangular shape is necessary so that the sheets can be joined on the wide side. In other words, if you don't have a support pad, attaching the sheet will be difficult.
Also, before the logs are installed, they must be treated with antifungal and fireproofing agents.
A variation of the first method - laying on adhesive compounds
Sometimes the surface of the old coating is almost perfectly smooth. It will still not be possible to lay laminate on such a floor, but it is possible to replace the hardware with adhesive compounds. For gluing plywood sheets, water-based glue, mastic, assembly adhesive, bustilate, and liquid nails can be used.
Example of glue used Source eco-stroycity.ru
Successful examples and options
In this case, the flooring was made on an old wooden floor, maintaining horizontality, using sections of threaded rods covered with PVC corrugated tubes.
The floor is covered with plywood evenly, the seams between the sheets are treated with sealant and putty.
Installation on joists is made in solid sheets with a minimum of cuts, compensation gaps between the sheets are taken into account. Mineral wool is laid between the joists as insulation and sound insulation.
Preparations are being made for flooring along the joists, the concrete floor is leveled, and polyethylene film is laid for waterproofing.
The case when the recommended gap from the wall can be neglected is a narrow section of the floor covered with joists. For metal elements protruding along the edges, cuts were made with minimal loss of load-bearing capacity. Fastening with self-tapping screws. Mineral wool in the space between the joists.
The second method is laying on logs
If the height difference on an old wooden floor is more than 1 cm, you need to lay the plywood in a second, more labor-intensive way. This method is also suitable if the old coating has become unusable and needs to be removed. The essence of the method is to lay plywood sheets on wooden supports, the so-called logs, which serve as the basis for the subfloor instead of the old coating that has become unusable. The logs are wooden blocks with a cross section of 40x40 or 50x50 mm and a length of 1.5-2 m.
Before installation, be sure to check the relative humidity in the room to decide which plywood to use for the joist floor. It is optimal to use environmentally friendly types of plywood - FC and FBA, but they can only be used in rooms with a relative humidity of no more than 60%.
Installing joists instead of a removed wooden floor Source pol-spec.ru
Before installation, it is necessary to inspect the old floor and replace damaged boards. After preparing the base, the process of installing the logs and laying the rough coating begins:
- Marking
The process begins almost the same as in the first method. In addition to the protrusions and niches, the joints of the sheets are marked. This is necessary in order to subsequently install the lag exactly in the place of the future seam. Otherwise, the edge of the sheet may “hang in the air”
- Sawing
This stage is no different from the previous method. Sawing is carried out according to the applied markings
- Installation of logs
Installing joists is the most critical stage, since the quality of the entire floor depends on their correct installation. Beams begin to be laid from the highest point of the floor, which is located using a building level. The logs are attached one by one to the base with self-tapping screws. In sagging areas, place bosses of the required height from fiberboard or timber. After installing all the beams, for greater structural rigidity, it is permissible to lay the second row perpendicular to the first.
You can install 1 row of logs Source pol-spec.ru
Or 2 rows of joists Source blog-potolok.ru
The frequency of installation of the bars determines what thickness of plywood to use for the floor along the joists. The more often the bars are installed, the thinner the sheets can be. It is recommended to install logs at intervals of 40-50 cm.
The main task when installing joists is to ensure that the upper ribs of all beams lie in the same horizontal plane. This is achieved by constantly checking the installed bars with a level and using a laser level
- Laying insulating materials
If necessary, sound and heat insulation is placed in the space between the joists. Communications can also be laid in this layer. It makes no sense to install heated floors under plywood, since it has poor thermal conductivity and retains temperature well without additional materials.
Communications can be installed under the subfloor Source archiq.ru
Technical nuances
Sometimes laying the floor with plywood on joists is the best solution. If wood is expensive in the region, it is cheaper to lay plywood directly on the joists - without a rough wooden floor. The height of the log depends on how much the finished floor level needs/can be raised. If the floor does not need to be raised to a significant height, you can save money and use a board with a thickness of 28 mm or more as a joist. If the floor needs to be raised to a greater height (from 50-60 mm), we take a beam of a suitable cross-section.
The minimum board thickness for joists under a plywood floor is 28 mm
If 50-60 cm is not enough, a small “shortage” (5-8 cm) can be “added” using spacers - cuttings of timber of the required size. All the same, a perfectly level base is very rare, and spacers are used under the logs to bring them “to the horizon” (as in the photo above). If you need to raise the finished floor even higher, then take 150*50 mm timber (for example). If this height is not enough, a sheathing of edged boards is made on top (perpendicularly), achieving the desired height.
How to lay plywood on joists: with edged board sheathing
In any case, we use chamber-dried lumber, first or highest grade. They are usually coated with bacterial protection. It can also be impregnated with compounds that reduce flammability. Before laying, it is advisable to keep the wood indoors for a week. Then there will be a guarantee that the floor will not creak.
Chamber drying boards and timber are very expensive. To save money, you can buy regular lumber (but not raw) and keep it for about a year in a well-ventilated area (in an attic, in a shed) or in a stack outside, covered on top (but not hermetically sealed) from rain. But during the drying process, some of the material will crack, some will twist, etc. So the source material must be purchased with a reserve for rejection. The amount of the reserve depends on the initial state of the forest. The more raw lumber you use, the more waste there will be.
Lag pitch and plywood thickness
The lag laying step is calculated from the center of the beam or board. The beam width is at least 50 mm, the pitch is from 300 mm to 900 mm. The greater the distance between the supports, the thicker the flooring required. That is, the thickness of the plywood for the floor along the joists depends on the distance at which the joists are installed from each other. So when installing a plywood floor, there are options:
- Lay joists less often and use thicker plywood.
- Install the joists with a small gap, use a smaller thickness of the flooring.
Which is more profitable? You will have to count for each region. In some places the first option will be cheaper, in others the second. If you also need to raise the floor to a considerable height, you can get out of this situation by installing joists, nailing the sheathing across them across the battens, and then placing plywood sheets on them.
Table for choosing plywood thickness depending on the joist installation pitch
Laying plywood on a wooden floor under laminate, linoleum is included in the technological map. It is recommended to lay plywood under parquet and parquet boards. In this case, long-term operation of the finishing coating is guaranteed. So, covering the floor with plywood is a justified decision in many cases. It's just expensive. Currently there is cheaper sheet OSB. But plywood has a more stable quality, and with OSB - depending on your luck.
Plywood thickness for floor joists
The thickness of the plywood is selected depending on the selected floor design. The specific thickness depends on the distance between the lags:
- logs every 300 mm, plywood needed 9 mm;
- supports every 600 mm - sheet plywood is required no thinner than 12 mm;
- the logs are installed at 900 mm intervals - we put 18 mm plywood and no less.
Which plywood for the floor to choose?
Coniferous, birch or combined? Birch is better, but coniferous is optimal for the price. When laying on joists, two layers are usually laid. The total thickness should be no less than recommended. Two layers are done to get the most stable floor at minimal cost. Because the material for two layers of 12 mm will cost less than one layer of 21 mm. But when laying two layers of plywood, the installation time will increase and the consumption of fasteners will increase. This is also worth taking into account.
Thickness of plywood on old floor
When laying on any hard base (rough or old plank floor, concrete), one layer of plywood may be sufficient. Moreover, it is possible to level it in this way even on an uneven base. But in this case, two layers will be required and we take their total thickness from the table above. Due to its high degree of elasticity, such flooring can compensate for unevenness.
The thickness of plywood for floor boards is 10-12 mm
Provided there are no significant differences (only a few millimeters are acceptable), the thickness of plywood for laying on an old floor is 10-12 mm (in one layer). This will be more than enough even for coatings that require stability of the base.
How do you attach the joists to the base?
If the sheathing is attached to a concrete base, studs are used. In wood and concrete, a hole is pre-drilled with a drill whose diameter is 1.5-2 mm smaller than the fastener. The length of the fastener must be such that at least half the length of the stud/bolt enters the base.
How to attach joists under plywood to the base
If for leveling you use several shims made of materials of different thicknesses, then you need to drill the hole so that the pin/bolt catches them too. This is a guarantee that the gaskets will be secured and the floor will not sag or begin to creak.
Soundproofing and thermal insulation
In a multi-storey building, you should take care of soundproofing your floor - there will be fewer problems with your neighbors. To do this, it is better to use materials that do not conduct sounds well as leveling pads - rubber, fiberboard, pieces of linoleum. You can also install special vibration damping pads.
You can insulate a plywood floor with any of the materials
For thermal insulation, mineral wool is placed between the joists. In high-rise buildings (second floor and above) this is the best choice. The material dampens sounds and has good thermal insulation properties. Expanded clay should not be used as thermal insulation. Compared to modern materials, it is less effective (the characteristics are 4-7 times worse). You can use polystyrene foam or extruded polystyrene foam. But this choice may be justified if there is an unheated room below or the floor of the first floor in a private house. In this case, foam glass may have even better properties. 100% harmless, excellent thermal insulation characteristics, does not burn. But the price is high.
Please note that on the ground floor of a high-rise building or in a private house, waterproofing is spread over the joists. And it’s better if it’s a membrane rather than a film. The canvas is spread over the joists, the edges are placed on the walls, securing them there no lower than the level of the finished floor.
Laying plywood on the floor: rules
To prevent the plywood floor from sagging and playing underfoot, the first layer is laid so that the fibers of the outer veneer layer are perpendicular to the joists. In this case, the dimensions of the sheet and the pitch of the lag must be selected so that the joint of the sheets falls in the middle of the beam/board.
The junction of two sheets should be in the middle of the board or beam
If the lag pitch is large (50 cm or more), an additional beam is installed under the connection along the short side so that the joint does not hang in the air.
Rules for laying plywood on the floor
When laying out sheets, remember the following rules:
- A gap of 20-30 mm is left between the edge of the sheet and the wall. This way the plywood will not rest against the walls. When temperature and humidity change, it changes size. And this gap compensates for this expansion, otherwise warping will begin and the joints may rise.
- The sheets do not fit together tightly. Leave a gap of 3-5 mm. This is also to compensate for thermal and humidity expansion.
- The second layer is placed so that the seams do not coincide. This is necessary to ensure that cracks do not form in the floor. It also makes the floor more durable and stable.
With a large pitch, transverse bars are added on which the joints of the sheets will rest.
A few words about installing the fasteners. Lay out the plywood sheet and adjust it the way it should lie. Next, mark the position of the joist (middle) and jumpers on it - then it will be easier to install the fasteners.
Plywood fasteners
You can attach plywood to the joists with nails or self-tapping screws. Self-tapping screws are not hardened (they break less often). The length of the fastener is not less than three times the thickness of the sheet. That is, for fastening plywood with a thickness of 12 mm, a length of 35 mm or more is suitable. The fastener installation step when laying plywood is 15 cm.
When laying plywood, do not forget about the gaps
The second layer of plywood is often fixed with glue. They usually use construction PVA, but any type that can be used to glue wood is suitable. “For reliability” they also add screws. To get into the logs when attaching the sheets of the second layer, the position of the supports is marked not only on the plywood, but also on the walls. But, even if the fasteners only connect sheets, this will be enough.
The rules for laying the second layer are the same: compensation gaps are needed. And the seams should not coincide with the seams of the bottom layer. They must be offset by at least 30 cm.
Video description
This video clearly shows the process of installing joists instead of the old floor that was removed:
The main thing to remember is that the seams between the sheets should run exactly in the middle above the joists so that their edges do not sag. We also must not forget that the thickness of the plywood for the floor along the joists depends on the frequency of laying the joists. Typically, plywood sheets with a thickness of 16-20 mm are used.
The only drawback of the method is that the floor on the joists “eats” about 10 centimeters from the height of the room, depending on the thickness of the joists and plywood. However, if it is installed in a large country house, such a loss will not be decisive. Therefore, to the question of what kind of plywood is best to lay on the floor in a house made of timber, the answer is unequivocal - as thick as possible.
Step-by-step instruction
To install a prefabricated screed yourself, you will need:
- Sheets of plywood of suitable thickness.
- Wooden logs.
- Lining material for leveling the base.
- Antiseptic primer.
- Hardware.
- Soundproofing and/or thermal insulation with components.
- Repair compounds for partial restoration of damaged foundations.
- Waterproofing.
- Damper tape.
- Silicone sealant or elastic wood putty.
- Tape measure, marking pencil, metal ruler or lath.
- Drill/screwdriver or hammer/nail gun (nailer) with accessories.
- Laser or water level.
- Spatulas, brushes, rollers.
- Construction vacuum cleaner.
- Cutting tools with accessories for wood and plywood (circular saw, jigsaw, etc.).
- Grinder machine.
The technology for installing prefabricated screeds is partially presented in SNiP 3.04.01–87 (SP 71.13330.2017) “Insulating and finishing coatings.” In accordance with the recommendations of these standards, installation is carried out in 4 stages.
Preparation
Any repair begins with cleaning the base from debris, dirt and dust. It is advisable to remove oil, bitumen and similar stains, traces of soot and soot from the surface.
No professional will begin work without partially repairing the damaged areas. Rotten, damaged elements of the wooden flooring must be replaced, and cracks and loose areas of the mineral base must be restored. To do this, you need to open up the cracks, remove dust and fill with repair compounds. If possible, it is better to clean off fragile sections, and smooth out the resulting pits using cement-sand, self-leveling and other quick-drying mixtures.
If necessary, the floor is waterproofed. It is needed if:
- it is necessary to protect the structure from residual moisture of the concrete base;
- there is a cold basement under the ceiling;
- the floor on joists is installed in the bathroom and the room located on the floor below should be protected from possible leaks.
To create waterproofing, the entire available range of materials is used: films, membranes, rolled adhesive products, coating compounds, painting agents, and the like.
In some cases, soundproofing of the base is required. According to the rules, the acoustic layer is laid between the base floor and the screed. Therefore, sound-absorbing mats are laid under the logs. If sound-insulating mineral wool (stone or glass) is used, then it must be laid in the openings between the joists, and the support rails themselves must be fixed using point acoustic pads.
Laying logs on acoustic pads.
It is advisable at this stage to treat the timber, bosses and other wooden structural elements with antiseptic impregnations.
Formation of a power frame
The frame of logs can be formed in the form of longitudinally located beams or as a single or double sheathing. Of course, the second option creates more reliable support for the plywood.
SNiP 3.04.01–87 (SP 71.13330.2017) recommends laying slats across the light flow, and in corridors and other rooms with a certain direction of foot traffic - perpendicular to the movement. Of course, in the future the frame will not be visible under the coating, but the essence of the advice is different. The developers of the building code determined that if the frame is formed across the most intensive movement of people, then the loads will be distributed over the majority of the supports of the load-bearing frame, and not among 2-3 elements. Or even worse - between them.
First of all, the zero mark is identified, relative to which the supports are aligned. Next, the beacons are mounted under the joists or the required level is stamped on the wall with thread and dye. But the most convenient way to construct a reference line is a laser level with a plane builder.
If sound insulation is required, before installing the supporting frame, it is necessary to lay acoustic material on the base: slabs, membranes, rolled products.
Now you can begin installing the logs, observing all the necessary gaps:
- Between the outer batten and the wall - at least 20 mm.
- Between adjacent supports - from 30 cm, but not more than 50 cm. We remind you: the higher the load on the floor, the more frequent the logs should be.
- Between the ends of one row – 0–0.5 cm.
For leveling, gaskets made of chipboard, OSB, MDF, etc. are installed under the frame elements. After checking with a level, the bosses or backing boards are attached to the base of the dowel - with nails, screws or anchors.
Plywood linings.
Joists on wooden bosses.
To drill holes for hardware in underlay components, joists and plywood, you should purchase feather or special wood drills with a countersink.
Many craftsmen recommend laying damper layers on firmly fixed supports. Such a preventive measure will prevent the structure from starting to creak in the future.
The penultimate step is to fix the joists over the entire area of the room using suitable hardware. Please note that a wide strip should be laid in doorways, which will protrude beyond the partition by 50–100 mm on each side.
For maximum leveling accuracy, you can use fastening and supporting hardware designed for adjustable floors. Essentially, these are powerful anchors that are installed in the floor slab. The adjusting nuts are screwed onto the main bolts, then the beam is placed and secured with a lock nut. The excess anchor rod is cut off with a grinder or a metal file.
If you plan to insulate the floor, then under the frame, in accordance with the manufacturer’s recommendations, you need to lay a vapor barrier. But after installing the logs, a suitable thermal insulation material is placed in the resulting “windows”: mineral wool, expanded clay, ecowool, linen or synthetic mats.
Laying plywood boards
The most controversial issue is the thickness and number of layers of plywood. There is no single correct opinion. It is clear that the higher the expected load on the floor (weight of furniture, intensity of foot traffic, etc.), the greater the thickness of the slabs should be and the smaller the distance between the joists. This will avoid sagging of the structure and its damage.
What type of flooring is best - single or multi-layer? There is no clear answer to this question. Each type has its own advantages and disadvantages. But the total thickness of the plywood flooring must remain constant - at least 18 mm.
Installation of slabs begins with their preparation. You should cut them to the required sizes, make cuts for communications or enclosing structures of complex shapes. Then a preliminary arrangement is carried out. The first row is laid out from the far corner along a solid wall.
If necessary, plywood sheets are adjusted, drilling points for hardware are marked with a distance from the edge of 2–3 cm and an interval between fastenings of 15–30 cm. An expansion joint of 0.4–1 cm must be maintained between the plates, as well as between the plates and the walls.
After one row of plywood is drilled and the sawdust is removed with a vacuum cleaner, the sheets are fixed with suitable fasteners. Experienced craftsmen recommend starting to screw in hardware from the center of the slab, gradually moving diagonally to the edges, and then along the perimeter. This approach will straighten the plywood and avoid waves. Do not forget that the hardware must be “recessed” into the plywood by at least 0.2 centimeters.
The second and subsequent rows are laid in compliance with the rule that the seams are offset by at least 1/3 of the length. If plywood is installed in two layers, then the joint areas of the first layer should not coincide with the seams of the second.
An alternative method is laying with self-tapping screws and polyurethane foam.
There is an alternative version of how to lay plywood on a wooden floor. This method is applicable if the old coating has sufficient strength, but the horizontal difference is too large.
The essence of the method is as follows: self-tapping screws are screwed into the old coating so that the ends of their heads are located exactly on the same plane. The distance between adjacent screws should not exceed 10-15 cm. The free space is filled with polyurethane foam. The result is a cushion on which plywood sheets are attached.
What does sheet thickness affect?
The sheets have different sizes. The choice of one material or another depends on the construction task assigned to the workers.
Size affects the following parameters:
- The thinner the plywood sheet, the worse the job of leveling the surface will be.
- If you choose thick sheets, you will not need additional thermal insulation materials.
- The thicker the veneer, the less deflection, and the rigidity of the structure, on the contrary, is greater. Thanks to this, it is possible to increase the interval between the lags of the subfloor, and the quality of the latter will not deteriorate as a result.
According to the standard, veneer sheets have a thickness of 4, 6, 10, 12, 15, 30, and 40 mm. This indicator affects the ease of installation in joists and its wear resistance.
The thickness of the sheets does not affect the height of the room in any way. Therefore, you should not be afraid of making a mistake with the size. Maximum plywood can raise the floor by 40 mm.
Useful tips
To understand how and what kind of plywood to lay on the floor , you can read brief tips on laying a subfloor:
- Plywood sheets should be laid offset, as in brickwork.
- When marking recesses and niches, the sheets need to be numbered and a diagram of their installation drawn up.
- More than 3 sheets of plywood should not be joined in one place.
- There should be a gap of 3-5 mm between the sheets, and 8-10 mm between the sheets and the wall.
- The thickness of the plywood sheets should be 2-3 times greater than the thickness of the final coating. Typically 16-20 mm is used.
- Self-tapping screws are selected at least 3 times the thickness of the plywood.
- The pitch between the screws should be approximately 15-20 cm.
- If thin plywood is available, you can lay the floor in 2 layers. In this case, the seams in the layers should be in different places.
- If logs are installed, the gap between them should be no more than 50-60 cm.
- The edges of the sheets must rest on the joist.
The result of high-quality work in compliance with technology Source pinimg.com
Pros and cons of choosing plywood
To the question: why is this particular material chosen to make an even coating indoors? The answer can only be given if you know its characteristics. The first positive quality is durability.
Compared to chipboard and USB boards, plywood will last much longer. The reason for this is the technology of its manufacture. Unlike other types of wood boards, plywood is glued with veneer, which gives it strength. Three types of adhesives are used for gluing veneer, two of them are moisture resistant, so plywood can withstand moisture for a long time without destruction or rotting.
When using this design, additional communications can be installed underneath it without resorting to cutting niches in the walls.
Plywood is stronger than other floor coverings and will last much longer
The negative nuance is that this material is the most expensive of the entire group of wood boards. But, the opinions of experts always agree on one thing: it is better to do it once and for a long time than to redo it due to the use of low-quality materials.
Briefly about the main thing
Laying plywood over an old wood floor is a great way to quickly and inexpensively prepare the flooring for laying linoleum, laminate or parquet. The plywood floor creates a flat surface for laying the final floor covering. There are 2 main ways of how and what kind of plywood to lay on the floor: laying directly on the old covering and laying on joists. The choice of method primarily depends on the condition of the old floor covering. Regardless of the chosen method, when laying it is necessary to comply with technological requirements: leave damping gaps, arrange the sheets in a checkerboard pattern, use high-quality materials. If all requirements are met, flooring laid on a plywood subfloor will last for many years.
Key characteristics of plywood
When planning the finishing of a subfloor, you should take into account not only the thickness, moisture-repellent qualities and strength of plywood, but also its grade.
Based on the number of existing defects per 1 m2 of slab, there are 5 quality levels:
- E is a standard of quality, characterized by the absence of any damage to the surface of the slab.
- Grade 1 – sheets of good quality with minor defects no longer than 18 mm.
- Grade 2 – on this plywood, minor glue leaks and microcracks up to 20 mm may be visible. Often, such plywood is purchased for laying laminate flooring (for more details: “What is the optimal thickness of plywood for laminate flooring”).
- Grade 3 – less than 10 small knotty defects up to 5 mm in size can be detected on one square meter.
- Grade 4 is a poor quality material that can be used in extreme cases, for example, for subsequent laying of laminate flooring.
The rough flooring can be made using sanded or unsanded plywood. According to this parameter, such slabs can be divided into the following types:
- Ш1 – plywood with one-sided grinding;
- Ш2 – plywood with double-sided sanding;
- NS – without polishing.
Most often, the preparation of the subfloor for laminate is carried out using NSh and Sh1 plywood. Due to the fact that an additional substrate is laid under the laminate, the roughness of the material can be neglected.
Installation of plywood covering
It can be broken down into the following stages.
- Cutting the material. Before it starts, measurements and calculations are carried out. Sawing of sheets should be carried out in such a way that the result is as few joints as possible. In addition, the dimensions of the elements are calculated taking into account clearances for the damper. Between adjacent sheets they should be 3-4 mm; between the outer elements and wall surfaces the distance increases to 8-10 mm. Damper joints are needed so that the plywood sheets do not swell under the influence of external conditions when the wood expands. Cutting should be carried out exclusively on a rigid and level base. For large floor areas, the recommended element sizes are 500x500 or 600x600 mm.
- The blanks are inspected. If the ends become delaminated when using a jigsaw, they should be sanded.
- The resulting elements are numbered in accordance with the intended layout. On the basis, a layout diagram of the workpieces is outlined.
The laying process itself has a number of subtleties that should be taken into account when laying elements.
In some cases, plywood underlayment is required on a wood floor. It is almost always placed if the room being renovated is located on the ground floor. Individual strips are fixed with construction tape. Holes for self-tapping screws must be marked and drilled before laying plywood sheets. At the exit from the workpiece, they are countersunk to fit the caps, for which a drill of a slightly larger diameter is used
Please note: the fastener heads must be recessed into the material so that they are flush with its surface. If they go a little deeper, the depression needs to be leveled, for which construction plaster can be used. First of all, plywood is laid in niches and any kind of protrusions.
Then installation is carried out from the center to the edges. Ventilation vents do not close.
At the end of installation, the smoothness of the resulting surface is checked with a level. As a final touch, it is scraped.
Preparing the base according to the first option
In any log house, the floors are laid on logs: wooden beams laid at the stage of erecting the first crown of walls.
- Subsequently, a rough floor is placed on these supports. Substandard boards are used for it.
- When installing thermal insulation, slats are placed on the first layer of the base in increments of 40-50 cm (based on the dimensions of the insulation).
- This structure is covered with a waterproofing sheet without tension.
- In the spaces between the slats, mats (rolls) of mineral or basalt wool are placed loosely. In some cases, bulk materials are used, for example, expanded clay. It serves as excellent sound insulation.
- A vapor barrier material is placed on top of the constructed structure and lightly pinned to the slats.
After this, plywood is laid down to finally level the floors. This base for laminate flooring is durable and reliable, and has additional comfort conditions.
Floor unevenness
Plywood can compensate for any imperfections in the base. It successfully copes with small dents of the subfloor; it also successfully solves the problem of excessive slope, the presence of surface differences, and a concave or curved floor plane.
For large differences in height, a subsystem of wooden blocks is used to level the floor plane to the required parameters; on bases with minor flaws, a layer of plywood is simply laid on the floor and serves as a leveling coating.
All options require the correct selection of material that can perform its functions in the required mode, not sag during movement and not create noise.
Stage 5. Format the sheets
Standard plywood sheets, as a rule, have dimensions of 125x125 cm. Here is an example of their installation:
However, many experienced craftsmen consider it necessary to cut them into four more parts to get squares with a side of 60 cm
These are not only more convenient to work with, but they end up with much more damping joints at the joints, and this is important for compensating for moisture and thermal deformations. And the sheets themselves will be much stronger, because they are now less susceptible to deformation
But after cutting the plywood, it is important to pay attention to the ends of the workpieces - there should be no delamination in them. If there are any, then just change them, the floor will turn out to be of poor quality
If you lay plywood in two layers, then divide the future thickness of the flooring by two:
Keep the plywood sheets for several days in the room where you will lay them. Just lay them on top of each other to avoid deformation; even better, place them on edge if the sheets themselves are not too thin. This is necessary to acclimatize the sheets, but if you make a plywood floor right away, without such preparation, then the laminate laid on top will go in “waves”: the sheets will simply pick up moisture from the air, like everything that is in such a room, and this will happen natural expansion. The plywood base will swell and the laminate will begin to lift in places, breaking the fragile locks. Needless to say, the finishing coating itself will not last long under such circumstances either.
And it is also important how different the humidity and temperature were in the warehouse. So, if the difference is small or the conditions are the same, it is enough to leave the plywood in the room overnight; if the difference is from 2 to 8 degrees, it’s about three days, and if it’s larger, it’s a whole week.
What screws should I use for plywood? What else do you need to know when installing plywood?
It is worth noting that the above-mentioned works are not the final preparatory activities. Initially, you should determine the presence of differences in the level of the base: are there any dips, bends. Then carry out the alignment. If there are differences of more than 1 cm, then it is necessary to lay additional logs of small thickness.
It is also necessary to carry out an additional preparation of the base, which consists of sanding, priming and fixing the boards, if necessary. In the process of cutting the material, it is worth considering the fact that there must be a gap between the walls and the floor elements. If the latter is missing, then the base will “rise” and the plywood will have to be dismantled.
Stages of work:
- if there is a deformation of more than 1 cm, then it is necessary to install an additional frame throughout the entire volume of the room. Also, logs made of multilayer plywood should be attached to it. The width should not exceed 30 cm;
- Laying of sheets of material is carried out with exact correspondence of the joints to the middle of each log. A thin-layer heat-insulating material is placed above the latter;
- if there is no difference, then installation can be carried out on a substrate. The latter is spread close to the walls. There is no need to fix it;
- Screw in connecting elements along the edges and diagonals in increments of 20 cm.
When installing plywood, it is necessary to take into account the screw caps. They should be as “recessed” as possible. Regarding the connecting elements, it is necessary to take into account some nuances. Let's look at them in more detail.
Why plywood
This material is distinguished by wide functionality and many advantages. The latter are represented by the following aspects:
- reasonable cost;
- To install plywood, you do not need to use large-sized construction equipment and use the services of professionals. Even a beginner can install the sheets;
- plywood sheets have a pleasant appearance due to which you can always create an unsurpassed design solution;
- plywood is lightweight, which is extremely convenient for processing and further work.
Plywood also belongs to the class of materials that are most resistant to moisture and other environmental influences. Therefore, the material is most often preferred by both professionals and beginners.
Method for measuring the moisture content of concrete screed
For measurements, you will need a piece of film 1 m wide. It needs to be spread over the concrete, the edges pressed down with something heavy, but so that the center is free. Let the structure stand untouched for several days.
After this, the film can be removed and its surface inspected. If it is dry, then the screed is ready for further work. And if moisture has accumulated on the film, you need to give the screed more time to dry completely.
Plywood marking for formaldehyde content
Classification of plywood according to this criterion is carried out based on the concentration of formaldehyde per 100 g of dry material.
There are two types of plywood available:
- E1 – for every 100 g of such plywood there is 10 mg of formaldehyde;
- E2 - the formaldehyde content per 100 g of material ranges from 10-30 mg.
The most popular type of plywood for interior work is E1.