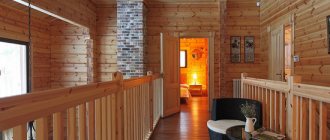
A wooden house is a safe and environmentally friendly home with a special cozy atmosphere. Wood retains heat perfectly, fills the house with a pleasant forest aroma, and is highly durable and durable. This is an aesthetic and attractive material that will harmoniously fit into the landscape and allow you to create any design.
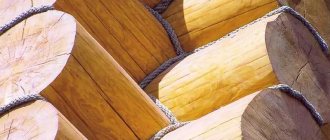
However, wood has a number of disadvantages, including susceptibility to the negative effects of moisture, torsion and drying out, and shrinkage. As a result, cracks appear on the log and timber, as well as between materials.
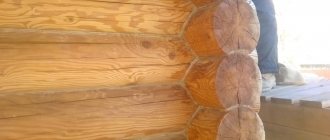
Cracks and crevices in a wooden house
As the house shrinks and due to strong temperature changes, lack of proper insulation and waterproofing, cracks appear on wooden materials and between them. To avoid this, it is important to treat the wood during construction.
Logs and beams are coated with antiseptics after the manufacture of lumber, during the assembly of the log house and during the final finishing work. In the future, a wooden house also requires maintenance. Protective treatment is carried out every 3-6 years, depending on the type and quality of antiseptics.
In this case, it is very important to carry out competent and reliable insulation of a wooden house, as it protects the timber and logs from severe cracking. In addition, you need to choose products with good drying.
The craftsmen of the construction company “MariSrub” independently produce beams and logs and carefully monitor each stage of production. We use safe and high-quality chamber drying, which prevents wood from cracking. Be sure to treat lumber with protective compounds!
If cracks and cracks appear, the defects must be eliminated. They reduce the thermal insulation properties of the house, as a result the walls or floor will be blown through, and drafts will appear in the room. In addition, cracks greatly spoil the aesthetic appearance of the house. In the future, the cracks grow and aggravate these problems, negatively affecting the condition of the lumber. Therefore, it is important to eliminate defects in a timely and correct manner.
What materials and tools will be required?
To carry out independent work on replacing wooden elements of a structure, you need to prepare certain tools and materials :
jacks (at least 4 pieces) to raise the house;- saw, hacksaw;
- nails (screws);
- Bulgarian;
- sledgehammer, crowbar, axe, hammer, screwdriver;
- electric drill;
- dowels;
- chisel, plane;
- hammer drill (if the house needs to be raised);
- bitumen mastic;
- metal pins with a diameter of 14 mm;
- logs similar in diameter to the old ones;
- brick (when replacing the lower crown, to raise the foundation);
- tow, moss, jute;
- lumber racks 10x10 (or edged board 5x10);
- tape measure, level, ruler.
Advice . When choosing a log to replace the old one, you need to check its moisture content. The maximum rate should not exceed 20%.
Types of cracks
Longitudinal cracks and cracks form on a beam or log, since the tree has a fibrous structure. But in rare cases, longitudinal defects also form due to overload or wood rotting. With this problem, the affected areas need to be replaced. Longitudinal cracks can be eliminated independently using easy methods.
Longitudinal cracks in structure and direction are of the following types:
- Straight lines coincide with the axis of a log or timber;
- Spiral or uneven are not aligned with the axis;
- Segmental - uneven defects with a fiber transition.
You can seal gaps and cracks using polyurethane foam, tow and moss, putty or sealant, or homemade compounds, regardless of the type of defect. Note that it is better not to use polyurethane foam and silicone for a wooden house, since synthetic products violate the environmental friendliness and safety of wood. After such treatment, the log or timber will not be able to “breathe”. In addition, such compositions often emit a harmful, toxic odor. Let's take a closer look at how and how to seal cracks in a wooden house.
Possible reasons for replacement
The lower crowns rot due to a number of reasons:
- moisture that gets from the soil onto the logs if the foundation is low. Moisture appears due to high groundwater, precipitation, untimely removal of snow from the blind area and its melting. Moisture gets into the soil and the frame of the building;
- poor waterproofing between the foundation and the lower crown;
- lack of ventilation in the basement and underground;
- lack of antiseptic wood treatment. As a result, insects appear in it: ants and bark beetles, which damage the tree, as well as microbes that cause putrefactive processes.
Source
How to seal cracks with caulk
Caulking effectively insulates the house and closes the resulting cracks, reliably blocking the access of cold to the room. Moss and tow are traditional materials for insulating a wooden house and for sealing cracks, which are environmentally friendly and safe. They will not disturb the naturalness of the wood and the aesthetics of the structure.
Before use, take wet moss and dry it completely, and then soak it in water half an hour before starting work. Then the water is drained, the moss is squeezed out and rolled into rolls. The rollers are placed in the crown joints, crevices and cracks, compacted with a hammer or mallet and left to dry for three days. After drying, excess material is trimmed.
Instead of moss, you can use tow or jute fiber, which is placed in joints and cracks. Tow, if desired, is filled with plaster or cement or left in its pure form. The quality of the caulk can be checked with a nail, knife or sharp awl. The product is stuck between logs or beams. It shouldn't go right through! Read more about caulking a wooden house here.
How to seal cracks with sealant
Eliminating cracks and cracks using sealing is the most common method due to its accessibility and ease of installation. Sealants firmly connect the walls of the wood gap. To prevent the product from getting onto the surface of the wood, cover the edges of the crack with masking tape. Then a strand of tow or jute or fabric for compaction is placed in the cracks and inter-crown joints. And the sealant is applied on top using a spatula or a gun.
When applying sealant, seams, joints and cracks are not completely filled to the brim. The composition is applied so that it comes into contact at two points of the tree and connects two opposite edges. The sealant is left for at least six hours, and after hardening, the sealed cracks are painted over to obtain a more aesthetic appearance.
If the product does get on the clean surface of a log or beam during work, remove it with fine sandpaper after drying. The masters of the MariSrub company efficiently and quickly seal a wooden house, which ensures reliable hydro- and thermal insulation, and also prevents the wood from drying out and the appearance of cracks or crevices.
The most optimal solution for a wooden house is acrylic sealant. This is an environmentally friendly and safe product without odor. It is not afraid of temperature changes and dampness, reliably fastens the walls of wood and eliminates cracks or crevices. Silicone sealant cannot be used for a wooden house due to its harmful composition. In addition, such material cannot be painted, and it will ruin the appearance of the wood. The most popular brands are Neomid and Eurotex, made in Russia.
Read also: How to make pomegranate juice in a blender
How to putty cracks
You can repair defects using ready-made wood putty, which is resistant to cold and dampness. It dries quickly and lasts a long time. For minor cracks, choose a thick, water-based product as it will adhere well to the wood. For deep defects - liquid compositions containing solvents. Today you will find a wide selection of putty.
Acrylic is the safest, odorless and colorless product, which is suitable for cracks up to 2 mm deep. It preserves the natural texture and shade of wood, is easy to apply and dries quickly. Acrylic putty levels the surface and does not allow moisture to pass through. For interior work, gypsum composition is also used. This is a flexible material with easy application. It maintains a comfortable microclimate and is absolutely safe for a wooden house.
Waterproof putty is suitable for sealing cracks on the outside of a log house, as it is highly resistant to moisture and dampness, precipitation and temperature changes. The composition is made in the form of a paste based on glue, oils or polymers. The polymer product masks cracks, seams, joints and is suitable for finishing. Adhesive putty is easy to apply to wood and is highly durable. An oil base is used when planning to further coat the wood with oil, paint or varnish.
If deep cracks and chips appear in a wooden house, choose non-shrink putty. This is a high-quality, reliable, strong and durable composition that is perfect for log houses. You can easily match the color of the product to the color of the wood. The most popular are putties from Tikkurila, Eurotex and Extra.
Dovetail
A type of tenon joint is the so-called “dovetail”. These are one of the most airtight, “warm”, and therefore popular locks for timber. True, it is also the most labor-intensive. In this case, both the tenon and the groove are shaped like a trapezoid, expanding outward. When docked, they form a strong, reliable unit that successfully withstands even the heaviest loads. By the way, dovetail technology is actively used in the furniture industry, in particular, in the assembly of drawers, which bear a high operational load.
Other methods of sealing cracks
- Instead of buying putty, you can make the putty yourself. To do this, mix PVA glue and sawdust until thick and use a spatula to fill the cracks with the mixture;
- To seal wide cracks, use a wood chip the same length as the defect. The piece of wood is sharpened with a wedge and the crack is hammered in; the top is secured with putty or homemade putty;
- Arbogypsum is another product that is used to seal cracks in a wooden house. It contains dry gypsum and crushed bark or sawdust in a ratio of 1:3. The result is a strong and reliable composition, which is diluted with water in the volume of half the gypsum taken. The elastic and dense mass is mixed until smooth and lumps dissolve. For greater plasticity and elasticity, you can add a little shampoo to the product. Seal the cracks with freshly prepared mixture, as it hardens quickly.
Whatever method you choose, before work you need to thoroughly clean the timber or log walls, and also clean the cracks from debris and dust. It is better to repair defects in above-zero temperatures, in dry weather and on dry wood. After caulking with moss, the walls are left to dry for three days; when working with other materials, for at least six hours.
What the appearance of a wooden house will be, first of all, depends on its decoration. Many owners of wooden buildings prefer to sheathe the house with a variety of finishing materials, which at the same time decorate, insulate and protect wooden walls from adverse factors. However, the cladding of a log house has some difficulties, the reason for which is the corner joints of the log house. The corners interfere with the installation of the sheathing, without which it is impossible to frame the house. Finishing the corners of a wooden house outside and inside the room causes the greatest difficulty when carrying out finishing work. How to properly finish corner joints, and how to sheathe corners without damaging the wooden structure? We will talk about this in the article.
Stages of work before finishing the corners of the log house
The finishing of the corners of the log house, as well as the entire house, begins after the initial shrinkage process, about a year after construction.
Directly finishing the corners inside and outside a wooden house can be done after performing the following work:
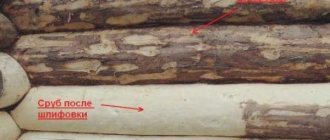
Grinding
Sanding a log house is designed to strip the logs of bark, remove small cracks, remove blue stains and prepare the house for protective treatment, which should be done on the ends and joints of the log house immediately after sanding.
Grinding corners is usually done manually with a chisel, since no tool is capable of sanding corner joints as well as can be done by hand.
Treatment with protective agents
If the treatment is carried out with a product that combines all types of protection, one layer is applied. If three different compositions are purchased, it is necessary to treat the wood in the following sequence: moisture protective, biological agent and fire retardant. Each layer is applied with your own tool and only after the previous one has completely dried.
Insulation
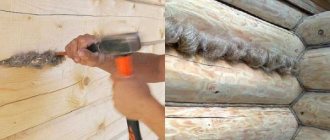
Corner joints are the most unprotected place in a log house, through which cold penetrates into the house. To avoid heat loss, the corners must be carefully caulked.
Typically, the corners of a log house, as well as the entire house, are caulked with natural materials: tow, jute, linen. Instead of caulking, you can use a modern insulation method - sealing the seams with sealant.
If in the future it is planned to cover the outside of a house made of timber with clapboard, siding or other material, you can adopt the following insulation method: the corner is completely covered with foil, the shiny side out, the foil can also be secured with a furniture stapler.
The appearance of the corners is not very presentable, but this does not matter, because the top of the house will be covered with decorative cladding, which will completely hide the insulation.
Other possible options for insulating external corners:
- basalt insulation;
- fiberglass;
- polystyrene foam;
- foamed polyethylene.
Features of finishing external corners
Regardless of what kind of lumber, timber or logs the house is made of, there are two main ways to connect corners:
- “into the bowl”, after the junction there is a certain piece of log;
- “in the paw”, beams or logs are cut without leaving any residue.
Exterior finishing of corners, chopped “into the paw”
When using this method of cutting corners, a very beautiful form of joint is obtained, which can be decorated in an original way, for example, by painting different elements of the log with contrasting colors.
With a corner connection without any residue, insulation becomes of particular importance, since in this option, the corner remains unprotected and, in the absence of good insulation, allows the cold to pass through.
Typically, this method of cutting a log house is used if the cladding of the log house is planned in the future. Closed corners, chopped without leaving any residue, become warmer and more airtight.
Read also Crafts from tangerine peel
However, if you cladding a log house that has not undergone complete shrinkage, the cladding may become deformed. At the same time, corners should not be left open for a long time. The ends of logs can crack under the influence of precipitation and sunlight.
You can cover the pre-caulked corners with a regular board. If you fix the board rigidly, then when the log house settles, the logs may hang and cracks may appear. To avoid this, it is necessary to make a vertical slot 2 cm long in the board and, when screwing it to the corner joint, screw a self-tapping screw into the highest point of the slot.
A board nailed in this way will not interfere with the natural shrinkage of the house. If over time the length of the slot turns out to be insufficient, you can unscrew the screw and screw it again to the top point.
After the shrinkage processes are completed, the corners can be sheathed with clapboard or siding. Cladding corner joints chopped into a paw does not cause any particular difficulty, since the corner is cut without leaving any residue, it will not interfere with making the sheathing in the usual way.
Covering external corners, chopped “into a bowl”
In another way, this angle is called “warm”, and this is no coincidence. With this type of cutting, the corners allow less cold to pass through, making the house warmer. But from the outside of the building, the logs protrude outward; often the ends are of unequal length, which does not allow the frame to be installed correctly. The question arises: how to sheathe the corners of a log house in this case?
In some sources you can find advice: gradually cut down the protruding structural elements, and fasten them with staples to strengthen them. However, as a result of sawing off the ends, which are elements of the supporting structure and give strength to the house, the building may lose stability and weaken.
If pins were not installed during construction, then for a weakened structure, even the slightest effort is fraught with destruction. Therefore, you should think carefully before making such a decision.
The cladding of a log house must be done in such a way as to keep all corners intact. When installing the sheathing, it is necessary that the distance from the wall of the house corresponds to the length of the protruding elements.
If the ends are of different lengths, they are filed so that they form an even line. It is quite possible that in this case the frame will recede greatly from the wall, then the dimensions will have to be equalized using thick bars with a section of 50x50 mm.
You can use an alternative option, which involves mounting the frame separately for the wall and separately for the corner. In this case, the corner frame is an independent structural element and is made in four planes. The presence of additional corner elements will increase the consumption of material, but in its finished form such a structure looks very impressive.
On a strip foundation
The work is more complicated because it requires partial destruction of the foundation and cutting out niches for jacks. Niches are cut into the rotten crowns, affecting the floor and part of the foundation. This installation is necessary so that the jack can move up and down freely.
An alternative option can be used: a lever system. As a lever, you can take a hardwood log or a metal channel number 10-12.
- A niche is made in the upper log of the lower crown for a channel or rail. To do this, wood is selected at a distance of 1-1.5 m from each corner.
- The channel is inserted into the niche.
- The corner of the house is raised with a jack.
- Wooden wedges are driven between the foundation and the channel.
- When the lower log is free from load, it is removed.
- The wedges are knocked out, the jack is lowered, and the channel is removed.
- Temporary supports are installed.
- The upper logs of the lower crown are removed.
- Again they take the channel, hammer in the wedges and raise the house.
- The temporary supports are removed, the logs are replaced, the wedges are removed, and the frame is placed on new crowns.
Finishing corners from inside the house
Finishing the internal, as well as external corners of the log house, begins with the obligatory grinding and caulking of the joints. Often, especially if the corners are cut “into a bowl,” they look very beautiful, and you don’t want to hide them under the trim, but on the contrary, you want to emphasize their beauty.
To highlight the smooth outlines of the lines, it is enough to place a jute or linen rope on top of the caulk. Internal corners connected in a claw fashion do not look as impressive, but they can also be beautifully decorated with decorative rope. For the same purpose, you can use contrasting paints, covering the joints and ends of the logs with them.
If there are wide gaps at the corner joints of the logs that are unlikely to be closed with rope, you can decorate the corner using two edged polished boards. They need to be tightly connected to each other so that there are no gaps and an even vertical angle is obtained.
You can also cover the corner joint with a single board installed vertically at a 45-degree angle to both walls. But such finishing is used much less frequently.
As for finishing the internal corners of a log house, it is not particularly difficult. A house made of timber has flat walls with even corners, which can be sheathed with any material: clapboard, block house, imitation timber.
If you want your wooden house to be warm, cozy and beautiful, trust its finishing. There are no impossible tasks for our specialists; we can easily cope with the most complex finishing and implement any interior solutions.
Our company employs not only experienced craftsmen, but also qualified designers who will offer you various design options for decorating your home.
You can contact us by phone or send us a message. You will find all our coordinates in the “Contacts” section.
Calculate the cost of painting and insulating your home right now
Environmentally friendly wood has long been considered an excellent material for building a house. Huts or log cabins built from wood are good because you can breathe easily in them. In summer, such buildings do not heat up much like brick or stone houses, and it is comfortable to stay in them even in the heat, and in frosty winters, wooden walls retain heat well, preventing cold from entering the room. For these reasons, many people prefer to build their dachas and country houses from wood.
Diagram of the sequence of internal work to seal cracks in a log.
However, along with the above advantages, wood also has many disadvantages. Thus, under the influence of natural factors it is subject to deformation and damage. Moisture causes wood logs to swell, and in dry weather they dry out. All this leads to the fact that cracks begin to appear between the crowns of the log house, through which winds and cold can penetrate into the house, and rain and dampness are the causes of rotting of the wood and its gradual destruction. But these processes can be prevented if the log house is insulated in a timely manner and the joints of the logs are sealed. The salvation of a home is high-quality sealing of the seams between the crowns. What materials are best to use for sealing walls and how to properly seal seams in a wooden house?
Nageli
A dowel (translated from German as “nail”) is a fastening element used to hold beams together.
It can be made of wood or metal. In the first case, holes three crowns deep are drilled in the timber wall every 30-40 cm and rods made of wood denser than the log material are inserted into them. For maximum strength, the channels must be alternated in a checkerboard pattern. In the case of metal dowels, work is carried out according to a similar scheme. Fastening elements are made from pipe (reinforcing bars are not recommended). Unfortunately, when the log house dries out, the crowns can hang on the non-drying metal dowels
Is it worth caulking a wooden house?
The most famous inter-crown insulation materials are considered to be moss, hemp and tow. The advantages of these natural materials are resistance to temperature fluctuations, bactericidal and mold fungi, low thermal conductivity, and good moisture absorption. But fewer and fewer people who build log houses use these materials to seal seams in a wooden house. Why has the demand for moss, tow and hemp decreased so much?
Read also Table of milk density depending on temperature
Diagram of the sequence of work with sealant for sealing cracks in a log.
The process of caulking cracks and spaces between the crowns is quite labor-intensive and lengthy, because you need to carefully and evenly plug them with natural materials using a chisel. The walls cannot be caulked immediately after the construction of the log house, since its shrinkage will take at least a year, and during this time moisture can already begin its destructive work. The disadvantage of caulking tow and moss is the fact that this process will need to be repeated more than once. The thing is that birds love to “steal” materials from people to build nests. By pulling moss and tow out of cracks and joints, they violate the integrity of the seal and give the wooden frame a sloppy, disheveled look. Winds also worsen the appearance of walls. As for material such as hemp, it is susceptible to attacks by moths, which, through their activity, harm the seal.
Knowing these shortcomings of natural insulation, manufacturers of building materials produce more advanced sealants to improve the quality of insulation of all cracks and seams of a wooden house. What are the benefits of modern wall insulation?
How to insulate walls with tape tow and linen rope?
One of the improved sealants is natural tow in rolls. It is made from flax, which is first well combed on carding machines, then the fibers are polarized and turned into a 15 cm wide ribbon. Next, the fibers are cleaned of various impurities. The result is an excellent noise and heat insulating material with good waterproof properties.
Unlike ordinary tow, tape tow is easier and more densely placed between joints; although it is soft, it is not so brittle.
Diagram of the sequence of external work to seal cracks in a log.
Thanks to the naturalness of the material, the walls of the log house breathe well and do not rot. Tape tow seams are more durable and are not easily pulled out of cracks by birds. Lay the rolled material, as usual, along the crowns and along their edges using a chisel or a special caulk spatula, carefully tucking the edges of the tape inside each seam and crack. The result is a reliable seal between the logs, and the appearance of the log house is quite attractive.
A house insulated with linen rope looks even more beautiful. This sealing of seams is called rope sealing. Three-strand flax rope is used as insulation, which is secured to the seam using staples or nails. To work on sealing a log house, you need the following materials and tools:
- tape measure or ruler;
- scissors;
- linen rope;
- hammer;
- short nails;
- metal staples;
- brush;
- wood impregnation.
The purchased linen rope is placed along the line of the inter-beam seam and every 15 cm, after pulling it well, a bracket or nail with a small head is driven into the beam. At the corners of a wooden house, the distance between fasteners may be smaller. To make the rope sealing of seams look aesthetically pleasing, when driving in nails or staples, perform the following action: first, open the strand of rope a little, then hammer in the fasteners, tuck the rope itself to the wall of the log house and tighten it. The strand is closed, and the staple or nail head is hidden underneath from prying eyes.
When sealing the seams with natural linen rope is completed, care should be taken to ensure its preservation for a long time. To do this, you need to take a protective impregnation for wood and carefully treat all the rope edges with it. You can perform this procedure by impregnating the log walls themselves at the same time. Despite the fact that the process of sealing all the seams of a wooden house is quite long, it is simple and can be done without the help of other people. Rope insulation of seams in a wooden house is highly reliable, perfectly protects the log house from moisture and gives the structure an unusual but attractive appearance.
Replacing a log house on a columnar (pile) foundation
This is a simpler option because it does not require demolition of the foundation. The distance between piles or foundation columns is usually sufficient for installing jacks. To prevent deformation of the log house and its sliding off the posts, it is advisable to lift the house simultaneously from all four corners of a simple rectangular log house. Only in extreme cases is it possible to lift only one side of the house.
The jacks are placed under the top log of the frame. A support is placed under the jack to prevent it from sinking into the ground (a wooden panel of at least 500x500 mm). The jack rod should not rest directly on the log, but should have a metal gasket-plate. After lifting with jacks, the lower beam of the dressing is freed from the load and can be replaced. Temporary supports made of logs or bricks are installed on it and jacks are lowered.
At the same time as the jacks, the upper logs of the frame will also be lowered. They are also replaced and immediately jacked up. After this, the temporary supports are removed from the lower logs of the dressing and the jacks are lowered. The log house falls into place.
How to seal seams using acrylic sealants?
The “warm joint” method of sealing cracks and joints is also growing in popularity; sealants based on acrylic resin are used for it. These insulation materials withstand the effects of all factors that cause harm to a wooden house. The advantage of acrylic sealants is their elasticity, which allows the material to compress and expand depending on the situation. Due to the flexibility of the sealant, insulation of a wooden house is carried out only once, because the service life of the material is very long. The beautiful color of the sealant (beige or cream) will harmonize perfectly with the wood of the log house. To work on sealing cracks and seams you will need to purchase and prepare:
- acrylic sealant;
- stapler with staples;
- mounting gun;
- polyurethane sealing cord;
- scissors;
- roulette;
- putty knife;
- water spray;
- clean soft cloth.
If you plan to insulate the seams of the logs of a wooden house, which were previously caulked with moss or tow, then you will first need to remove all the old caulking. Next, you will need to lay a polyurethane cord in each horizontal and vertical seam to a depth of 5 mm in its center. It is needed in order to reduce the consumption of sealant and make its application more accurate. The cord is laid along the seam line and secured between the logs using staplers every 12-15 cm. After this, the seams are sealed with a mounting gun filled with acrylic sealant. Acrylic is carefully applied to the seam along its entire length. The seam can then be smoothed using a spatula. For convenience, the seam is moistened with water from a spray bottle. If sealant gets on the top and bottom of the logs, it can be easily removed from them with a damp cloth. The result is a neat and beautiful seam. Sealing the seams with rolled tow, rope cord or acrylic sealants will guarantee that a wooden house will delight its owners with warmth, reliability and a beautiful appearance.
Scheme for replacing a section of log
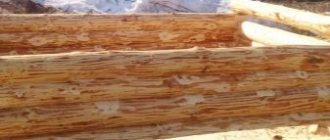
First, the affected area of the wood is determined. It is visually difficult to understand how widespread the rot has become. To accurately determine the damage, use either a chisel, which is used to punch a log from the side of the visible area of the damage, or a feather drill for wood, which is used to drill holes using an electric drill.
The condition of the wood is determined by the condition and color of the chips. Having decided on the area to be replaced, they retreat 200 mm to the sides from its boundaries, and using a chain saw or electric saw, a section of the lower crown is cut out. After this, waterproofing is laid on the foundation in two layers.
Replacing a crown part. 1. Damaged area. 2. A cut area with a margin of at least 10 cm from the identified damage. 3. Liner
In the unaffected areas of the lower crown, notches are cut out with a saw for more reliable fixation of the insert element. The lower part of the second crown is treated with an antiseptic. An insert is cut from a log of the appropriate diameter; its length should be 10–20 mm shorter than the cut section.