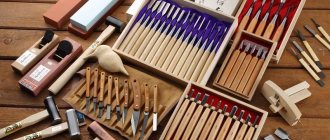
All photos from the article
Experienced craftsmen can use even the simplest folding knives with a wooden handle to make various decorative crafts. However, a beginner should use a specialized tool for carving that will allow him to perform all basic operations without additional effort.
In our article we will tell you which knives can be used to process wood, and also provide recommendations for making and sharpening such tools yourself.
With the help of the simplest blade you can create real masterpieces
Description and types of instruments
Knives for wood carving can have a variety of shapes. As a rule, they differ from ordinary knives in having a shorter blade. This design feature is explained quite simply: when threading, the tip experiences a fairly strong load, and therefore the shorter the metal part, the less the risk of it breaking under pressure.
Typical carving tool
Depending on the type of design, there are several types of cutting knives.
| View | Peculiarities |
| Cutter | A universal knife that is used both for giving the main shape and for making small parts. The design usually features an elongated blade with a straight or curved cutting edge. The types of cutters are:
|
| Jamb | Structurally, a knife-jamb for wood carving follows the design of a cutter, however, it is characterized by a larger bevel angle of the blade. Due to this, the jamb can be subjected to heavy loads, which is actively used when carving on flat surfaces. At the same time, the technique of some craftsmen involves using a joint as the main knife due to a fairly long cutting edge. |
| Auxiliary tool | When performing carving, in addition to knives, craftsmen also use other cutting tools, such as:
In fact, all of them are not knives, but have a cutting edge. |
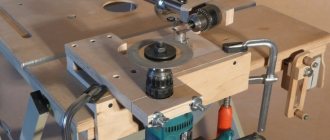
Profile knives for wood cutters
In addition, other tools used in mechanical woodworking are sometimes included in the classification.
These include:
- Wood milling knives are either whole cutters or removable parts of cutters.
- Planing knives for a wood lathe - used for machining elongated parts.
- Planing blades are used, as the name implies, in planing machines.
Replacement knives for wood routers used for making products of different shapes
However, these and other types of parts for carving are used only as auxiliary ones, so we will not dwell on their description in detail.
Making a knife
Making a blade
When choosing a cutting knife, you should give preference to simple and reliable models made of high-quality steel. However, the price of such products is quite high, so beginners most often purchase cheaper models, and therefore are inevitably disappointed in the quality of the cutters.
Simple Bogorodsk knife made of tool steel
The solution in such a situation may be to make a knife with your own hands. This task is solved quite simply, so even a beginner in plumbing can quickly acquire his own tool.
First of all, we need to find a suitable material. This is not difficult since we need a fairly small piece of good steel.
The following can be used as a blank for a future knife:
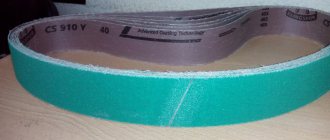
- A strip of good steel is about 8 - 12 cm long, up to 2.5 cm wide and 1.5 - 2.2 mm thick. The brand does not play a special role, as long as the material is strong enough and holds an edge well - R6 / R6M5, and R9, and even R3AM3F2 will do.
Saw blades with markings
- Mechanical saw blade made of hardened metal. It is better to choose the same dimensions as in the previous case - this way we will save energy on roughing.
Note! Despite the fact that, compared to a saw, the knife will be subjected to significantly less stress, you should not use rusty blades or parts with cracks (even shallow ones).
Drawing of the jamb with main dimensions
The work process itself looks like this:
- First, we make a drawing of a jamb knife for wood carving, determining the shape of the shank, the length of the blade and the bevel of the cutting part.
Note! For cutters, the bevel ranges from 15 to 450, for jambs - up to 60 -700.
- Next, we cut the workpiece to the required size, making the blade from 30 to 90 mm long and leaving a shank sufficient to secure it in the handle.
- We form the blade by cutting the front edge of the workpiece at the desired angle.
- We perform rough sharpening, making the cutting edge.
- Several holes can be drilled in the shank, which will be used for fixing in the handle.
Photos of blanks
After this, we wrap the cutting part with electrical tape so as not to cut ourselves during further operations, and proceed to making the handle.
Making a handle
The knife handle is made from linden, birch or similar wood.
The main thing is that the material absorbs moisture well - then the knife will not slip out of a hand that is sweaty from exertion.
- We take a block with a diameter of about 40 mm and a length of 200-250 mm.
- We cut out the handle of the shape we need from the workpiece, thinning the rear edge of the part.
Note! We can limit ourselves to rough processing, since then we will still be “finishing” the surface of the wood.
- Carefully split the workpiece along the fibers.
- We place the shank of the knife on one of the resulting planes, and then trace it along the contour.
Making a handle for a cutter
- We select a recess in the workpiece that corresponds to the shape and thickness of the tail plate. At the same time, we make sure that the shank laid in it does not protrude above the plane.
- We remove the workpiece from the wooden plank, and then apply wood glue to all surfaces.
- We install the blade in place, press both parts of the handle tightly, and then clamp all the parts with clamps.
The product is ready for gluing
After the glue has dried, we perform the finishing treatment:
- If necessary, we drive rivets into the pre-drilled holes, with which we finally fix the shank in the wood of the handle.
- We put a metal ring on the front of the handle.
- We carefully sand the wood, removing all irregularities. We pay special attention to the junction of the halves.
Correct sharpening
Now, to get started, we just need to sharpen our knife.
The sharpening instructions are as follows:
- Place the blade on an abrasive block with coarse grain (pre-wet it with water) at an angle from 15 to 240. Using movements away from us, we shape the cutting edge until the sharpness can be felt under the finger.
- We switch to a medium-abrasive stone and repeat the operations, leaving a ground metal chamfer (burr) on the cutting edge.
Procedure for sharpening
- On a small (diamond) block, generously moistened with water, we finally remove the burr, forming a blade.
- We perform editing either on a leather belt or on a special block. For straightening we use GOI paste or a similar material, which allows us to get a perfectly sharp knife with mirror-like surfaces of the cutting parts.
These operations must be repeated regularly to maintain the sharpness of the knife, since only with the help of a perfectly sharpened tool can clean and high-quality wood carving be performed.
Editing on the belt
Conclusion
If necessary, you can make knives for wood cutting yourself - this is not particularly difficult even for a beginner. But the result will be that you have a tool that perfectly meets all your requirements.
You can learn more about the features of such devices, as well as the techniques for their manufacture, sharpening and use, in the video in this article.
Source: https://rubankom.com/obrabotka/ruchn/526-nozh-po-derevu
Kiridashi blade shape
There are standard-shaped products with double-sided slopes and double-sided supply. For different types of work, blades of different widths are used. The narrowest products can be no more than 1 cm. The angle of convergence of the edges of a Kiridashi knife can be very diverse.
It comes in a triangular shape for shoemaking tools. And traditional for ordinary knives, radius or completely chisel, with two angles of convergence of the edges. Traditional Kiridashi knife blades can range from 10 to 30 mm in length.
How to make wood cutters with your own hands
One of the most pressing topics for any carver is where to get a good wood tool?
High-quality, well-sharpened wood cutters can help out even a less experienced craftsman. The cuts are smooth, clean, and working with such a tool is much easier!
Having tried different options for the source material for making woodworking tools, from scalpels to razors, I settled on metal cutters.
They are quite fragile and strong at the same time. Carbon steel allows you to keep the edge of the blade sharp for a long time; it does not dull even on hard wood.
So, first we cut the cutter on a metal cutter according to a pre-applied drawing of the future cutter:
In our case, this is a small knife-cutter, which is the main tool of the carver:
The presence of such an abundance of sparks during cutting indicates that the steel is good, carbon, and therefore suitable for wood carving:
The result is something like this:
It is desirable that the part that will be in the handle be larger than the blade. This is for durability.
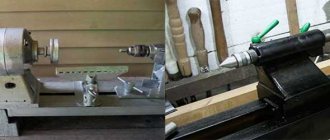
We polish the knife blade, constantly dipping it in cold water so as not to overheat:
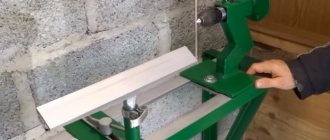
Now you need to make a handle for the knife. To do this, we take slats made of durable wood. In one part we draw the outline of the knife, the other as an overlay:
We cut a notch in the tree in the shape of a knife so that it is flush, coat both parts with PVA glue:
We glue the knife in a vice. It takes about 12 hours to glue:
After gluing, we sand the handle and sharpen the knife to the desired sharpness. Using this principle, you can make a knife with your own hands.
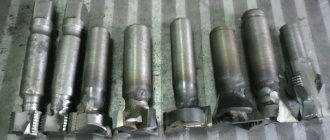
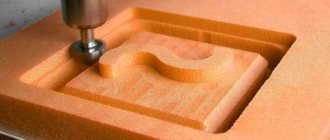
By the way, excellent wood chisels are made from metal drills:
And semicircular chisels made from punches:
A knife-jamb can be made from a rapite saw:
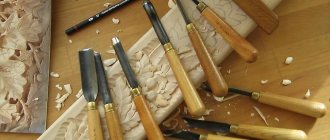
Here are some more wood cutters that I made with my own hands from a metal cutter:
The main tools of any woodcarver are jamb knives:
They are needed in different sizes and with different angles of inclination
Wood jamb knives use all zones (blade, toe and heel). The main requirements for knives: 1) they must be well adjusted to the master’s hand, 2) they must be made of good carbon steel with good sharpening. You can make a jamb knife for wood carving with your own hands.
auxiliary knives are also used for figured wood carving :
They come in different sizes and shapes, some of them are needed for rough cutting, others for cutting fine details.
chisels are often used for geometric wood carving . They are semicircular with varying degrees of convexity
and also with straight section
and triangular section
Semicircular chisels are sometimes made with a cutting edge beveled at an angle of 45 degrees
Carvers often use cranberries . These are the same semicircular chisels with a blade curved near the cutting end
They are convenient for carving figured surfaces or choosing a background in relief carvings. In the photo, the one on the far left is a spoon , which is used to cut wooden spoons.
In addition to wood cutters rasps ; they leave behind a smooth surface like a plane
Hacksaws
on wood and metal (makes a thin and neat cut):
You can't do without a plane and a hand drill :
To sharpen tools, you need whetstones : double-sided abrasive, double-sided diamond, finishing hard and finishing soft:
And of course, marking tools : carpenter's square, triangles, calipers, protractor, tape measure, compass:
Source: https://umelye-ruchki.ucoz.ru/publ/derevo/rezba/kak_sdelat_rezcy_po_derevu_svoimi_rukami/70-1-0-1151
A little history
The preparation of logs for the winter, or products for everyday life, were widespread not only in Rus'. But time passed and people who had a desire for beauty in their souls and hearts quickly realized.
That wood is an excellent material on which you can depict your feelings or the events surrounding them. Each nation had its own special techniques for processing wood, which was related to the culture, worldview and worldview of the people themselves. The higher the cultural heritage, the better and higher quality the work of the masters.
In Rus', elements of carving were present in everyday life, which carried a ritual component. Household and kitchen utensils were always decorated with carved elements.
The patterns that were applied to the hut had the meaning of elements and natural phenomena. Or to attract light forces that were a symbol of fertility and longevity.
Today this craft continues to live, perhaps the tools have become a little more convenient and modern. Knives for wood carving were and are now quite diverse. Let's try to take a closer look at a modern woodworking workshop of a master.
Knife-jamb - do it yourself
A woodcarver's tool is everything! The success of all work depends on its quality and sharpening. Therefore, many craftsmen prefer to work exclusively with knives of their own making. Moreover, making a chisel or the same cutter yourself will not be difficult for an experienced person. The main thing is to have suitable materials at hand.
My toolbox contains quite a few chisels, cutters, knives and other wood carving tools. And I must say that most of them are handmade, that is, made by me personally. One feature distinguishes them all - a special shape of the handle. I always do it with finger pads so that it is comfortable to hold the knife in your hand and convenient to work with.
Actually, today I want to share my experience on how you can make a jamb knife at home.
We will need:
- old chair leg for handle
- metal cutter for cutting part
- cardboard for templates
- epoxy resin
Please note: the shape of the leg can be either rectangular (this is what I use) or round.
Tools:
- hacksaw
- straight and semicircular chisels
- Bulgarian
- vice
- drill
Making a template
Before I start working with the material, I always prepare a template. I advise you to follow my example.
We will make it from thick cardboard. The shape of both the handle and the cutting part can be chosen arbitrarily. The main thing is that it is comfortable for you.
For the handle, I personally am going to make this option, as shown in photo No.2. As for the cutting part, I intend to make the “heel” of the future knife with an oblique, so that in the future it can be used for cutting recesses and slits.
We transfer the templates to wood and metal and cut them out.
If you have already noticed, I make two tools at the same time.
Cutting out the cutting part
We place the cutter in a vice and use a grinder to cut out the part we need. We work carefully, not forgetting about safety rules.
Preparing the handle
Using a hacksaw, we cut out the shape of the handle and process the wood. We make cutting movements in a circle and under the arm.
When the handle is almost ready, we begin sanding. We carry out this process with sandpaper until the surface of the wood becomes smooth.
Then you need to drill a hole into which the metal part of the knife will be inserted. We use a drill for this. Moreover, the resulting hole should be slightly larger in size than the tail of the knife.
Assembling a knife
Now you need to secure the cutting part and the handle. We insert the metal blank into the hole of the handle and fill it with epoxy resin (photo No. 4).
You can buy it in the store and easily prepare it yourself (detailed instructions are included with the kit). After 1-3 hours, the mixture will set and the joint knife will actually be ready. If you want to shorten this wait time, add a little hardener to the resin.
And the last steps - before use, the handle of the knife must be varnished (I choose nitro varnish for these purposes), and the cutting edge must be sharpened. That's it: our tool is ready to go.
Alexander Tsaregorodtsev, Tomsk. Photo by the author
Source: https://www.samsmasteril.ru/anons/26-03-2013-nozh-kosyak-svoimi-rukami
How to make knives for wood carving, Bogorodsky knife, jamb knife
How to make knives for wood carving?
On one of the forums I came across quite clear material on the manufacture of carving knives, which is given below without any changes. I hope that the author of the note Serjant and the administration of this forum will not complain. “Hello guys, it’s me, Serjant, I’m writing from Flyslayer’s computer, because the bastard admin cut off my Internet.
So:. Let's begin.
It's called 'Bogorodsk knife' (Fig. 1). Designed for both rough and fine woodworking. For rough work it means to give the workpiece the desired shape. Approximately trim so that the silhouette can be guessed. For example, whittling a spoon. For a thin one, for example, cut out fingers on a small wooden toy, cut out the face of an animal, etc. Speaking of toys. This knife got its name from the village of Bogorodskoye, Moscow region, where they cut the world-famous wooden toy for several centuries. As can be seen from the figure (Fig. 1), the knife is simple in shape and also simple in manufacture.
You will need: 1. A piece of steel. The ideal option for wood carvers is a mechanical saw blade (they cut rails with this saw and similar pieces of iron). The grade of steel does not play a special role. It doesn’t really matter whether it’s P6, P9, P6M5 or the really tricky P3AM3F2. This is all wonderful material. The thickness of these canvases is usually 1.8:2.3 mm. We are looking for the right size piece of canvas. You can buy canvas at any construction market. 2. Tree. Or rather, a couple of linden or birch plates. Evenly planed and dry. Why linden or birch? This wood is very good at absorbing the hand sweat that comes with the wood carving process. But still, linden is preferable, although it is inferior to birch in terms of fur. properties. 3. PVA glue or any other hardening wood glue. You can also use epoxy resin. Glue 'Moment' and the like are not suitable; they do not hold the glued seam. Sharpening the blade. We choose the dimensions of the blade and shank based on what we will do with this knife. If you roughly plan wood, then we make the blade larger, 70-90 mm, more is possible, but not necessary. If delicate work, then smaller, 30-60 mm. Shank:. We leave as much as we don’t mind. On the shank, using a sharpener or grinder, we make a bunch of “teeth”, notches or whatever else you call them. This will serve as a good fastener in the tree. We sharpen the blade; razor sharpening of the blade will make the cut softer, and the blade will not get stuck in the wood. (see Fig. 1). We sharpen the blade and straighten it to the point of shaving hair (we use our own carcass). After sharpening, we wrap the blade with paper and electrical tape so as not to cut ourselves when installing and processing the handle. We attach a shank to one of the wooden plates and trace the outline of the shank with a pencil. We hollow out a groove in the plate with a depth equal to the thickness of the blade. The blade, after being inserted into a wooden plate, should not protrude; it may even be necessary for it to be slightly below the plane of the wood by 0.1..0.2 mm. There is no need to worry, the glue will fill this gap. In principle, you should get what is shown in Fig. 2. On the wood planes to be glued, using the sharp tip of a knife, apply a mesh for better penetration of the glue. Apply glue liberally, insert the blade into the groove, and press the second plate. We tighten this entire structure with clamps or clamp it in a vice until the glue dries completely. For PVA this is usually a day. When the glue dries, shape the handle into an oval shape. I deliberately do not give any cross-sectional dimensions; everyone can choose what suits their hand, how it will be comfortable to hold and how it will be correct. We carefully grind the handle, but without fanaticism; there is no need to grind it to a “cat-like” state. There is also no need to soak it in oil or any other nasty thing like cyanoacrylate, let the wood nourish the sweat from your hand.
Sometimes it is useful (but not necessary) on the handle, closer to the blade (step back 5 mm from the edge of the handle), to sharpen a narrow groove with a file, and wrap it with wire or thick cotton thread and soak it with glue.
Make the winding not wide, 10:15 mm wide, so that the winding and the handle are flush.
Such strengthening of the structure is necessary for power work or when repairing a knife, when you are lazy to make a new handle.
It is useful to have several Bogorodsk knives, of different sizes and with different sharpening angles. Personally, I have 5 of them.
The name comes from the fact that the knife has a beveled blade.
Well, that's not the point:
The knife is used for cutting through material, cutting veneer, trimming contours, various types of carvings, such as flat-relief geometric carvings, Kudrinskaya, etc.
This knife is also called a shoe knife, but, as far as I could find out, a shoe knife is distinguished by a one-sided (chisel) sharpening of the blade. Although not always. General view and dimensions are shown in Fig. 3
The knife manufacturing technology is exactly the same as the Bogorodsky knife. The only difference is that the handle of the knife is adjusted in such a way that it is convenient to hold the knife with a reverse grip, with the blade facing you. This is the basic position of the knife in the hand.
The number of jamb knives a carver has is also not regulated by any rules or traditions. I have about 10 of them, all different. "
You can enlarge the images by clicking on them or open the following links:
Bogorodskiy knife https://cam.narod.ru/oborudovanie/instrument/pict/knive-bogorodskij-big.jpg
knife - jamb https://cam.narod.ru/oborudovanie/instrument/pict/knive-kosiak-big.jpg Source https://talks.guns.ru/forummessage/5/61314.html Additional links on the topic: How make a knife for wood carving like Carpenter https://www.finka.ru/howdo/50.htm Folk crafts. Tools for wood carving https://www.kefa.ru/article/xple/te/ Classification of tools for carving. Carver A. Senkevich https://rezbaderevo.ru/topic.php?topic_id=350
About chisels - for beginners. V. Kuznetsov https://cam.narod.ru/oborudovanie/instrument/knives.html Catalog of resources about wood carving https://cam.narod.ru/techno/rezba.html
Compiled by Alexander Viktorovich Abushenko, May 2006
The world of wooden toys - information system
Source: https://www.cam.narod.ru/oborudovanie/instrument/knives.html
Blade geometry
A Kiridashi knife can have very different geometries. But traditionally it is a flat strip of metal, 2-3 mm thick. The descent takes place along an oblique line and ends with zeroing. This is what a traditional chisel sharpening looks like.
The angle of descent of the product ranges from 18 to 30 degrees. For rougher work, blades are made with an angle of 45 degrees or more.
The cutting edge of a knife can be brittle with high hardness of steel. And it is prone to chipping.
To strengthen the cutting edge, micro-approach at an increased angle is often used. It can be large and produces a step sharpening. In rare cases, you can find lens-shaped descents.
Sometimes you can find a significant amount of metal on the opposite side of the descent; this turns out to be a kind of valley. This increases the cutting properties of the blade significantly. But in this case the supply becomes very fragile and lateral loads are contraindicated for it.
Kiridashi blade.
We make a chisel-jamb and a Bogorodsk knife at home from the canvas of an old hacksaw for wood
I found an old hacksaw for wood one day on the balcony and decided to use it to make myself a “starter” set for a carver: a hatchet knife, a jamb knife, a Bogorodsk knife.
The steel in a hacksaw can be called “anyhow,” but I don’t have a special tool, any saw blades or machines to automate the metal cutting process.
Therefore, I use a marker to mark the shape of the desired cutters, and I’m going to cut the wood with a hacksaw with a hacksaw for metal, because I had a supply of blades:
From the starting material - a metal ruler, a hacksaw for wood, an old kitchen knife:
5 canvases were killed, at different times around 3 pm (after work, like a respectable neighbor, she made noise only until 9 pm), with grief, sawed in half:
- Notches, creases - everything is subsequently removed using a proper stone (for me it’s more like a dead block - kitchen knives used to be sharpened with it) and coarse sandpaper.
- I'm trying to sharpen it at an angle, as the masters advised, who sharpens on a machine - without handles for now. It’s inconvenient and the angle is off:
Even from a phone photo, deep scratches in the metal are visible during the first rough sharpening:
- The blank for the Bogorodsk knife
is formed with files and cleaned of rust: - And now I need to make handles.
To do this, I take a piece of board and cut the bars along the fibers: - I cut out a recess using a stencil of a metal sheet (this is where my grandfather’s old chisels came in handy, I used them to select fibers):
- Coat the inside of the recess with glue (I used transparent Titan Wild), place a metal blank and also coat the other half of the piece of wood with glue:
I used a little too much glue, a lot leaked out, I had to wrap it in newspaper and tape on top. In a good way, this would need to be clamped in a vice, but I don’t have one either and I work in a city apartment in the kitchen.
- Preparation for a knife-jamb:
- I also coat it with glue:
- Coat the second half of the wooden block with glue and tie it with electrical tape for strength, leaving it to dry completely:
- I don’t have a plane, so I hammer an old steel knife, cutting off the excess wood from the handle, also along the grain:
- The result is a rough pen like this:
- A little effort to wrap things up:
- A bunch of shavings from 3 handles:
And here is such a small knife-jamb
and
a pocket hacksaw for wood
are ready! You can leave the handles like that (just a little sanding), you can soak them in oil, paint them with something, and do whatever you want. The hacksaw still needs to be sharpened a little, there is a set of teeth here.
Of course, this is more like a hacksaw for drywall, because in reality it is impossible to cut something cleanly with it - it leaves too large “teeth”. The ideal is to go to the dacha, cut down small branches on trees or trim the stems of burdocks and sunflowers in the garden.
The handles can be left untreated; they will fit comfortably in your hand without slipping. In extreme cases, you can soak it in linseed oil and wipe dry.
Did you like my post?
Click on the advertising banner on this site. It’s free and not difficult for you, but for me it’s an honest income from the blog and a pleasant addition to the enthusiasm for a cup of coffee