Vase made of glass bottles
A glass bottle is one of the best blanks for making a vase. You will need a minimum of effort and expense. For decoration you can use the following methods:
- decoupage (transfer of the finished image followed by application of a varnish layer);
- patterned painting;
- decoration with ribbons, threads, twine;
- pasting with sand, salt, glitter, crumbs;
- pasting with paper napkins with additional decoration.
Instructions on how to make a vase from a bottle:
- Remove the stickers, wash and dry the container.
- Select paints; it is recommended to use acrylic in spray cans.
- Apply the first coat of paint and let dry, then apply the second.
- Decorate with patterns to add dynamism. You can use patterned stencils.
- Open the product with varnish to protect and add shine.
It is advisable to paint the bottle in an open space or, at least, on a balcony.
If the vase will be used for its intended purpose (for flowers), you need to cut off the neck of the bottle. This is done this way:
- Mark the location of the cut (in the narrowing area). Draw a circular line.
- Wrap a line of wool around the bottle and moisten it with paint thinner.
- Pour cold water into a large container (large enough to fit a bottle).
- Set fire to the thread.
- When the thread burns out, sharply lower the bottle into the water. The bottle will burst along the perimeter of the thread.
- Sand sharp edges.
You can watch the detailed process of creating and decorating the product in the video of making a vase.
You can use bottles of different sizes, depending on the purpose of using the future vase.
Original craft
Try creating a vase from a material such as cardboard, which will become a wonderful stylish item in the interior.
Gather the components needed for work:
- a cardboard pipe of certain parameters can be purchased at a hardware store;
- stationery knife, glue, newsprint;
- paint and varnish used as a fixative.
Make a bottom for the prepared pipe - cut out a circle with a diameter that matches the diameter of the pipe and glue it to it. The vase frame is ready. Making paper decorations is a rather labor-intensive process. Fold the cut newspaper strips in half and then roll them into small rolls, gluing the ends together.
Prepare a sufficient number of such parts. Cover the surface of the cardboard tube-vase with them. Please note that they need to be placed very close to each other. However, there will still be gaps that can be filled with any available material - small buttons, beads, types of pasta, beans (white or red).
It is advisable to paint the product with gouache, not very diluted with water, or with aerosol paint, carefully painting the paper flower rolls. Leave the product for a while to dry. Decorate according to your taste.
The simplest items can become the highlight of your home's interior. When thinking about creating a vase with your own hands, you need to carefully analyze the style of the interior so that your work emphasizes its originality. Let's look at some of them and listen to the advice of designers.
The laconic, discreet shape of the vase, its discreet colors and neat finish are perfect for the minimalist style. Classicism presupposes symmetry in ornaments of light colors. A variety of materials are used to create a vase with your own hands, suitable for the high-tech style. Metal, plastic, glass or wood are used. Vases, the design of which combines literally everything (even the seemingly incompatible) look interesting in the extravagant kitsch style.
Preference in decoration is given to spectacular rich colors and original decor. Art Nouveau is characterized by abstraction, smooth lines and decoration using decoupage. To create a vase that suits the avant-garde style, you need a rich imagination, as well as extremely rich colors and elegant patterns.
An individual vase in your own design will become a unique addition to the design, tell about the taste of the owners, and delight the guests. This item will be a great gift for birthdays, New Years and other holidays. Make crafts - vases, give yourself and those around you beauty and a good mood.
Vase made of plastic bottles
Almost any plastic bottles are suitable for making a vase. In such a product it will be possible to contain fresh flowers by simply pouring water, like in a factory vase.
In this case, you will need to cut off the neck. The bottle must be decorated. The decoupage method works very well.
Prepare napkins, glue, a plastic bottle, satin ribbon and twine. Instructions on how to make a vase from a plastic bottle:
- Cut off the neck.
- Cover the workpiece with a layer of glue.
- Carefully wrap the napkins with the selected image.
- Apply varnish on top.
- Make a hole at the top using a hole punch.
- Secure the twine.
- At the top, secure a braid that hides knots and defects in the container and additionally decorates the product.
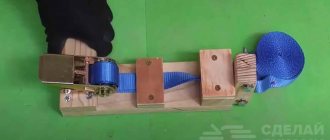
Features of working with a spiral saw
This is not as easy as it sounds because it requires an internal cut (like ). The scroll saw blade is held in place at the top and bottom of the arm by small pins. The blade does not have a free end, so you cannot place it inside the circle while it is attached to the saw.
Why natural sounds not only lift your mood, but also relieve stress
Vertical flower bed made of PET bottles: a great idea for a small summer cottage
Oatmeal-honey pie with glaze: both prepared and eaten very quickly
To overcome this problem, you first need to drill a hole in the board, thread the blade through the hole, and then install the blade on the saw. When you are done cutting, you need to remove the blade and repeat the process in reverse. This is why quick blade release is so important in a scroll saw. I had to take the blade and turn the machine off eleven times for this project.
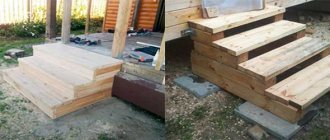
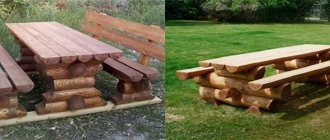
DIY wooden vase
One of the best ways to make a floor vase is to make a product of sufficient size from wood. This material looks solid and attractive.
You can use branches, boards or logs. Wood can be decorated in any way - carving, painting, forging, etc.
Transferring the design to plywood
You need to translate the drawing accurately and carefully: secure the drawing using buttons, double-sided masking tape, or simply hold it with your left hand. Check if the drawing fits the dimensions. Arrange the individual parts so that you can use the plywood sheet as economically as possible. There is no need to rush, because your future craft depends on the drawing. If you are short on time, then to speed up the translation process you can use the technique of quickly translating a drawing; for this, I suggest that you read the article in the tips section: Drawing technology.
Rectangular vase made of wood
It is made as follows:
- Take a board of small thickness. The optimal size is 100x25 mm. Cut 4 pieces of equal length. Make the base in the shape of a square from a 150x40 mm board.
- Fold the blanks into a rectangle; use PVA glue and self-tapping screws to secure them together.
- Attach the base in the same way.
- Seal the joints with mastic. Paint the workpiece in the desired color.
- Let the paint dry, then apply the decor. You can decorate the product with beads, glass elements, ribbons, etc.
Wooden vase made from a round log
You can make a cavity in the deck by making an original vase. But, this requires the use of carpentry tools. Manufacturing procedure:
- Cut a piece of wood to the desired length.
- Remove the bark.
- Make a recess of the required length and diameter inside the log. This can be done using a drill. Do not drill through the workpiece. Sand the walls of the cavity with sandpaper.
- Clean the outer walls.
- Cover the workpiece with stain.
- Apply the desired decor to the vase. To add shine and protection, you can apply a layer of varnish at the end.
Vase made of glass jars
A very simple way to make a vase yourself is to decorate a glass jar of the desired size. The jar is actually a finished vase that remains to be decorated.
Let's consider a simple option for making such a craft. To create a vase you will need:
- glass jar;
- fabric (burlap looks very good);
- twine;
- small twigs;
- glue.
It is made as follows:
- Wash and dry the container.
- Trim the branches so that they are approximately the same length. It is recommended that they be slightly higher than the jar in height.
- Wrap burlap or other material around the entire surface of the jar. Use glue to fix it.
- Arrange the branches in a row and tie them at both ends with twine (step back about 2 cm from the edge).
- Secure the resulting mat to the container with twine. To increase reliability, glue the branches to the material.
- Place some pebbles at the bottom to increase stability.
Preparation of the workplace
As usual, the first thing you need to do is equip your workplace where you will work. The rules are not complicated: there should be no unnecessary things on the table, all the tools should be in their place and at hand. Not everyone has their own desktop, and you’ve probably already thought about creating one. Making a table is not difficult; choosing a place for it in the house is more difficult. A good option is an insulated balcony, where you can start working on your craft at any time. If you have a specially equipped room with a workbench, then you are lucky. In a separate article you can read about preparing a desktop where I tried to describe in as much detail as possible the entire process of creating it. After you have completed the process of creating a workplace, you can proceed directly to your future craft.
Plaster vase
The plaster vase looks very attractive. It can be large on the floor or, on the contrary, miniature for shelves, window sills, racks, etc.
Let's look at how to make a vase with your own hands from plaster using a 2-liter plastic bottle:
Cover your work area with oilcloth. Prepare the gypsum solution according to the manufacturer's instructions. Place it on your work surface in a circle. Place the base (bottle) in the center.
Gradually apply the solution to the template, moving from the bottom to the neck. After applying the first layer, wrap the container with a bandage. Allow approximately 30 minutes to dry. Remove the plastic bottle from the blank.
Prepare another part of the gypsum solution (do not prepare too much at once, the gypsum hardens quickly). Make the base of the product. Apply the composition in several layers, fixing with a bandage or gauze after each.
After making the base, start creating the top of the vase. Make a template from a cut 1.5 liter bottle. Apply the solution in layers, connecting the top to the base. Pay special attention to the joint.
After giving the workpiece the required shape, leave it to dry completely (preferably at least overnight, preferably 24 hours). Sand the workpiece with sandpaper.
Decorate the product as you wish. You can apply a pattern, paint it in any color, paint it with a design, glue a photo or do decoupage.
Homemade concrete flower pots
The good thing about concrete is that it can be poured into any shape. Plastic, glass, metal, wooden, clay vessels and even cardboard boxes are suitable.
Outdoor flowerpots made of concrete are easy to make with your own hands
It is most convenient to work with plastic - it is easy to remove from it. It’s even easier with glass, but such forms are usually disposable. It was not possible to take them out - they are broken.
What concrete to use
To make outdoor flowerpots, you can use ordinary concrete consisting of cement and sand in a ratio of 1:3/4 (Portland cement of a grade not lower than M 400 and clean sifted river sand). The surface of such a flowerpot will be monochromatic, gray. In some cases, it looks stylish, and the gray color does not distract attention from the main thing - the colors. But not always.
Products made from decorative concrete look more interesting. It is also called artistic, art, architectural, acrylic, polymer - concrete. All this is a designation for the same product. In addition to cement and sand, architectural concrete contains polymer additives, small fragments of natural minerals, and some contain dyes. The surface of a pot made of decorative concrete is smoother, more interesting, interspersed with natural stones. The specific type depends on the selected composition. Some types of decorative concrete are shown in the photo below.
Some types of decorative concrete
The surface of a pot made of decorative concrete is smoother, more interesting, interspersed with natural stones. The specific type depends on the selected composition. Some types of decorative concrete are shown in the photo above.
What to make forms for pouring a concrete flowerpot from
Any shape, from almost any material can be used. It is important that it does not get wet and keeps its shape for 4-5 hours. Then the concrete sets and holds itself. That’s why they even make molds from thick packaging cardboard, gluing them well with coal and tightening them with belts of tape. But caron can be used to make molds only for small flowerpots - for a small group of plants. But the form can be any.
Mold for making a concrete flowerpot with your own hands
Actually, you need two forms - one to form the outer surface, the second - much smaller in size - is inserted inside the first and forms a zone into which soil is then poured and plants are planted. The internal shape is selected based on the dimensions of the planned flowerpot, but the wall thickness should not be less than 3 cm.
Concrete flowerpots made from plastic molds
You can use plastic bowls, glasses, containers, trays, water flasks - large and small. You can make a shape from boards, plywood, or pieces of other sheet material. It doesn't matter. Anything, anything that comes to mind to use.
You can use any container to make a concrete flowerpot.
Do you have an interesting shaped basin or bowl? This will do too. And to form the internal volume, you can find something heavy, preferably of the correct shape, but this is absolutely not important. Even a bowling ball will do. It is good because it is heavy and smooth - you can take it out easily.
A metal bowl and a bowling ball make an excellent flowerpot.
Round flowerpots look best, but finding the right shape is not easy. Usually these are either plastic containers or glass balls, which are cut/broken after the concrete has set.
Manufacturing process
You can only work with cement at temperatures above +5 °C. Ideal conditions are +20°C and high humidity, but temperature is more important. The place where you will leave the concrete to “ripen” should be in the shade.
You have found suitable forms, stirred the cement. It should not be too liquid, not too thick. It shouldn’t drip off a spatula or spatula, but it shouldn’t be so dry that you can make something out of it.
You need to wear gloves when working - concrete corrodes your hands very quickly. You need a spatula or something similar to spread the solution, a long thin stick or a metal rod to remove air. You will also need either a large container of water or a piece of plastic film.
You come up with the form yourself
We take the molds and treat them with some kind of lubricant. This is necessary so that the pot can be removed from the mold easily. The following drugs can be used:
- Non-stick cooking spray. Harmless and effective.
- Special sprays for concrete. They cost much more, but the effectiveness is the same.
- Engine oil.
- Universal lubricant VD-40.
Maybe other compositions work, but these have been tested.
We process the forms with one of the compounds. The big one is inside, the small one is outside. In a large mold, pour the solution into the bottom in a layer of 3-4 cm, level it. This will be the bottom. If you want drainage holes in the bottom, insert pieces of pipe. You can use metal ones, cut them into pieces 3-4 cm long, and also treat the outside with lubricant. In this case, the thickness of the bottom should be equal to the height of these tubes. And place them strictly under the bottom of the second form.
How to make a flowerpot from concrete with your own hands
Place the second mold on the solution. If it is light, we fill it with small stones, crushed stone, pebbles, and sand. Fill the gaps between the two walls with solution. If the material allows, we knock on the walls with a hammer, then take a rod or thin stick, pierce the solution to the bottom, and swing it from side to side. With these actions - knocking and piercing - air bubbles come out of the concrete, and it settles down a little. This procedure can be repeated a couple of times. Then we take some smooth object (a spoon, for example), spray it with lubricant and level the top of the wall. try to make the side as even as possible - then it’s difficult to do anything with it.
Cover the form filled with concrete with a piece of polyethylene and leave it in this form for at least a day. After a day, the form can be removed, but the flowerpot cannot yet be used. It can be placed in a container of water and left there for a week. Another option is to cover with film and sprinkle with water three or four times a day. Spray generously until completely darkened. Remember to cover with film each time. After about 10-14 days you can start planting plants. That's all, now you can make concrete outdoor flowerpots with your own hands.
Finishing a concrete flowerpot
If you don't like the surface of the flowerpot, you can decorate it. Don't make the flowerpot too bright. It is only a background for the flowers and greenery that will be planted in it. There are traditional methods - painting, there are more exotic ones - finishing with mosaics, pieces of broken ceramic tiles or pebbles.
When painting, choose a paint that is suitable for concrete; first prime the surface (so that the paint sticks better and does not peel off in flakes).
To finish with tiles or pebbles, a layer of tile adhesive (for exterior use) 5-6 mm thick is laid on the surface, and the pebbles are pressed into it. You have to work carefully, immediately erase traces of glue on the pebbles - it doesn’t come off later.
Flowerpots made of concrete, decorated with colored pebbles
The finished flowerpot is left to dry until the glue dries (time indicated on the package). The seams can then be grouted using standard tile grout. It is inconvenient to work, the gaps between the stones are too narrow. You can try using thin plastic strips or narrow tile joints.
Flowerpots made from building concrete blocks
Hollow concrete blocks with large cells are suitable for planting plants. Soil is poured into the cells and flowers are planted. You can lay out an entire wall from such blocks. The recipe is simple but very effective.
Flowerpots made of concrete blocks
Original decor of a flowerpot Ready-made homemade flowerpots and flowerpots made of concrete for outdoor flowers Low and wide bowl - can be made from a basin Finishing a concrete flowerpot with pieces of tiles The whole composition in the same style Finishing a concrete flowerpot with pebbles Art (polymer) concrete does not need finishing A bucket can also be shape
And finally, a video - a master class on how to make a flowerpot from a tire.