To eliminate the largest heat losses in a residential building, it is impossible to do without insulation. The process of insulating the floor of the first floor using wooden beams located above the basement begins at the construction stage, but the work can be done after construction. Mandatory thermal insulation and sound insulation of horizontal structures of the upper floors is also required.
Design features of the room
This indicator plays a decisive role in determining the work plan for thermal insulation of the second floor in a private house. Structurally, the room can be:
- A full second floor, above which there is an unheated attic or living room.
- The attic, which is located directly under the roof.
In each case, the principle of insulation will be different. The main difference between an attic and a full floor is the proximity of the roof, so the main task of insulation is to preserve heat in the room.
It should be emphasized that thermal insulation of the second floor must be done not only inside, but also outside the house. When insulating a full floor, you don’t have to install a vapor barrier layer; for the attic, vapor barrier is mandatory. Expanded polystyrene, mineral wool or expanded clay are most often used as insulation.
When to insulate the ceiling
According to the laws of physics, warm air always rises to the top. If the attic space is not heated, heat from the lower floor goes out through it. Heat loss can be up to 40%. Warm air escapes through small cracks in concrete and pores in wooden ceilings. Properly performed thermal insulation will prevent freezing and reduce heating costs.
In all private houses with a cold ceiling, it is recommended to thermally insulate the ceiling. Such work can be performed at the construction stage or in an already constructed house. In the second case, insulation is carried out if the coatings were made a long time ago and over time have lost their heat-insulating properties.
Insulation materials
Various thermal insulation materials can be used as interfloor insulation for a wooden house:
- glass wool;
- basalt wool;
- slag;
- Styrofoam;
- penoplex;
- expanded clay;
- foamed polyurethane;
- shavings, sawdust.
The choice is based on the availability of the material, its cost, and characteristics. Thus, mineral wool and expanded clay are the most acceptable from the point of view of fire safety. At the same time, penoplex does not absorb moisture, does not cake, and has high thermal insulation properties. Sometimes materials are combined to increase thermal protection.
Various types of cotton wool
Most often, various types of construction thermal insulating mineral wool are used to insulate interfloor ceilings. They are made by melting and drawing fibers from raw materials. These fibers are then intertwined on special machines and formed into mats or rolls. In some cases, such mats or rolls are stitched with synthetic threads to increase the strength of the products.
For glass wool, the raw materials are waste and waste from glass production; for mineral wool and basalt wool, igneous rock melts are used. Slag is produced by melting blast furnace slag.
Different types of cotton wool have different properties. They have different densities and different thermal conductivities. These characteristics depend not only on the type of feedstock, but also on the specified production parameters.
Foam plastic and penoplex
These are two similar materials in properties and production method. The starting materials for their production are plastics of various compositions. During the production process, they foam and, when hardened, are formed into sheets of the correct geometric shape. The difference lies in the fact that during formation, penoplex is extruded through a special device - an extruder.
Both foam plastic and penoplex have closed pores filled with gas in their volume. Only in polystyrene foam it is ordinary air, and when foaming polystyrene foam, carbon dioxide is usually used. In terms of thermal conductivity, both materials are almost identical. But due to the fact that the pores in the penoplex mass are distributed more evenly and they themselves have almost the same size, its strength is much higher.
Very often, when forming sheets of penoplex, their ends are not made even, but in the form of two or more ledges. When insulating, two adjacent sheets, connecting to each other during installation, provide better insulation, since the joints are not blown through and retain heat well.
Expanded clay
Expanded clay is a building material that consists of many oval granules - pellets with an average diameter of 10 to 20 mm. The material of these granules is clay and shale sand. The pellets themselves are obtained by firing pre-prepared semi-finished products in special ovens. When heated, pores of different sizes appear in the volume of expanded clay, as a result of which it has a very low density. One cubic meter of bulk expanded clay can weigh only 300 kg. For comparison, it can be noted that one cubic meter of pine wood weighs 500-550 kg at natural humidity.
Note! Expanded clay is an environmentally friendly material. It is durable and will not rot or decompose.
Polyurethane
Foamed polyurethane is used, as a rule, for insulating basement and attic floors. It is simply applied using special equipment, and later it foams in air and takes on a three-dimensional shape. The advantage of using such material is that it fills all the leaks and cracks in the ceiling structure, allowing you to create a sealed water- and windproof thermal protection.
Sawdust
Wood shavings and sawdust have recently been used much less frequently, but more recently they have also been used to insulate interfloor ceilings, filling the cavity between the beams. To prevent such insulation from rotting inside the ceilings, it is treated with special compounds that kill putrefactive bacteria and woodworms. When laying, shavings or sawdust are mixed with lime.
Vapor barrier
To properly insulate interfloor ceilings, it is not enough to use only materials with thermal insulation properties. If you do not protect the insulation from the action of moisture located in the interior of the premises, various microorganisms will multiply in the material, which can subsequently lead to mold or mildew. To avoid this phenomenon, it is necessary to make the correct vapor barrier for the insulation.
Any of the many options produced by industry can be used as a vapor barrier. Ready-made protective membranes are very widely represented on the building materials market. When building and insulating a private house with your own hands, you can use available materials if you know their strength and vapor barrier properties and use them correctly.
As the main layer, the coefficient of vapor permeability of which should be minimal, you can use ordinary polyethylene film or foil. This layer is laid below the insulation, preventing moisture vapor from the basement or lower floor from penetrating into it.
As the second layer, which will be on top of the insulation, you can use wax paper or glassine. These materials have greater vapor permeability than foil or polyethylene. They will facilitate the free release of vapors from the thickness of the insulation upwards.
Extruded polystyrene foam
Most often it is called penoplex, and is also confused with polystyrene foam (they are similar in appearance). What they have in common is only the raw materials, but the production methods are fundamentally different. As a result, this insulation is very dense, so it can be immediately plastered or used as a subfloor. Features are as follows:
- High density.
- Lowest thermal conductivity (best in class). This indicates maximum efficiency.
- Convenient to use (easy to cut).
- Harmless to humans.
- Very light weight, so there is no need to create a strong structure between floors.
- Lights up (class G4). Apart from the high cost, this is the only drawback.
Foil polyethylene foam
Despite its thinness, it is a very effective insulation material (second only to penoplex). It can be recommended in cases where the space between floors is not enough to insert a thicker mat. However, such material is often used for other reasons.
It is sold in the form of rolls 100-120 cm wide, and the thickness can reach 2 cm. It almost completely reflects heat, preventing it from escaping. The main feature is that it is not at all “afraid” of moisture, which is why it is often used to create a moisture-proofing layer. For houses located in the far north, we can recommend the combined use of penoplex and foil polyethylene (laid as a vapor barrier film).
How to insulate the floor in an old house, including without removing the covering
In old, but still reliable houses, cold floors are often found. There are many options for its designs, but each can be turned into insulated, and even heated. Warm floors are always a welcome feature in the house, and it’s not difficult to make it yourself. Let's look at the most typical options.
Article on the topic: How to decorate a kitchen in a wooden house
Without removing old floors - how to insulate
Not everyone wants to do the serious work of tearing out old boardwalk and then putting it back in place. To insulate an old floor without removing the flooring, there are two options:
- get to the subfloor through the basement, or by partially removing the covering in the form of working hatches, and insulate from below;
- insulate over the old coating, but this is possible if the height of the ceiling and doorways allows.
Both options are good if there are prerequisites for them. Let's look at it in more detail below...
Typical insulation of an old wooden floor - remove the flooring and place the insulation between the joists
We have a typical ventilated underground and wooden joists. The laid insulation layer must be ventilated from the street, with the exception of samples that are not saturated with water. Therefore, the vapor barrier membrane is located on the room side. Leaky insulation on the side of the ventilation stream (underfloor) must be protected by a windproof membrane so that its layer is not blown through.
- We tear out the old floor.
- We stuff counterbeams, lower sheathing, and thrust beams under the joists and lay boards and plywood on them scattered - we do everything possible under the given conditions to create a basis for laying the insulation.
- We put a windproof membrane and mineral wool 15 cm thick. Polystyrene is not advisable here due to the threat of damage by rodents...
- We cover everything on top with a vapor barrier with a bloat on the walls and install the flooring.
But with appropriate protective measures, you can also use any insulation - polystyrene foam, self-leveling penoizol (recommended), vermiculite, ecowool, expanded clay (if the layer is thick), leaves and straw with lime...
We fill the low underground with ash and expanded clay
Often, old floors were made directly along a shallow trench, only 30–50 cm, slightly more than the height of the log itself. A popular insulation option in this case is to fill the low subfloor with ash and expanded clay, as well as close vents and cracks, and prevent air from blowing through the insulation. A layer of ash-slag from coal, 40 cm thick, even moistened from the ground, gives an excellent thermal insulation effect, comparable to expanded polystyrene foam 7 - 10 cm thick.
On top, the logs with backfill are insulated with a vapor-resistant membrane and covered with wooden flooring.
We insulate with soil - we insulate the foundation on the sides
The soil directly under the house can also serve as a heat insulator - yes, yes, just cold, cold earth... You just need to ensure that there is no ventilation of the subfloor, fill the space between the joists with soil, stone, or preferably expanded clay or slag if possible, and put a vapor barrier membrane on top, and then ordinary flooring.
- We tear off the foundation around the perimeter of the house, insulate it to a depth of at least 0.8 meters below the soil level, as well as the base of the house with 5 cm extruded polystyrene foam.
Article on the topic: What is a wooden barrel for a bath called?
Now the top layer of soil under the house with a thickness of 0.7 - 1.0 meters will have an increased temperature and serve as an excellent thermal insulation layer.
We insulate the old floor without tearing the coating - we use polyurethane foam
If it is possible to more or less freely reach the coating from below, then you can use sprayed polyurethane foam, with a layer thickness of only 7 - 10 cm. Let us recall that this heat insulator has the lowest thermal conductivity coefficient, about 0.03. But the possibility of creation must be agreed in advance with the specialists who will do the spraying. Polyurethane foam is a vapor barrier, forms a continuous layer, holds the structure together, no additional use is required here.
We measure the height - is it possible to insulate over the old flooring?
A comfortable height in the house is 2.4 m, perhaps 2.2 meters if the residents are not tall and are willing to put up with a low ceiling. Therefore, it is not possible to lay a layer of insulation and coating 12–15 cm thick everywhere. Additional obstacles:
- The height of doorways must remain sufficient to avoid the appearance of a “head impact area” sign. Replacing the door hatches will also help here; the height of the top crossbar in modern versions can be only 3.5 cm.
- the old radiator system should be placed between the floor and the window sills; in extreme cases, a niche is left in the covering for the radiators themselves...
Thus, having completed the necessary measurements, you can come to a conclusion about how best to insulate the floors in the house, whether it is possible to lay layers on top of the existing flooring...
We insulate over the flooring
On the old boardwalk we put a vapor barrier with a screw on the wall, then a couple of layers of extruded polystyrene foam, with a total thickness of 10 - 12 cm (thermal conductivity coefficient - 0.033), then a separating polyethylene film, and a damper tape along the walls. We lay a prefabricated dry screed - two layers of gypsum fiber, laid with overlapping seams and leaving thermal gaps between the sheets of 2 mm, and fastened with screws at 30 cm intervals.
Making a heated screed
Only a thin prefabricated screed can be placed on top of old wooden floors - approximately 50 kg per square meter. A thick 8 cm reinforced concrete screed is unlikely to be suitable here - only on floors on the ground, or on joists installed on intermediate supports. For a thin screed, it is most correct to use a profiled heat insulator and metal heat distributors. Here, extruded polystyrene foam is already needed for economic reasons from 12 cm, and preferably 15 cm.
Hydraulics can often be made into short circuits - up to 30 m; in this case, the temperature in the circuits can be adjusted with a simple adjustment valve, by limiting the amount of coolant, without installing mixing units.
You can also install heat distribution plates on a wooden counter-lattice, laid staggered, on an already well-insulated underground - how to do it...
Construction requirements for wooden floors
In order to install a durable and safe wooden floor between the 1st and 2nd floors with your own hands, you must strictly comply with the technical requirements for them.
Thermal insulation layer
Thermal insulation of the floor will improve the temperature in the room on the second floor.
If a wooden floor separates the upper and lower rooms with a temperature difference between them of more than 10 ° C, it will be necessary to construct a thermal insulation layer.
This is necessary, for example, when arranging floors between the first floor and the subfloor, basement, or between the first/second floor and an uninsulated attic.
Beam strength
Beams and floors must withstand up to 180 kg/sq.m of load.
When constructing the floor of the second floor on wooden beams, special attention should be paid to the strength of the load-bearing structures. The safety of the building depends on how strong the wooden floor beams are.
According to building standards for wooden low-rise buildings, the maximum load on the floors of the first floor should not exceed 210 kg per sq.m., the pressure on the wooden floor of the second floor should not exceed 180 kg/sq.m., and for attics and attics this figure should be less than 105 kg/sq.m.
Maximum deflection
In addition, building regulations also impose requirements on the deflection values of wooden floor beams. According to SNiP, this coefficient should not exceed 1 to 250. That is, the maximum deflection of wooden load-bearing structures during operation should be less than 4 mm per meter of beam length.
According to this standard, the deflection of a beam structure 4 m long in the center should not be more than 1.6 cm (4 m: 250 = 0.016 m). If it is planned to place massive furniture and household appliances in the room, tile flooring, etc., then the requirements for structural rigidity increase to 1 to 400.
That is, the deflection should not exceed 2.5 mm per meter. For non-residential attics and attics, a higher deflection coefficient is allowed - 1 to 200 (5 mm per 1 meter).
Soundproofing
Fifty-millimeter mineral wool will not only insulate the floor, but will also become a good sound insulator.
According to building regulations, the sound insulation threshold for interfloor ceilings of residential buildings should be 50 dB.
To meet this requirement, it will be sufficient to cover the floor of the second floor under the finishing coating with mineral wool 50 mm thick.
Length of supporting beams
The length of the beam should be no more than 5 m.
The maximum permissible length of free sag of wooden beams should not exceed 5 m for interfloor and 6 m for attic floors. If the design length of the room is more than 5 m, it will be necessary to install additional support under the load-bearing beam. The fact is that the optimal length of a load-bearing wooden structure is 4 m.
With a further increase in its length, the rigidity and strength of the supporting structure sharply decreases and the requirements for the thickness of the beam section increase disproportionately. So, in order for the deflection indicators for an 8 m beam to “fit” into SNiP standards, its thickness should be about 40 cm. For example: the same deflection indicator is shown by a 4 m beam with a cross section of only 15 x 15 cm.
Wood is a material quite vulnerable to external influences, primarily dampness and fire, therefore, before proceeding with the construction of load-bearing structures, all wooden elements must be treated with antiseptic materials and fire retardants.
Vapor barrier between 1st and 2nd floor
Moderator: Izospan
Re: Vapor barrier between 1st and 2nd floor
Izospan » 02 Oct 2012, 17:46
The problem you have is that: 1. There should be a vapor barrier film underneath the insulation, which serves to protect the insulation and floor structures from penetration of steam from below from the heated room. In your structure, when heating begins, moisture from the room begins to freely penetrate into the insulation, which leads to its moistening and a decrease in thermal insulation properties. In addition, a vapor barrier also serves to protect against the penetration of insulation particles into the living space. Glass wool particles entering a room can cause allergies. 2. On top of the insulation there should be a vapor-permeable membrane that allows moisture from the insulation to evaporate. Since you have a vapor barrier on top, there is simply nowhere for moisture to go. And when the insulation gets wet, it begins to release binding chemical components into the living space.
Re: Vapor barrier between 1st and 2nd floor
Edward » Oct 31, 2012, 9:02 pm
Good evening! After reading here, I chose for myself three “pies” of the ceiling between the 1st and 2nd floors (1st heated, 2nd only summer room):
1. plasterboard – 20mm sheathing – isospan “C” (rough side down) – 100 mm insulation – 50mm ventilation gap (as it happened) – second floor floor or: 2. plasterboard – isospan “C” (rough side down) – 100 mm insulation – ventilation gap 50mm – floor of the second floor or: 3. plasterboard – ventilation gap 20mm – insulation 100 mm – ventilation gap 30mm – isospan “C” (rough side down) – floor of the second floor
which one is more true?
Re: Vapor barrier between 1st and 2nd floor
Izospan » 01 Nov 2012, 13:59
Re: Vapor barrier between 1st and 2nd floor
Feb 2014, 20:15
Re: Vapor barrier between 1st and 2nd floor
Izospan » 02 Feb 2014, 10:04
Re: Vapor barrier between 1st and 2nd floor
Stanislav » 02 Feb 2014, 15:29
Re: Vapor barrier between 1st and 2nd floor
Izospan » 02 Feb 2014, 18:15
Re: Vapor barrier between 1st and 2nd floor
Sergey 113 » 02 Feb 2014, 22:49
Re: Vapor barrier between 1st and 2nd floor
Stanislav » 03 Feb 2014, 11:49
Re: Vapor barrier between 1st and 2nd floor
Izospan » 03 Feb 2014, 12:49
Private low-rise construction has become increasingly popular in recent years.
Country houses and country houses built with their own hands are occupying an increasingly large share of the total volume of housing put into operation.
The most popular material in private construction is wood, due to its affordable cost and ease of processing. But not all individual developers have sufficient experience and knowledge to independently carry out the entire range of construction work. So, the question often arises of how to properly lay the floor of the second floor in compliance with all building regulations and technologies.
Construction material
Before you begin installing the floor on the second floor using wooden beams, you should make a list of all the necessary materials. This will allow you to avoid unexpected downtime and delays during work caused by the need to purchase additional building materials.
Beams
A beam section of 15 x 15 will be sufficient.
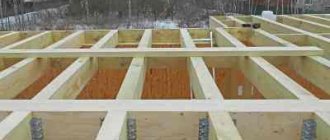
The basis of the entire structure of interfloor wooden floors is beams. They act as load-bearing elements, and the strength of the structure depends on them. For them, a beam or carriage with a section of 15 x 15 cm or 18 x 18 cm is usually taken.
This cross-section is usually enough to provide sufficient rigidity for a specific load of 400 kg per sq.m. In this case, it is necessary to comply with the parameters recommended by construction standards: the span length is 4 m, and the step between the beams is 60 cm. Based on these parameters, you can also calculate the required amount of timber.
The table shows the recommended cross-sectional dimensions of the load-bearing beam for a certain span length.
No. Span length (mm) Beam cross section (mm)
| 1 | 2000 | 75×150 |
| 2 | 2500 | 100×150 |
| 3 | 3000 | 100×175 |
| 4 | 3500 | 125×175 |
| 5 | 4000 | 125×200 |
| 6 | 4500 | 150×200 |
| 7 | 5000 | 150×225 |
However, in the absence of timber and small values of the expected loads on the floor, it is quite possible to use boards 50 or 40 mm thick, knocked together in pairs and placed on edge. This option is suitable for installing floors in an attic or in a small country house.
For the first floor of a residential building, this option is not suitable due to the low load-bearing capacity of the boards: to ensure the necessary rigidity, the pitch between the board beams will have to be significantly reduced, which will lead to an unjustified waste of material.
Pine is most often used as a material for beams.
This is the best option in terms of price-quality: its wood is quite affordable and at the same time has good technical characteristics. Beams made from wood of stronger species (larch, oak) can rarely be found on the open market, and their price is incomparably higher, and pine wood, after appropriate treatment with antiseptics, will be little inferior in durability to the same larch.
When purchasing timber, you should choose a material with dry wood. Otherwise, after installation of the beams, they may become deformed during the drying process - bending and twisting.
Flooring
Wooden flooring laid on the beams will be a rough base for the floor covering.
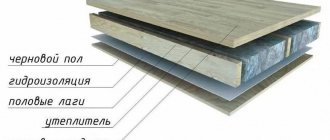
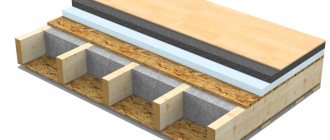
Typically, the flooring of interfloor floors is made in two tiers: below are rough floors on which insulation is laid, and on top is a pre-finish flooring mounted on top of the load-bearing beams. Decorative flooring is laid directly on it.
To determine the nature and amount of material for the flooring, you should clearly think through the design of the floors.
When constructing a subfloor, either 5 x 6 cm bars, packed onto load-bearing beams, or grooves made in the beams can be used as support for the flooring boards. The latter option is quite labor-intensive, so most often 5 x 6 cm bars are used to create support.
To calculate the required number of bars, it is enough to count the number of beams and multiply them by the length of each of them. We multiply the resulting footage (the total length of all beams) by two more (since the bars will be packed on both sides of each beam).
A wide range of materials can be used for finishing flooring. This can be plank flooring, plywood, chipboard panels, MDF, OSB, etc. Each of these materials has its own advantages and disadvantages, after reading which you can choose one of them. To calculate the required amount of material, simply calculate the area of the room.
When purchasing building material, you should always purchase it with a reserve of 10–15%, since during construction unforeseen material overruns are inevitable.
This will save you from having to interrupt your work and buy the missing part.
Impregnations
An antiseptic will extend the service life of wood.
To maximize the service life of wooden structures, they must be treated with antiseptic materials.
It would also be useful to treat the wood with fire retardants, which increase its fire safety.
To calculate the required amount of impregnation, you should read the instructions for its use - the approximate consumption of the mixture per sq.m. is always indicated there.
Thermal insulation with sawdust
Sawdust insulation is one of the most budget-friendly options for thermal insulation of wooden floors. The environmentally friendly material is quite light, so it can be used to insulate interfloor ceilings. The thickness of the heat insulation layer can be easily varied due to its flowability. Thus, it is possible to regulate the level of heat loss in the room.
When finishing the base with sawdust, you can use the following types of wood-based coatings:
- Blocks of pressed sawdust. The material is produced from copper sulfate, sawdust and dry cement. As a rule, it is laid between the joists when insulating the first floor. Lightweight blocks of small thickness - up to 15 mm, can be used for wall cladding;
- Pellets with sawdust. Granular bulk material is made from sawdust treated with an antiseptic and glue. Hard-to-burn sawdust can be used to insulate interfloor floors, since they do not create a large static load due to their low weight;
- Arbolit. In this case, the base material is mixed with synthetic and organic additives, and then molded into blocks. The non-flammable thermal insulator has high bending strength, while it is hygroscopic. Therefore, during its installation it is necessary to use waterproofing layers;
- Sawdust concrete. Externally, blocks with sawdust resemble cinder blocks. They are made from a mixture of wood chip granules, cement and sand. Suitable only for thermal insulation of the first floor of a house.
Insulating the floor along joists with sawdust in any case involves the use of a waterproofing layer. Hygroscopic material is a good environment for the development of mold and pathogenic flora, so during the operation of the coating it is necessary to exclude the possibility of moisture ingress.
Design nuances
The ceiling, made on beams, consists of wooden beams that are laid at a certain distance from each other. They determine the degree of strength and reliability of the entire structure. Usually they are sheathed (on one side or both) with various materials of a flat configuration. These can be sheets, panels or slats. Inside a structure equipped with this method, voids appear between the beams, inside of which it is convenient to lay insulation.
Another feature is the presence of wooden beams, which are fragments of lumber. Attaching additional elements to a wooden structure is very simple. The fastening elements can be self-tapping screws or nails; there is no need to glue or embed the heat insulator. Thus, the process of installing insulated floors becomes as simple and convenient as possible.
Benefits of wood
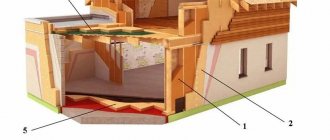
Floors are horizontal structural elements of buildings and structures that divide them into floors or separate them from technical rooms (attic or basement). Depending on what material the building is constructed from, the floors can be monolithic, prefabricated reinforced concrete or wood.
For the construction of a private house, floors on wooden beams are most suitable, since their weight is less than that of structures made from other materials, and constructing them with your own hands is cheaper and easier.
Wooden interfloor ceilings can be installed in houses made of any material, with the exception of monolithic reinforced concrete. They are erected simultaneously with the construction of the walls, as the latter are built to the height of the next floor. In frame wooden buildings, floors can be made simultaneously with the construction of the frame of the entire building, even before it is insulated and covered.
Main workflow steps
The instructions for carrying out the work will be divided into several stages so that you can understand all the features as best as possible. And we will start by laying out the main supporting elements.
Fastening beams
Work in wooden buildings can be carried out in several ways; consider the sequence of required operations:
- First of all, you should prepare the products - clean them of dirt and bark residues, if any, and also coat them with a special fire-retardant composition. This will protect the wood from fire and damage from woodworms and will significantly extend the life of the structure.
It is most convenient to carry out the treatment before attaching the elements; if you have a sprayer, the work can be done with your own hands very quickly
- Next, all the necessary measurements are taken; if cutting of beams is required, then it is better to double-check all the dimensions, since cutting off the excess will simply ruin the product, the price of which is quite high. Cutting is easiest done with a chainsaw or other special woodworking device.
Fastening is carried out in three main ways:
- The first is cutting out recesses to fit the ends of the beams and securing each element in special recesses. This option has been very widely used for several centuries. It is important to cut the material carefully so that the laying level of all elements is the same, the joints are sealed and thermally insulated using tow, this helps protect all cutouts from the penetration of cold air.
Laying in recesses is convenient because each element is located in its place, which is prepared in advance
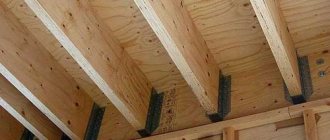
- The second solution is laying on the ends of the walls, with each of them fixed in a stationary position using staples or special screws. This option is applicable if cutting the recesses would be too time-consuming and complex, and the configuration of the building allows the beams to be laid with sufficient overlap on the walls so that they rest securely and provide high load-bearing capacity.
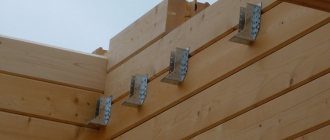
- The newest option - the use of special supports for timber - is used if it is necessary to make a partition anywhere on the wall surface without cutting out recesses or where the beams extend into the walls only a few centimeters. The work is simple: the fastening element is fixed to the base, after which the element is inserted into it and fixed using self-tapping screws.
The supports are highly durable and provide the necessary load-bearing capacity
Ring fastening, waterproofing and insulation
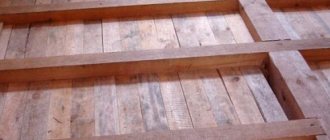
After the beams are installed, you can begin covering the structure with rough flooring, the work is carried out in different ways, we will consider the simplest and most cost-effective option:
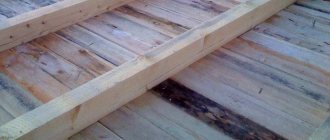
- The underside is filled with rough flooring, which is most often made from inexpensive unedged boards of the same thickness. The optimal solution is a 20-25 mm pine board. Its cost is low, and for this type of work it is ideally suited.
Important! Be sure to remove the bark from the ends if there is any, as it may contain pest larvae, which can greatly harm your home in the future. Also, do not forget about treating all elements with a fire-retardant composition.
- The boards can be laid on a cranial block specially fixed at the lower level of the beams (50x50 mm in size) or screwed directly to the beams. We strongly recommend using self-tapping screws for these purposes; they are much more reliable than nails and will hold all the elements much better.
This is what the construction of the second floor floor in a wooden house using a cranial block looks like
- Next, the surface must be waterproofed, and if previously various options were used for this - from clay-based putty to roofing felt, then in our time special materials have appeared that release moisture from the wood, but prevent its penetration from the outside. These are so-called membranes, and we recommend using them.
Special membrane materials are an excellent solution for floors
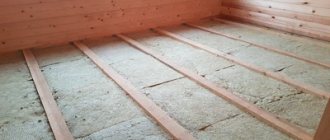
- Now let's look at how to insulate the floor of the second floor of a wooden house. Previously, different options were used - from sawdust and slag to expanded clay and various mixtures. With the advent of mineral wool, all work has been simplified - this type of material is characterized by high performance properties and excellent heat retention. In addition, mineral wool is an excellent sound insulator.
Insulating the floor of the second floor in a wooden house using mineral wool is a quick and simple process; it is important to lay the material as tightly as possible
- From the outside, the surface is covered with another layer of waterproofing material, at which point this stage of work can be considered complete.
Floor construction
The floor of the second floor on wooden beams can be laid in two main ways:
- Directly along the surface of the structure, this option is applicable if the thickness of the insulation inside the structure is less than the height of the beams and there is a small cavity below for ventilation. If the mineral wool is located flush with the top edge of the beams, then it is better to use the second option.
- Logs are laid on the beams, which makes it possible to create a so-called “floating floor”, since it is not rigidly connected to the walls and can move slightly due to temperature changes. This option allows you to improve sound insulation in a wooden house.
The work also varies depending on the material used:
- If you decide to make a wooden floor, then purchase a special board 32 mm thick or more with a special tongue-and-groove fastening system. The work is simple: the board is secured with screws or nails through the recess, i.e. groove, then the next element is inserted so that the connection is tight; if necessary, you can tap the end with a mallet. This results in a smooth surface without nail heads or screws.
- If you decide to lay laminate, parquet or other covering, the easiest way to cover the surface is with sheet materials: plywood or oriented strand board. The second option has high moisture resistance, so it is used more often. The work is simple: the sheets are combined so that the connections go along the beams and are screwed with self-tapping screws.
Preparatory work before installation
When laying insulation, it is imperative to use various construction and measuring tools. Regardless of what kind of insulation will be used, the installer must keep a level, tape measure, hacksaw, screwdriver, etc. on hand.
To fasten and close the joints of the waterproofing film, you must use construction tape or polyurethane foam.
If the work is carried out in a house where the floor has already been installed, it is necessary to inspect the load-bearing beams and, if necessary, make minor repairs. You must be prepared for the fact that some of them may have to be replaced.
It wouldn’t hurt to treat them with antiseptic and fire-fighting compounds. By the way, during an inspection, traces of small rodents may be found; accordingly, measures must be taken to prevent their movement in this space.
In addition, it is necessary to remove debris and dust that has accumulated during the use of the floor.
All wooden materials (beams, boards) must be dried. There should be no traces of rotting on their surface
Attic insulation
Unlike a cold attic, the thermal insulation of which is done solely to minimize heat loss through the roof, the attic is a full-fledged living room, so the task is to insulate the room so that it can be lived in.
How to properly insulate an attic floor
- A vapor barrier material is laid over the wooden beams, the canvases are laid overlapping each other with a margin of 20-25 cm.
- On the vapor barrier from the lower floor, boards are placed on the beams, which will serve as the subfloor of the attic and the base for the ceiling of the second floor.
- Fine expanded clay is poured between the ceilings, which will serve as insulation and at the same time soundproof the room.
- Another layer of vapor barrier is laid on top of the expanded clay, and the film is fixed to the beams using slats.
- The bars are mounted perpendicular to the beam floors; the distance between them should be equal to the width of the selected insulation.
- Plates of insulating material are laid between the bars, bringing them as close as possible to each other. A vapor barrier layer is laid on top.
- If ecowool is used as thermal insulation, instead of wooden blocks a truss is made from metal profiles. Installation of a metal frame and insulation with ecowool are jobs that are difficult to do yourself. To do this, you need to have professional equipment and devices, so such thermal insulation is usually not done independently, but is entrusted to specialists.
- Boards or thick plywood are laid on top of the insulating pie, which are attached to wooden blocks.
Insulation of the ceiling and walls of the attic floor
The method of insulating these elements depends on the design features of the room. If the attic roof reaches the floor, the ceiling is insulated as follows:
- Waterproofing is laid from the floor itself to the ridge. The film must cover the entire surface, so that no open spaces are formed, the sheets must be placed on top of each other. The material is secured to the rafters with a stapler.
- The sheathing is made from wooden slats, which are attached to the beams at a distance of 50-60 cm from each other.
- Insulation is laid between the lathing slats; its thickness should correspond to the width of the joists. The slabs are laid from the bottom of the room, moving towards the top.
- The top of the pie is covered with a vapor barrier film, which is attached to the sheathing with thin slats, and the joints between the sheets are additionally taped.
- Finishing finishing material, for example, lining or decorative panels, is mounted to the sheathing.
If the ceiling and walls of the attic are separate parts of the room, then insulation of the walls is carried out as follows:
- Lay a layer of waterproofing.
- They make wooden sheathing around the windows.
- A horizontal base beam is installed below along the entire length of the wall, and vertical racks are mounted from it in increments equal to the width of the insulation.
- A heat insulator is laid between the beams.
- Everything is covered with a vapor barrier film.
- A counter-lattice is made from thin slats to create a ventilation gap.
- Finishing is being installed.
Installation diagram
- Now we lay insulation in the interfloor space, avoiding even the slightest cracks. If mineral wool is chosen, then we trim it with a margin, since it shrinks.
- We lay a second layer of moisture insulation on top (on the beams) over the entire floor area. The result will be something like a sandwich - a structure in which the thermal insulation material is reliably protected from all natural factors.
- We cover the joists (with plywood, boards, etc.) and lay the finished floor.
That's all. To achieve maximum protection of your home from cold air, it is necessary to insulate all floors, avoiding the slightest cracks.
Formation of floor covering
So, we have sorted out the questions of what is the best way to insulate the floor in a wooden house yourself, and what are the best ways to do this. It remains to give a little information on how to form the floor covering.
If the floor structure is a concrete screed, then covering it will require materials and technologies used for finishing concrete floors. Moreover, the floor itself is already insulated, so no additional measures are required.
What can you offer? Here are a few traditional options: linoleum, laminate with underlay, plank flooring with joists underneath, ceramic tiles, stone, etc.
Building a floor using floor beams is a little more complicated. If a plank floor is assembled, then it is carried out without additional operations and nested, that is, using standard technology. In order to lay laminate or linoleum over the beams, additional investments will be required in the form of plywood sheets or OSB boards. They are the ones that are first laid along the beams, leveled in one plane, and then the floor finishing can be mounted on them. In this case, the substrate layer must be treated with protective compounds, often drying oil.
Boardwalk under a wooden house
Before making an insulated floor in a wooden house, you need to think carefully about what technology and thermal insulation material is best to use. But keep in mind that you should not save on thermal insulation measures. The initial investment will pay off quickly by reducing energy consumption for heating a wooden house.
Arrangement of a double floor
Suitable for rooms with high ceilings. The insulating structure will take up 12-20 cm of usable space.
Work in the following order.
- First step. Remove the baseboards, replace damaged wooden supporting elements, and fill existing gaps with foam.
- Second step. Fix the wooden logs in increments of up to 90 cm. The optimal installation increment is about 60-70 cm.
- Third step. Make sure the top edges of the joists are horizontal. If there are deviations from the horizontal, get rid of excess wood using a plane. In places with insufficient height, place pieces of wood, roofing felt or other suitable material under the beam.
- Fourth step. Cover the surface of the base with a vapor or moisture insulating material with a 10-15 cm overlap on the walls.
- Fifth step. Place the selected insulation in the space between the joists.
- Sixth step. Cover the thermal insulation layer with waterproofing film.
- Seventh step. Install the flooring elements.
- Eighth step. Lay the selected covering and install the skirting boards.
Important! If a wooden house stands on a screw, bored or pile foundation, you need to additionally install windproof material. It is installed on the outside of the heat-insulating layer.
Now you have all the necessary knowledge to independently carry out floor insulation in a wooden house.
Whatever material or technology is used, first of all, you must always remember that a high-quality result can only be obtained if the work technology is strictly followed.
Proper sound insulation of wooden floors
The technologies described above are designed to insulate floors as efficiently as possible. It is important to remember that in addition to thermal insulation, there are other important standards related to the sound insulation criterion. Some insulation insulates noise well and does not require additional measures in this direction. Noise coming from the street should not exceed a human-comfortable level of 45 dB. Below are ways to achieve this result using different building materials.
- Laying mineral wool with a density of 50 kg/m3 and above in a layer of 100 millimeters or more.
- Installation of special acoustic mats with a density of 30 kg/m3 and a thickness of 100 millimeters.
- Construction felt stuffing. Its density is from 20 to 30 kg/m3, the required layer thickness is from 20 to 40 millimeters.
Ecowool thermal insulation
Why is it better to make thermal insulation with ecowool? 100% natural coating has good technical parameters and a relatively low cost. It is made from cellulose and mineral additives, so even when heated, the ecowool coating does not emit caustic chemicals. A product impregnated with boric acid is practically invulnerable to fungus and mold.
What advantages does this type of insulation have?
- Good heat and sound insulation;
- Fire safety;
- Environmentally friendly;
- Low thermal conductivity.
As you can see in the photo, finishing the rough base using ecowool joists can be done in two ways:
- Manual. In this case, finishing with ecowool involves installing insulation along the joists on boards attached below. To prevent heat loss, the joints are treated with polyurethane foam;
- Mechanical. To finish the base of ecowool, blowing machines are used: through a special hose, crumbly insulation is evenly distributed over the coating. In this case, the layer thickness should be at least 3-4 mm.
The process of thermal insulation of ecowool floors is shown in more detail in the video clip.
Thanks to the glue that is included in the thermal insulator, it can be used to insulate not only the floor base, but also walls. It is also worth noting that ecowool is convenient for insulating not only the first floor of a house, but also interfloor ceilings. The vapor-permeable coating does not contribute to the accumulation of condensation and the development of mold.
Sand as a soundproofing layer
Soundproofing with sand has been used for a long time because the material has the ability to absorb both low and high sounds. In its mass it is porous with small cells inside between the particles. It is there, reflected from the walls of the air chamber, that sound waves are damped.
But sand has several negative characteristics:
- high specific gravity, which requires the construction of floors using powerful beams and a rough foundation (ceiling);
- high thermal conductivity, it is impossible to insulate floors with sand, you will have to add an additional layer of thermal insulation material;
- If you do not assemble a sealed structure, sealing all the cracks and holes, then sand will penetrate into the premises of the house.
Sand is used as a soundproofing layer in wooden floors