PVC is polyvinyl chloride, or in other words plastic. It is used for finishing bathrooms, bathrooms, balconies, loggias, verandas, office and residential premises.
PVC panel how to glue
Advantages of this material:
- durability - the service life of such panels is about ten years or more,
- resistance to heat and frost,
- moisture resistance,
- resistance to ultraviolet radiation, mechanical damage,
- safety,
- possibility of laying on any surface,
- high sound insulation,
- ease of installation.
When choosing PVC panels, you need to pay attention to their appearance, make sure there are no defects, a rigid and high-quality joining groove.
When asked how to glue decorative PVC panels , builders use several methods:
- fastening with brackets,
- fastening with clamps,
- fastening with nails or self-tapping screws,
- Glue mounting is the best way to do it at home.
Can PVC panels be glued?
Of course, you can, and for this you need to adhere to the following algorithm:
- Prepare the surface for installation, namely, eliminate defects and unevenness using putty,
- Prepare the panels themselves by keeping them at room temperature for at least ten hours, and then degrease them for applying glue,
- Apply glue dotted or dotted on the back side and press it to the wall,
- Install the framing profile and remove all dirt.
The installation method using liquid nails or glue is the fastest and easiest, accessible to those who do not have specialized skills and knowledge.
VIDEO INSTRUCTION
Often the installation of panels is impossible without lathing.
What glue to use to glue PVC panels
On a dry and flat surface, you can install panels without staples and screws directly on the glue. But this option is suitable for lightweight materials. Liquid nails and special compounds are suitable for the job.
High-quality adhesive composition for PVC panels has the following properties:
- after drying it becomes transparent, forms a film,
- gives a strong seam,
- not afraid of moisture, cold, heat, temperature changes,
- durable,
- sets quickly.
We recommend the following options:
- Universal adhesive for PVC Kleyberit 636. It contains synthetic resins, it is safe, dries quickly, and is not afraid of moisture.
- Adhesive Moment Crystal, which has no color, reliably attaches panels to different surfaces.
- Emfikol 34012A is a viscous, colorless, durable composition designed to work specifically with PVC.
- MitreFix is moisture resistant, transparent, and has a strong seam.
If you don’t know how to glue PVC wall panels, ask a consultant at a hardware store for help, and he will help you choose a composition that suits your purposes.
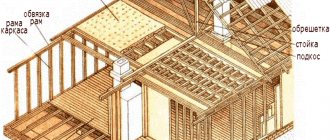
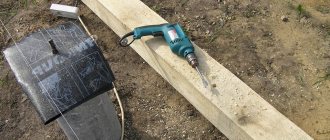
To install panels using lathing, you need:
- dowel-nails,
- hacksaw for metal or wood,
- miter box for fitting panels,
- level to control the position of the panels,
- drill,
- furniture stapler, screwdriver, hammer, nails.
Profiles and plinths are used as framing materials.
First you need to carry out a calculation and determine how many panels and slats are required.
- Their length should be equal to the height of the room.
- The calculation is made using the formula: wall length/panel width.
- Additionally, the number of slats is calculated.
- They are placed perpendicular to the panels, and the minimum cross-section is 20x20 cm, the distance between them should be no more than 50 cm. That is, to calculate how many beams are required, you need to divide the height of the room by 70, and take into account that the floor and ceiling should have each beam .
- When laying the sheathing, it is important to remember that the beams must be positioned exactly either horizontally or vertically. To do this, use a level and a tape measure, which are used to mark the wall with a pencil. To ensure that the wooden sheathing does not deteriorate from moisture, it is treated with special means, or instead of wood, a galvanized profile is often used.
- The slats are attached to the wall with dowel nails, and corners are installed in the corners. The finishing profile is mounted to the bottom and top rails on the brackets.
- When laying on the sheathing, the panels themselves begin to be mounted from the bottom corner on the left. The first panel is the most important; it must be positioned strictly vertically. To secure the sheet, clamps are used - metal holders that are fastened with nails to the sheathing. Next, the panels are attached to the groove with the previous one.
What to look for when choosing glue
In order for plastic panels to last a long time and have a presentable appearance, you should take the choice of adhesive seriously. It is worth noting that in construction stores you can find adhesives that are intended specifically for installing PVC boards. However, a situation may arise when there is no such product or the owner of the premises has some preferences.
Usually, those who are planning to do repairs themselves are puzzled of what kind of glue to use The choice of means for fastening is, of course, important, but we must not forget about other conditions.
The adhesive composition for PVC panels must have the following properties:
- After drying, it should be transparent so as not to spoil the appearance of the finish.
- The composition used must be well resistant to moisture, temperature changes, cold, and the like.
- It is important that the glue sets quickly.
- The quality of gluing should be as high as possible.
- It is also worth considering the durability of the fastening.
- The glue used must be safe for health, so you should avoid toxic compounds that have a strong odor.
It would be useful to have antibacterial additives in the glue . A correctly selected composition will ensure that the finishing material is well attached to the wall and the panels will decorate the room for many years, despite the aggressive effects of water and temperature changes.
Types of materials
Work can be performed using the following materials:
- Drywall. For production, GVLV brand slabs are used - this is a moisture-resistant plasterboard. Installation can be carried out in several ways: mounted on glue, putty, polyurethane foam, or mounted on a frame structure;
For the installation of slopes, moisture-resistant plasterboard and plastic panels are used. They have a pleasant glossy surface that harmonizes with the profile of the PVC window. Fastening can also be carried out by fixing it with glue, foam or using modern material - liquid plastic ;
Plastic panels MDF panels. They are not used very often for the manufacture of slopes due to the fact that it is not easy to choose the appropriate appearance of the panels so that they are combined with the profile material;
The use of MDF when constructing slopes is rarely used. Sandwich panels. They are used to install insulated surfaces of window niches;
Sandwich panels are used to install insulated slopes
- Plaster. The most inexpensive and traditional material. Most often used for outdoor work. To work with this material, you must have certain professional skills to do the job well.
Installation features
PVC panels are a soft and plastic material. On a wall with an uneven surface, if some measures are not taken, they will also lie unevenly and will look unaesthetic. Leveling the wall with putty or plaster is not the best solution in this situation. Therefore, a sheathing is first attached to the wall, onto which the panels are screwed with self-tapping screws. The distance between the slats of the sheathing is 35-40 cm. If you decorate the ceiling with plastic panels, then the slats should be located closer - at a distance not exceeding 30 cm. This is necessary in order to prevent sagging of the PVC slats.
PVC cladding material can be glued to a flat wall. With the right choice of glue and adjustment of the lamellas to each other, the wall looks smooth and beautiful. Such a wall can then be easily maintained.
Fastening PVC panels to polyurethane foam
Internet users who are interested in the question of whether it is possible to glue PVC panels to polyurethane foam have probably watched more than one video in which craftsmen show how famously they glue plastic panels to polyurethane foam. But these videos leave questions. What happens to the glued cladding after 12 hours, a day, three days? Nobody demonstrates this. Without a doubt, the foam has excellent adhesion on rough surfaces. And while it is wet and has not begun to polymerize, everything looks even, smooth and beautiful. What happens next? Knowing the properties of foam, this is easy to assume. Expanding, the polyurethane foam deforms the panels, and they bend in waves. To avoid this effect, some recommend installing supports, while others screw in a self-tapping screw in the middle to secure these panels.
Experts recommend gluing the panels onto the foam point by point. This will reduce the expansion effect. But then the adhesion area decreases, which in turn reduces the strength of their attachment.
Supports made from wall-to-wall slats can be installed if PVC is glued on a narrow balcony. But what to do, for example, if the distance between the walls is two or more meters? Or if the slats are narrow and the balcony is six meters high, how many of these supports need to be installed to cover the entire wall? It is recommended to spread out such work over 3-4 days.
If you fasten the panels using just one self-tapping screw, you can count on the fact that they will last for some time if they do not start to tear out and swell from the expanding sealant. This is only possible if very little foam is applied.
Craftsmen assure that polyurethane foam adheres to the wall and smooth plastic panels. If the first statement can be believed, then the second is doubtful. Thus, gluing PVC wall panels to the wall with mounting foam is not advisable, since the foam has high expansion and low adhesion on smooth surfaces.
Installation of decorative wall panels
From all of the above, the question arises: what to glue it with then? For such purposes, the construction market offers:
- Liquid nails are an adhesive based on liquid rubber, supplemented with binding polymers and clay as a filler. Liquid nails do not expand at all when dry and are perfect for gluing panels on a flat wall.
- Adhesive foam. It consists of polyurethane, like polyurethane foam, but unlike the latter, it does not expand and has excellent adhesion thanks to special additives. Visually, foam adhesive is similar to assembly foam, as it is also packaged in spray bottles. Only she is blue. It's easy to use. Just remove the cap, shake the can, and it's ready to go. Foam adhesive is great for PVC panels. For example, sipall foam glue. Or TechnoNIKOL.
Before gluing plastic panels to the wall, you must first prepare it: wash it from dust and prime it with an adhesive solution.
First, the upper and lower guides are attached, which are produced, as a rule, by the same manufacturers as the panels themselves. They serve as accessories. A thin strip of foam adhesive is applied to the outer edge of the guide and glued to the selected location. For greater reliability, you can fix the guides with three self-tapping screws: two in the corners and one in the middle.
Note! If the wall is flat, you can do without guides. Just cover the edges after finishing the work with a decorative cornice on top and a plinth on the bottom.
PVC panels have a remarkable feature. Their side ribs are equipped with grooves on one side and a protrusion along the entire length on the other. Thus, the panels are inserted into each other, and the connecting joint is almost invisible. Foam adhesive is applied to the plastic panels and pressed against the wall after it has been inserted into the groove of the previous lamella.
Fastening PVC panels to the wall
Important! You cannot attach wall panels with the mentioned types of glue in rooms with elevated temperatures, for example, next to heating appliances, in saunas, in the kitchen near the stove, since the glue softens when heated. In these cases, it is better to use self-tapping screws or heat-resistant glue.
Features of using polyurethane foam when installing plastic windows and sandwich panels
So, it’s time to talk about the direct purpose of polyurethane foam, namely sealing openings when installing plastic windows and leveling bevels from sandwich panels.
Installation in a window opening
Before installing the window in the opening, it is necessary to level the end, sealing all the cracks in it. This requirement is especially relevant if the wall is made of bricks, stone or concrete blocks. To level the wall from the street side, waterproof dry mixtures should be used. On the room side, ordinary dry mixtures for plastering are suitable.
If the window consists of several elements, for example, a window with a balcony door, they must first be connected and the finished structure inserted into the opening. Before installation in the opening, it is also necessary to stick a vapor barrier tape to the end of the entire structure. It will cover the space between the window and the opening, filled with polyurethane foam, and protect the polymer from the effects of the external environment. It is important not to pull the tape.
Then the anchor plates are installed to mount the window. Anchors are attached according to pre-prepared markings. After completing this operation, a self-expanding sealing tape is glued to the window frame, which will perform two tasks simultaneously:
- will cover the mounting foam between the wall and the frame;
- will serve as an additional seal and insulation.
But before this you need to remove the protective film, otherwise it will be much more difficult to do later. Here the tape is not bent at the corners, but is cut with scissors so that the next one, glued at an angle of 90°, fits tightly with the previous one. Thus, the glued SU tape (SUL) forms a frame on the structure fixed to the wall. Until the JUL begins to expand, it is important to install a window system in the opening. The window is leveled using a regular spirit level. After this, you should secure the structure in the opening by pressing the anchor plates to the wall with self-tapping screws.
Finally, another tape is glued on the street side - diffusion waterproofing tape, which is also vapor permeable. When gluing this tape, it is important that there are no gaps left anywhere for moisture to penetrate. Foaming of seams with polyurethane foam is carried out from the room side. But before that, you need to moisten the wall with a spray bottle. This is not done to capture dust, but for more efficient polymerization of the polyurethane foam.
Finally, the foam is covered with the tape that was glued at the very beginning. Then the seam between the frame and the window sill is foamed and also sealed with waterproofing tape. After completing all the activities, work is done with the sashes.
Thus, when installing a plastic window, polyurethane foam does not serve as an adhesive holding the structure in the opening, but acts as a sealant and must be protected on both sides with impermeable films.
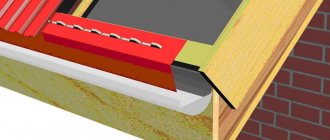
Leveling the slopes of window openings with sandwich panels
When you mention sandwich panels, the reader probably imagines massive slabs that are used to build walls. But these are different panels. They have a thickness of 15-25 mm. The outside may be thin plywood, thin sheet metal or PVC. The filling of this sandwich is extruded polystyrene foam. The material is easy to cut, has heat-insulating properties, and is aesthetically pleasing. This material is now used as slopes in window openings.
PVC window slopes look very aesthetically pleasing and are easy to install
For their installation, U-shaped plastic profiles, or “pawns”, as builders call them, are used. The width of the groove in the profile must correspond to the thickness of the panel so that it is easily inserted and does not move around in the pawn fixed around the perimeter of the opening. The pawns are screwed to the frame so that they do not interfere with the hinges and sashes. Thin, short self-tapping screws are used to secure them. It may be necessary to cut off the polymerized foam protruding from behind the frame before installing them.
First, install the side vertical panels. They are simply inserted into profiles. The horizontal slope falls on the side slopes. Accordingly, the profiles for it are located above the profiles of the side slopes. Then the slopes are leveled using a rule and fixed with tape and wedges inserted from the inside, which are cut from a board or the same sandwich. The wedges prevent the panel from bending inward, and the tape prevents it from bending outward. The space between the wall and the panel is filled with polyurethane foam. After the foam has dried, the corner fasteners and tape should be removed, and the outer corners should be decorated with special cornices.
Slopes are so called because they are installed in the opening at an angle of more than 90° relative to the window. In the slopes, the expanding foam will fill the free space, maybe it will come out, and the clamps will not allow the panel to deform. Moreover, if the thickness of the sandwiches is 24 mm, it has some resistance to deformation.
Mounting method on polyurethane foam
You can glue the slopes to the windows using polyurethane foam. This is a universal material with a high degree of adhesion. How to glue plasterboard slopes in this way is shown below.
- On the window opening, the width and depth are measured from above. On the sides, the height is measured twice - at the window and at the wall;
At the side openings, the external and internal heights are measured. In accordance with the obtained dimensions, details are drawn on a sheet of drywall;
Marking the part Using a construction knife, cut out the necessary parts;
Cutting parts The polyurethane foam is applied to the slope, the plasterboard part is pressed for a few seconds, then it is separated from the wall and wait until the foam expands again . Then the part is put back and fixed in the required position. In this case, you can use self-tapping screws, which are removed after the polyurethane foam has dried;
The part is glued using polyurethane foam. Metal corners with perforations are installed on the plasterboard corners;
The corners of the slopes are covered with perforated corners. The corners are finished with putty and left until completely dry;
Finishing corners with putty At the final stage, the surface is painted.
Slope painting
Advantages when installing panels in the bathroom
The most common practice is finishing with ceramic tiles, but this costs time and money. A good alternative is lining the walls and ceiling with plastic panels.
This method has a number of advantages:
- Affordable cost of materials - the price of one square meter of panels is significantly lower than that of tiles.
- Eliminates the need for tile adhesive.
- Dirty types of work associated with the generation of dust when cutting tiles are eliminated
- Minimum set of tools.
- Simple installation - it becomes possible to independently perform the entire complex of work.
- Ease of use - the panels can be easily processed with ordinary hand construction tools.
- Plastic is a completely inert material with respect to water.
- The ability to complete all work within 7 days - taking into account the lack of professionalism of the person carrying out the work.
Why should you choose plastic products?
Plastic is the most common and versatile material.
Plastic slopes are most often installed
This is due to its performance characteristics and ease of installation. The advantages of plastic slopes include:
- Easy to care for the surface - just wipe the plastic with a cloth and soapy water;
- High-quality plastic does not fade when exposed to sunlight;
- Plastic looks best combined with the profile surface of plastic windows;
- The service life of these products is calculated in decades;
- For plastic slopes, when insulating them, you can use mineral wool. In this case, heat loss through the window structure is reduced and the effect of window fogging is eliminated;
- The moisture resistance of the plastic is obvious, so it does not collapse under the influence of condensation;
- Simple installation - the parts just need to be treated with adhesive and fixed to the surface of the base.
What is liquid plastic
Liquid plastic has recently appeared on the construction market. It has found application in many areas, including the installation of plastic slopes.
Liquid plastic is used for gluing plastic slopes
Liquid plastic is a type of modern sealant that can be used as glue when attaching plastic slopes. The content of liquid PVC in its base gives this material many positive qualities.
Mode of application
Using this glue, you can guarantee strong adhesion between the material and the surface.
Using liquid plastic when processing joints and seams, you can be sure that it will never turn yellow, as happens with silicone analogues. This ensures a neat appearance of the window opening.
When temperature changes indoors, plastic panels secured with silicone may lose their joint tightness. And the panels, placed on glue in the form of liquid plastic, will stay in place for many years.
When working with this material, it is important to consider that it hardens in one minute . This is the interval during which it is necessary to apply it and distribute it over the surface. You need to work quickly and efficiently the first time.
It is also worth considering that liquid plastic is quite toxic due to the chemical reaction that occurs, so when working with it you must use a respirator and ensure a flow of fresh air into the room.
It should be noted that after liquid PVC-based glue dries, it will become absolutely harmless to the environment and people.
Positive qualities of liquid plastic
The appearance of this modern material did not go unnoticed by specialists involved in the installation of metal-plastic windows. For them, the question of how to glue plastic slopes has disappeared forever. Liquid plastic is characterized by the following positive qualities:
- When processing joints, the highest degree of sealing is achieved;
- It cannot be washed off with water, like its silicone counterpart;
- It does not turn yellow over time, does not emit or absorb foreign odors;
- The material does not change its qualities even after 10 years;
- It is moisture resistant;
- Does not rot or become moldy;
- Does not collapse or fade when exposed to sunlight;
- Resistant to mechanical stress;
- Has an affordable price.
If you glue the slope onto liquid plastic, you will get a neat monolithic structure.
Mounting methods
Fasteners for sheathing
Recommended by all manufacturers. It is a series of longitudinal slats made of wood or PVC profiles, attached to the surface in several rows (up to 4...6). If a wooden grate is used in a bathroom, it must first be treated with an antiseptic composition against rot, mold and mildew.
The panels are fastened to the sheathing:
- Carnations with a wide head , for example, “tar paper”.
- Self-tapping screws with a large head , for example, “galvanized self-tapping screw with a press washer.”
- With staples, clamps - they themselves are attached to the sheathing, and the panel is fixed with them through the protruding flat lower (rear) part.
When attaching panels to a plastic profile using staples, it is advisable to additionally use “liquid nails” glue. This is due to the fact that the brackets have low strength - during installation they are deformed, the fastening becomes unstable, this is especially evident when installing panels on a ceiling surface.
A type of sheathing is a metal frame made of metal profiles. The main advantages are greater rigidity and strength, moisture resistance. The panels are fastened to it using metal screws with a large head. Fixation is possible using glue with the general name “liquid nails”.
Note: If the panels are installed in a damp room, the glue must be based on chemical solvents - the acrylic base is not resistant to moisture.
Fastening directly to the surface
Available in several ways:
- With a “nailable” surface - wood and wood products, drywall, etc., the panel can be fixed with nails or self-tapping screws directly to the surface to be finished.
- Using alcohol-based adhesives , they are used to attach foam baseboards and ceiling tiles; disadvantage - setting time is 15 minutes; advantages - price and moisture resistance.
- The use of a group of adhesives colloquially called “liquid nails”; advantage - reliable and durable fixation, adhesion to most materials, including plastic.
Tip: When choosing this type of adhesive, it is not at all necessary to choose a highly specialized composition - most of these adhesives have a wide range of applications. What is more important is the initial grip strength; the higher the number, the better. Measured in kg/m².
The use of double-sided tape on a foam base will provide reliable instant fixation, is easy to use, and is moisture resistant.
Note: all these types of “fixing directly to the surface” have a significant drawback - they require a flat surface without drops.
If the surface is uneven, the above methods are used with wooden sheathing or PVC profile, as well as using a metal frame.
Fastening with polyurethane foam
Advantages:
- Compensation for level differences on the surface up to 30mm.
- Reliable fixation.
- Foam adhesion to most materials.
- Fairly quick installation - tiling the walls of a “typical” bathroom will take no more than 2…3 days.
- Ease of use - the method is similar to fastening with “liquid nails” glue.
- Minimal contamination during work - trimming panels and plastic corners.
Note: it is advisable to use professional foam, and one that is marked “65” and the time for the formation of a surface “crust” is 10...15 minutes.
To use foam, you can buy an inexpensive “disposable” plastic gun - it will pay for itself on the first use, and its performance will be enough to produce up to 10 cylinders.
Installation of PVC slopes using polyurethane foam
Anyone can install window slopes from sandwich panels with their own hands. Such slopes are good because they are easy to install yourself, they do not crack, do not get wet, do not fade, mold and mildew do not develop on them, they are warm, easy to clean, and sandwich panels are affordable.
The technology for installing plastic slopes from sandwich panels is quite simple.
We measure the height of the slope (the distance from the window sill to the top edge of the window opening), cut the sandwich panel according to this distance.
Main properties and characteristics
Plastic panels have a number of undoubted positive consumer and technical properties:
- Most plastic panels are lightweight, which has a positive effect on the ease of installation work. In addition, it allows you to save on transportation costs.
- Absolute moisture resistance. This property is ensured by the material from which the panels are made - PVC, polyvinyl chloride. They don't rot.
- Bacteriological resistance - not susceptible to destruction from mold and mildew.
- Quite high fire resistance. High-quality panels have a fire safety certificate according to KM2 (G1 - according to the old designation). In practice, this means that they cannot be lit with a match or lighter.
- Durability. Under normal operating conditions, the service life of high-quality products can exceed 50 years.
- Technological in use - easy and simple installation, ease of maintenance.
- They have increased sound and heat insulation.
- They have high consumer properties:
- Affordable price.
- Wide range of design solutions for installing panels.
- Rich, constantly updated color range.
At the same time, plastic finishing materials are not without disadvantages:
- Low mechanical strength - the surface is easily scratched, and when pressed, residual deformation (indentation) may appear.
- Temperature operating range is -20°C…+60°C. At low temperatures, plastic becomes brittle and can crack from a small impact. As the temperature rises, the plastic material becomes too plastic and begins to melt and deform. This leads to restrictions on use:
- The panels should not be used near heating devices with temperatures above +50°C, for example, infrared heaters or gas stoves.
- When installing lighting fixtures in a panel, it is necessary to provide protection from light and heat radiation.
- If used for finishing unheated balconies or entrance vestibules, the panels will require careful handling during periods of severe frost.
- In accordance with fire safety requirements, plastic panels are prohibited from being used in general evacuation areas - stairs, corridors, halls: the panel may be non-flammable, but when heated above a certain temperature, it begins to emit harmful substances and has increased smoke production.
Tips for determining the quality of panels:
- The most durable are laminated panels, but also the most expensive.
- If you have a choice between panels with thermal transfer printing or offset printing, then it is better to choose the latter.
- Stiffening ribs should not be visible visually.
- The number of internal jumpers affects the rigidity; the more there are, the stronger the panel.
- When you gently press the panel with your fingers, there should be no dents left - this indicates that the surface has elasticity and is not oversaturated with chalk, which makes it brittle.
- The smell that the panel emits, after opening the package, must disappear within 5...6 hours, otherwise the product must be returned - the product is “fonit”.
- for a bathroom ; the only thing you need to pay attention to besides the aesthetic appearance is the strength of the panel. If you accidentally slip on soap in the bathroom, and then search for a support point on a wall made of panels, residual dents may form on the latter.