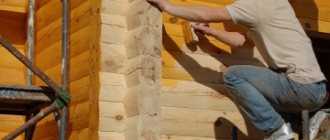
I wish you good health to the readers of From-the-wood-with-your-own-hands!
Let's look at some options for treating wood with natural substances, which can be very useful in the absence of special tools.
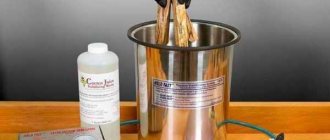
Linseed oil
Linseed oil treatment is a classic method for treating wood types such as birch to achieve a durable, strong and moisture-resistant surface. Possible options:
1. Raw linseed oil, undiluted oily drying oil.
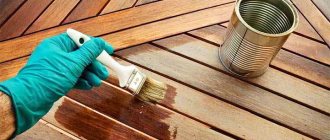
Application example: the handle of a knife (or other product) should be placed in linseed oil for several days.
To do this, the knife can be placed in a jar with a screw-on lid with a thin slot for the blade, which, after placing the knife in it, must be hermetically sealed.
When the wood is soaked through, it must be wiped with a smooth, dry rag. After this, let it dry completely for several weeks. When the oil evaporates, oxidation and polymerization of the surface occurs, which after some time becomes strong and elastic.
2. Flaxseed oil, diluted half with turpentine. A liquid prepared from linseed oil, real natural turpentine (do not use substitutes!) in a 1 to 1 ratio.
Turpentine has long been called
resinous discharge from wounds inflicted on trees. Now this substance is usually called oleoresin.
With the help of turpentine, the time for wood drying and oil oxidation is reduced. Application: (see 1). Drying time is 1-2 weeks.
3. Linseed oil with tar.
The addition of 50% tar gives the wood a red-brown tint. (for use, see 1) Use only natural tar; after use, thoroughly wipe off any remaining oil with a soft, smooth cloth.
WARNING: When using linseed oil, there is a risk of spontaneous combustion of rags soaked in linseed solution. Therefore, dispose with extreme caution to avoid causing a fire!
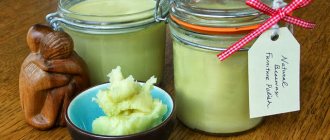
Wooden products can be waxed, here is one varnish recipe:
wax - 100 parts rosin - 25 parts turpentine 50 parts (parts are indicated by weight).
Grind rosin and wax and melt, mix, then remove from heat and pour in turpentine, mix thoroughly. Coating recipes are different and here you can and should try different compositions. Another method of such folk varnish is rosin dissolved in turpentine.
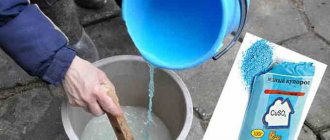
Ancient recipes for cheap and durable paints for wooden surfaces
Curd-lime
Equal quantities of fresh cottage cheese and slaked lime are thoroughly kneaded. A white, quickly drying liquid is formed. It must be used on the same day because it spoils quickly.
Ocher and some other paints can be mixed into this composition. In this case, it is necessary to consume as little water as possible, as it negatively affects strength.
The paint dries very quickly and does not leave the slightest odor. Therefore, you can cover the surface with two layers in one day.
To make the paint more durable, after applying two layers it is polished with pieces of coarse cloth.
Starch-painting
From 10 parts by weight of wheat starch, poured with cold water, a composition is obtained whose consistency resembles thick sour cream.
Stirring constantly, add boiling water until the composition reaches the desired thickness. For greater strength, you can add 1 part of alum or borax to the warm paste.
To prepare the paint, add zinc white and any colored paint, vegetable or mineral, to the still hot paste.
Then zinc chloride is dissolved in water and a small amount of tartaric acid is added to it.
Before use, mix the first mixture with this solution. The amount of material and proportions do not matter much. The paint is applied in the usual way. It is not flammable, is not afraid of dampness and cold water, but can be washed off with hot water and soap.
Potato paint
Take 1 kilogram of potatoes and boil it. Peel while it is still hot and add 4 large mugs of water. After this, you should mash everything into porridge and rub through a sieve so that there are no lumps left. Add 1.5 kilograms of powdered chalk, which is pre-diluted in 4 cups of water. The result will be about 8 mugs of grayish, durable, well-covering and very cheap paint.
All these paints have been tested and give excellent results.
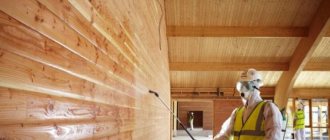
Processing of wood and other products
1. To prevent the wooden product from cracking and crumbling into pieces, it was boiled for 1-2 hours in a solution of ash alkali. After this, it was dried, and, if necessary, the processing of thinner parts continued.
Ash lye is an ancient recipe of our ancestors, used both for washing woven products and for processing wooden products.
Making lye is simple - burning wood (birch is best) until it becomes white ash (ash). Ashes (ash) are filled with water, into which, during soaking, all alkaline groups of substances pass. After this, the sediment can be used to fertilize the soil (it is not dangerous for plants, since it does not contain “soap”), and the water can be used for washing or for treating wood products.
2. In a strong decoction of crushed oak bark, our ancestors either boiled (for a couple of hours) or soaked (for a day) products not only made of wood, but also all kinds of wicker - from bast, flax, hemp, reed... Tannins strengthened the product so much that, for example, ropes and ropes increased their strength by an order of magnitude.
- Related Posts
- Finishing wood. How to make and apply shellac
- Making furniture wax and wood waxing techniques
- How to coat wood carvings. Tinting technology
« Previous entry
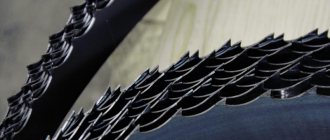
Do-it-yourself wood brushing: how the process is carried out
In this case, the wood is processed using special brushes that have durable (usually metal) bristles.
The meaning of the actions performed is to ensure that the annual rings on the tree become noticeable. This makes the surface visually embossed. The origin of the term is associated with the English word brush. Many people know such a tool as a cord brush. It is suitable for brushing wood.
Nowadays, completely manual processing of wood with brushes is becoming increasingly rare. Automatic devices are used much more often. Moreover, there are even special large-sized machines equipped with appropriate fleecy parts. With their help you can quickly process a large surface.
Brushing is ideal for working with larch, pine, spruce, alder and oak. In other words, we are talking about hard wood.
Binding of wood is not recommended for species such as pear, maple, teak, beech and cherry.
Mastering the process of brushing wood with your own hands is not that difficult. To get started, you will need a set of necessary tools:
- Brush (with metal or other dense bristles)
- Paint (one or more shades)
- Solvent
- Surface to test (a kind of “palette”)
When everything is ready, it's time to feel like an artist and do some brush work!
- Degrease the wood
- Apply a sufficient amount of carefully selected shade of paint with a brush; excess can be removed with a rag.
- Check the color and visual effect on the “palette”. If all is well, you can continue.
- Start applying paint to the wooden surface with a brush, making movements strictly along the grain of the wood. It is recommended to go in one direction, without reverse movements and repetitions, but this is not so necessary. While working, do not put pressure on the brush - the bristles should not tuck or wrinkle.
- When everything is ready, simply let the product dry.
Do-it-yourself wood brushing is complete!
Direct maximum effort to processing the protruding parts of the product - carefully go over the edges, corners, etc. This will create the illusion of a 3D effect and emphasize the relief, which always looks advantageous.
Features of Inlay
The main rule of inlay
– making the socket after making the insert exactly according to its dimensions. Fitting an insert to a pre-cut nest is very difficult, and usually the job turns out to be sloppy. The recess for the strips is made either with a dowel or a saw with an adjustable stop.
If you have a machine, use a milling cutter. Under the coal inserts, cutting is made with a chisel or chisel according to the markings with an awl. Inlay with a strip of metal driven into a slot cut with a knife. In this case, the rectangular strip is held obliquely, first the corner is driven in, then the driven piece is cut off at a right angle from the main strip and the next one is driven in.
Protrusions and irregularities are then cut off with scissors or a saw and file. This method can be used to create any design, including letters and portraits. Of course, an outline - a drawing - must first be applied to the base with a pencil. The surface is sanded using sandpaper on a piece of wood, and excess metal is cut off with a file.
The strip is cut with non-ferrous sheet metal scissors. Brass, red copper, cupronickel 0.5 mm thick are suitable for this purpose. Thicker strips, usually used in the form of straight frames, are cut with a saw and filed on one side. If the strip should protrude beyond the plane, the upper edge is treated with a half-roller and polished.
You can also glue round wire, burying it halfway into the groove. Epoxy glue will hold it in place quite well. For greater strength, you should only solder pins in the corners and in the middle that go deep into the base.
How to age wood
Things from the distant past are quite popular these days. This did not bypass the design sphere either. The design of the house, which contains notes from the past in the form of old wooden furniture, floor beams, and various antique wooden decorative elements, gives it a chic and expensive look. You might even think that the owners inherited from their great-grandfathers a luxurious house that was centuries old.
In fact, everything is much simpler. The fact is that with the fashion for everything old came the concept of imitation of the old. The same thing happened with wood, because in any construction or furniture store you can find decorative elements made to match the old style. Of course, the prices for such items are quite high, so rarely anyone can afford them.
Antique wood processing is done using 3 common methods, namely:
- brushing;
- burning;
- alkali.
At home, great preference is given to option 1.
The first step is to select the wood that we will process. If you want to artificially age boards or timber to further create various objects and furniture from them, then you can choose materials with various defects (chips, small cracks, potholes, knots). After proper processing, such defects will only improve the result. If you choose ready-made furniture for aging, then you need to use pieces that look like they were made by hand in past centuries. Before processing, the furniture must be completely disassembled so that it is possible to reach hard-to-reach places.
You also need to prepare the necessary materials, such as:
- hard metal brush;
- softer wire brush;
- paint brushes;
- acrylic paint, varnish, wax or stain;
- sandpaper.
It doesn’t hurt to practice a little on unnecessary, small pieces of wood before working with the prepared material.
Some operations can be harmful to health (when fired or using chemicals), so it is better to carry them out in the fresh air and in compliance with safety rules.
What should you protect wood from?
Any natural building materials are exposed to the external environment - they are able to expand when the temperature rises, absorb moisture, and also fade under the rays of the sun. The tree is especially vulnerable in this regard. It is a living organism, and after being cut from the root it loses moisture. The drying process is accompanied by cracking and deformation, and at the same time, with an increased level of air humidity or even contact with water, the wood begins to actively absorb it, and as a result, swell.
The accumulation of moisture in the wood will certainly lead to mold and mildew spores settling in it, which begin to quickly develop and destroy the structure, penetrating deeper and capturing the surface. Signs of such damage will be visual differences - uneven wood texture, gray/white/bluish and black deposits, stains that spoil the appearance of the wood structure. Gradually the tree becomes ordinary dust.
Please note that rot caused by fungi is dangerous not only because it has a destructive effect on wood, but is also very harmful to human health. Fungal spores that are in the air penetrate deep into the lungs and begin to cause various diseases.
For many structures, this situation will be very dangerous, even if high aesthetic requirements are not imposed on them. For example, if you don’t think in advance about what exactly to cover the porch of a barn with or to process wooden fence posts, then after a short time everything will rot and the fence will not be able to bear the load that was previously calculated.
The second dangerous factor is fire, which wood cannot withstand without special treatment. In addition, wood-boring insects, which gnaw many passages in it, will irreversibly destroy the structure of the material and deprive it of its former strength.
Moreover, after a certain time, the surface of untreated wood parts begins to darken and an ugly gray tint is obtained, and the material becomes covered with deep cracks. All this will not have the best effect on the appearance, and therefore it is worth deciding how to cover the wood outdoors so that both the strength and beauty of the material are preserved for a long time.
Patination of wood
A brown or greenish surface patina is more characteristic of metal. First of all, it concerns copper and bronze objects that have been affected by oxidation.
e4ff561f178dac0036cea758d1067463.jpe
a405a5d1a8accfffcc764ba4559d5062.jpe
However, patina can also appear on non-metallic objects. In this case, patina refers to any plaque that appears on the surface over time, regardless of shade and origin.
Aging wood using the patination technique makes it unevenly dark, as if it has been in human hands many times and has been exposed to high humidity and time.
Depending on your goals, you can artificially achieve a more or less dark patina on wood, make the surface look like metal, and even give it a very specific color. For example, it is very common to age wood with a white patina (a process known as liming) or to give it a noble bronzed appearance.
The types of wood with which the patination technique works optimally are cherry, maple, beech and others that do not have a clear texture.
The instructions and tips below will help you figure out how to age wood with paint and how to achieve patina.
The process of processing a wooden product and the necessary tools depend on which type of patination to choose. Let's look at the main ones.
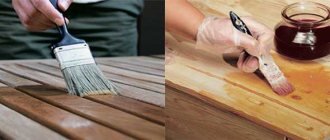
In this case, bitumen varnish and shellac varnish are used. The first is applied to clean, dry wood with a soft brush or sponge. The second is to cover the entire product to consolidate the patina effect.
This is the simplest and most understandable method, so it is ideal for those who are trying to age wood with their own hands for the first time. All you need is acrylic paint of the desired color, a brush or roller, and a cloth to soak up excess paint.
The process is simple: apply acrylic paint to the indentations in a loose layer, apply a dry rag to remove excess. Then all you have to do is wait for it to dry completely.
It is necessary to apply a small amount of oxidizing agent (lye, ammonia) to the painted and cleaned wooden surface. Within a few minutes, the surface will begin to oxidize, causing its color and appearance to change.
To consolidate the result, after using alkali, you need to wipe the wood with a vinegar solution. This is not required for ammonia.
In addition to these agents, during the process of chemical patination, you can etch wood with iron or zinc sulfate, calcium chloride or potassium chromium. It is necessary to create a solution based on any of these substances and place the tree in it. The longer you keep the wood in the solution, the more obvious the effect of surface corrosion will be.
When chemical patination, you need to be as careful as possible so as not to spoil the product or achieve an excessive effect. In addition, you cannot do without safety precautions - be sure to use gloves and work in a well-ventilated room.
You will need a wax polish, which needs to be rubbed onto the wood. Overall, the wood will instantly become smoother and shinier. And over time, an additional result will be added - tinting will become noticeable in the recesses and places where wax accumulates, highlights and reflections will become softer.
The wax on the wood takes quite a long time to dry, so you will have to be patient when using this method.
The general sequence of actions for color patination of wood with your own hands is as follows:
We degrease and clean the wood We perform a gentle sanding We apply a primer, paying close attention to the recesses and grooves We begin to carefully apply the paint in a thin layer (before giving the color to the wood completely, you need to make sure that the shade is chosen correctly) We finish painting the wood We briefly go over the painted surface with emery We perform patination using one of the methods described above. Rub the wood with a dry cloth. If desired, coat the treated object with varnish from a spray bottle or with a brush.
Thermal and chemical treatment of wood
Thermal treatment of wood.
These methods can be called related, since the destruction of the top layer of wood occurs almost without mechanical influence. These are more dangerous methods than the previous ones, so processing should be done in the air and in compliance with safety measures.
d38a11acc721b6e7f63305bd75228ae7.jpe 487063a49eaddd6ab4361668c06841bf.jpe
bd7655974f7fb4ec37862d665fe32c49.jpe 8e509b1b77ca50b9575993c0d4932b6a.jpe
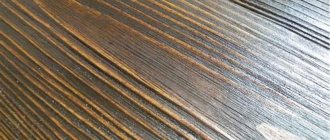
The essence of firing is that soft fibers are destroyed when exposed to open fire. To do this, the surfaces of the workpiece are burned with the flame of a blowtorch or a special gas burner to a depth of 3 mm. With superficial firing, the aging effect will be insignificant, with deeper firing it will be more pronounced. The master regulates the process depending on his taste and needs.
After the top layer is charred, a metal brush or drill attachment is used, scraping off the carbon deposits until the desired color and texture is obtained. Such wood does not need to be painted, because it will already have dark and light areas. Final processing consists of sanding and varnishing the product.
With the chemical method, decorating wood to look antique occurs through exposure to alkalis or ammonia. To do this, you can use stove cleaning aerosols or drain cleaner. It is necessary to familiarize yourself with the composition of the product before use; it must contain alkali
Particular attention should be paid to safety precautions when working with it.
Once on the surface of the wood, these chemicals “burn out” some of the soft fibers, while simultaneously coloring the wood gray. After treatment, all surfaces are washed with water and coated with a weak solution of table vinegar or citric acid (1 tsp per 200 ml of water), removing any remaining alkali.
Dried products are brushed and painted, if necessary.
Processing wood using the listed methods will help the owner to decorate the interior of the apartment in an antique style without investing a lot of money and without spending a lot of time on it. The availability of materials and tools for processing allows both an experienced carpenter and a beginner, and even a woman with imagination and skillful hands to engage in this type of creativity.
Types of decorative metal processing
content .. 11 12 19 ..Corrugation
- the simplest method of decorative finishing of forged metal, reminiscent of engraving and etching when done carefully.
Corrugation is used mainly for finishing small forged products, fittings, furniture, decorative overlays, and small-shaped products. When corrugating, coins are used mainly in the form of chisels with different sharpening angles and different curvatures. They differ from chisels in having a more blunt working edge, which does not cut the metal, but presses it. With a coin with a semicircular working part, the middle part of the line is first extruded, and its edges smoothly fade away. When joining with the next notch line, a smooth transition is formed.
The outline of the design is transferred to the product using a template, scratching the lines with a scriber; in a free composition, it is drawn with a pencil by hand and the lines are cut with a chisel. The pattern is obtained due to the difference between the smooth and corrugated surface.
Graining
They are performed in the same way as corrugation, with the only difference being that they use coins with a different working part. The simplest way to make coins for graining is as follows: the end of the heated workpiece is placed on a file with a one-sided notch and it is struck with a hammer. In this case, uniform parallel depressions in the form of cones are formed on the workpiece. The operation is repeated, turning the workpiece by 90°. Then heat treatment is performed.
It is recommended to make several coins of different sizes and with different frequencies of denticles. When working with such a coin, a certain area of the product is immediately invoiced with one blow. More labor-intensive is graining with a coin, which has the shape of a working part in the form of an inverse hemisphere, since only one textured point is obtained with one blow. However, after processing and light polishing of the surface processed with such embossing, it turns out to be covered with small balls.
Decorative graining was widely used for finishing ancient weapons and jewelry.
For better glide of the hammer on the metal, its working part must be wiped with a rag moistened with oil.
Etching
- a finishing method in which part of the metal is removed from the surface not mechanically, but chemically. It can be positive or negative. With positive etching, the metal is removed along the line of the design; with negative etching, the line remains untouched and the background is removed.
With positive etching, the degreased product is coated with a protective composition, and then, using a needle and cutters along the line of the pattern, it is removed, carefully scratching down to the metal surface. The prepared product is immersed in the solution and etched to the required depth.
As a protective composition, use 88N glue, diluted with a solvent, or wax mastics of the following composition,%:
Recipe 1
Natural wax 40-65 Paraffin 15-25 Rosin 10-40
Recipe 2
Natural wax 50-70 Rosin 50-30
The given mastics are suitable for etching not only with acids, but also with alkalis. Remove them from the product by immersing them in hot water. If it is necessary to etch out a small area on a product that has a large area, it is surrounded by a shell made of thick cardboard and secured with plasticine. The inside of the resulting bath is coated in several layers with a protective composition.
Pickling can also be carried out in solutions for chemical milling. Steel is etched in the following solutions (temperature 20-40 ° C), g/l:
Recipe 1
Hydrochloric acid (density 1.19) 45 Sulfuric acid (density 1.84) 550
Recipe 2
Ferric chloride 70 Nitric acid (density 1.4) 650 Hydrochloric acid (density 1.19) 300
After etching, the part must be washed with an alkaline (soda) solution to neutralize acid residues.
Copper is etched with a solution (temperature 20-30 °C) of the following composition, g/l: ferric chloride - 75, hydrochloric acid (density 1.19) - 3.
In the simplest case, copper and brass can be etched with dilute nitric acid. Water is added to the solution until the formation of bubbles stops. Their intensive formation indicates that the solution is still strong.
Aluminum is etched in a solution of caustic soda - 100-200 g per 1 liter of water at a temperature of 70-80 ° C. Since the wax protective mastic will melt at this temperature, in this case the following composition is used, g/l: copper sulfate (copper sulfate) 500, sodium chloride (table salt) 200, hydrochloric acid 125.
To prepare the composition, copper sulfate is poured with hot water, sodium chloride and hydrochloric acid are added to the supersaturated solution, after which it is stirred and cooled to room temperature.
The part is immersed in the solution for 20-25 s, then removed and the resulting sludge is removed. Repeat this several times until the required etching depth is reached.
With negative etching, the opposite is done - the line of the design is covered with a protective composition, and the background is left open. Wax mastic is applied using a brush or a glass tube with a pulled-out spout; scoop it up in small portions so that it does not harden. Next, the drawing is retouched using steel needles and a scalpel, removing excess coating.
The protective composition for aluminum consists of 100 g of 88H glue, 90 g of kaolin and a solvent, which is used as ethyl acetate and gasoline in a 2:1 ratio or gasoline alone. The solvent is added to obtain a paste that is easy to work with.
By etching you can obtain not only graphic, but also relief images and texture. To do this, etching is carried out in several stages. First, the details that should have the greatest height are marked on the sketch, then the details of the drawing of the second plan, the third, etc. The details of the first plan are coated on the metal with a razor composition. Having removed the metal to a certain depth, the background parts are isolated with the same composition and the etching of unprotected areas continues. This is done several times. In cross-section, such a relief has the shape of steps with individual design elements of different heights. By varying the etching depth of different areas, a plastic relief can be created. Having processed it with the help of embossing (knocking down sharp edges), the relief is given soft smooth lines.
Inlay
- a method of decorative finishing in which the recesses formed by etching or engraving are filled with another metal or inlay mass. Sealing wax of various colors is used as a mass. To prepare sealing wax, melt 25 g of natural wax in a water bath and add 100 g of finely crushed rosin. Add 20 g of sifted chalk (tooth powder or kaolin) and 40 g of pigment in small portions to the molten mixture. Chalk is a filler, and pigment gives color to sealing wax. Metal oxides are used as pigments: iron oxide gives brown, cobalt gives blue, chromium oxide gives green, etc. Dry dyes used in construction can serve as pigments.
The molten inlay mass is mixed well and poured into molds, preferably in the form of grooves, so that the frozen sealing wax has the shape of sticks. By melting the end of such a stick, it is convenient to fill the indentations with sealing wax.
In another method of preparing sealing wax, it is crushed and dissolved with alcohol until a paste is obtained. Using a spatula, fill the recesses with this paste. After the sealing wax hardens, its excess is removed from the surface with pumice or sandpaper. In this case, the surface will be matte. To make the inlay shine, the product is slightly heated until the sealing wax melts or is glossed with a cloth swab dipped in alcohol.
On ferrous metal, the recesses are also filled with molten brass or copper. You can perform direct welding with a gas torch and then remove excess metal with a scraper. On a flat product, the recesses are filled with a mixture of brass filings and borax and it must be heated from the reverse side, because a stream of gases from the burner can blow the metal out of the recesses. If the part has a significant mass, it is heated on a forge.
The depressions in the metal formed by etching can be filled with an alloy that imitates gold. For these purposes, an alloy called “American gold” is sometimes used, the composition of which can be as follows, parts by weight:
Copper 100 Tin 17 Magnesia 6 Tartar 9 Ammonia 3.6 Quicklime 1.6
Etched designs on ferrous metal can be plated with gold. The simplest method of gilding is with “golden ether”. To prepare it, gold shavings are poured with aqua regia - a mixture of concentrated nitric (1 part) and hydrochloric (3 parts by weight) acids - and the same amount of ether is added. The mixture is prepared in a bottle with a ground glass stopper. The bottle is shaken until the dissolved gold salts pass into ether. The mixture is then allowed to stand until the acid and ester are completely separated, the lighter ester being located above the acid. It is carefully poured into another container with a ground stopper. The resulting “golden” ether is applied with a brush to a thoroughly degreased product, the ether evaporates, and the remaining salt is reduced to metallic gold and, when the product is heated, sticks to the base metal. The resulting coating is polished with a steel polishing pad.
Silvering
It is performed by rubbing a moistened mixture of silver powder, obtained by chemical reduction of silver nitrate, with crushed table salt with a hair brush. The silver particles have the shape of regular hexagons with a thickness of less than 0.1 microns and easily stick to the cleaned metal. The oxide film on the metal is removed with table salt. With a ratio of silver powder and table salt of 1:3, the coating is coarse-grained; with a ratio of 1:50, a fine-grained film is formed.
Blackening
- a method of decorative finishing of metal, which consists in applying a low-melting alloy of black color (niello) to the surface of the product. Usually, niello is used to decorate gold and silver items after engraving. It also adheres well to copper and can be used to fill in an etched design. The main components of the blackening alloy are silver, copper, lead and sulfur. There are many recipes for its composition, differing in color and shine depending on the components. Here are several recipes for alloys for blackening, parts by weight:
- Silver 4, copper 9, lead 9, sulfur 48, borax 2
- Silver 2, copper 5, lead 3, sulfur 24, borax 1
- Silver 2, copper 9, lead 15, sulfur 75, aluminum chloride 2.5
- Silver 9, copper 1, lead 1, sulfur 30, bismuth 1
- Silver 1, copper 2, tin 3, borax 6
Cherni can be prepared in several ways.
First way.
Silver and copper are melted in a crucible or piece of charcoal with a notch. Lead and a small amount of borax are then added as a flux. Slag is removed from the molten charge and sulfur is added.
The alloy is constantly stirred with a wooden or clay stirrer. Next, borax is added again, the slag is removed and the melt is poured into a cast iron frying pan. The cooled and hardened niello is crushed into pieces and melted again with the addition of borax and sulfur. The operation is repeated at least three times.
Second way.
Silver, copper and lead are melted in a crucible, the resulting alloy is poured into another crucible with pre-molten sulfur, which should be one and a half times more (by volume). Sometimes it is not melted first, but a metal alloy is poured into the powdered sulfur. After mixing, the contents are poured into a cast iron frying pan and allowed to cool. Then the alloy is crushed and melted, but without crushing the sulfur. The operation is also repeated several times.
Third way.
Silver sulfide, copper and lead are prepared separately, and then alloyed together in the required ratio. To prepare 1 kg of black using this method, take 97.8 g of pure silver in the form of shavings and 20 g of sulfur in powder. The resulting mixture is poured into a crucible and heated in a muffle furnace to a temperature of 300-400 °C. Sulfur diffuses into the metal under the influence of heat and forms silver sulfide. In the same way, copper sulfide and lead sulfide are obtained (for 800 g of copper, 250 g of sulfur and for 400 g of lead, 75 g of sulfur).
The resulting compounds are ground into powder and mixed in the following proportions, g:
Silver sulfide 111.2 Copper sulfide 466.6 Lead sulfide 422.2
The mixture is poured into a cold crucible and charcoal is sprinkled on top to prevent the components from burning out. The crucible is placed in a muffle furnace heated to 800 °C. After 30-40 minutes, ammonium chloride is added at the rate of 284 g of ammonium per 1 kg of mobile. After the mixture has completely melted, it is poured onto a heated cast-iron frying pan, in which the alloy gradually cools. Ammonium chloride, potash with table salt and borax are used as flux.
The niello is applied to the product using a dry or wet method. Before applying it, the surface of the product is sanded, because niello can get into the remaining marks and shells and distort the design. The edges of the product, soldering points and parts that will not be blackened are covered with fireproof clay mixed with water.
With the dry blackening method, the surface of the product is moistened with a flux solution, and blackening powder is applied to it through a sieve, removing it from areas not subject to blackening. Then the product is transferred to a muffle heated to 400 °C, where the niello melts, while the process is carefully monitored to prevent overheating. As soon as the mobile has melted, the heating is stopped.
In the wet method, black powder is mixed with an aqueous solution of flux and applied to the product in a creamy form using a wooden spatula. After drying, it is fired. Excess black is removed with a scraper and filing with a file, followed by polishing. The depth of the lines of the drawing that will be blackened is at least 0.2 mm.
Using the above-described recipes for chemical milling, in products with a significant metal thickness or increased hardness, it is possible to make through shaped holes without using cutting and sawing. Using the same method, shaped coins and other tools with a shaped working surface, including those made of hardened metal, are made and processed.
Application of decorative and protective coatings on metals.
The application of decorative and protective coatings is the final stage of finishing an artistic forged product, the quality of which largely determines its appearance and safety.
When processing steel by forging, a layer of scale of a beautiful gray-blue color forms on its surface. However, this layer does not protect the product from corrosion, but is a product of oxidation and consists mainly of iron oxide and iron oxide. Having different thickness and density, it is subject to gradual peeling from the base metal, therefore, during the final finishing of the forged product, scale should be removed. To remove it, products of small forms can be treated with solutions of the following composition, g/l: 1. Hydrochloric acid 150-200 Hexamine 40-50 2. Hydrochloric acid 150-200 Potassium iodide 0.5-1.0 Hexamine 9-10
From large products scale is removed mechanically - with sandpaper, metal brushes, and then ground pumice with water. After this, the product is washed and dried. Further processing of products that will be used in a dry room consists of oxidation by heating their surface with a torch or blowtorch. In this case, tarnish colors are formed on the metal - from straw-yellow to blue-black. When the desired color is achieved, heating is abruptly stopped. The only difficulty with this technique is that the part at the heating site may have a different thickness, which will lead to uneven heating and, accordingly, the formation of different tarnish colors. This can be avoided by starting heating from the massive part of the part, the heat from which will be transferred to the thinner part. In some cases, oxidation is used as a decorative technique to obtain different colors on individual parts of the product.
The oxidized product is covered with a layer of wax dissolved in gasoline. When the wax coating is dry, it is polished with a hair brush. After such processing, the color and texture of the forged metal are more fully revealed. The black color on steel products is obtained by rubbing descaled metal with linseed or other vegetable oil and then heating until a film of the desired color is obtained.
The oil must not ignite. At elevated temperatures, it decomposes and, penetrating into the pores of the oxides, reliably connects with the metal, forming a film of black or gray-brown color, depending on the surface preparation. After cooling, the layer dries and does not stick. The resulting coating is lubricated with technical petroleum jelly or wax dissolved in turpentine or gasoline.
It is advisable to apply paint and varnish coatings to products that experience significant atmospheric influences. Good results are achieved by using sealants for this purpose to cover the underbody of cars, which after drying acquire a matte black color. The surface of the product is first primed with a primer appropriate for the given coating. Then, having prepared the sealant according to the instructions, it is applied to the products with a brush or spray.
A forged product can be chemically burnished into a thick black-brown color. The size of the product that needs to be blued will be limited by the capacity available. You can use a plastic barrel with the top cut off as a bathtub.
The defatted product is immersed in a solution for bluing (15 g of ferric chloride, 30 g of ferrous sulfate and 10 g of nitric acid are successively dissolved in 1 liter of water) and kept until a rusty coating appears, which is removed with a brush. Then the product is again immersed in the solution, after a while a rusty coating will appear again, which is also removed. The process is repeated until a thick black-brown color is obtained. Burnishing occurs at room temperature.
To obtain a black-blue color on steel, 100 g of potassium dichromate (chrompic) is dissolved in 1 liter of water. The product is immersed in the solution and kept for 20 minutes. After this, it is dried at high temperature over an electric stove or a forge flame. A gray-brown color appears on the metal. The operation is repeated until a black-blue color is obtained.
A black matte film on steel can be obtained by chemical oxidation in a solution of the following composition, g/l: water 1000, sodium hyposulfite (potash) 80, ammonium chloride 60, orthophosphoric acid 7, nitric acid 3.
At room temperature, the oxidation process lasts about an hour, and when it is increased to 70 °C, its time is reduced to 20 minutes.
To give steel a blue color, use a solution consisting of 120 g of water, 30 g of ferric chloride, mercury nitrate and hydrochloric acid, respectively, with the addition of 120 g of alcohol. Working temperature of the solution is 20 °C, coating time is 20 minutes.
Before all types of coatings, products must be degreased and pickled, that is, the oxide film must be chemically removed from the metal surface.
Degrease the surface of the product with gasoline, acetone and other solvents. After this, it is advisable to touch it less with your hands, since the slightest touch will leave unnoticeable grease stains, on which defects form during the coating process.
Picking is carried out in weak solutions of sulfuric or hydrochloric acid in water (3-5 g/l). The product is moved in the solution using wire hangers; after pickling, it is washed with running water to remove acid residues.
When working with ferrous metals, there is often a need to remove rust. Depending on the intensity of rust damage, more or less strong solutions are chosen to remove it.
The area partially affected by rust is cleaned with sandpaper, after moistening it with kerosene. If the area is large, rust is removed chemically using a preparation called “Rust Converter” or by preparing a solution based on phosphoric acid. The effect of the solution is directly proportional to the acid content in it. A weak solution contains 1000 ml of water, 15 g of concentrated phosphoric acid and 4 g of butyl alcohol (it can be replaced with ethyl alcohol). Alcohol is added to improve the wetting ability of the solution.
The solution is applied to the product with a swab attached to a wooden handle, and after drying it is treated with a metal brush.
A solution of the following composition, g, has a stronger effect on rust:
Potassium nitrate 6 Chromic anhydride 3 Phosphoric acid 275 Tartaric acid 12 Zinc phosphate 8 Thiocarbamide 3 Water 100 ml
After complete removal of rust, 6 g of isopropyl alcohol can be added to the solution. At the same time, degreasing and sautéing of the product will occur.
Less strong, but more accessible is the following solution, g:
Water 680 Ethyl alcohol 160 Emulsifier (washing powder) 60 Phosphoric acid 200
This solution is also applied with a swab until the rust is completely removed.
When carrying out restoration work or removing rust from products of artistic value, it is necessary to use gentle solutions that remove rust well and minimally affect the base metal. This solution can be prepared at home. To do this, you will need dry stems and leaves of some plants - celandine, marshmallow, yarrow, as well as potatoes and tomatoes. The leaves and stems are crushed and poured with a five percent solution of hydrochloric acid so that it completely covers the herbal mass. The container is closed with a lid and kept for at least eight days, then an etching solution is prepared. If there is a lot of rust, then prepare the following solution, parts by volume:
Extract 5 Concentrated hydrochloric acid 40 Water 75
A weaker solution consists of 10 parts of extract and 20 parts of acid, the amount of water is slightly increased. The product is kept in this solution until the rust is completely removed.
Zinc
and galvanized iron can be dyed different colors by reacting zinc with various substances to produce colored compounds.
To obtain a black color on zinc products, a solution is required, parts by volume:
Copper nitrate 2 Copper oxide 3 Hydrochloric acid 8 Water 64
After color appears, the surface is washed with water and dried.
The green color of zinc is obtained in solution, parts by weight:
Copper sulfate 10 Tartaric acid 10 Water 12 Soda solution in water (1:15) 24
If color appears, the product should be rinsed with water to avoid the appearance of a brown tint.
Zinc products are painted blue in a solution of 6 g of nickel sulfate and 6 g of ammonium chloride per 100 g of water.
Golden coloring is done in a solution, parts by volume:
Tartaric acid 1 Soda 2 Water 1
The components are mixed with pure clay or kaolin. Then the surface of the product is rubbed with the mixture and, after it dries, rinsed with water.
The brown-bronze color is obtained in a solution of 1 part verdigris and 5 parts by weight of acid. The surface is rubbed with the mixture, washed with water and dried.
To obtain a copper color on a zinc product, it is enough to moisten it with a solution of copper sulfate, since zinc is more active than copper.
Copper
and its alloys are most susceptible to the application of decorative coatings. Copper is tinted black in a solution in which 0.9 g of sodium hydroxide and 0.3 g of ammonium persulfate (used in photography) are taken per 100 ml of water. The degreased and pickled part, suspended on a wire, is dipped into a solution at a temperature of 90-100 °C.
In a solution of potassium chloride, nickel sulfate and copper sulfate (4.5, 2 and 10.5 g per 100 ml of water, respectively) at the same temperature, copper and brass acquire a chocolate color.
Black and gray colors on copper and brass can be obtained in a solution of liver sulfur at room temperature. To prepare sulfur liver, take one part of powdered sulfur and one part of potash. The resulting mixture is melted in a metal container until a dark brown mass is obtained. Then wait another 15 minutes. The appearance of a blue-green flame will not degrade the quality of the mass. The heating is stopped and the sintered mass is allowed to cool. After cooling, it is ground into powder and stored in a tightly closed container. Liver sulfur is dissolved in water (10-15 g/l), the solution is stored for no more than a day. Tinting is performed by immersing the product in a solution or wiping it with a moistened swab.
You should not strive to immediately get a rich color. It is better to do tinting gradually, in several stages, immersing the products in the solution for 1-2 minutes. The process is easier to control by applying the solution to the product with a swab. In this case, you can adjust the depth of coloring in different places of the product by applying an additional amount of solution. To apply a light gray patina, dissolve 2-3 g of table salt and the same amount of sulfur liver in 1 liter of water.
The highest quality solution is a solution consisting of liver sulfur and ammonium sulfide. Depending on the amount of liver sulfur solution introduced into ammonium sulfide (from 5 to 15 g), shades of oxide films are obtained from light brown to dark brown, including black, which is more saturated on copper.
A brown color with a reddish tint is obtained in a solution of 2.5 g of antimony pentasulfide in 1 liter of four percent sodium hydroxide.
If it is necessary to lighten certain areas of the relief, wipe them with a cloth with moistened sand. All products are wiped with sand if they were not degreased or pickled before tinting. A rag swab is moistened with a tinting solution, rolled in sand and the product is thoroughly wiped. Sand acts as an abrasive, removing grease stains and oxide films, and the dye solution with which the swab is moistened, combining with the cleaned metal, creates the first, primer layer for subsequent tinting.
This method is convenient when processing large embossings and sculptures.
Rubbing with sand is repeated until the product is covered with the first uniform layer of tinting, free of stains.
The color of antique patina on products made of copper, brass and bronze is obtained in a solution of 50-250 g of ammonium chloride and 100-250 g of ammonium carbonate in 1 liter of water.
The solution with accelerated patina formation has the following composition, g/l:
Ammonium chloride 64 Medium acetic acid copper salt 132 Acetic acid (5%) 1 l
Gray-green patina is obtained in solution, g/l:
Liver sulfur 50 Ammonium chloride 74 Iron acetate 50 Ammonium carbonate 60 Acetic acid (5%) 35
Replacing iron vinegar with copper vinegar in this recipe produces a black-green patina.
A blue-green color similar to malachite can be obtained in the following solution, g/l:
Ammonium chloride 40 Potassium tartrate 120 Sodium chloride 160 Copper nitrate 200
Brass will acquire an azure color when briefly kept in a solution of 3 g of lead acetate, 6 g of sodium thiosulfate (hyposulfite) and 5 g of acetic acid in 100 ml of water. The solution temperature is about 80 °C.
Copper can be greened. To do this, it is treated in a solution of 20 g of copper nitrate, 30 g of ammonia and 40 g of ammonium carbonate (ammonia) and sodium acetate in 100 ml of water. Sodium acetate is made by mixing baking soda with vinegar.
Here are some ancient recipes for chemical coloring of metals
*.
* (Here and further in ancient recipes, the modern name of the substances is as follows: antimony oil - antimony trichloride, sodium sulfide salt - sodium sulphate, lead sugar - lead acetate, copper carbonate (or copper carbonate) basic copper carbonate; milk sugar - lactose, copper acetate salt (verdigris) - the main copper acetate, tartaric-copper salt is a copper derivative of tartaric acid.
)
Giving iron a chestnut-brown color.
Pour 16 drops of nitric acid into a porcelain vessel, heat it, adding 32 drops of antimony, then 16 drops of refined olive oil and boil until the oil is completely combined with the rest of the substances. The heated objects are covered with this mordant, left for 12 hours, wiped with a brush, heated again, covered with the mordant and pickled again after 12 hours. This operation is repeated a third time, after which a woolen rag is dipped in bone oil and the objects are rubbed until they shine.
Shiny black on iron is obtained by applying a boiled solution of sulfur in turpentine using a hair brush. After the latter evaporates, a thin layer of sulfur remains, which combines with the metal when heated on a gas burner.
Blackening of copper.
Prepare a solution of copper sulfate and add enough ammonia to it so that the mixture acquires a bright transparent blue color. The product to be treated is dipped into this solution for a few minutes, then removed and slightly heated until it turns black. A more durable blackening is obtained if the copper product is immersed in a saturated solution of copper metal in nitric acid and then slightly heated.
The second recipe for blackening copper: prepare a saturated solution of copper sulfate and add so much carbonated soda to form a precipitate of copper carbonate. The liquid from this precipitate is drained, and it is washed and dissolved in ammonia. Otherwise, proceed as in the first recipe.
For blackening, a copper product can also be dipped in a solution of ferric chloride (1 part by weight to 1 part water).
Painting brass in different colors.
The brown color is obtained by immersing sand-cleaned and water-dried brass objects in a solution of ferric chloride after pre-etching them in dilute sulfuric acid.
The purple color is obtained by immersion in a solution of chlorine antimony, the chocolate brown color is obtained by burning the metal with wet red iron oxide and then polishing it with a small amount of lead luster.
Painting brass blue.
Half a bucket of distilled water is poured into a container, where 600 g of sulfide-sodium salt is dissolved, and in another slightly larger container, 200 g of lead sugar are dissolved in the same amount of water. The container should be porcelain, glass or enamel, not chipped or cracked, to avoid contact of the solution with the metal surface. The first solution is mixed with the second and the mixture is heated to 94-95 °C. After this, cleanly polished objects are placed in it and heated evenly in a sand bath for 4 minutes. When the desired shade is achieved, remove the items and rinse them thoroughly with water. Another method, especially suitable for thin objects, consists of immersing in a solution of 50 parts ferric chloride and 50 parts yellow blood salt, after which the products are coated with a colorless varnish.
Painting brass black.
Mixes 180 g of cuprous oxide, 400 g of ammonia and 400 g of water. Pre-cleaned brass objects are immersed in this mixture, removed frequently and quickly for observation, then rinsed with water and dried in sawdust. The process is repeated two more times. Finally, brass products are lightly rubbed with a small amount of linseed oil.
Smoothly turned parts or polished brass objects can be coated with a golden-yellow, orange or brown-red layer of oxide by dipping them in a mixture of 5 parts caustic soda, 50 water and 10 parts wet carbonic salt (copper oxide). Shades appear in a few minutes. When the desired tone is obtained, remove the brass object, wash it thoroughly with water and dry it in fine sawdust.
Brass products can be given a golden yellow color using a liquid prepared by boiling for 15 minutes 4 parts of caustic soda and 4 milk sugar with 100 parts of water and adding 4 parts of a concentrated solution of copper sulfate with continuous stirring. The resulting liquid is cooled and pre-cleaned items are placed in it. When kept in such a solution for a long time, they first acquire a bluish and then a rainbow color.
Painting zinc surfaces.
A completely clean and lead-free metal is rubbed with sand and hydrochloric acid, washed, dried with blotting paper and then immersed in a solution at a temperature of about 10 ° C, consisting of 3 parts of tartar-copper salt, 4 of caustic soda and 48 parts of distilled water. . Depending on the duration of immersion, different colors are obtained: 2 minutes - purple, 3 - dark blue, 4.5 - golden yellow and 8.5 minutes - purple-red.
Once the desired shade is achieved, the zinc is washed with water and varnished to better preserve the color.
In the 19th century medals made of copper alloys were oxidized, i.e. bronzed. Bronzing was carried out with a composition of equal amounts of cinnabar and chernyaza (dark ocher) with the addition of about 1/16 of ammonia. Glacial acetic acid (diluted halfway with water) was poured into the resulting mixture until it became creamy. The composition was applied with a brush to a medal mounted on a wire hanger, then dried over heat, and after complete drying, it was dipped in cold water and wiped with a rag.
In another method, the medal was rubbed with a mixture consisting of 1/3 graphite and 2/3 iron sulfate, immersed in a solution of ammonium sulfide, wiped and dried.
Aluminum tinting.
Aluminum is tinted by applying a layer of molten paraffin to its surface, followed by firing with a blowtorch. As a result, a golden film forms on the surface. To obtain a range of tones from golden to black, the metal is rubbed with wood oil and fired. The depth of color depends on the number of layers applied. Instead of wood oil, you can use turpentine, drying oil and vegetable oil. When firing, the flame should not touch the surface of the product. Aluminum coated with turpentine, after firing, acquires a golden brown color, and with drying oil - red-brown and black.
The gray color is obtained by rubbing the product with a thin layer of drying oil, followed by exposure over a smoky flame. A good smoking flame is created by a torch made of roofing felt, roofing felt or other materials containing resinous substances and, when burning, releasing a large amount of soot, the particles of which firmly adhere to the drying oil coating.
Since electrochemical tinting of aluminum requires proper equipment, we present a simpler technology for chemical oxidation.
The product is pre-treated with alkali - in caustic potassium or sodium, then washed and re-treated in potassium tartrate with alkali. After this treatment, the product is immersed in a solution of 130 g of copper sulfate or 4 g of zinc chromate, 3-5 g of nitric acid and 15 g of zinc fluoride in 1 liter of water.
The color of the coating ranges from yellow to golden.
content .. 11 12 19 ..
Preparing for work
Different types of wood can be aged using different methods. A number of methods are not suitable for working with certain varieties.
Table 1. Aging methods and types of rocks that can be subjected to the techniques.
| Technology | What breeds are recommended to use? |
| Aging by chemical action | Oak, willow, walnut, maple, beech, mahogany, linden, aspen. |
| Techniques related to mechanical surface treatment | Everything except teak, maple, cherry, beech and pear. Particularly suitable: pine, larch, oak and ash. |
The result of aging a pine board using brushing and a solution of vinegar and steel wool
Effects on the surface using special compounds can be divided into techniques:
- using a dry brush;
- patination;
- glaze;
- spray;
- crackle;
- technique for creating scuff marks (Shabby Chic);
- etching (use of compositions such as stains).
Bark beetle - a technique for applying a pattern that imitates the movement of a bark beetle larva along a tree (you can use a denture drill with a large attachment)
Processing with physical impact on wooden planes is also possible:
- brushing – a technique using brushes with metal bristles (cord brushes);
- roasting – the use of fire or metal heated to a high temperature;
- in hot sand.
Other methods are also possible - for example, imitation of natural damage, which is achieved using an awl, sandpaper and other tools.
Master Class. How to age wood?
A couple of antique wood recipes
You can find many recipes for aging wood using improvised means, but all of them are derivatives of the processing methods already described. Let's look at some of them.
Using wax
Using regular wax you can achieve a good effect; you only need 2 types of wax (colored and regular), as well as a wood sanding machine. This method is convenient because it does not require additional steps such as brushing the wood or using acid to remove soft parts of the wood.
You can buy any color of wax
The technology for doing the work will look like this:
- first the board is sanded, and the direction is strictly along the grain;
- then colored wax is applied; at the previous stage, the pores of the wood have opened, so it will penetrate well. It takes about a day for the coating to harden;
- Next, you will have to apply colorless wax on top of the colored one, and some of the colored wax will inevitably be removed.
An example of wood processing with colored wax
Bleached wood
Bleached wood will look unusual in any interior. It costs a lot, but you can achieve the same effect with your own hands when painting wood. The main task in this case is to ensure that the white color does not completely “clog” the texture of the wood; ideally, the wood should have a slightly grayish tint and the wood pattern should be visible through the layer of white paint.
Bleached wood
You can get the desired effect using brushing technology, and the key point will be how to paint an antique board so that the wood pattern remains noticeable after painting.
To do this, you can use tinted and transparent varnishes, and painting will be carried out in several stages:
- if the wood is dense and does not absorb varnish well, then you can immediately treat the prepared surface with tinted varnish in a couple of layers;
- then a clear varnish is applied over it to protect the tint.
Tinted varnish from a renowned manufacturer
The same effect can be achieved using white paint, but here you need to take into account that it is easy to paint over the wood pattern 100%. Therefore, after applying the paint, you can carefully blot it with a sponge so that the texture of the board becomes visible.
Wood finishing materials: types of products
It is very easy to create a unique and very organic, natural atmosphere in your home. The main thing is to know about all types of molded products made from natural wood, which are now produced by well-known manufacturers. If you stay up to date with the current range, this will make the process of choosing the right finish easier. So, the following types of plank coverings are now offered for cladding facades and interiors:
- Lining.
- Imitation of timber.
- Planken.
- Decking, terrace and deck boards.
- Floor board.
- Glued laminated timber.
Now let's talk in more detail about the most popular wooden lumber.
How to age wood? Preparing the material
First, before aging the wood, it must first be prepared. First of all, for brushing, it is better to choose soft wood or medium-hard wood, which has a pronounced woody texture. This could be, for example, spruce or pine. These species are distinguished by the fact that their soft fibers are often formed in spring and summer, and during this period the tree’s growth rings grow fastest, so the fibers are more “loose.” Wood with a uniform and almost unexpressed texture, such as beech and maple, is not suitable for aging.
Before starting work, the surface of the wood must be carefully prepared. All dirt and possible defects are removed, these could be traces of grease, sweat, or other stains - the fact is that they can appear when applying the tinting solution. Any wooden products must be processed in disassembled form, regardless of their size - this way you will reduce time costs and reach with a brush in all places, thereby ensuring a uniform aging effect.
Manual scraping
Products processed in this way are designated by the abbreviation HS (“Hand-Scraped”). Also, hand scraping is sometimes called simply scraping. The name of the method is not a marketing ploy: hand scraping is really only done by hand. This is not an easy and painstaking work, but its result is truly impressive.
As is the case with brushing, hand-scraped coatings have a more pronounced wood grain. But the main thing is that a very noticeable “antique effect” is created, and not only visually, but also quite tactilely perceptible (with your hands or when walking barefoot). A room with such a floor no longer looks like a newfangled apartment with a fresh renovation, but a place with traditions and history. Thanks to manual scraping, floor defects are imitated that would only appear on their own decades after installation. First of all, these are irregularities, dents, as well as wormholes and cracks in the wood. The important thing is that this is an imitation: if such real defects can lead to the rapid destruction of the floor, then in an artificially aged coating they have a purely decorative function, are carefully waxed and varnished. The service life of an artificially aged floor is no different from a regular one.
In the Amber Wood line, hand scraped products are presented in the Jade Collection.
Do-it-yourself wood brushing
If you really want, you can make artificially aged wood yourself:
- The selected workpiece needs to be slightly moistened, this will eliminate the release of wood dust during work. First, the workpiece is processed with a hard metal brush. Its rigidity is selected experimentally. It is necessary that the brush removes soft surface fibers well, but does not disturb the structure of hard fibers. The movement of the brush attached to the grinding machine or grinder is carried out in the direction of the fibers. The rotation speed is also pre-selected on the sample; for each wood the speed can vary significantly. When working manually, there are no problems with selecting the rotation speed of the brush, but the process of preparing wood becomes significantly more complicated and lengthened.
- After using a wire brush, use abrasive bristles. Using this attachment or brush, all fiber fragments and roughness are removed. At this stage, using a chisel, you can further add various indentations and grooves. They can be given the appearance of natural cracks in wood.
- In the future, final polishing is necessary, this is usually done using a brush with sisal bristles. You can use sandpaper by hand. At this stage it is necessary to achieve perfect polishing of the entire surface.
- The part acquires a special decorative appearance if it is tinted, painted, or gilded at the final stages. Stain is often used. Impregnation with stain and its quick removal allows you to paint areas with the softest fibers, while the hard ones are practically not stained.
- Painting with gold or silver paint gives the wood an original look. When applying the dye, particles of coloring pigment get clogged into microcracks, which ensures the appearance of glare in sunny weather. You can use different dyes for painting, but they must be designed for working with wood. After painting, it is recommended to polish the surface again, this will remove roughness from the product.
- At the last stage, you need to apply several layers of varnish. Before applying a layer of varnish, the previous one must dry well and it must also be polished.
With sufficient experience, the process of brushing wood and using special devices is not particularly difficult. At the same time, it is possible to produce the most exclusive products, ranging from wall shelves to cabinets and kitchen units.
This video will tell you how to age wood yourself:
Brushing
This method of aging wood with your own hands is called from the concept brush, which translates as brush. The second name is tree structuring.
The degree to which it needs to age is determined by its purpose. If necessary, to create the appearance of deep antiquity, cutouts are made up to 3 mm. For floor coverings, such aging is not suitable, since it will collect a lot of dirt, and it is difficult to wash it off. On average, a depth of about 0.7 mm is left. Only hardwood can be aged using this method. Brushing wood improves its quality characteristics. It becomes stronger, lasts longer, and is not susceptible to attack by fungi and parasites.
Tools and materials for processing
The basis of the brushing aging method is cleaning with a hard metal brush. Soft fibers are cleaned manually. Using this tool, a relief is formed. The shorter the bristle of the brush, the more it will age after the procedure. Using a chisel, apply straight deep stripes, changing their curvature. Sandpaper is used to emphasize the resulting effect.
After the first stage is completed, the wood is coated with paint that has its own natural wood shades. The coloring composition is applied unevenly on purpose. This is how the upper layers age, they acquire a dark shade, while the lower ones remain lighter. The relief after this coloring stands out even more. The ideal texture of aging wood is created by gray-white paint. Before it completely dries, the top layer is wiped off the surface. The result is the appearance of a tree that is at least 10 years old.
Processing technology
Before aging by structuring, the wood must be prepared. Lumber is selected without defects with a moisture content of 10-15%. Otherwise, the fibers will not be processed and will break. How to properly age wood with your own hands:
- Moisten the surface so that there is not a lot of dust during work.
- The brush should move in the direction of the grain. Remove only soft wood fibers.
- The speed should be moderate so that the wood does not heat up.
- Primary grinding is done with a polymer brush with abrasive. Remove torn fiber residues using sandpaper. After removing the roughness, it will become clear how well the aging was done.
- If necessary, make the grooves better by brushing again.
- Decoration is done with a chisel. The appearance of cracks is created.
- Polishing. It is carried out with a sisal or hair brush, if aging is carried out with a grinder or a grinder. The final appearance of the workpiece is given. For the same purposes, fine-grain sandpaper is used for manual processing.
- Next, the piece of lumber needs to be dried and then completely cleaned of dust.
- A layer of stain creates a contrasting pattern. A generous layer without rubbing and quickly removing excess will dye soft fibers and leave hard fibers light. Gold and silver colors look especially advantageous if the wood is aged.
- Patination is the darkening of deep furrows. Gives nobility when aging.
- Finally, polish again, erasing any unevenness after painting.
- Varnishing is done with parquet varnish.
If you age the workpiece in this way, it will preserve the characteristics of the breed for a long time.
With a candle
This is a versatile technique that helps give wood or wooden furniture an antique look. It can be used on both untreated wood and already painted wood and furniture. Suitable for painting in one or several layers.
Let's take a closer look at how to paint wood using this method, making three layers (brown, white and yellow).
Necessary materials:
- paint (brown, white and yellow)
- brush, candle, rag.
Step 1: First coat of paint
- Decide on the color of paint that you will use as a basis. This will be the first, bottom layer of paint, which we will apply directly to the wood. In this case we use dark brown color.
- Paint the wood with slightly chaotic strokes, without painting the surface completely and evenly.
- Leave until completely dry.
Step 2: Use a candle
Take a candle and rub it on the surface of the wood in several randomly selected places (press the candle quite hard so that a clear trace of wax or paraffin remains on the wood).
- Step 3: Second Layer of Paint Select a color for the next layer and apply paint (we're using white here). At this stage, the paint can be applied evenly over the entire surface, and not in strokes, as with the first layer. Leave until completely dry.
- Step 4: After this, take a rag and wipe the surface, using some pressure. In those places where wax was applied, the paint will come off the surface. If two layers are enough for you, then you can stop there, but if not, move on.
- Step 5: Third coat of paint Repeat steps 2 and 3, but the last one using a different color of paint (here it will be yellow). After the paint has dried, you can apply a protective varnish. The latter is not necessary due to the fact that we deliberately gave it an antique look, so if the paint starts to lag a little over time, it will not be noticeable.
Wooden products: scope
The scope of use of wood as a finishing building material is very wide, as it covers both the external and internal design of the house. All thanks to the versatility of the molding, which we already mentioned earlier.
High-quality products made from natural wood can withstand the strongest wind, snow and other mechanical loads. Properly selected boards will perfectly help in arranging simple and ventilated facades. Moreover, they will create an aesthetic appearance for your home! To do this, many manufacturers offer a wide range of varnishes and paints that will highlight the pleasant texture of the wood and give it the necessary shade.
Certain types of building materials are perfect for landscaping areas that do not have a canopy. That is, loggias, balconies, verandas, terraces. There are, of course, more options with interior wood trim. If necessary, almost the entire room can be decorated with lumber. Upgrading walls, floors and ceilings is now not particularly difficult, because the choice of plank coverings is wider than ever.
We will return to this topic more than once during the blog - stay on the current page! Using high-quality wood, you can also decorate interfloor stairs, doorways and other elements of a modern interior.
Antiquity effect: what is it?
Paradoxically, the more technologically advanced a society is, the more it values antique products. It would seem that with the appearance on the market of a huge range of innovative building materials with which you can build and decorate your home in an ultra-modern style, many people prefer old things.
By the appearance of the front door you can determine the status, level of well-being and personal preferences of the home owners
The Wright (Prairie) style is easily distinguished by its clearly defined lines, flat or hipped roofs with widely projecting eaves, and maximum integration of houses into the surrounding landscape
What styles does the antique effect suit?
- French, Swedish or German;
- Victorian, medieval and Gothic;
- country, baroque, rococo, classicism;
- modern or alpine;
- Russian estate style.
Thanks to the wooden design elements, the super-fashionable industrial loft style does not seem lifeless and gray, but, on the contrary, cozy and stylish
If initially loft-style rooms were rough and sometimes brutal, recently such living rooms have become more and more sophisticated and fashionable.
Although this super fashionable trend is considered bohemian and the most expensive, you can still bring the characteristic elements of this attic style into any room without special expenses. This may be due to the existence of techniques for aging materials.
afc5bf42701d7a257de741e117f01aca.jpe