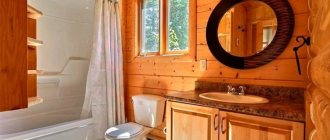
When arranging a bathroom in a wooden house, 4 points must be taken into account: good insulation of electrical wiring, complete sealing of the floor covering, a modern ventilation system, selection of a suitable style for filling the room (furniture, decor, finishing materials).
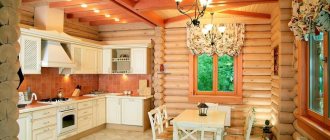
A simple combination of wood trim and tiles looks perfect in the interior of a country house bathroom Source izba.spb.ru
The rough texture of wood in natural light creates an atmosphere of unity with nature Source izba.spb.ru
Small decor in the bathroom of a wooden house can transform and fill the room with color Source izba.spb.ru
Layout
Top tips when developing a bathroom renovation plan:
- It is better to arrange a room for water procedures on the first or basement floor. Plumbing fixtures are heavy; additional reinforcements are used to position them on the floor: wooden beams and screed.
- If the house consists of several floors and there is a need for a second bathroom, it is located symmetrically with the bathroom on the floor below.
- It is better to place the plumbing along the wall, this will reduce the load.
- We choose only plastic pipes for water supply that do not come into contact with the walls. This will help reduce condensation accumulation and avoid rotting processes, mold and mildew on the wood.
- We construct the floor a few centimeters lower (1-3 cm) than in the other rooms. Add a drain hole to the room plan. If the plumbing is faulty, water will not flood other rooms in the house.
- Don’t forget about ventilation: grilles at the bottom of the door, a gap between the door and the floor, a lattice air duct system on the wall (you can choose a model with an additional function - a humidity sensor).
- If the bathtub is on the ground floor, we bury the sewer pipes in the ground to prevent them from freezing in the winter.
The dark color of the wood can be obtained by staining or by covering the wood with stain Source izba.spb.ru
Make an accurate plan for the placement of plumbing fixtures and sockets in the bathroom. Then move on to planning the arrangement of furniture and additional decor: mirrors, laundry baskets, shower curtains, vases of flowers. Assess the space of the room. Consider how best to arrange your furnishings to leave enough free space to move around in the bathroom.
Zoning space in “wet zones” with tiles helps combat humidity in a wooden house Source izba.spb.ru
Step-by-step instructions for arranging a bathroom
As an example, we will look at the most complex arrangement option: the premises are old and require dismantling of the walls, ceiling and floor, and revision of utility networks. During new construction, some operations can be skipped. Old finishing materials from the walls must be removed down to the wood, the floor must be cleaned and the old ceiling must be dismantled.
Premises before renovation
Ceiling before renovation
Step 1. Remove all the finishing of the room down to the skeleton of the house, check the condition of the wooden structures, and correct them if problem areas are found. The ceiling must be cleared to the floor beams, and the floor to the joists.
Removing trim
Step 2. Screed on the subfloor with a semi-dry mortar; the plane of the screed should lie at the level of the joists. Semi-dry screed has a relatively low weight and good thermal insulation properties, which is why it is recommended to use this material for work. Surface leveling is carried out as a rule; the surfaces of the logs serve as beacons. Allow time for the material to harden.
Subfloor
The technician checks the levelness of the floor
Screed arrangement
Floor screed
Checking the levelness of the floor
Step 3. Cover the screed with two layers of 200 micron thick polyethylene film. Around the perimeter of the walls, it is necessary to provide turns with a height of approximately 15–20 cm. It is better to do the turns with a reserve, and then carefully trim the film, than to allow the mortar to come into contact with wooden elements. The film is fixed using an ordinary stapler.
Film laying
Fixing the film
Practical advice. Other modern materials can be used for waterproofing. We recommend using film for two reasons: it has the lowest cost, and in terms of efficiency the material is in no way inferior to expensive analogues.
Step 4. Attach damper tape to the walls. It is needed to compensate for the linear expansion of concrete screeds. If it is not installed, then large forces arise between the walls and the floor. As a result, the screed may swell and crack. The thickness of the tape is approximately 4–5 mm, it is also fixed with a stapler.
Damper tape for screed
Step 5. To increase the strength of the concrete screed, lay reinforcement.
Laying and tying reinforcement
It is necessary to use only construction reinforcement of a periodic profile. To raise the rods above the floor, you can use sections of plastic pipes up to five centimeters high. Lay the rods once across the room, and the second time along the top. The dimensions of the reinforcement must correspond to the size of the room, the distance between the bars is approximately 20–25 cm, the diameter of the bars is 8 mm. To prevent the rods from moving while pouring the screed, tie them together with wire. There is no need to knit often; it is enough to fasten each rod in three places in a checkerboard pattern along the surface of the reinforcement.
A chain-link is laid on top of the reinforcement
Practical advice. To increase the strength of concrete, you can additionally use a chain-link mesh and place it on reinforcing bars. But professional builders consider this a waste of time and money. The strength of the mesh is much lower than the strength of building reinforcement; it does not have any noticeable effect on the final performance of the concrete screed. Moreover, it lies on top of the reinforcement.
Chain link on top of reinforcement
Step 6. Make holes for the sewer, insert temporary mortgages into them. Subsequently, they are removed and permanent sewer pipes are installed.
Step 7. How to fill the screed correctly? This is a simple process, but some inexperienced builders make serious mistakes - they make a screed in two layers. The reinforcement is poured first and the beacons are placed second and the surface is leveled. This is explained by the fact that it is difficult to install beacons on the reinforcement, especially if there is a chain-link mesh on top of it. This is strictly prohibited.
Why? Firstly, the adhesion values between two different layers are much less than the strength of a monolithic layer. Secondly, in most cases, the reinforcement is located in the middle of the screed, and in this position it does not work. The reinforcement should be located at 1/3 of the layer thickness, it does not matter whether it is on top or bottom. But not along the axis of symmetry. Only in this position does it compensate for bending forces to the maximum by binding the concrete layer into a single monolithic structure. Conclusion - you need to correctly place the reinforcing layer in height, and pour the screed over its entire thickness at once. It is more difficult to make beacons with fittings, but you don’t need to pay attention to this.
If the installation of beacons is prevented by a chain-link mesh, then they will have to be done in two stages. At first, throw the solution in heaps slightly above the mesh, give time for the solution to harden. After setting, increase the height of the poured mortar under the beacons to the required height. For beacons, you can use metal or wooden slats. The bathroom space is small; there should be no problems with accurate installation of beacons. First, mark the zero floor level on the walls; for this work you need to use a water or laser level. The slats are set along the marked lines, the position is controlled by the level.
Step 8. Prepare a cement-sand mortar and make a screed. If the bathroom is small, then in this case you can use a semi-dry mixture. Alignment is carried out as a rule; after completion of work, the slats can be removed or left in the solution.
Mixing mortar for screed
Filling the screed
Floor screed
The work on preparing the base floor for the slab is completed, you can begin finishing the walls and ceiling.
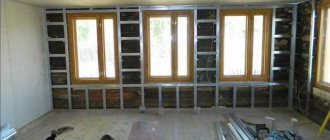
Step 1. Treat the walls with an antiseptic and primer, it will increase the adhesion of the surface to the plaster. It is better to treat with a pneumatic spray gun; the jet moves at high speed and penetrates into all the recesses.
Wood primer for interior use Biofa
Practical advice. If the bathroom has a solid wall, then it is recommended to insulate it with pressed mineral wool at least five centimeters thick. Mineral wool is glued to the wall with a special glue (you can use glue for ceramic tiles), which ensures a tight and durable fit.
Mineral wool
Adhesive ST 180 Ceresit for mineral wool
Keep in mind that there should be no gap between the insulated surface and the insulation. Air moves freely in the gap, and this sharply reduces the effectiveness of insulation. To increase the stability of fixing the mineral wool, nail it to the wall with long nails; pieces of sheet metal can be used as large heads.
Step 2. Finish the front surface of the mineral wool with waterproofing mastic to protect it from moisture. Mineral wool has many advantages, but also two significant disadvantages. As humidity increases, thermal conductivity increases sharply. In addition, it does not dry well, and prolonged contact of wet mats with wooden structures causes putrefactive processes.
Waterproofing mastic
Step 3. Using the same algorithm, insulate the bathroom ceiling. If two rows of pressed mineral wool sheets are required, they should be staggered to cover the joints.
Step 4. To vapor barrier the ceiling, trim it with any foil material. The overlap between the vapor barrier strips must be at least ten centimeters; adhesive tape is used for complete sealing. Carefully and very efficiently insulate the ceiling; during water procedures, it is exposed to the maximum amount of steam. Wrap the vapor barrier on the walls; the width of the ceiling should be approximately 10 cm.
Foil reflective vapor barrier
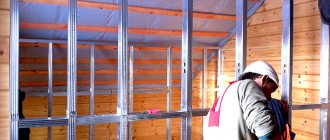
Step 5. Start installing metal mesh on the walls under the plaster. The mesh is secured with a large pneumatic stapler or nails.
Mesh for plaster. Beacons have been installed. Photo
Important. Be sure to go around the corner with the mesh and do not make joints in this place. This technique eliminates the possibility of cracks appearing in the corners of the plaster.
Make a gap of several centimeters between the mesh and the wall, use various available spacers.
Step 6 . Install beacons. This is easier to do with the help of wood screws, a metal strip and a laser level. If you don’t have one, then the beacons can be set with an ordinary plumb line.
- As a rule, determine the most convex place on the surface; to do this, apply it to the wall in several places. This parameter determines the thickness of the plaster layer.
- Screw in a self-tapping screw under the ceiling, attach an ordinary plumb line to it and screw in the lower self-tapping screw at its level. Fix the hardware in one line under a straight rail. If you have enough practical experience in plastering work, then instead of a plumb line, you can set the beacons to an ordinary level.
- Do the same operation at the opposite corner of the wall.
- Screw the metal strip onto the self-tapping screws; use special metal plates for fixation.
- Stretch ropes between the two outer slats and install all the remaining beacons along them. The distance between them should be 20–30 cm less than the length of the rule.
Installation of beacons for plastering walls
Step 7. Check the position of the metal mesh; it should not touch the surface of the walls; if such areas are identified, bend the wire with pliers. According to the electrical wiring diagram, mount the casings of wiring, sockets and switches on the wall. After the wires are pulled inside, the housings should be closed, this will prevent the solution from getting inside.
Step 8. Install the electrical cables, while strictly following the requirements of the PUE. If you do not have enough knowledge, then you need to seek help from a professional electrician.
Walls can be plastered without pre-installed boxes, but then special holes will have to be drilled under them and sealed. If you do all the work yourself, then you shouldn’t create unnecessary problems for yourself. At the same time, place mortgages under water sockets, water inlets, etc. Mortgages are needed for all communications that are in the bathroom.
Step 9. Check that the elements are installed correctly, everything is in order - start plastering the walls. This can be done in two ways: traditional manual using a kelly and modern mechanized using a hopper bucket. The first method is very labor-intensive, the second allows you to complete the work much faster and at the same time minimize the amount of labor-intensive work. Ordinary plastering has long been known to everyone; we’ll tell you how to work with a hopper bucket.
Preparation of the solution
Important. Before preparing the solution, the sand should be sifted through a fine sieve. Otherwise, problems will arise with the mechanism for applying the mixture to the wall.
Remember that the thickness of a single layer of plaster cannot exceed 1.5 cm - when a thick layer dries, deep cracks will certainly appear. If your plaster is thicker in some places, you will have to carry out the work in two stages.
- Cover the floor with cardboard or plywood scraps to protect it from liquid plaster. Thick layers of dried plaster can be removed from the floor screed without any problems, but if you level it with your feet, the coating will take a long time to clean.
- Prepare the plaster mixture. Add 4-5 parts sand to one part cement and water as needed.
- Use a hopper scoop to scoop up a portion of the solution and throw the first contact layer about one centimeter thick onto the wall.
- Allow time for the plaster to harden slightly and remove excess as a rule.
Set of mortar with a ladle
This completes the first stage; you can continue only the next day. During this time, the solution will harden a little and excess moisture will evaporate from it. If cracks appear, no problem, the second layer will cover them. Apply the final layer of plaster with a hopper bucket as well. Work in sections, immediately remove excess plaster as a rule. Pull it along the beacons from bottom to top, at the same time move it slightly left/right. Throw excess solution back into the container with the mixture. The small remaining depressions can be filled with kelly and again leveled with the rule.
Plastering walls
Plastering process
First layer of plaster
Spray the next layer
The plaster is leveled using the following rules:
Plastered wall
Important. When working with the hopper bucket, be sure to use personal respiratory and eye protection.
If you plan to finish the walls with ceramic tiles in the future, then nothing else needs to be leveled. Before painting, the surfaces must be perfectly leveled with grout. At this point the plastering process is completed, you can proceed to the next stage of arranging the bathroom.
Style selection
The design of a bathroom in a wooden house should match the overall design style of the apartment. The atmosphere in the room depends on the choice of style. You can create a “house on chicken legs” from a famous fairy tale, or turn your home into a standard palace, a Russian hut. All rooms in a wooden house should be compatible with each other or at least complement each other.
At the style selection stage, you should decide what additional finishing materials will be used. On walls and ceilings, wood can be covered with any material using plasterboard sheets of different thicknesses. To cover the floor, use a concrete screed where appropriate. This way you can create any modern and retro interior in the bathroom. For adherents of the naturalness and primitive beauty of wood, with minimal use of additional materials for cladding, the following styles are suitable: Russian, Italian, eco-style, loft, country and Provence.
Combinations of natural stone, linoleum and tiles merged into a single design of a wooden bathroom in the loft style Source izba.spb.ru
To better understand which design suits you best, think about your interests and hobbies. If you are an active and risky person, choose a bold, avant-garde, bright interior. If you prefer calm and balance, modernism with notes of minimalism, Japanese style. Or maybe you miss your “grandmother’s” country house from childhood - then filling the room with Provence will come to the rescue.
Choosing a style is always an individual matter. No tests will determine a suitable interior better than you can do it yourself. Look at some examples of decorating a bathroom in a wooden house. Decide which ones you like best.
Pay attention to the dimensions of the room. In small houses, it is better to exclude the classic style, which is intended for large rooms.
A small bathroom in a wooden house, decorated in country style, looks cozy and presentable Source izba.spb.ru
Features of gluing a bathroom with a waterproofing membrane
The work phase begins with the preparation of the foundation. The following requirements apply to it:
- There should be no obvious defects or flaking particles on the surface.
- Cracks and areas of unvibrated concrete are also unacceptable.
- Surface evenness - the maximum difference per 2 meters of length is 5 mm in any direction.
- If all conditions are met, then we begin cleaning. First of all, we sweep away large debris with a brush or broom, after which we carefully vacuum the base. We move around the bathroom only in clean shoes.
- We check the moisture content of concrete using a moisture meter. In this case, you need to know how the device used takes measurements: by volume or by mass. Humidity levels will influence the type of primer; if an aqueous bitumen emulsion is used, it should not exceed 8% by weight. For other compositions, the permissible humidity is 4%.
Checking the moisture level of the substrate
- Next, a layer of bitumen-type primer is applied, also called a primer. This can be done with a brush, roller or brush. Material consumption per square is 0.25-0.35 liters.
Applying primer to concrete
- The material will be laid immediately after the primer has dried, so that its surface does not have time to become clogged. The readiness of the base can be checked by applying a white paper napkin, which should remain clean.
- Before laying the material, it must be rolled out onto the prepared base. We cut it to length and straighten it.
- Then you need to roll the rolls, starting from both sides and connecting them in the center of the room.
- Glue the rolls one by one. To do this, you need to carefully cut the anti-adhesive film along the width of the roll. Then we begin to separate this film and gradually roll out the insulation.
- It’s difficult to do this kind of work alone; it’s better to have a partner. While one rolls out the roll, the other presses it with a mop brush, thereby expelling air from under the material. The same work can be done with a heavy metal roller.
- Neighboring and adjacent canvases are overlapped. For longitudinal alignment it should be at least 100 mm, and for end alignment – 15 mm. If there are T-shaped joints, then the central piece is cut to the shape of the overlap to avoid unnecessary layers.
- When making an end connection, the corners of the top piece are cut at an oblique angle to improve the quality of the connection. All overlaps must be rolled with a heavy roller.
- It is also important to observe the minimum indentation of adjacent seams - it should be at least 500 mm.
Seam spacing parameters
- The laid material should not have wrinkles, waves, folds.
After installation is completed, a screed of at least 5 cm thick is made on top of such waterproofing. You can use a similar solution in the bathroom if your house is located on an area with a high groundwater level. More often it is used to protect foundations.
Finishing walls, floors and ceilings
At the planning stage of the room, you should decide whether additional materials will be used for cladding, or whether the wood will remain exposed. The style of the future interior and the amount of the spending budget depend on this. Let's consider which materials are more suitable for a bathroom located in a wooden house:
- Floor. The constant humid climate of the bathroom requires reliable waterproofing. Rough finishing includes several stages: applying a primer layer to a clean floor, degreasing the surface, and moisture-resistant coating. Then sheets of plasterboard are placed on the pre-constructed frame, and a screed is made with cement. A screed is recommended if the bathroom is located on the ground floor, so that the floor does not collapse due to its large mass. On the second floor, additional wooden beams are used and the distance between them is reduced. Laminate, linoleum, and ceramic tiles are suitable for finishing the floor. These materials are the most moisture resistant. The tiles are used if they are screeded with cement, so they are practically not used for finishing the floor in the second floor bathroom.
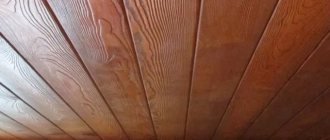
- Walls. If the house is built from calibrated wood, you can preserve the natural appearance of the logs in 2 stages: sanding (using a sanding machine) and tinting (with stain, glaze with wax, vegetable dyes using etching). After this treatment, the wood becomes resistant to moisture and more textured. If you decide to use additional cladding materials, you will need a frame made of plasterboard or gypsum board sheets, on which tiles or plastic panels are subsequently attached.
- The ceiling can be made suspended if wooden beams do not suit the style. The structure is erected in the same way as in the case of walls, using a frame. Such a ceiling can easily hide ventilation and electrical wiring. Suitable materials for finishing: moisture-resistant plasterboard, plastic panels, cassette tiles, slatted structures made of metal or wood, stretched PVC sheets.
Using frames, you can tiling a bathroom in a wooden house with tiles and natural stone Source izba.spb.ru
Waterproofing wooden walls in the bathroom
Before starting waterproofing work, the surface must be thoroughly prepared. All existing cracks and cracks must be covered or filled with a special product that will provide protection from moisture. To avoid liquid penetration deep into the wood, wax should be applied to the surface. If you use rolled materials as waterproofing, it is better to treat the joints with mastic - this will better protect the wood from moisture, because tiles are not always laid to the ceiling. And in order to stick it, it is important that the walls are smooth. If this is not the case, you need to level them, that is, plaster them using a building level.
After the walls are leveled, we use a polymer-cement composition as waterproofing. In areas around the sink and behind the bathtub, it should be applied in three layers. Before applying the next layer, it is necessary that the previous one is completely dry, but not too dry. Only then can you lay the tiles, starting from the floor.
Before starting waterproofing work, the surface must be thoroughly prepared.
Color selection
Psychologists say that the color we perceive visually can influence the nervous system. In a wooden house, many choose to finish the bathroom exactly in the color of natural wood.
The tree has strong energy and has a lot of shades. If you do not use additional finishing materials, the color can be selected from the following types of wood, based on the healing qualities of the material:
- oak - replenishes strength, relieves fatigue;
- cedar, larch - cope well with anti-inflammatory diseases, increasing the body's immunity;
- pine - calms, helps restore the central nervous system;
- spruce - strengthens breathing, treats diseases of the ENT organs;
- alder - normalizes the cardiovascular system;
- beech - monitors blood circulation;
- Rowan - preserves family values, has a positive effect on mood;
- willow - relieves headaches;
- beech - fights migraines.
The tree can be soft yellow, white, beige, dark red or brown. After covering the wood with stain or special paint, it acquires any desired shade. It is important to decide which color scheme makes you feel joy and comfort. A person uses the bathroom every day; the correct design and decor of the room can lift the mood, give strength and confidence.
Correctly selected decorative elements in a wooden house transform a boring and small bathroom Source izba.spb.ru
Accommodation
If the arrangement of a bathroom in a wooden house is carried out in compliance with all norms and rules, then no problems will arise during its operation, and it will serve well for more than one generation of residents. All important points must be thought through at the stage of planning the house. First you need to decide on the location of this room. As practice shows, it is most convenient to place the bathroom close to the kitchen. In this case, it is much easier to design and install a single sewerage and water supply system than to disperse it around the entire perimeter of the house. However, if desired and the necessary funds are available, the bathroom can be arranged in other places convenient for future residents. Only the configuration of the pipes will be much more complicated.
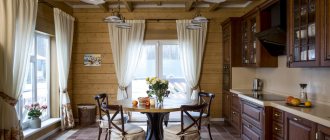
Left: a compact bathroom with a modern shower cabin and exquisite decor in a house from the PSG “Vyatsky House” (architectural design by Elena Rybalko). Left: In one of the bathrooms of the house, built by VSL Construction Company from structures, porcelain stoneware and marble were used.
When designing bathrooms on the second and third floors, you need to calculate the possible loads on the floor, because the weight of the bath itself can vary significantly depending on its volume: for standard models it is 200 liters, and for a Jacuzzi it reaches 500 liters or more. If necessary, the overlap is strengthened, for example, by reducing the pitch of the beams and increasing their cross-sectional area.
Italian style
Italy is a luxurious country where the sun always shines. When choosing materials, Italians give preference to naturalness. Color scheme: white is more often used, which adds space to the room. The bathroom is no exception. Let's consider the 2 most popular room designs:
- Naturalness. We place large wooden beams on the ceiling, leaving the walls in their original, log form. The floor is covered with moisture-resistant laminate. It is better to take valuable wood species that are durable and durable: walnut, oak, ash, alder, beech.
- Aristocratic. We lay ceramic tiles or mosaics on the floor and walls. Snow-white or gold columns and false windows with a Venetian pattern look great in such a room. We decorate the ceiling with plasterboard or make it suspended.
Italian-style furniture has an elegant texture. You can install a bathtub on golden twisted legs or buy a round Jacuzzi. For decor, the following would be suitable: a mirror in a gold frame with artistic painting, a hanging chandelier with imitation candles. On the walls, with the classic design of the room, paintings with precious stones and frescoes look beautiful.
You don’t have to live in Italy to enjoy the beauty and luxury of a bathroom in a wooden country house Source www.homify.ru
Mistakes when painting a bathroom
When carrying out work independently, it is extremely rare to avoid mistakes. Painting the walls in the bathroom is a very responsible process. It is necessary to carefully prepare the base.
Preparation is necessary for any wooden surface, but in the bathroom this procedure takes on special importance. In a damp room, wood will have to withstand great strength tests, which, without careful preparation, can trigger irreversible processes in the wood.
It is at this stage that mistakes are most often made, ranging from poor-quality sanding to an incorrectly selected wood protection product. As a result, the coating quickly loses its appearance, and the tree is left without protection and begins to collapse.
Eco style
The name of this style speaks for itself. The main thing in an eco-interior is naturalness, safety and simplicity. We choose calm sand shades. We remove unnecessary, intrusive accessories. We leave only the necessary plumbing fixtures, wooden shelves and a mirror. Paintings and posters will be superfluous in the design, but wicker baskets are just the thing. The room should simulate being in nature. You can add green colors to your interior using indoor plants. If the microclimate of the bathroom does not allow placing a live flower, replace it with an artificial composition (for example, vines hanging down from the walls, a carpet with imitation of evergreen grass). The walls can be lined with natural stone or left with a wood texture. Suitable for flooring: laminate, ceramic tiles, marble. The ceiling looks beautiful from wooden slats.
An eco-style bathroom will fill a wooden house with harmony and comfort Source yandex.ru
Modern
The Art Nouveau bathroom combines modernity and architecture. To decorate a room, curved lines and shapes and muted shades are suitable. For filling, 2-3 colors are usually used. For example, the floor is made of brown tiles, the walls are half made of mosaic tiles and timber, the ceiling is made of light wood panels or plasterboard. A traditional bath can be replaced with an innovative shower. We take the sink and toilet hanging, without unnecessary parts. We add lighting: illuminated stained glass windows, chandeliers on a long base. It is better to put the doors in an arched shape. Mirrors look good in an artistic metal frame. This style is thought out down to the smallest details. All decorative elements and furniture should fit well together.
We choose in one color scheme: containers for storing accessories, handles for towels, toilet paper holder.
Art Nouveau is relevant everywhere; a bathroom decorated in this style looks equally good in an ordinary apartment and a wooden country house Source izba.spb.ru
What waterproofing materials are there?
The most common methods of waterproofing are pasting and coating. The first has its advantages and disadvantages - you can continue working after 24 hours, but pasting is a painstaking job in itself. You can apply both well-known roofing felt and roofing felt, as well as more advanced materials - Ecoflex, Isoflex or some other. Among them, there are adhesive ones - the protective layer is simply removed from them, and the material is ready for use, and weld-on ones - the adhesive layer that they have must first be heated. A gas burner is used for this. You just need to remember that this type of waterproofing will add 5 millimeters to the main floor height.
The second method – coating – is a simpler option. The materials used adhere perfectly to any surface and can withstand high temperatures. Coating materials are divided into several types.
The simplest waterproofing option is coating. It easily sticks to any surface
| Bitumen. | They are applied to the surface in two ways - cold and hot. But the first option has a disadvantage - it does not fit on a concrete base. The second option uses heating of 160 degrees. |
| Bitumen-polymer. | It does not require heating and is suitable for all surfaces, including concrete. They create a soft, but at the same time highly reliable layer. |
| Polymer-cement. | The waterproofing layer is quite plastic, excellent connection with the surface. |
| Acrylic. | The most advanced type of waterproofing. Ecologically pure. Produced as a water-based emulsion. Creates an elastic and very strong layer. |
Nowadays there are many different waterproofing materials in stores, they are divided by type: painted, glued, impregnated. The first includes mastics and emulsions. They allow you to create a reliable waterproof layer. Apply to the surface in layers after a certain time. The second group is a film or roll material made on a polymer or bitumen basis. To glue it onto a plane, you will need cold or hot mastic. It is better to overlap the material so that moisture does not penetrate into the seams, and to use cement-based, moisture-resistant compounds for filling.
The third group includes all materials, which include moisture-repellent cement, chemicals, and crushed sand. It is not advisable to use this type in residential buildings. For waterproofing in the bathroom, the first and second groups are mainly used. They can be combined with each other.
Mastic will create a reliable waterproof layer
Provence
By decorating the interior of a bathroom in Provence style, you can easily move to a country estate in the French province. The filling of such a room is always romantic and functional. When choosing a color scheme, it is better to give preference to calm, light shades: white, beige, turquoise, blue. Natural materials are used to decorate the walls and floors: lining, wooden beams or siding. The ceiling looks great with wooden beams. Small decor takes almost the most important place in the design of the room: an aged mirror frame, lace on the curtains, stained glass windows, decoupage-style clothes hangers, hand-made accessories (a cup for toothpaste and brushes, a wicker laundry basket), antique furniture (chest of drawers, wall cabinet, sink cabinet). An excellent addition would be rounded faucets with large valves, gold or silver. We choose oval or round sanitary ware.
A bathroom in a wooden house filled with Provence style interior looks elegant and harmonious Source vannayasovety.ru
Professional painting
Our specialists have extensive experience in painting any wooden surfaces. We know all the nuances of working with wood, we have the necessary equipment and materials. We use professional paints and varnishes that are ideal for painting wet rooms. Craftsmen will complete all stages of bathroom painting work in a short time and at a high level of quality. You will find our coordinates in the “Contacts” section; you can contact us in any convenient way.
Calculate the cost of painting and insulating your home right now
Select types of work:
Select materials:
Loft
A bathroom in a wooden house can be extraordinary. Decoration in the loft style will emphasize the individuality of the owner of the apartment. The loft combines the textures of untreated wood and stone tiles - these are the main 2 materials for finishing walls, floors and ceilings. After renovation, the premises look like an industrial plant or an abandoned warehouse. This interior is suitable for bold and extravagant personalities. Plumbing fixtures can be placed anywhere to make the space feel even more relaxed. “Brutal” lamps with a rough metal shade or without it at all are suitable for lighting. If there is enough free space in the room, you can put a bench made of pallets. Plumbing fixtures made of chrome or other metal will fit perfectly into such a bathroom. To give the interior a little warmth and coziness, we place a carpet with a vintage pattern on the floor.
A loft-style bathroom is an ideal solution for a small country house Source izba.spb.ru
Installation of sewer and water supply systems
An important issue in the decoration of sanitary rooms is the installation of a sewer system and water supply. After all, even a small leak in these systems can ruin everything.
Before installation, the loads on the floors are carefully calculated, the water consumption is planned, and the volume of the septic tank or sewer pit is calculated.
During installation, compensation gaps are provided. At the base of the foundation, a reinforced concrete gutter is constructed around the sewer outlet; this is done to prevent the sewer pipes from moving.
The water pipeline should be protected from sub-zero temperatures, so bottlenecks are insulated with special thermal insulation materials.
So that water pipes are not afraid of frost, they need to be well insulated Source postroim.net
Minimalism
The interior of a bathroom in the style of minimalism is modern, practical plumbing fixtures and multifunctional interior items. An ottoman that doubles as a laundry basket or a mirror behind which hides a cabinet for a toothbrush and other accessories would be appropriate in the bathroom. Minimalism is characterized by design in light colors with a slight accent of gray or black. In terms of finishing materials for walls and floors, ceramic tiles or marble are more often used. The tile is chosen without a pattern. It is better to make the ceiling suspended or made of plasterboard, with spotlights. To increase the space in a room, it is advisable to use one or even several mirrors. Plumbing fixtures include wall-mounted bathtubs, shower cabins, compact wall-hung toilets and sinks.
Country
This style brings you to the American “village”. The walls and ceiling remain wooden; tiles or wooden boards with a protective coating are used on the floor. Country loves small details and homemade decorations. You can hang several paintings of flowers in a wooden frame or a straw hat. Place an unused bicycle under the sink. Towels with bright embroidery will also look beautiful in such an interior. Mirrors are often chosen to be simple, rectangular in shape, with a forged frame. The lighting can also be framed with a metal frame. Hooks and hangers should imitate antiquity; it is better to choose alloys made of copper or bronze. For furniture in the room, you can place wrought iron chairs or restored wooden armchairs. We choose simple plumbing fixtures, without unnecessary decorations. The bathtub is suitable for an oval shape with curved or straight legs. We leave the space under the bathtub open (there is no need to sew it up with a special finish). If the room is large, it is appropriate to install a wooden vintage wardrobe or chest of drawers.
A country interior in a country house looks magical; to decorate “wet areas” you can use tiles with a rustic pattern; they go well with the texture of wood Source eto-vannaya.club
Japanese style
Japan is a calm and very modern country. Its culture contains the wisdom of the times and innovative technology of the 21st century.
The traditional Japanese bathtub is actually made of wood, its name is ofuro. It will be the highlight of your interior design if you choose this as a plumbing fixture.
A Japanese-style bathroom is designed for comfortable rest and relaxation. The room does not like flashy shades and sharp lines. When choosing a finishing color, it is better to choose soft, natural tones: sand, beige, brown, olive, gray. Often in this style, bamboo, marble, and ceramics are used to decorate walls and ceilings. The ceiling can be made of slatted, suspended or plasterboard sheets. We approach the selection of plumbing fixtures with special attention. A Japanese-style bathtub can be lowered to the floor. It is better to make the toilet and sink suspended. Space zoning is suitable for such an interior. For decoration, the following are used: screens (shoji), candles, stones, paintings with hieroglyphs or sakura, lamps in the form of lanterns.
A bathroom built into the floor looks very original; such a composition will definitely highlight the room and fill it with Japanese notes of peace Source inhomes.ru
Rustic
When decorating the floor and walls of a bathtub in the Russian style, we give preference to the natural type of wood: untreated, rough logs or wooden boards covered with stain and wax. The ceiling may have large wooden beams. A Russian bath resembles a bathhouse, so the ventilation system here must be especially thought out. Rustic combines rustic style and modernity. You can choose a bathtub made entirely of wood (bathtub) or place a corner shower in the room, with a built-in ventilation system. The following compositions are suitable for decor: a fireplace, a mirror in a wooden frame, a clay jug on a shelf, a fur carpet on the floor, a birch broom in the corner of the room, painted towels with Russian motifs. An excellent addition would be a sink built into a wooden cabinet. We choose gold or silver plumbing fixtures, less often white. If the bathroom is large, you can experiment with space, an imitation of a Russian stove will add color to the room.
The rough texture of wood coated with wax or stain looks great in the Russian interior of a country house Source izba.spb.ru
Features of wooden houses
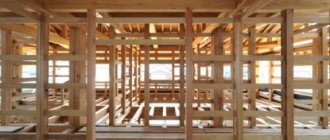
The materials for the construction of wooden houses are rounded logs and profiled timber. Due to the change in the shape of wood under the influence of moisture, the arrangement of “wet” rooms should be carried out strictly according to technology. Particular attention should be paid to waterproofing, sewerage and ventilation.
Wooden surfaces must be treated with antiseptic and protective agents, drying oil or linseed oil.
During operation, houses shrink, and wooden buildings are no exception. During shrinkage, seams depressurize and partitions and walls become deformed. Therefore, a separate supporting frame is required for the bathroom, and it is better to use plastic and metal-plastic for the pipeline material. Special clamps with rubber gaskets are suitable for fastening such pipes.