You can make furniture for your home/dacha yourself from what you have on hand. These are various snags, stumps, trees or branches.
Consider furniture made from branches.
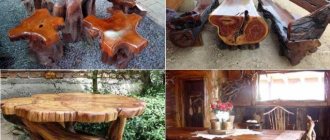
With some imagination and a little effort (relatively little), you can make furniture like this:
To make such furniture, select branches with interesting shapes. You can take both live branches with green leaves and dry ones. Don’t let cracks scare you; on the contrary, they add additional individuality to such furniture. The main thing is not to weaken the branch.
Remove the bark from the branches and dry well. How to dry? In the shade for half a month or a month, then dry it indoors.
We use brushing. Brushing is the mechanical processing of products using metal brushes.
Don’t forget about safety and health precautions - wear a respirator and safety glasses. Processing should be carried out correctly along the fibers. When the main dirt and dust have been cleaned, we change the cartsovka to a fine one for more accurate processing. We repeat the procedure until the desired result is obtained, and we evaluate the degree of processing ourselves.
After processing, we dry the branches, treat them with antiseptic agents and assemble the product. The biggest difficulty when working with branches is caused by the connections of parts that are joined at an angle. Here, spikes and hand tools such as chisels will help you. After adjustment, the final joining is done with glue.
It is advisable to prepare a sketch - it will be easier for you to work with it.
It is desirable that furniture made from branches be light and mobile . After all, it is convenient and practical when pieces of furniture can be moved from place to place or put away for winter storage.
Branches can also be used to decorate large objects such as cabinets, chests of drawers, and imitations of living trees can be made on the walls.
Painted branches can be even more impressive. In modern style interiors they are used to enhance the color scheme or create contrasting elements. Both small branches and massive sculptural cuts are painted.
Photo of furniture made from branches, plus decor
Tags: wood decor, for the garden, for the home, made of wood, do it yourself, photo, photographs
- Related Posts
- How to make a wooden flower vase with your own hands
- Hanging shelf made of sawn wood, photo
- DIY decor and crafts from branches. 12 original ideas for the interior
« Previous entry
Garden furniture made from branches and driftwood
A huge number of garden furniture options can be made from ordinary branches, tree roots and driftwood. Seemingly trash can turn into real masterpieces of garden decor. The cost of original works of folk craftsmen made from branches and driftwood is quite high. But, if you show your imagination, you can make similar elements of garden furniture yourself. In terms of practicality and beauty, handmade furniture will be no different from its expensive counterparts.
In order to make a beautiful bench, sofa, stand or shelf, the material must be prepared in advance. In order for garden furniture to be in the same style, it is necessary to gradually select interesting specimens of driftwood and process them.
Before you begin assembling furniture, the bark must be removed from snags and branches. The material must be thoroughly dried. In order to prevent the effects of insects and rotting processes, the wood must be treated with antiseptic and antipyretic agents.
Driftwood chair
Bench made of driftwood
The advantage of furniture made from branches is that to make them you only need the branches themselves, a screwdriver and a hacksaw. Even fragile girls can assemble the simplest furniture from branches using only twine or any other textile material.
The finished product is given the desired shade using stain and varnished. You can also use acrylic or enamel paints for coating.
Bench made of branches
A bench is an essential element of any summer cottage. Today, such structures perform many important functions: from their intended purpose to giving the garden a unique design.
Many owners of suburban areas prefer to build benches themselves, since this simple task will not take much time and money.
There are several basic materials that are used as the basis for constructing benches.
Wood
The most popular option is wood. It is believed that it is from this material that the most aesthetic designs are obtained.
Due to the universal aesthetic characteristics of the material, wooden benches fit perfectly into the landscape of any garden
It is important to consider that the benches are always in the open air. Therefore, it is necessary to choose those types of wood that are characterized by maximum resistance to atmospheric conditions.
These include: hazel, oak, cherry pine, and larch. For additional protection, the material is coated with a special varnish.
Metal
Metal is popular for the production of benches for many reasons: durability, practicality, resistance to precipitation, ease of use. As an optimal option for the garden, openwork structures with interesting patterns are most often made. As an alternative, you can stick to minimalism.
Stone
Stone benches are impressive and monumental. Main materials: granite, marble, quartzite. In some cases, rough stone is used to create a unique design, in others, stone with a smooth surface is used.
Plastic
Plastic is the most affordable, convenient option. It is considered more seasonal and budgetary than aesthetic and decorative. However, if properly designed, a plastic bench can become a garden decoration. Colorful pillows, lanterns, flowers and much more are often used for decoration.
The most successful design solutions for crafts
| Name of crafts | Description and manufacturing tips |
| Lamps | No person can replicate the natural pretentiousness of the bends of driftwood; its forms best reflect the freedom of natural development. You need to select snags with long roots; if there are none, don’t be upset. You can then bend them into the desired position in hot water. It is very important to come up with a stand; it must guarantee the stability of the structure and prevent it from tipping over. Wood can be natural in color without various surface finishes. The electrical cable must be hidden; this cannot be done using branches; it is recommended to use thick natural linen rope for this purpose. There are options for using individual parts of a table lamp or sconce and attaching them to driftwood in an original way. During manufacturing, unquestioningly follow the requirements of the PUE; do not forget that wood is a flammable material and requires special measures to protect against fire. |
| A simpler craft, you can use both large driftwood and individual branches for making. There are a lot of options for design solutions; no two are alike. Each turn of the driftwood can be used, given a special look and accentuated by its geometry. |
| Picture frame | Any photographs decorate the interior, and if they are also in exclusive frames, then the effect increases many times over. Frames can have geometrically regular or bizarre natural shapes and different sizes. Hang on the wall or install on bedside tables, have a natural color or be covered in bright, catchy colors. The specific type doesn’t really matter; there are a huge number of solutions. The ideal option is the one you personally like; this is the main criterion for choosing a frame design. |
| Hanger | Can be used both in country houses and in city apartments, looks great in bathhouses. On the one hand, you need to thin out the roots a little and make room for clothes. Special shelves or hangers are made for hats. |
| Bonsai | Recently, passion for Japanese folk traditions has become very fashionable in our country. You can make an excellent bonsai from driftwood, the technology is simple, the entire composition can be ready in just one day. |
Candlesticks and vases
Candlestick for three candles Horizontal candlestick Pieces of driftwood are glued to the flask and tied with a ribbon
Vase with succulents
The process of making a vase and candlestick from a glass cup and driftwood
Lamps and fixtures
Table lamp made of driftwood and rope Sconce made of driftwood
Another version of the driftwood chandelier table lamp
Decorations
Pendant made of driftwood Earrings with beads Another pendant with a blue stone
Shelves made of driftwood
Book holder Shelf made of driftwood and boards
Woodpile
How often, when walking through a forest or park, we see thick dry branches broken by the wind, snags or pieces of rhizomes. It's a shame to pass by such material. A person with imagination immediately imagines a beautiful, functional thing. Crafts made from tree branches can decorate the yard of a house or the interior of a room.
Man instinctively associates himself with nature and considers himself a part of it. Therefore, any natural material - stone, wood - brings comfort and tranquility to your home. Wood is a warm material. It absorbs moisture and creates a healthy microclimate. It’s not for nothing that in a log house you can breathe so easily and sleep well. The best bathhouse is also wooden. You can put unusual furniture made of branches in it - a bench, a hanger, stools. It smells of pine resin and birch broom. This adds vigor and strength.
What can be made from driftwood and branches? You can make pieces of furniture and decor from different parts of wood.
You can’t put furniture made from stumps in your house or on your veranda. But such an armchair or stool is well suited for a yard or summer cottage
An original solution for a table and seat made of stumps and thick branches will attract the attention of your neighbors and guests. In order to make such items, you need to have artistic taste, woodworking tools, time and patience.
The main advantage of stump furniture is the lack of materials costs. Everything can be done even without nails using a hacksaw.
Furniture made from stumps and driftwood will harmonize with the rustic style of the site. A real or decorative well made from a log house, a wattle fence made from willow twigs or a fence made from thick branches will look good.
The simplest solution is a bench made of two stumps with a thick board placed on them. You can leave it without a back, or you can equip it with a back made of sanded thick branches. It will be beautiful and unusual. This will be a combination of furniture made from branches and stumps.
Even the marks of time that inevitably appear on the tree do not spoil the appearance of garden items and look natural.
Furniture made from roots and stumps is massive and durable. From a solid tall stump you can use an ax to cut out a chair or a chair with a backrest. The root can be planted on the armrest of such a product.
The most difficult thing is to deliver the forest material to the site and load massive logs or stumps onto the truck.
Stumps are used to make stable stools. They are also sanded and varnished. You can decorate the body of the stump with carvings. The top is colorfully decorated with colored glass or flat stones. They are glued to liquid nails or epoxy resin.
Furniture made from driftwood and thick curved branches are real fairy-tale creations. Product parts are fastened together with self-tapping screws and wood glue, depending on the configuration of the items. Furniture made from branches gives room for imagination. From this material you can build something like a small gazebo. It is good to plant wild grapes near it, which will eventually entwine the tree.
The material for a garden chair, sofa or chair is cleaned of soil and dirt, the bark and top layer of the rhizome are scraped off to light wood, and impregnated with stain and varnish.
Furniture made from branches creates the feeling of openwork weaving.
The garden plot of creative owners is inhabited by fairy-tale characters - goblins or birds - products made from driftwood, gnomes made from tree roots and other forest inhabitants. Logs turn into bears, frogs - princesses and other figures.
To make furniture from branches or furniture from stumps, the wood must be well dried so that it does not rot. To protect against bark beetles, it is treated with antiseptic compounds. DIY crafts made from branches add a romantic style to the interior. You can make an exclusive thing with your own hands.
There are many varieties of such crafts. Handmade crafts from tree branches include wall decoration, various vases, figurines, candlesticks, coasters. If you want the masterpiece you made to decorate your interior for a long time, you need to choose the right material for it.
Design options
Depending on the size of the raw materials, large furniture is made from stumps and snags or small objects are decorated.
Furniture for all occasions
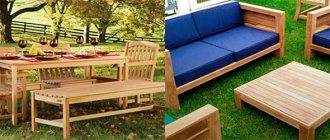
You can make rustic furniture for your home or garden with your own hands. Here are some ideas:
- Tables, chairs, bar counters and other furniture made from driftwood look unusual. It is easy to strengthen the tabletop using a cut of large driftwood.
- Small branches are suitable for the back of the chair; larger driftwood will be used for the legs. The seat is made from roots held together with hemp or a continuous, even cut.
- The bed of the bed is made of boards or thick branches; thinner branches are used for the backrest.
- If it is possible to find a fragment that has powerful branches, it is used as the basis for a floor lamp. Less solid branches will make an original candlestick or hanger.
- A wide log will make a bar counter or tabletop.
Thus, by selecting the material according to size and diameter, you can make any piece of furniture.
And even a stump
If a stump has formed on the site, you can use it as the center of the composition, surrounding it with logs. The main thing is that the hemp furniture has an even cut - the table and chairs will be stable. If desired, they are supplemented with backrests made of branches and pillows are placed.
You can even use an old rotten stump as a flower pot. They are placed in the rotten middle only in a pot so that the wood does not completely collapse, and if there is moss and other vegetation on the stump, this is only a plus: they will add decorativeness.
The quirkiness of roots, branches or driftwood creates endless scope for implementing the most unexpected solutions. They are fabulously beautiful and at the same time look cozy, but most importantly: they exist in a single copy.
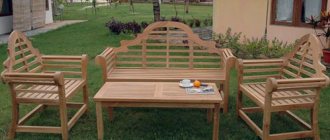
Bench with backrest with tongue-and-groove joints
The next project is an outdoor wooden bench with a backrest. It has a fairly strict appearance and will become a functional decoration in any garden or dacha. The vertical slats of the back give the massive structure visual lightness. Shaped armrests and a curved top bar add Japanese influences to a clean, classic look. It is simply created for carefree contemplation on shady alleys, and will look even more expressive surrounded by greenery and flowers.
If in the previous two projects we talked about how to make benches using simple carpentry joints, then here we will talk about the classic tenon-socket connection. It underlies all design elements of the project. You will have to make a lot of spikes and nests, so it is advisable to think about optimizing this process in advance. The simplest and most affordable option is to use a hand router and a saw table.
Advice! For accurate and quick selection of slots, use a homemade milling template with slots of the required sizes.
Drawing of a bench with a wooden back
Advice! Decorative antique finish perfectly complements the simple design of this wooden bench with a backrest. Use the brushing capabilities to texture individual structural elements - the top crossbar, the middle backrest and armrests. The combination of smooth and aged surfaces will create an original design contrast.
Prepare the details
According to the dimensions specified in the drawing, make the main parts of the bench. To quickly apply markings, use pre-prepared templates. Duplicate parts can be mass produced. After cutting, fasten all the identical parts into a pack and process their ends with a sander, this will significantly speed up the work process.
Make spikes
On the saw table, form tenons on all tenon pieces, following the dimensions from the diagram. Using a groove disc will make this job much easier. This can be done no less carefully with a regular saw blade, followed by trimming the waste with a chisel, as shown in the photo.
Mill out the sockets
Assemble the sidewall
Perform dry assembly of the sidewall. If the joints in the structure are not tight enough, fine-tune them using one of the methods we discussed in the article “Perfectly Fit Joinery Joints.”
Carry out sequential gluing of the structure
After checking the accuracy of the fit of the connections of the entire bench, proceed to sequential gluing of the base elements first, and then the back. After the glue has completely dried, attach the seat strips with self-tapping screws.
Traditional simple stools
Timeless classics live not only in the facades of buildings. Time-tested solutions are also preserved in the designs of stools. Adding smooth lines to their appearance eliminates boring angularity.
In the photo below we see the classic version. Thanks to the rounded drawers and legs, it looks quite decent. The milled grooves on the legs also improve its appearance.
Simplicity has its own charm. Designers successfully play with this quality, creating deliberately rough, brutal products. Artificially aging furniture is not an easy task. The author had to work a lot on the product, the photo of which we see below.
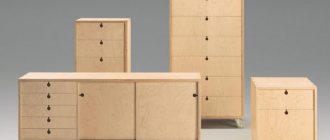
The category of classic “stool design” includes designs with drawers under the seat. To do this, use wide side frames and hinged lids.
Furniture made from stumps and solid wood cuts
Stumps are an excellent material for making stylish, inexpensive and completely unique furniture with your own hands, because in nature there are no two absolutely identical trees. Such stump furniture will fit into almost any interior, be it light classic or country, Scandinavian style or minimalism, loft or industrial. If the stump is painted in glossy or metallic shades, then even high-tech can organically accommodate such an object. A processed cut of a tree trunk or stump can become a comfortable coffee table in the living room, a bedside table in the bedroom, stools in the kitchen or a table in the bathroom. Most often in the interior, a stump is used as a cabinet or table.
How to make a table from a stump with your own hands
First, find a suitable tree stump to create a table or cabinet. This is not so difficult even if you are a purely city dweller without a dacha. Firstly, there are a lot of companies that deal with wood - logging, sawmills, and so on; you can purchase cut wood of the desired size from them. Secondly, we advise you to interview all your acquaintances and friends who have dachas or relatives in villages; they probably have supplies for firewood or uprooted stumps. And thirdly, you can take a saw, go into the nearest forest, find a fallen tree and cut it into pieces.
The stump should be dry, but not rotten. If the bark comes away from the trunk easily enough, then such a stump can be used. If you find fresh wood, you need to let it dry. Leave such a stump for a month or two in a warm and dry room.
The bark must be removed from the trunk. To do this, take a chisel or chisel and carefully, using a hammer, remove the bark.
If you plan to use the stump not just as a decorative decoration, but as a functional piece of furniture, you need to level it. Using a building level, check how level your workpiece is. If the surface of the stump is sloped, level it with a plane.
Sand the cut of the stump and the side with a sander or by hand with sandpaper.
It’s good if the stump has an interesting natural texture with knots, cracks and chips. After you have processed and sanded the entire surface of the stump, clean the cracks of small shavings and dust. To do this, you can use both plumbing tools, a cloth, and a regular vacuum cleaner.
Any stump or cut of a log is beautiful in its natural form. But you can paint the stump in any color (after a coat of primer), apply patterns with a brush or using a stencil, or, at a minimum, open it with varnish or apply a water-repellent impregnation for wood. The latter is especially true if your future table will be actively used outdoors or in a room with high humidity, for example, in a bathroom. Remember that even one coat of varnish will darken the wood a little. It is recommended to apply two or three layers of water-based varnish, and after the last layer has dried, polish with a soft abrasive fiber.
Such a table made from a stump can simply be placed on the floor. You can also use shortened legs from old tables or stools, wheels or special stands
By the way, the use of legs, firstly, will protect your floor from scratches, and secondly, will raise the stump and ensure air circulation, which is important for the long service life of such furniture
Cabinets and tables made of stumps in the interior
Look at different options for tables and bedside tables made from stumps in the interior.
Tables made of stumps in their natural form with minimal processing (click to enlarge):
Painted stump tables:
Stools and chairs and stumps in the interior
There is practically no difference between a table and a stump stool. But it is obvious that sitting on a stump is not very comfortable. In order to make the stump a comfortable stool or footstool, you can simply put a pillow on it. You can also make soft upholstery with filler and attach it to the surface of the log. The presence of a back will make the stump chair even more comfortable. Designers and carpenters cut such a chair from a single piece of wood using a chainsaw, followed by processing. Some examples of using stumps as seats can be seen below.
Garden furniture made from stumps
It’s as easy as shelling pears to build soda furniture from ordinary stumps. Moreover, many stumps may remain after uprooting old fruit trees. In this case, the issue of transporting the material disappears by itself. If you show a little imagination and creativity when working, the resulting stumps can turn out to be unique, exclusive furniture that will not go unnoticed. For example, the seats of hemp stools can be decorated with mosaics made from pieces of broken dishes. Small pieces of broken saucers, cups or ceramic tiles are attached to the surface of the stump using liquid nails or epoxy glue.
Unnecessary stumps can become unusual firefly stumps, which during the day will decorate the garden or summer cottage and serve as an ordinary seat, and at night they will turn into lantern stumps. Such stools perform two tasks at once - they illuminate the garden area and expand its boundaries. Making such an element is very simple. It is enough to put a fluorescent or LED strip on a well-cleaned saw cut and cover it with plexiglass and secure it with self-tapping screws.
If you have the skills to work with a chainsaw, you can make an excellent chair from a tree stump. If the cut height allows, the chair will have a back and even armrests. For a chair with armrests you will need a tall and wide stump. It will turn out to be an analogue of the usual soft chair.
Folding stools
There are a huge variety of them, from the simplest solutions to very complex transformers.
We present to your attention an original folding design. It consists of two rectangular frame-legs connected in the center by a metal axis. The support frames are attached to the seat with carpentry hinges. When folded, the axle moves along two slots cut into one of the legs. The seat rotates on hinges and stands upright.
Here is another version of a folding stool. His seat is made of two halves. When folded, the legs rotate around an axis and are placed in the same plane. The seat halves are pressed against them on both sides.
Fans of complex folding systems are offered an option consisting of eight pairs of lattice legs connected at the base by a common bar.
The upper ends of the legs on one side are hingedly connected to the seat, which is also made of bars. To fold the structure, take it by the lower slats and move them in the opposite direction. In this case, the lattice legs and seat bars fit into the gaps provided for them, and the stool becomes flat.
Another option is a folding stool with a “crawler” seat. Despite the simplicity of the design, it looks very original. Its two crossed legs are hinged in the center and connected at the top by a wooden segmental seat. By holding the edges, you can easily fold and unfold this stool.
Mandatory requirements for the bench
In addition to the previous nuances in the process of designing a product, it is worth taking into account a certain list of requirements that it must meet. The following must be taken into account:
- Safety
. You should not allow an unreliable design of the product, because this can bring a lot of troubles when using it. To ensure safe use, it is worth choosing only high-quality material, as well as fastening devices and any accessories. - Convenience
. Undoubtedly, such an item in the garden as a garden bench should be comfortable so that nothing interferes with the relaxation process. To do this, you need to approach the project creation stage very competently and carefully and think through all the details in advance. - Immune to influence of external conditions
. To ensure long-term preservation of appearance and service life, it is necessary to select only solid material at the assembly stage of the product. Additionally, it is worth treating it (if made from wood material) with special means that can provide protection to the product.
Bench options
- A bench made of logs that blends well with the surrounding nature. It consists of half a log, used for a seat, and two short round logs, which are legs.
- A beautiful wooden bench with a back and armrests, reminiscent of a sofa. Curved and cut elements make it more attractive, while leaving knots and irregularities gives the structure a natural look.
- Bench made of wood and metal. The base of the structure is metal. The wooden parts of the seat and back are attached to it. The thin metal parts make it look lightweight.
- The bench has a simple, classic shape. It is made of wooden, rather wide boards. This width allows you to sit comfortably on the bench. Armrests make the design more complete.
- An original bench made of wood with figured details. This option is well suited for a site with a natural, rural design. Carved legs and armrests, a figured back - all this gives the product originality.
- A bench with an interestingly shaped back. The curved parts gradually bend back, creating a unique design. The seat is slightly curved but has a more traditional appearance.
- A set of wood – a table with two benches. The design looks traditional due to the material used. The original solution is to fasten all components into a single structure.
- The bench is made of solid logs. A single piece is cut out of it, combining the back and seat. The legs are attached to the bottom. The log required is quite large.
- Bench with a drawer for storing toys. Outwardly it looks like an ordinary wooden bench-sofa, but under the seat there is a drawer in which you can put various things.
- A comfortable bench made of wood with a simple shape. The base is made in the form of a rectangular box. The back is also simple with a straight shape. The seat has soft cushions for added comfort.
- Wooden bench located around a tree. It is made as if it consists of four benches, each of which has one armrest. The composition looks attractive and comfortable.
- A simple bench made of wide boards. It looks solid, but its size is somewhat hidden due to the gaps between the boards and the light blue color in which it is painted.
How to cook driftwood correctly
Small driftwood is used for crafts; their preparation can be done at home. The process consists of several stages. First of all, the surface must be cleaned of dirt; use any brushes. To facilitate the process, it is recommended to pre-wet the dried soil. Next, special processing is performed.
- Prepare a container according to the size of the driftwood, it can be a plastic basin or a barrel, it doesn’t matter. The main condition is that the driftwood must be completely contained in it. If you soak it in separate sections, there is a high probability that stripes will remain on the tree, indicating the boundaries of the water. This has a very negative effect on the appearance of the product, and it is difficult to get rid of the marks.
- Add baking soda to the water at the rate of 100 grams per liter of water.
- Place a piece of driftwood in the water and press it firmly with a weight; it should not float, but be completely immersed in the solution. Keep in this position for at least a day.
- The surface of the wood has become clean, but darkened - this is the action of baking soda. If your craft requires a white surface color, then pour bleach into clean water at a rate of 1:15 and again drown the driftwood in the liquid, leave for at least two days. Check the condition periodically; you can increase the bleach concentration or exposure time.
Soaking the driftwood
Now you need to take out the driftwood and dry it well. What to do with it next depends on the type and manufacturing technology of the chosen craft.
It is recommended to cut off very small and completely rotten roots; in any case, they will break off on their own. If the products are planned to be used outdoors, then the surfaces must be impregnated at least twice with antiseptics.
Wood preservatives
Types of benches
Garden benches are traditionally divided into several categories. The criterion for division is location.
They are usually installed near the threshold, which determines the choice of material. Design experts insist that the appearance of the front bench should match the exterior of the country house. Thus, if the structure is made of stone, then the bench, accordingly, should also be made of stone.
water bench
The main purpose is to be able to spend time comfortably near a body of water. For the construction of structures, it is recommended to choose waterproof materials - artificial or natural stone.
Can be located virtually anywhere in a summer cottage. Plastic is usually used as a base, as it is lightweight and easy to maintain.
An indispensable option for hardworking summer residents. Garden benches are installed so that the owners of the site can relax comfortably while working in the garden. To ensure aesthetic pleasure that accompanies relaxation, the structures are located next to flower beds.
This variety can also be called a “solitude bench.” The fact is that it is customary to place them in the most remote places of the garden so that a person has the opportunity to hide from prying eyes. A popular material for manufacturing is wood.
Seasonal bench
This is a foldable design that is lightweight. This greatly simplifies the task of moving the bench from one place to another: in the summer - in the shade, in autumn or spring - in sunny places. The optimal material is plastic.
Step-by-step instructions for making bonsai
Step 1. Find a small piece of driftwood that looks like an old tree. It should have a prominent thick trunk and crown branches on the sides. Do not pay attention to small branches; they can be cut off later.
Suitable driftwood
Step 2. Clean it from dirt, wash and dry it. First, use pruning shears to cut off all the excess and form a crown, work carefully, you won’t be able to glue anything back.
You need to cut off excess branches from the driftwood
Practical advice. Washing driftwood is much easier and faster with an old toothbrush. Its fibers remove dirt from even the smallest holes and bends.
Step 3. Stir the alabaster. The quantity depends on the container in which you plan to fix the driftwood. Alabaster will hold it and imitate the earth.
Fine-grained gypsum
The larger the snag, the larger and heavier the base should be to ensure the stability of the structure. In our case, approximately 0.7–0.9 liters of finished mass is sufficient.
Remember that alabaster hardens very quickly, first prepare a container for the composition, then you won’t have time to look for it.
The driftwood is fixed with alabaster
Step 4. Hold the driftwood upright with one hand and level the alabaster with the other. If dirty stains of the mass appear on the surface of the driftwood, they must be immediately and thoroughly removed with a slightly damp cloth. After drying, white alabaster is deeply absorbed into the wood, making it almost impossible to clean the surface.
Use a cloth to immediately remove spills and drops.
Wait a little until the solution begins to set; the driftwood should hold on its own. Leave the solution alone until it sets completely, this will take about 10-20 minutes.
Step 5. Prepare special artificial pine or spruce branches, they are then cut into small branches and inserted into the driftwood. To make holes you need to have an awl or a hand drill. The surface of the wood is impregnated with stain; it emphasizes the structure. Prepare small pebbles and a glue gun. It is better to use modern hot one, it is easy to work with, and the adhesion indicators are quite sufficient for our craft. To improve the designer look, a final varnish coating is applied. All these materials must be prepared in advance.
Step 6. Using a small brush, paint the alabaster with stain. The material absorbs a lot of water, you will need to cover one place at least three to four times.
Step 7. Saturate the driftwood with stain; here you need to be careful and achieve the most natural color of the wood. Don’t make it completely one tone, let there be areas with different shades.
Applying stain
Step 8. Using a small hand drill, carefully make holes in the driftwood, fill them with hot glue and immediately insert the pieces of artificial pine needles. Work carefully, do not leave thin strands of glue. They can be removed immediately or after the composition has hardened. The second option is preferable; the threads come off easily at the base and your hands don’t get burned.
Step 9. Gradually form the crown of the tree. Make every effort to make everything look organic.
Applying hot glue
Gluing twigs
Step 10. Cover the alabaster with moss and attach part of it to the driftwood. The fact is that in Japan such trees have been growing for many decades, and the trunk is always covered with living moss.
Gluing moss
At this point, the production of the craft is completed, you can install it in the designated place and enjoy the results of your labors.
Artificial bonsai made from driftwood
Self-production
Simple options
Even a novice summer resident who does not have too much experience in working with carpentry tools can make wooden crafts for the dacha with his own hands. Naturally, you need to start with simpler options, and then you can move on to monumental products that will become the central element of the landscape design of your dacha.
The manufacturing instructions below give only general direction. Otherwise, you should rely only on your own taste and sense of style. Don't be afraid to experiment.
Perhaps in the future your wooden sculpture will be a role model.
- The simplest option is plywood garden crafts. On a sheet of suitable size, you can draw out individual parts of a pony, donkey or goblin, cut them out and tie them together using strong twine.
- Another idea is small branches of fruit trees. They are suitable for making wall or floor planters. In this way you can make pots for house plants with your own hands. In this case, it is advisable to cover the interior space with plastic film to avoid soil spillage or insert plastic containers there.
- Having gained experience in working with a manual or electric jigsaw, you can begin making more complex crafts. Carefully transfer your chosen design onto the plywood and carefully cut it out. The finished wooden sculpture is sanded with sandpaper, cleared of sawdust and coated with varnish or paint to protect it from adverse environmental conditions.
- There are other DIY plywood crafts: for your dacha you can make not only garden sculptures, but also figurines that look natural in the garden. For example, plywood bunnies will be an unexpected detail decorating a carrot bed. The procedure for making them is simple: draw an outline and cut out the shape using a jigsaw.
Complex designs
For those for whom making country wood crafts with their own hands has already become a kind of hobby, you can offer more complex options - making a mill or a wooden well. Here, in addition to your desire, an accurate mathematical calculation is necessary, otherwise the cut out parts will be impossible to fit together.
You can also offer a simpler option:
- We saw planks of the same length, which will be the basis for the mill (you can use small blocks of suitable cross-section).
- We take two sticks and place them parallel to each other at a distance slightly less than the length of the element itself.
- The next two elements are placed on the laid planks (perpendicularly) (the whole process is somewhat reminiscent of building a log house only on a smaller scale). You can fasten the parts to each other using nails or glue.
- Having constructed a structure of the required height, we begin to build the roof. To do this, take four small blocks and connect them in pairs to form a ridge. Pieces of ondulin left over from the construction of the house can be used on the roof. Then the design will fit best into the landscape design of the site.
- The material for the blades will be two or three planks, fixed at an angle like an aircraft propeller.
- You can decorate the structure with a decorative climbing plant that will entwine one of the walls.
The well is made in a similar way. In this case, you can complement the composition with a miniature bucket and a bench. By fencing all this off, you will get a beautiful and unusual playground for children.
Do not forget that the wood must be treated with antiseptic compounds, varnished or painted. This will extend its service life and make the crafts more attractive.