Proper preparation of the base before laying parquet allows you to get a beautiful floor, which for decades will delight the owners of the room not only with its appearance, but also with its reliability and convenience. Despite the fact that laying plywood under parquet can be done with your own hands, some nuances of such surface finishing should be taken into account.
Laying plywood under parquet
What is parquet
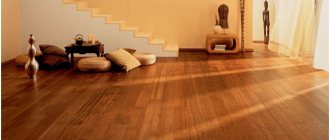
This material has been used for finishing indoor floors for more than two centuries. Its main advantage is naturalness. Since parquet is made from wood (its various species), it is characterized by durability and environmental friendliness. In addition, surface treatment of products helps protect them from the effects of adverse climatic factors. But the most important thing is that the floor finished with this coating looks very aesthetically pleasing. For all this, parquet is very loved by consumers. But the high price of the material does not allow it to become widespread in the segment of finishing materials. The coating belongs rather to the elite class of products.
Parquet floor
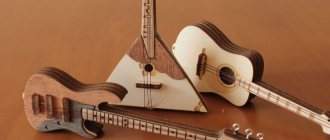
The difference between parquet and parquet boards
Today, several types of parquet are produced, but the following types are mainly widespread.
Parquet sizes
Table. Popular types of parquet.
| Type of parquet | Description |
| Block parquet | Rectangular planks made of hard wood are available in sizes up to 75x500 mm and thickness 15...22 mm. |
| Solid board | The difference between this material and the piece variety is its dimensions. Boards are available in lengths starting from 500 mm. Their thickness reaches 32 mm. |
| Modular parquet | When manufacturing a coating in a factory, elements are selected according to the design. Ready-to-install modules allow you to quickly lay a very aesthetic coating without doing any design work. |
Prices for Tarkett parquet
Tarquette parquet
Solid boards and piece parquet
Parquet boards, despite the fact that the technology of its production differs significantly from the production of the above varieties, can be classified as “parquet”. This multi-layer material, also made from natural wood, is characterized by greater functionality. The process of covering the bases using longer and wider planks, in contrast to laying previously common small planks, is less labor-intensive. However, a parquet floor looks no less presentable. The coating itself has good resistance to mechanical and climatic influences.
We recommend that you familiarize yourself with the rating of the best and inexpensive brushless screwdrivers from Aliexpress .
Parquet board
Which method should you prefer?
Each method of installing parquet boards on concrete has the right to life. The method using fasteners is one of the longest. Its implementation provides the best thermal and waterproofing, somewhat reduces the requirements for the quality of the base, and also makes it possible to covertly lay communications. The small thickness of the manufactured dies forces the installation of logs with small pitches, which is not entirely justified. The most labor-intensive and time-consuming is the adhesive method.
The glue helps to further reduce deformations in the coating; however, replacing defective boards is extremely difficult. The floating method is the fastest. Allows floors to change area without deformation depending on changes in temperature and humidity conditions.
Defective dies can be easily replaced with new ones. Thin planks can be used to install heated floors. The laying method contributes to deflections of the coating, leading to wear of the locking joints.
Requirements for the base for installing parquet
Today, parquet, along with linoleum, ceramic tiles, laminate or ordinary boards, is one of the most common types of finishing materials for flooring in premises for various purposes.
Expert opinion
Masalsky A.V.
Editor of the “floor screed” category on the Pol-exp.com portal. Engineering systems specialist.
If the base preparation is carried out incorrectly, it is possible that problems with the operation of the coating may arise in the future. Moreover, this concerns parquet in the first place. It is possible that if any of the technological stages are not taken seriously, soon after the completion of the repair work the whole process will have to start again.
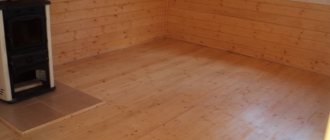
Leveling the floor with plywood sheets for installing parquet sheets
Basic requirements for the base for parquet.
- Since materials made from wood do not react well to moisture, it is necessary to check the moisture level of the subfloor before starting the finishing process. The base must be dry (devices used for testing should not show more than 4...6%). This is especially true for concrete screeds, which require at least 4 weeks to dry after installation.
The subfloor must have sufficiently low humidity
- The performance characteristics of the facing coating throughout the entire period of its use largely depend on the strength of the subfloor. It must also be stable; deflections in any area are unacceptable. The impact of significant loads on a base of poor quality can lead to its deformation.
- The evenness of the surface also plays an important role in the design of the coating. Defects can lead to deformation of the cladding, and the creaking of parquet will not bring pleasure to anyone. In accordance with regulatory requirements, the deviation from the plane should not exceed 2 mm over a length of 1 m.
An uneven base can cause parquet floors to squeak.
- Before laying the decorative coating, the subfloor must be cleaned of all types of contaminants.
The base for parquet can be made either from concrete screed or using modified compounds. In addition, a continuous covering made of tongue-and-groove wooden planks can also be used as a subfloor.
Features of the design and installation of panel parquet
One of the most common ways to prepare a surface for installing parquet is to fasten sheets of plywood to a concrete or wooden base.
Prices for Barlinek parquet boards
Parquet board Barlinek
Preparatory work: tools and building materials
Before laying plywood under the parquet, you must first prepare the base:
- The working surface is cleaned from dust and dirt.
- Shortcomings and defects are eliminated - cracks and chips are repaired.
- Large differences are removed, the subfloor is brought to the same level (the difference should not exceed 3 mm).
In order for the plywood under the parquet to be laid correctly, you will need to stock up on the following building materials:
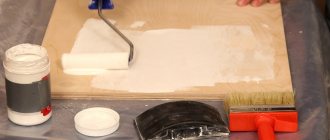
- Water-dispersed or acrylic adhesive compositions, with the help of which the plywood backing will be attached to the base.
- PVC film (for greenhouses), acting as a waterproofing layer.
- Thermal insulation, if there is a need to insulate the floor.
You will also need a specialized tool that is used at different stages of work:
- Medium power electric sander for sanding the surface of plywood substrate.
- Drill and attachment for preparing concrete and adhesive mixtures.
- Screwdriver for screwing in self-tapping screws.
- Hammer.
- Jigsaw for cutting plywood sheets.
- Construction or household vacuum cleaner.
- Building level.
- Tape measure up to 10 m, ruler and square.
- Mounting wedges.
- A scraper used to remove dirt.
- Hammer and spatula, including a serrated one.
- Roller or brushes of different diameters.
TOP 3 largest plywood producers in Russia
| Photo | Name | Rating | Price | |
| #1 | SVEZA | ⭐ 98 / 100 | More details | |
| #2 | Syktyvkar Plywood Plant (SFZ) | ⭐ 94 / 100 | More details | |
| #3 | Arkhangelsk Plywood Plant | ⭐ 91 / 100 | More details |
Plywood production in Russia according to Rosstat
In the Russian Federation, more than 30 enterprises are engaged in the production of plywood.
Production capacities of the largest European plywood companies
Important! Russia occupies a leading position in the birch plywood production segment (except for the Russian Federation, it is produced only in Finland and some other neighboring countries).
The main volume of plywood is produced in the Northwestern District. This is due to the location of forest resources.
Arkhangelsk Plywood Plant
The production capacity of the plant is 125 thousand m³/year. Plywood is produced in four grades, thickness from 3 to 36 mm, main formats: 1830x1525 and 1525x1525 mm (sheets of other sizes can be produced upon request). The main line of plywood is general-purpose material of the FK and FSF brands. Low-flammability plywood boards, which have slow flame propagation, moderate smoke-generating ability and explosion safety, have also become very popular. 80% of all products are exported to other countries.
Arkhangelsk Plywood Plant
Syktyvkar Plywood Plant (SFZ)
The plant's productivity is 180 thousand m³ of plywood per year. Products are exported to many CIS and European countries, as well as to the USA, South Korea and Saudi Arabia. Sheets are produced from birch veneer, as well as with alternating layers of birch and aspen.
Syktyvkar plywood plant
Sheet characteristics:
- thickness 4…40 mm (3…29 layers);
- toxic substance emission class - E1;
- typical dimensions: 2500 x 1250, 2440 x 1220 mm.
The product line includes: standard and increased water resistance plywood, laminated material, coating prepared for painting.
Plywood production at SFZ
SVEZA
This holding includes six plywood factories.
SVEZA
The consumer is offered a wide range of sheet materials:
- laminated;
- with an outer layer of valuable wood veneer;
- with ultraviolet coating;
- intended for painting;
- lined with anti-slip coating;
- with a wear-resistant outer layer;
- polished and untreated;
- standard FC (for interior work) and FSF (for exterior and interior finishing).
Birch plywood SVEZA
Products are produced in all five grades, with a thickness of 4...40 mm and a density of 640...700 kg/m³. Formaldehyde emission class is E1. Plywood is supplied to 80 countries. The factories have installed modern equipment from the largest foreign manufacturers (RAUTE, Hashimoto, Holzmann, etc.).
Products of SVEZA Holding
Prices for SVEZA plywood
SVEZA plywood
To lay or not to lay underlayment
Experts unanimously say that before laying parquet, it is necessary to cover the screed with moisture-resistant plywood. Many home-grown self-taught practitioners object to them in their reviews, saying that this is a completely unnecessary step and a waste of money; parquet holds up well on a concrete floor. It must be said that there is a certain reason for both arguments.
Of course, if you look at how parquet is laid in old houses, specifically on concrete without a plywood backing, you may be inclined to agree with the opinion of the craftsmen. But the thing is that the technology for laying parquet has changed a lot. Previously, it was laid using a hot method, using molten bitumen mastic, but today a special glue is used for installation; it is its use that determines the base for parquet in the form of plywood.
If the parquet is laid using a rigid method, then it is quite possible to neglect the plywood backing. But a floating floor, be it natural, classic piece or panel parquet, is still better to lay on plywood, as it is easier to drive pins into it.
But from the point of view of practicality, it is still better to lay plywood, since it will serve as additional noise and heat insulation; you must agree, this is a fairly compelling argument in favor of the substrate. The parquet can then also be laid on plywood using glue.
A cork underlay is relevant if a floating floor is installed; it is not practical to lay parquet in this way
For floating installation, you can use a cork backing instead of plywood. It is elastic, will smooth out even the smallest bulges and debris on the screed, in addition, the cork will serve as a protective layer for the joints between the dies, whether you like it or not, and concrete dust during the operation of the floor still clogs the locking joint. The cork backing is also an additional hydro-, sound- and noise barrier, and contributes to the uniform distribution of mechanical load over the entire surface.
Methods for installing plywood on the floor, technology of work
Installation of parquet (and floor preparation) should begin after completion of other finishing work in the room. Any floor covering requires preliminary preparation of the base.
- First of all, you need to arm yourself with a level to determine the deviation of the floor plane from the horizontal. The permissible height difference of the base is 2 mm per 1 linear meter. If the existing subfloor is less level, you will have to fix the problem. This is the most labor-intensive process when performing facing work. The floor can be leveled by pouring a concrete screed (with waterproofing, installing reinforcement mesh and beacons) or by using self-leveling mixtures. In the first case, you will have to take a fairly long break, since the concrete base will gain strength within 28 days.
Pouring self-leveling mixture
- In addition to the evenness of the floor, it is necessary to evaluate its condition. Existing defects (grooves, chips, cracks) in both concrete and wooden foundations will have to be repaired. For these purposes, a repair solution or wood putty is used. If it is not possible to do without leveling the floor, then in this case all existing voids will be filled with the composition used.
Repairing cracks in a concrete floor
If rotten boards are found in a wooden base, they must be replaced. The subfloor should not have any peeling areas. They must be removed, after which the irregularities must be restored. The old coating should also not remain.
- The subfloor should not be wet (no more than 6%).
- Before starting work, it is recommended to treat the entire base with an antiseptic (in two layers, with the obligatory drying of each). This coating helps minimize the likelihood of biological damage.
Protective impregnations for wooden floors
When starting to cover the floor, it must be cleared of debris and dust.
Calculator for calculating dry mortar for self-leveling floors
Go to calculations
You can prepare a plywood base for parquet in different ways.
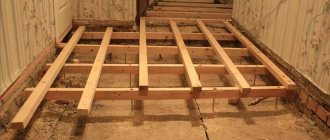
Installing plywood on joists
This method of installing plywood sheets allows you to level out small differences in the height of the base without using a concrete screed or self-leveling floor. Also in this case it is convenient to carry out work on noise and thermal insulation of the base. Material (for example, stone wool) is placed in the resulting niches. The ability to hide communications in the sheathing is also one of the advantages of such a floor arrangement.
Plywood floor on joists
What will be needed to carry out the work?
- Logs made of coniferous or deciduous wood (excluding linden and poplar). Most often, spruce and pine are used to construct the frame (due to their low cost). Planed bars are suitable for finishing (unplaned material can also be used). There should be no cracks, bark, or signs of rot. The thickness of the logs can be 40 or 50 mm, the width can vary between 80...100 mm. The moisture content of the material should not exceed 12%.
- Plywood sheets 18 mm thick, polyethylene for waterproofing, mineral wool.
- Anchor bolts for fastening logs, self-tapping screws for fixing plywood.
- A jigsaw (or circular saw) for processing plywood and blocks, a laser level for leveling, a hammer drill , a screwdriver , a tape measure .
Calculator for calculating the number of plywood sheets per floor
Go to calculations
Layout diagram of plywood sheets
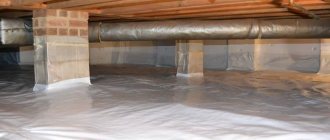
Step 1 . After the primer on the rough base has dried, you can begin laying the waterproofing. These can be coating materials, film or membrane. The most common option is polyethylene with a thickness of 200 microns.
Laying polyethylene film
Step 2 . Using a laser level, the level of the base height difference is determined. This must be done in order to decide how to install the logs. Lines are drawn on all walls, measurements are taken that need to be recorded.
Using a laser level
Step 3 . Near the walls, logs are laid out with a gap of 0.5...1 cm. This will provide compensation for deformations of the base when exposed to temperature. The joists are fixed to the subfloor using anchor bolts (holes in the concrete are drilled with a hammer drill). Such fasteners will provide the necessary strength to the structure. The caps of the hardware should not protrude above the surface of the sheathing (they need to be recessed into the joists). The distance between the anchors varies in the range of 30...50 cm. The length of the hardware must be such that it can penetrate into the rough base by at least 5 cm.
Fixing joists to the subfloor
The distance between the logs (as well as from the ceilings, if they are used during installation) should be 40...50 cm. The correctness of their installation must be controlled using a level. The logs can be located parallel to each other, but the sheathing provides greater reliability. For leveling, spacers are used, fixed to the base with dowels and nails. Such elements can be made of plywood, chipboard, MDF, etc.
Chipboard
Step 4 . Installed logs are treated with an antiseptic and hydrophobic composition.
Step 5 . If this is planned, mineral wool is placed in the spaces between the bars.
Step 6 . A waterproofing film is placed on the thermal insulation.
Step 7 . The sheets are being cut. Cutouts are created for communications and enclosing structures. The plywood is laid out on the base (without fastening yet). It is recommended to number the sheets to avoid confusion in the future.
The plywood is laid in such a way that its edges are located in the middle of the joists. Compensation gaps of 2...3 mm wide should be provided between the sheets. It is necessary to fix the material in a checkerboard pattern (like brickwork). You need to shift the sheets relative to each other by about half their size (you can do it by 1/3).
Plywood is fixed in a checkerboard pattern
The plywood is secured using self-tapping screws (designed to work with gypsum fiber board or chipboard, as well as universal galvanized ones). Their length should be 2...2.5 times the thickness of the plywood, and their diameter should be at least 3.5 mm. The heads of the hardware must be recessed into the material by approximately 2 mm.
Important! It is not recommended to use black hardened screws. It is recommended to start installing self-tapping screws from the center of the sheets, gradually moving to the edges. This way you can better level the material.
It is better not to use black screws
Step 8 . After completing the work on fixing the plywood, it is recommended to sand the new base. Debris and dust should be removed. Expansion joints must be filled with sealant. The floor is ready for finishing.
Attaching plywood directly to the subfloor
In this case, the sheets are fixed using adhesives (or mastic) and hardware. The process is less labor-intensive compared to the method described above. But it is important to choose the right adhesive, which requires:
- good adhesion to plywood and base;
- resistance to moisture;
- environmental Safety.
Adhesive based on organic solvents, intended for gluing plywood and parquet
Various compositions on the market are characterized by different drying times, toxicity levels, shrinkage rates, and performance characteristics. Two-component adhesives are considered the most functional, but they must be prepared (mix two components) before starting work.
Two-component adhesives are considered the most functional
Polyurethane adhesive for fastening plywood and parquet
Step 1 . It is more convenient to work with sheets of small format. The optimal size of the elements: square blanks with sides of 0.6, 0.75 or 1 m. In addition, a floor made from such a coating is less susceptible to deformation. Using an electric jigsaw or circular saw, standard material is cut into the required parts.
Cutting plywood
The cut sheets (it is also necessary to provide configuration cuts) are laid out on the floor. In the same way as described above (with offset). Expansion joints between plywood and gaps from walls are provided. If the layout suits you, the sheets are numbered and folded to the side.
Step 2 . Glue is being prepared. If it is two-component, then both components are mixed (there is no need to mix the entire volume at once, it polymerizes quickly enough). An adhesive composition is applied to the previously primed base. A notched trowel is used for this. There is no need to immediately apply glue to a large area. An area on which 3-4 sheets are placed is enough.
Step 3 . Laying plywood begins from the farthest corner of the room. The sheets are pressed tightly against the applied glue. To keep the expansion joints even, you can use spacers. If the composition comes to the surface, it must be removed.
The process of laying plywood with glue
Step 4 . To make the base more reliable, you need to fix it with self-tapping screws (the caps should also be recessed) in increments of 20 cm.
Additional fixation with self-tapping screws
Step 5 . The plywood is sanded, the base is cleaned, the seams are filled with sealant or wood putty.
Sanding plywood
As you can see, fixing plywood using this combined method can be much faster and easier. After laying the plywood, you can proceed directly to the facing work.
Prices for LECHNER SIPOL parquet adhesive
parquet adhesive LECHNER SIPOL
What to glue
Now there is a huge selection of adhesives on the market. The most inexpensive is dispersion glue, it hardens quite quickly, but it is better not to use it for exotic wood species, but it is ideal for solid oak.
Solvent-based adhesives are good for installing parquet yourself. It is also recommended to lay artistic parquet using this glue. The setting time is quite long, so all installation defects can be corrected within half an hour.
The new generation adhesive is a two-component polyurethane composition and a reactive setting one-component adhesive. Very strong and reliable adhesives, good for expensive parquet, especially for exotic ones
The glue should be used with caution, strictly according to the instructions. It greatly speeds up the process of installing floors; sanding can be done within 24 hours
At one time, parquet flooring was actively glued using PVA glue, but over time it became obvious that this composition was not suitable, it could not withstand the constant work of wood through compression and expansion.
Laying parquet on a plywood base
Installation of parquet is most often carried out in two ways: with glue or using the floating method. In the first case, the adhesive composition fixes the planks to the base and to each other.
Stages of laying parquet
Laying in a floating manner is carried out using interlocking connections found on the facing material. Why this method is interesting: the base changes its linear dimensions under various influences (which does not lead to its deformation), and repairing the damaged area is quite easy. However, the strength of the coating is slightly lower when compared with a floor fixed with glue.
Before you start tiling, you need to decide on the layout of the parquet (if a non-modular material is used). Several options for placing planks are used: herringbone, squares, diagonally, etc.
Parquet laying schemes
It is important that the room where finishing is carried out has a suitable microclimate: humidity no more than 60%, temperature within +15...22 degrees. The residual moisture content of the substrates should not exceed 6%. Otherwise, deformation of the cladding and deterioration in the appearance of the base are possible. It is also necessary to control the humidity of the parquet itself. It should not exceed 10%.
The slats should sit indoors for two days to acclimatize.
Parquet flooring technology.
- If there are any defects in the plywood base, they are eliminated using wood putty. After it dries, the surface is sanded. The floor is cleaned and primed.
- With the floating fixation method, a polyethylene film and a foam backing are laid.
- If the room is large, installation of parquet begins from its center and is carried out in both directions from it. Small rooms are tiled from the wall furthest from the front door.
Quick-hardening materials with water-resistant binders are used as an adhesive composition. The parquet is laid in accordance with the approved pattern and embedded in mastic. If necessary, the boards are trimmed.
The adhesive must be fast-hardening with water-resistant binders
With the floating method, the planks are snapped into place with locks and fixed exclusively to each other. It is necessary to retreat 1...1.5 cm from the wall. To create this compensation gap, you can use special wedges. The fastening is sealed using a rubber mallet. The last rows are tacked using a special mounting bracket.
An expansion gap is created during installation
The final finishing of the base can be done after a few days, when it has rested. Skirting boards are installed, the parquet surface is scraped and polished. After this, varnish or special oil is applied to the base. In some cases (when the decorative layer has already been applied at the factory), sanding and painting are not necessary.
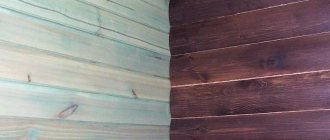
Why do they polish parquet at all?
The finishing of the parquet floor gives it a noble appearance
If the finishing technology is followed, parquet laid on a plywood base will delight others for many years.
Choosing a parquet board
There are several important factors that affect the service life of the floor, its quality and other characteristics.
Top layer thickness. The service life of the parquet board directly depends on this indicator, since over time the surface wears out, scratches and other physical damage may appear, which, in turn, will require scraping and sanding. The greater the thickness of the top layer, the greater the number of processing cycles the coating can withstand without losing its performance properties.
Overall thickness of the board. The thickness range of parquet boards is between 7-25 mm; in residential premises it is advisable to lay parquet boards with a thickness of 13 mm and above. For laying on a concrete screed, it is preferable to choose a 22-25 mm board; on joists or plywood, a smaller thickness is allowed. Type of wood and quality of processing. A high-quality board must be carefully sanded; if the slightest roughness, unevenness or other defects are detected, it is better to refuse the purchase
It is also worth paying attention to the type of wood used to make the top layer. Depending on the type of wood, the hardness of the coating, its moisture resistance and resistance to temperature changes may differ.
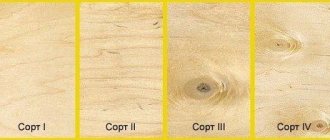
When choosing, you need to take into account the conditions in a particular room: humidity level, temperature, expected loads. Appearance, dimensions and design. The standard overall dimensions of the board are in the range: length 1.7-2.5 m, width 13-20 mm. The top sheet can consist of either a single solid piece of wood or several tightly fitted lamellas that imitate a stacked package; they can be one-, two-, three- and four-strip. Depending on the method of cutting the wood, the surface pattern may differ. When sawing radially, the fibers of the board are parallel to the annual rings of the tree trunk, the color and texture of the coating is uniform along the entire length of the board. With the tangential cutting method, the surface has an original and interesting pattern due to contact with the annual rings, however, the technical characteristics of such a board are somewhat lower. A mixed method (rustic) is also used, in which the cutting line includes sections of wood with a different structure. Some types of wood undergo heat treatment, which provides greater strength and resistance to fading.
Quality of locks. The absence of damage, chips, as well as high-quality processing of the joints will ensure simple and reliable installation of the parquet board. Type and properties of coating. If the surface of the board is varnished, you should inquire about the number of layers applied - the wear resistance of the material, its durability and the service life before the first cosmetic repair depend on this. Parquet oil is made from beeswax, natural vegetable oil or synthetic analogues. This coating allows air penetration and allows the wood to “breathe” but requires more careful daily maintenance.
Briefly about the main thing
Laying plywood over an old wood floor is a great way to quickly and inexpensively prepare the flooring for laying linoleum, laminate or parquet. The plywood floor creates a flat surface for laying the final floor covering. There are 2 main ways of how and what kind of plywood to lay on the floor: laying directly on the old covering and laying on joists. The choice of method primarily depends on the condition of the old floor covering. Regardless of the chosen method, when laying it is necessary to comply with technological requirements: leave damping gaps, arrange the sheets in a checkerboard pattern, use high-quality materials. If all requirements are met, flooring laid on a plywood subfloor will last for many years.
Photos of the scraping process
- https://viascio.ru/poly/ukladka-parketnoj-doski-na-faneru
- https://centro-pol.ru/ukladka-parketa-na-faneru.html
- https://remontami.ru/ukladka-parketa-na-faneru/
- https://openini.by/poleznoje/o-parkete/kak-podgotovit-osnovanie-dlya-ukladki-parketnoj-doski
- https://polspec.com/parket/kak-ukladyvaetsya-fanera-pod-parketnuyu-dosku-tekhnologiya.html
- https://parketklub.ru/cziklevka-fanery-pod-parket
- https://www.servis-parket.ru/ciklevka-fanery/
- https://profmaster-msk.ru/ciklevka-parketa/ciklevka-fanery-pod-parket/
Published: 08/18/2017
Concrete screed
If you decide to create a concrete screed, then after pouring you need to wait a few days. During this time, the base should dry out. The resulting base is primed and covered with an adhesive solution. Then plywood sheets are laid out on it.
To reduce stress, plywood is cut into squares (50-75 cm). They are laid out so that each row does not meet the previous one in the corners. A gap of 1 cm is left between the wall and the plywood. Between the squares - 3-4 mm.
Fix the plywood sheets with self-tapping screws. They are screwed in following special rules. The screw head is recessed into the plywood by 3 mm. After fixing all the squares, you need to wait a few days. The plywood will cure and return to its normal position. After this, you can install the parquet board.
Laying plywood on a screed
Glue method
A more solid floor construction involves gluing the boards to the screed. True, the requirements for the evenness and strength of the base in this case are increased. A layer of primer (usually reactive) is applied over the screed to provide vapor barrier and increase the adhesion of the adhesive to the base. It is recommended to sprinkle the primer with quartz sand (about 1 kg per 1 m²) so that the surface becomes rough and the adhesion of the glue to it becomes even better. Next, lay the parquet board. To compensate for different changes in linear dimensions between wood and concrete surfaces, highly elastic adhesive compositions are used - either one- or two-component polyurethane, or based on MS polymers, but in any case not containing any moisture (water or solvents). A high-quality coating made using this technology can be sanded. There is no need for overhead thresholds.
When installing a floor using the adhesive method, difficulties may arise. In particular, for reliable and uniform gluing, a weight must be placed on each board. This is easy to do in a small room, but problematic in a spacious room.
4
How is surface puttying performed?
The wooden surface is leveled in the same way as other materials, the technology is no different.
At the first stage, the following are aligned:
- seams;
- cracks;
- unevenness.
The work is carried out with a rubber spatula. After applying the composition, you need to wait and let it dry. Then the treated areas are cleaned with sandpaper and dust is removed from the surface.
Only moisture-resistant plywood sheets can be puttied.